
How to Transfer Picture Files from One Computer to Another
How do I transfer photos from my PC to my laptop? If you are having this question, don’t worry. Here in this post, we provide you with several options on how to transfer picture files from one computer to another easily.
By Ellie / Updated on December 13, 2024
How do I transfer photos from my PC to my laptop?
“I want to transfer some of my photos from my old Windows 10 PC to my new laptop. What is the easiest and the most convenient way to do this?”

How to transfer picture files from one computer to another on Windows 10, 11
You have multiple options to transfer files between computers. Of course, most of these options apply to transferring pictures between computers as well. In this section, we provide you with several options on how to transfer picture files from one computer to another on Windows 10, and 11.
Option 1. Remotely transfer pictures wirelessly via remote file transfer tool [highly recommended]
The easiest and fastest option on how to transfer pictures from one computer to another wirelessly on Windows 10, 11 is to use the free yet professional remote file transfer tool AnyViewer.
- ★Benefits:
- Wide compatibility. It works with several Windows versions, including the newest Windows 11 and Windows 7.
- High efficiency. You don’t even need to appear in front of the computer which contains the picture files you want to achieve file transfer with AnyViewer.
- Fast speed. It allows you to transfer a batch of files at a breakneck speed. For example, it only costs about 20 seconds to transfer a 2 GB zip file from the local to the remote computer.
- Improved security. The file transfer process is secured by Elliptic Curve Cryptography (ECC) encryption, protecting your data from leakage.
- Multiple features. As a remote desktop tool as well, it also allows you to easily control and manage another computer remotely. Besides, it is also a screen share tool.
Step 1. Download, install, and launch AnyViewer 3.0 or above on both Windows computers. If your version is lower, please upgrade first.
Step 2. On the Controller computer, go to Log in, and then click Sign up. (If you already have signed up on its official website, you can log in directly.)

Step 3. Fill in the signup information.

Step 4. Then you can see you successfully logged in to AnyViewer. Your device will automatically be assigned to the account you’ve logged in to.

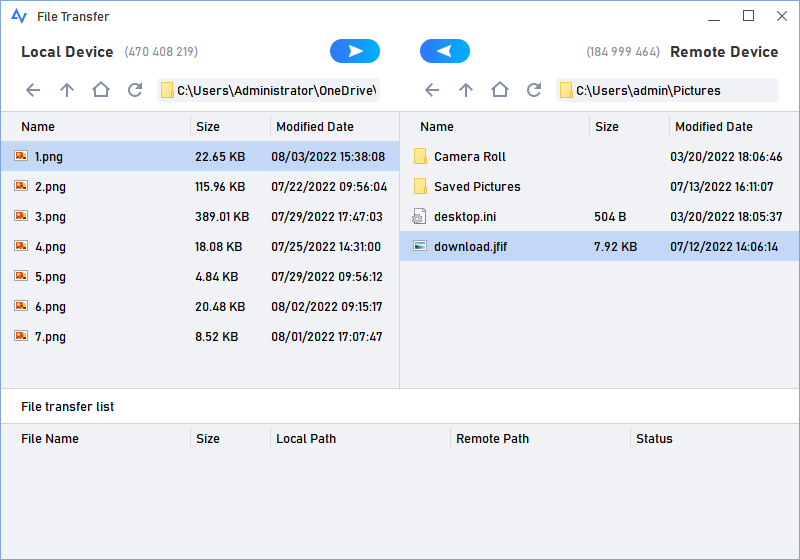
Step 5. Choose your target computer, and then click File Transfer.


Step 6. Then a File Transfer dialog box will appear. You’re able to transfer picture files between devices freely by clicking the arrows after choosing the target files. You can also double-click the target file to achieve transfer.
- Notes:✎...
- It is highly recommended to upgrade your account to a professional or enterprise plan. Here are what a professional or enterprise plan can bring to you:
- Faster file transfer speed. Transfer speed for a free account is 500 KB/s, and for a paid account is up to 10 MB/s.
- Increasing numbers of files are being transferred at once. For a free account, 100 files can be transferred at a time; for a paid account, this number is unlimited.
- Larger size of a single file that can be transferred. The maximum size of a single file that can be transferred for the free account is 100 MB, and for a paid account is 1 TB.
Option 2. Remotely transfer picture files using the Windows built-in tools
You’re also able to transfer picture files from one computer to another on Windows 10, 11 using the Windows built-in tool. There are two ways.
Way 1. Share picture files between computers via File Sharing
The first way is to use the Windows built-in tool File Sharing. But please note that the shared items will be inaccessible when the computer that receives the picture files is asleep.
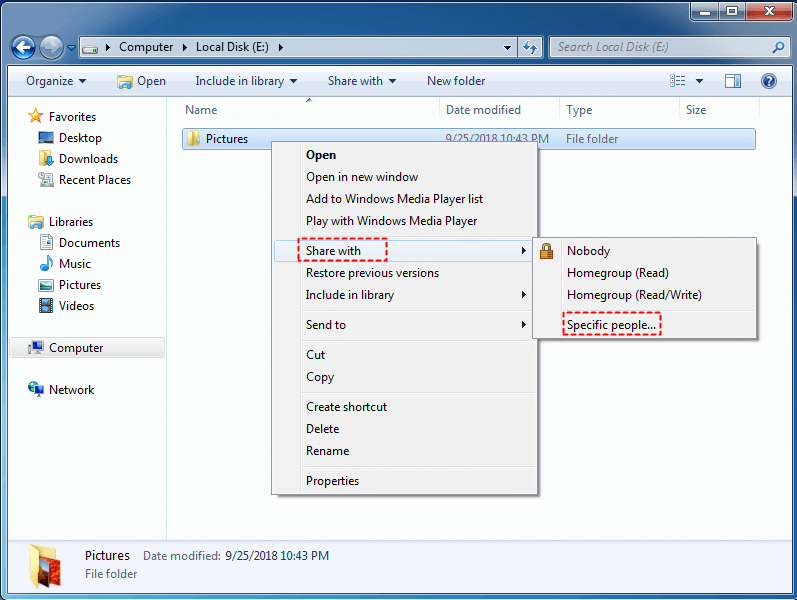
Step 1. Locate the folder you want to share on Computer A and right click on it. Choose Share with and then select Specific people....
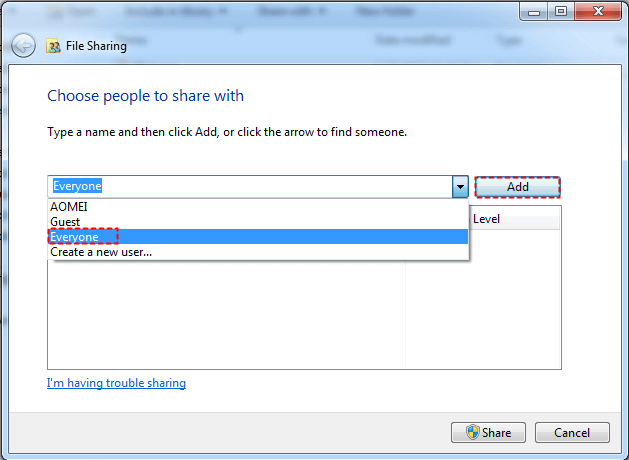
Step 2. Choose people to share with using the drop-down menu and click Add. You can choose to share with Everyone, which means the files will be accessible on your local network to anyone even if they don’t have a password.
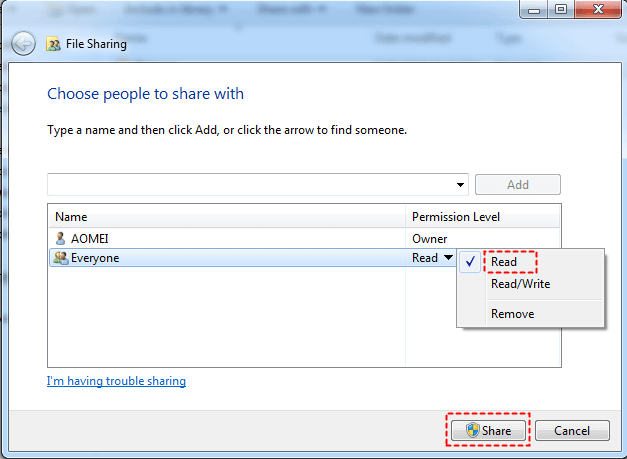
Step 3. Click the user you just added in the list, set permissions for it, and click Share. When you see Your folder is shared, click Done.
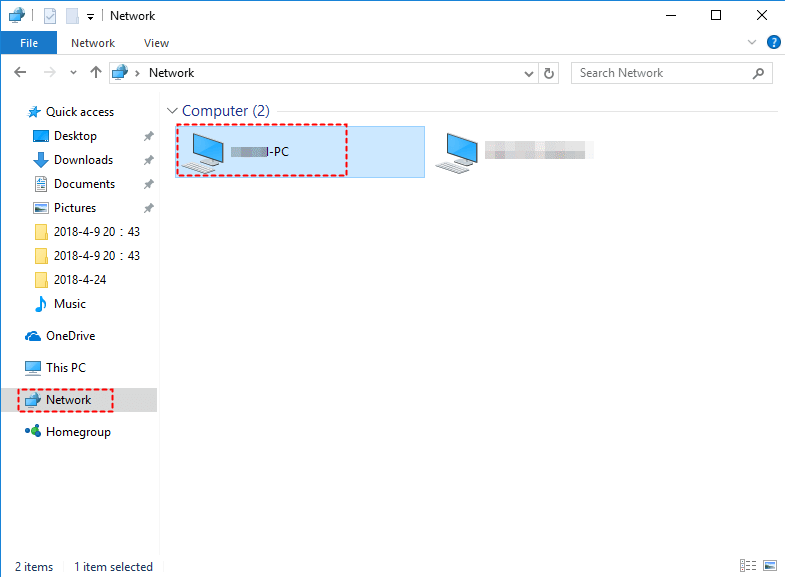
Step 4. Keep Computer A on and access the shared folder on Computer B. Find the computer name of Computer B in the Network section. Double click the name to open it, and the shared folder is located there. You can copy the shared folder anywhere else based on your needs.
Attention: If you have trouble accessing shared items on the Windows 10 and 11 computers, please go to Network and Sharing Center> Change advanced sharing settings and change the following options for both systems:
- Turn on network discovery
- Turn on file and printer sharing
- Turn on sharing so anyone with network access can read and write files in the Public folders
- Turn off password protected sharing
Way 2. Share picture files between computers via Nearby Sharing
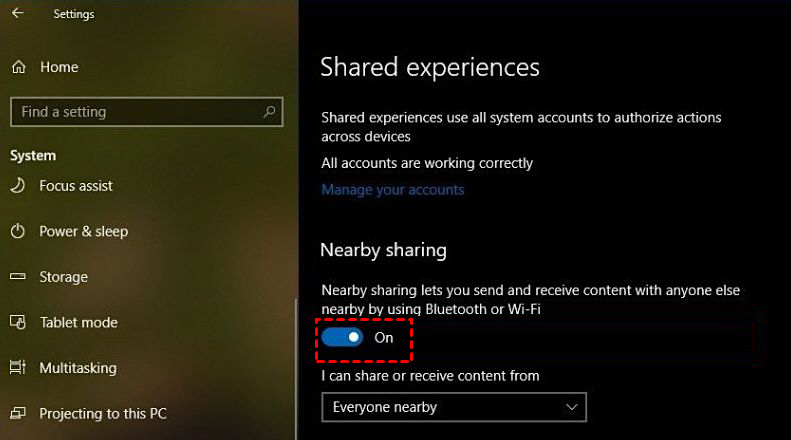
Another way how to transfer picture files from one computer to another using the Windows built-in tool is via Nearby Sharing. You should be informed before you begin that this method only works with Windows 10 and Windows 11, and that both devices need to be linked to the same network.
Step 1. Navigate to: Settings> System> Shared Experiences, and then turn on the Nearby sharing button.
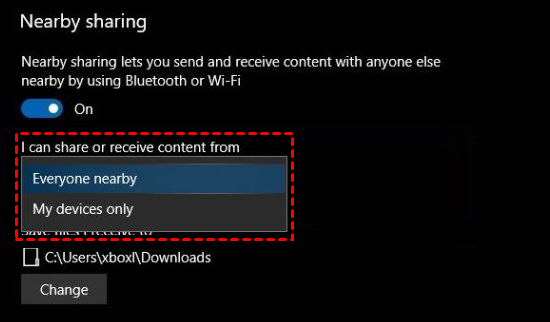
Step 2. Select the sharing pattern based on your own need from the drop-down menu.
Tips:
- Everyone nearby means your PC will share or receive content from all nearby devices.
- My devices only means your PC will share or receive content only with devices using the same Microsoft account.
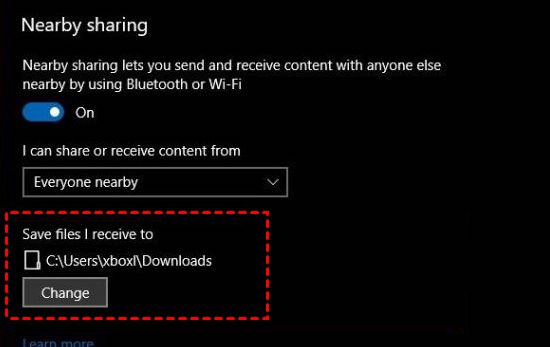
Step 3. You can click Change to choose the folder location where you prefer to store the files being transferred to your PC.
Step 4. Go to the file explorer, right-click the desired file you want to transfer, and then select Share in the context menu.

Step 5. Select the target device you want to transfer files to from the pop-up window.

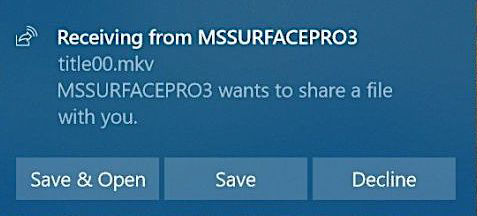
Step 6. Then the target device will receive a notification. Click Save & Open to start the file transfer.
Option 3. Transfer picture files between computers via online services
Another option how to transfer photos from one computer to another on Windows 10, 11 is to use online services, like email or cloud storage.
Way 1. Send picture files between computers using email
The first way to send picture files between computers via online services is to use email.
- ★Benefits:
- You can view your picture files before sending them through email.
- You can almost transfer picture files to computers running any OS as long as you’ve logged into the email account on it.
- You can transfer picture files between different email services, for example, Gmail, Microsoft Outlook, Hotmail, and so on.
We’ll take Gmail as an example to show you how to transfer picture files from one computer to another.
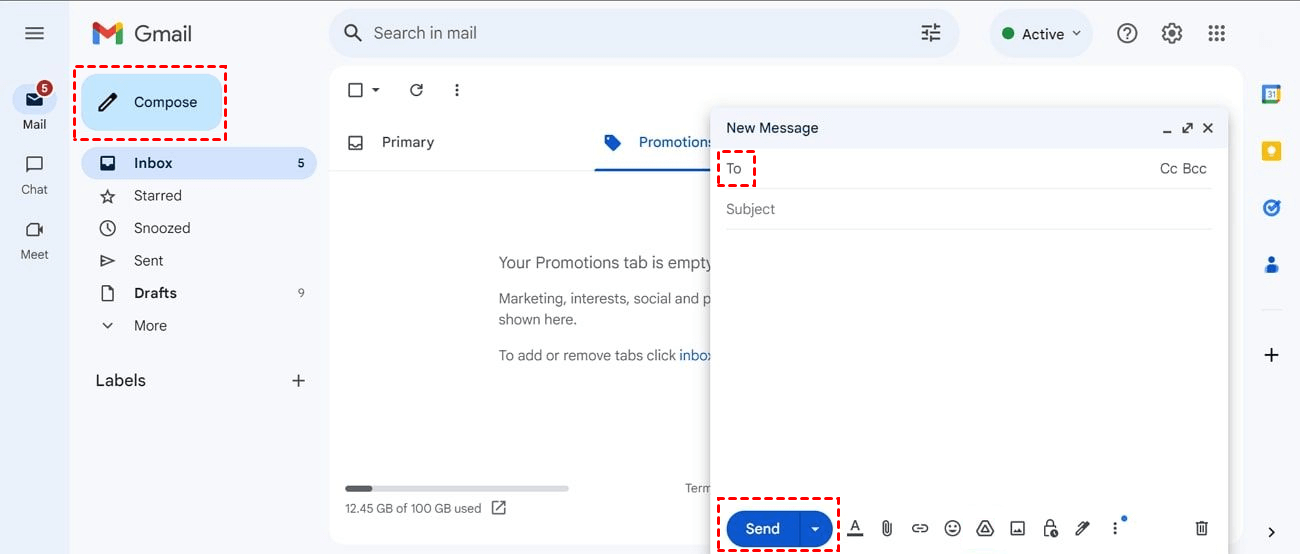
Step 1. Open Gmail official site on one computer, and create and sign in to your email account. On the main page, click Compose.

Step 2. Then type in the email addresses that have been logged in to another computer behind To. Click the attachment icon below to choose the picture files you want to transfer. Click Send to start sending picture files to the other computer.
Step 3. On the other computer, open and sign in to your email application to check and download the picture files.
Way 2. Computer to computer photo transfer via cloud storage services
Cloud storage service is also a way to transfer files between computers. Technically, a cloud storage service is more like a backup tool allowing you to back up and sync your files to your cloud and then download it whenever and wherever you want.
- ★ Benefits
- The cloud storage service app lets you view and edit your files.
- You can also access your uploaded files from any computer by going to the cloud storage service website and signing in.
- Your files will still be backed up and secured at the cloud storage service if your device is stolen or damaged after you have saved your files there.
There are lots of cloud service providers at present. Here we’ll take Google Drive as an example to show you how to transfer picture files from one computer to another using cloud storage services.
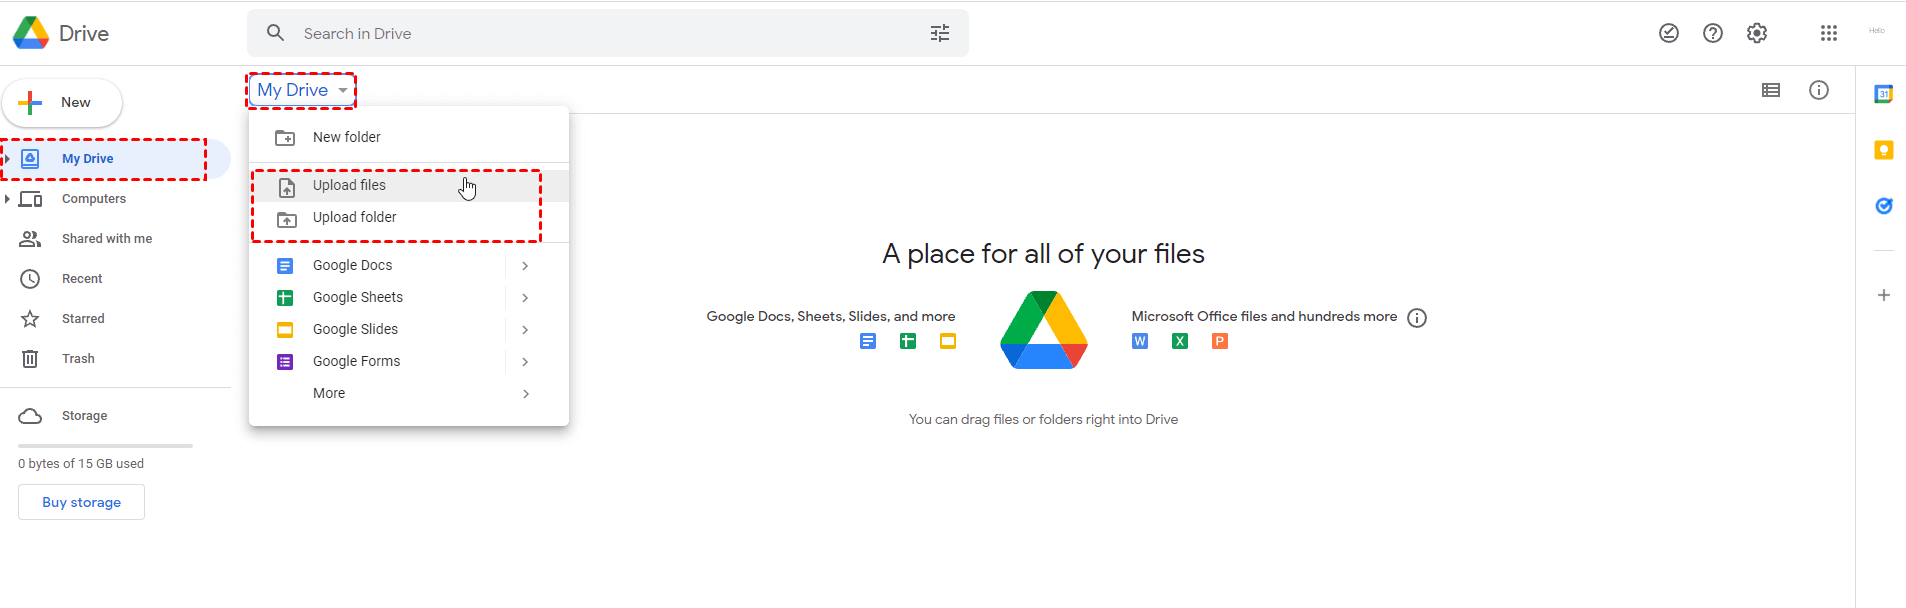
Step 1. Open the main interface of Google Drive, find and click My Drive in the left sidebar, click My Drive again, and select Upload files or Upload folder in the expanded menu.
Step 2. For example, click Upload files, and a window will pop up automatically. Select the picture files you want to upload and click Open in the lower-right corner.

Step 3. You can see the file upload progress in the lower right corner. After the upload is completed, you can find the file in the main interface.

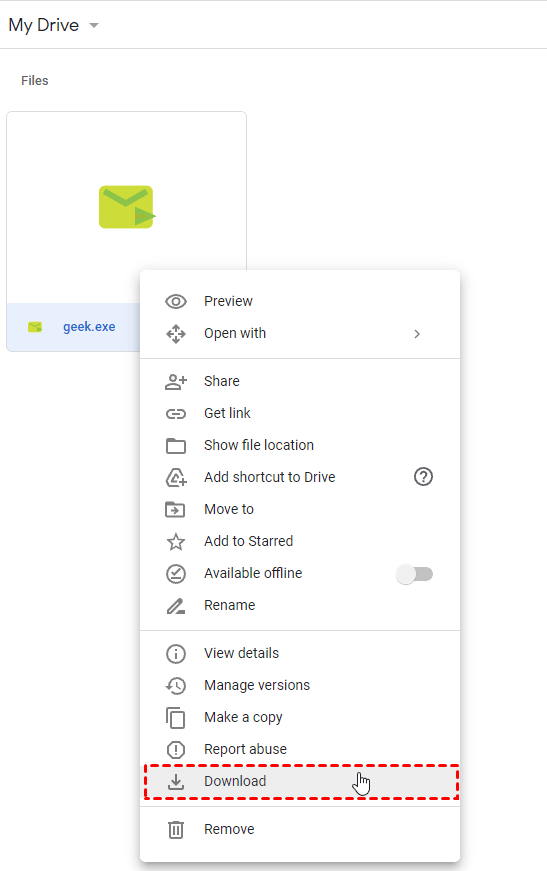
Step 4. Open Google Drive on the other computer and log in to the same Google account. Find the file you’ve transferred, right-click the file, and select Download in the expanded menu to realize remote picture transfer between different computers.
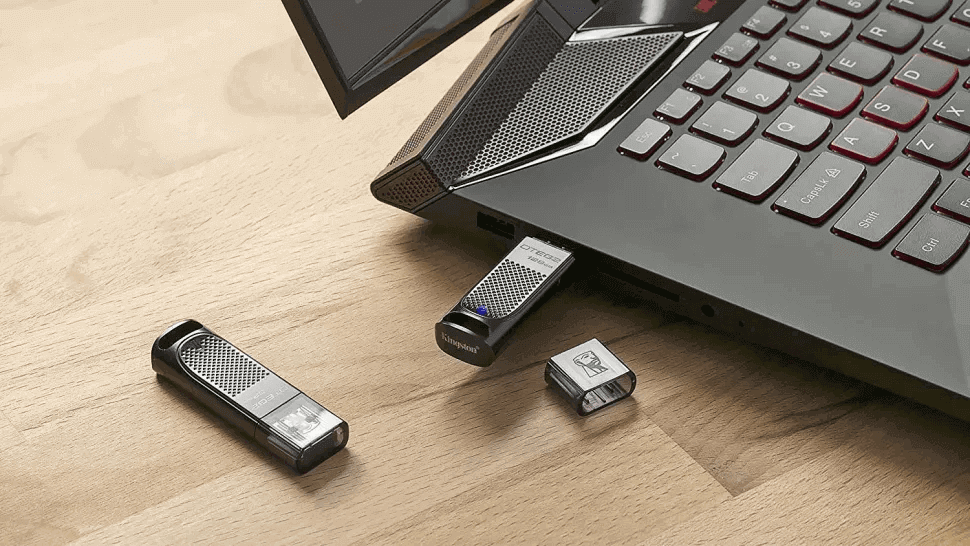
Option 4. Move picture files between computers via external devices
You can also transfer picture files from one computer to another via external devices, such as a USB flash drive or external hard drive, and then move the device to the other PC to transfer the picture files.
- ★Benefits:
- There is no need for internet access, additional software, or services.
- External drives are portable, convenient, and secure because they can be encrypted.
- Moving a large collection of files that require a lot of storage space via USB can be the quickest and most cost-effective option.
Step 1. Connect your USB/external hard drive to one computer.
Step 2. Copy wanted picture files to the device.
Step 3. Plug out the drive and connect it to another computer. Then copy the picture files to the other computer.
What’s your preferred picture transfer way?
The main focus of this post is on teaching readers how to transfer picture files from one computer to another on Windows 10, 11. In particular, the ways to transfer picture files using remote file transfer tools, the Windows built-in tools, online services, and external devices are introduced. What’s your preferred picture transfer way? Choose based on your personal preferences.
