
Full Tutorial: ConnectWise File Transfer on Windows, Mac, & Linux
This post is a complete tutorial on ConnectWise file transfer on Windows, Mac, and Linux. Besides, it also introduces a free ConnectWise file transfer alternative. Keep reading if you're looking for a free way to transfer files.
By Ellie / Updated on December 13, 2024
Different ways of ConnectWise file transfer [Windows/Mac/Linux]
ConnectWise Control, formerly known as ScreenConnect, endeavors to offer a comprehensive and secure software solution for managed service providers (MSPs) and IT professionals. Its primary objective revolves around streamlining remote technical support and troubleshooting, enabling IT experts to assist clients or colleagues with their computer systems remotely. Alongside its core functionality, which focuses on remote assistance, ConnectWise Control provides various features and tools, including the ability to transfer files effortlessly.
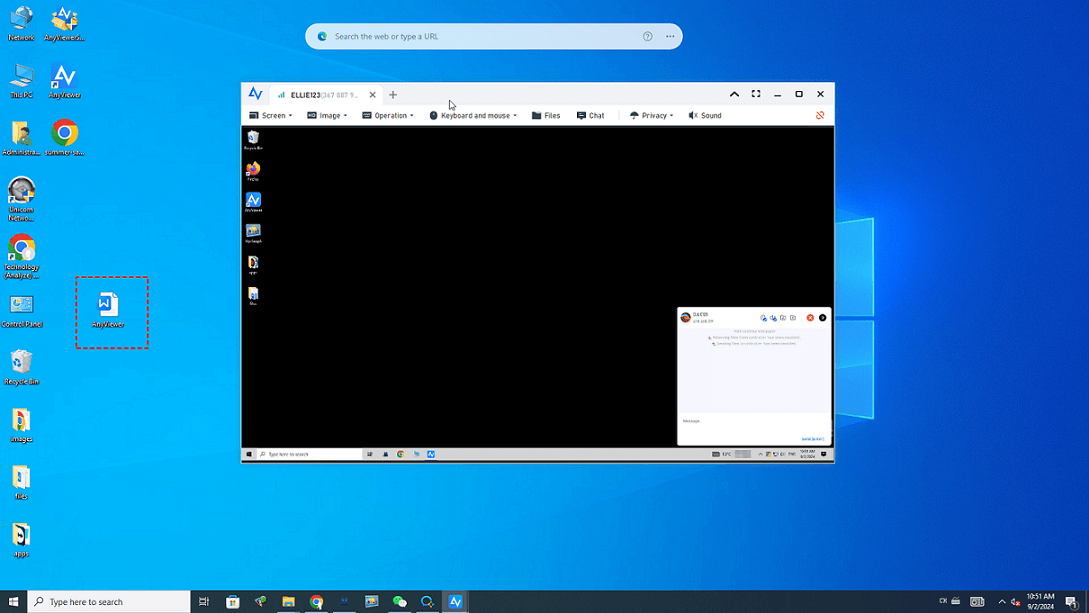
![]()
Now, you might be wondering if ConnectWise file transfer poses any challenges. Rest assured; the answer is a resounding NO. In the following sections, we will provide a detailed tutorial on performing file transfers using ConnectWise Control on various operating systems, namely Windows, Mac, and Linux.
How to transfer files via ConnectWise on Windows
On Windows machines, there are three ways to allow ConnectWise transfer files from a local machine to a remote machine during a session.
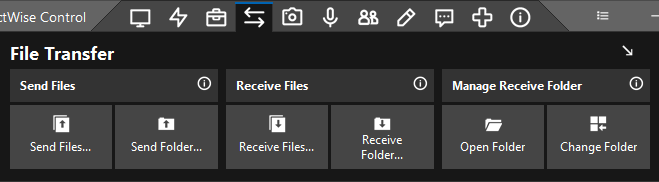
Way 1. File Transfer manager
During a remote session, find the File Transfer manager on the toolbar. The transferred files will be saved to the default C:\Documents and Settings\UserName\My Documents\ConnectWiseControl directory.
- Send File / Send Folder - To send a file or folder to the guest machine, click "Send File/Send Folder". This will open the Send Files or Browse for Folder dialog, allowing you to select the desired file or folder. On the guest machine, an explorer window will open, and the file or folder will be saved in the default file transfer directory.
- Receive Files - To receive files from the guest machine, click "Receive Files". This will open the Send Files dialog on the guest machine, where the guest or the host can navigate to the desired file. Once the file is selected, click "Open" to receive the file. An explorer window will open on your machine, and the file will be saved to your default file transfer directory.
- Manage Receive Folder - To change the location where received files and folders are stored on the host's machine, you can do so by selecting "Manage Receive Folder".
Way 2. Drag-and-drop file transfer
Drag and drop files into the chat window to transfer them to your macOS guest on a Windows machine. You can send and receive files and folders for other operating systems by dragging and dropping them into the client window.

Way 3. Copy and paste file transfer
Utilize the right-click context menu and select the "Copy" command to copy the desired file(s) or folder(s) from one location. Then, navigate to the target location and right-click again, this time selecting the "Paste" command.
Alternatively, you can use the keyboard shortcuts CTRL + C to copy and CTRL + V to paste the files or folders.

How to transfer files via ConnectWise on Mac
On Mac machines, there are three ways to allow ConnectWise Control transfer files.
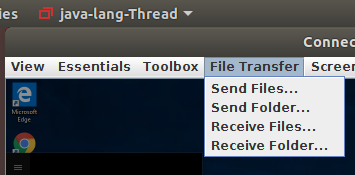
Way 1. File Transfer manager
Find the File Transfer manager from the toolbar. By default, files will be transferred to the following directory: ~/Users/{logged in UserID}/ConnectWiseControl/.
- Send Files - To send files from the remote machine, choose "Send Files" and select the desired files.
- Send Folder - To send an entire folder to the remote machine, select "Send Folder".
- Receive Files - To receive files from the remote machine to the host's machine, select "Receive Files" and choose the files to transfer.
- Receive Folder - To transfer a folder from the guest machine to the host machine, select "Receive Folder".

Way 2. Drag-and-drop file transfer
Drag and drop the files you wish to transfer into the client window to send to the guest machine.
Way 3. Copy and paste file transfer
Use the right-click Copy and Paste commands to transfer files from one specific location to another. You can also use the keyboard shortcuts by pressing "Command + C" to copy and "Command + V" to paste.
How to transfer files via ConnectWise on Linux
On Linux, there are only two ways to transfer files.
Way 1. File Transfer manager
By default, the files will be automatically transferred to either the directory /{logged in UserID}/ConnectWiseControl/Files or /tmp/screenconnect-xxxxxxxxxxx/.
- Send Files - To send files from the remote machine, select "Send Files" and choose the desired files.
- Send Folder - To send an entire folder to the remote machine, select "Send Folder".
- Receive Files - To receive files from the remote machine to the host's machine, select "Receive Files" and select the files you wish to transfer.
- Receive Folder - To transfer a folder from the guest machine to the host machine, select "Receive Folder".
Way 2. Drag-and-drop file transfer
You can quickly transfer files to the guest machine by dragging and dropping them into the client window.
AnyViewer: Best ConnectWise file transfer alternative
Like ConnectWise, AnyViewer is a remote support software with a file transfer feature. However, the critical distinction is that AnyViewer is entirely free to use. Currently, AnyViewer is specifically designed as a professional Windows remote desktop solution and does not support Mac or Linux operating systems. If you're a Windows user seeking a free file transfer tool, AnyViewer is the ideal option.
Now, let's delve into the various methods of transferring files via AnyViewer. But before we proceed, it is essential to set up AnyViewer on both computers. Please follow the steps outlined below:
Step 1. Download, install, and launch AnyViewer on your devices.
Step 2. Create an AnyViewer account and sign in to it on both devices.

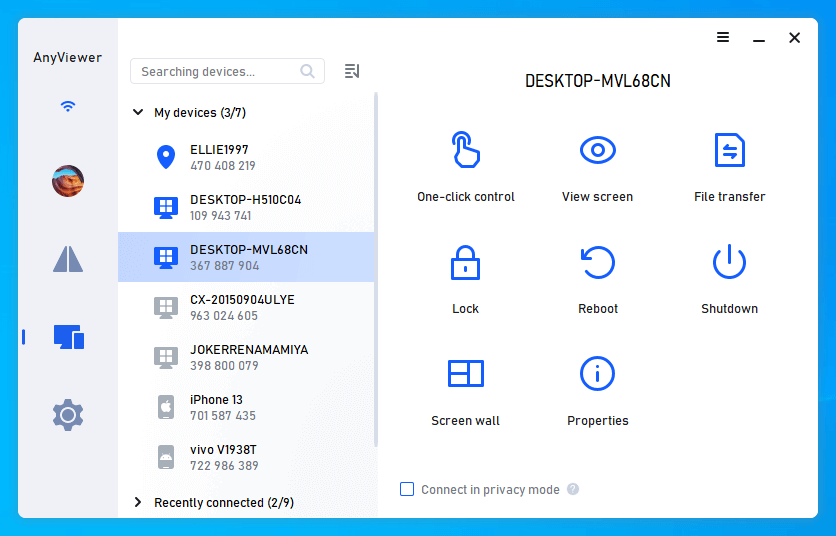
Step 3. On your local device, navigate to the "Device" section to find the list of available devices.
Way 1. Transfer files outside of the session
Step 1. Select the destination computer from the list to transfer files directly and click "File Transfer". This will open the file manager.
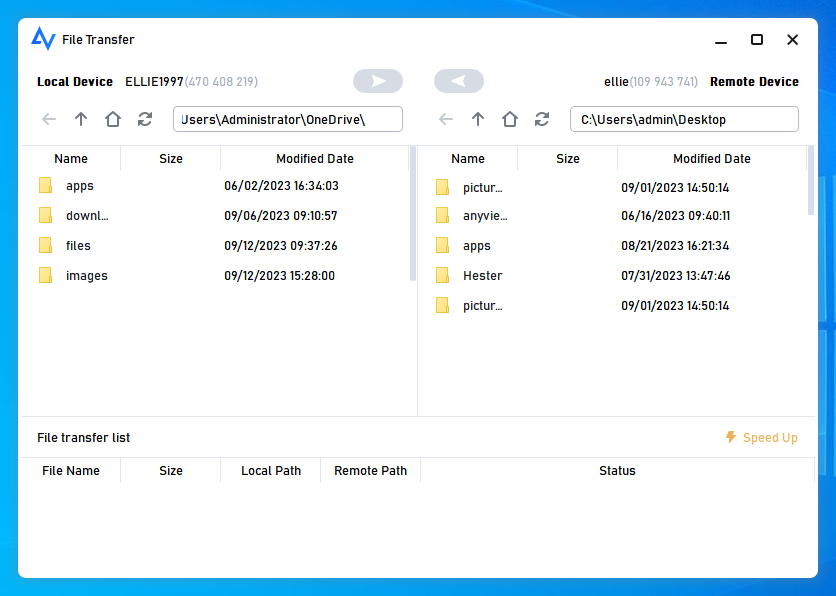
Step 2. The left pane of the file manager displays the file path of your local computer, while the right pane shows the file path of the remote computer. You can transfer files between devices by selecting the target files and clicking the arrow buttons.
Way 2. Transfer files during a remote session
Step 1. During a remote session, AnyViewer allows you to transfer files as well. To gain unattended remote access to the remote computer, select "One-click control".
Step 2. Click the "Files" button to transfer files in the menu bar.

Alternatively, you can perform file transfers by dragging and dropping files during the session.
- Notes:✎...
- To transfer files freely, it is highly recommended to upgrade your account to a professional or enterprise plan. Here are what a professional or enterprise plan can bring to you:
- Faster file transfer speed. Transfer speed for a free account is 500 KB/s, and for a paid account is up to 10 MB/s.
- Increasing numbers of files are being transferred at once. For a free account, 100 files can be transferred at a time; for a paid account, this number is unlimited.
- Larger size of a single file that can be transferred. The maximum size of a single file that can be transferred for the free account is 100 MB, and for a paid account is 1 TB.
The bottom line
This post provides a full tutorial on ConnectWise file transfer on Windows, Mac, and Linux. It's important to note that ConnectWise is a premium service and doesn't provide a free version. If you're seeking a cost-effective alternative for Windows, consider exploring AnyViewer. This intuitive tool boasts a user-friendly interface and offers multiple transfer methods. With AnyViewer, you can effortlessly transfer files within and outside remote sessions, ensuring efficient and seamless transfers. Say goodbye to complications and experience hassle-free file transfers with AnyViewer.
