
How to Remote Into a Virtual Screen
This guide explains how to remote into a virtual screen to access headless servers or closed-lid laptops. It provides quick setup steps for top remote desktop tools to eliminate physical display requirements.
By Ellie / Updated on March 6, 2026
In the world of remote work and remote IT support, physical hardware constraints shouldn't dictate your productivity. One of the most common hurdles professionals face is trying to remote into a virtual screen when the target machine has no physical monitor attached. Whether you are managing a headless server in a data center or trying to access a laptop with a closed lid, virtual display technology is the "invisible" hero of modern remote desktop solutions.
Top Software Solutions for Virtual Displays
If you need to remote into a virtual screen, several industry leaders have integrated this feature directly into their platforms. Below is a detailed look at the top three software solutions that excel at creating virtual displays.
1. AnyViewer: Simplified Virtual Multi-Screening
AnyViewer is a rising star in the remote desktop market, known for its high-speed performance and user-friendly interface. Its "Virtual Screen" feature is specifically designed to help users expand their workspace or manage PCs that lack a physical display.
Key Features:
- Hardware-Free Expansion: Create up to three virtual screens without needing physical dummy plugs.
- Independent Tasking: Run different applications on each virtual screen and switch between them seamlessly.
- Separate Windows: View multiple remote screens in individual windows and drag screen tabs in or out as needed.
- Performance Optimized: High frame rates ensure that even the virtual screens feel as responsive as a local monitor.
Steps to Create a Virtual Screen in AnyViewer:
Step 1. Launch AnyViewer and start a remote control session to your target PC.

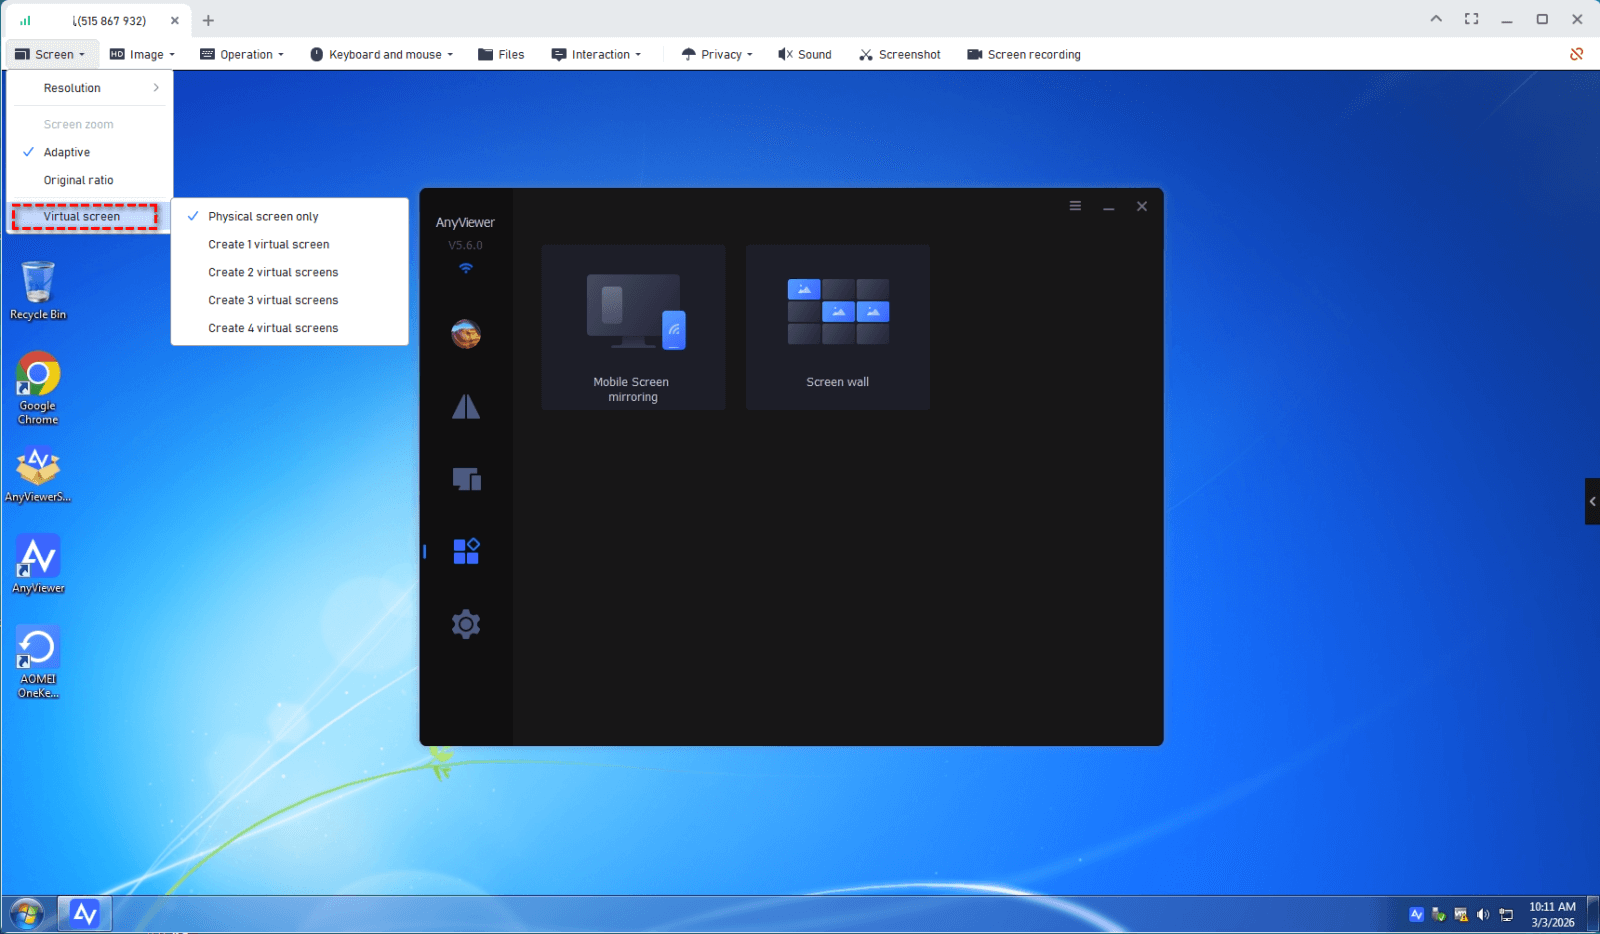
Step 2. In the remote session toolbar at the top of the window, click on the Screen tab.
Step 3. Select Virtual Screen from the dropdown menu, and choose the number of virtual monitors you wish to create (e.g., 2 or 3 screens).
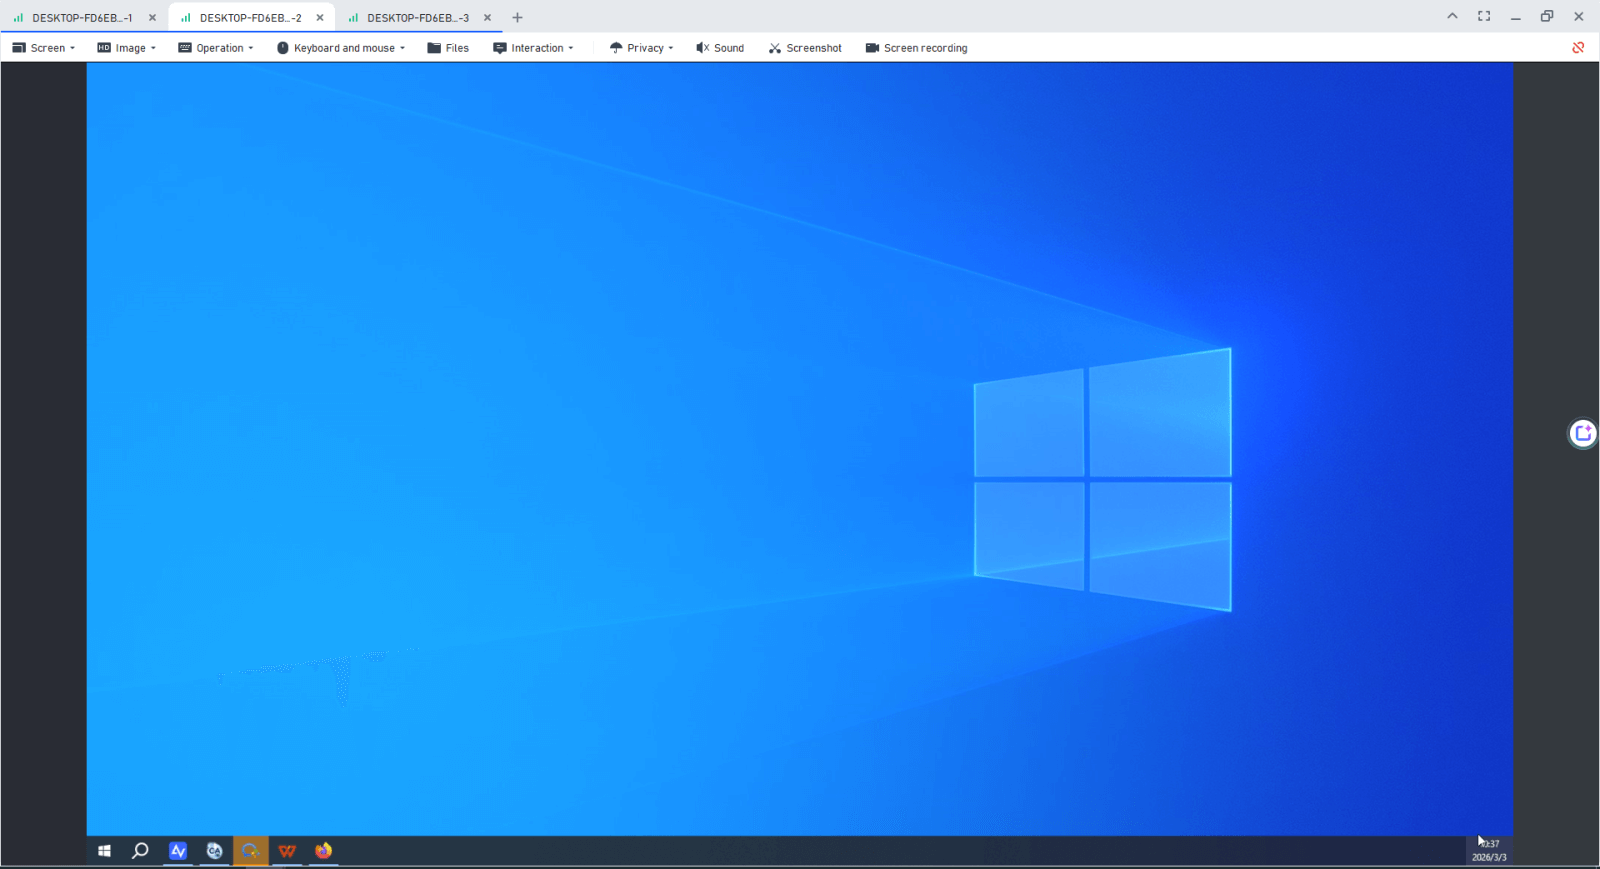
Step 4. Your virtual screens are now active. You can switch between them using the toolbar or drag windows across the "invisible" edge to move them to the virtual display.
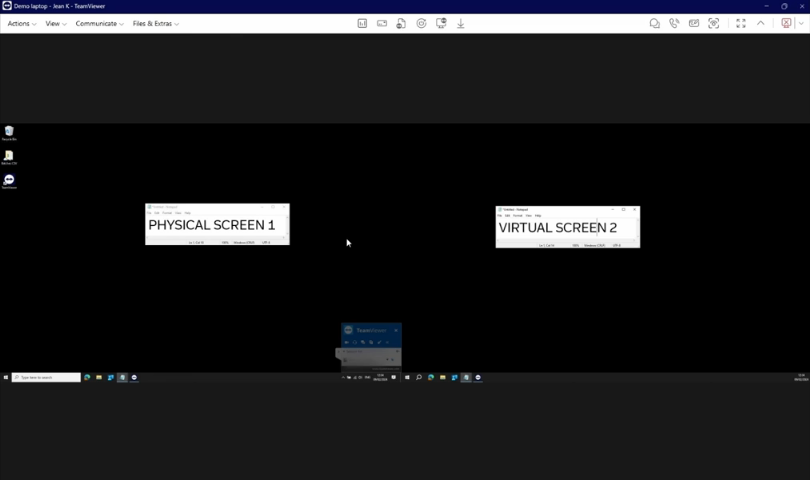
2. TeamViewer: Enterprise-Grade Virtual Monitors
As a global leader in remote connectivity, TeamViewer offers robust support for adding virtual displays, particularly for Windows-to-Windows connections. This is a critical tool for enterprise IT departments managing server racks or automated kiosks.
Key Features:
- Seamless Integration: Virtual monitors appear within the standard "View" menu alongside physical ones.
- Multi-Monitor Grid: View all screens (physical and virtual) in a single grid mode for a bird's-eye view of the system.
- Unattended Excellence: Works perfectly with TeamViewer Host for 24/7 access to headless machines.
Steps to Create a Virtual Screen in TeamViewer:
Step 1. Start a remote control session to a managed device with Easy Access enabled.
Step 2. In the remote session toolbar, click on the View menu.
Step 3. Select Manage virtual monitors and then click Add virtual monitor.
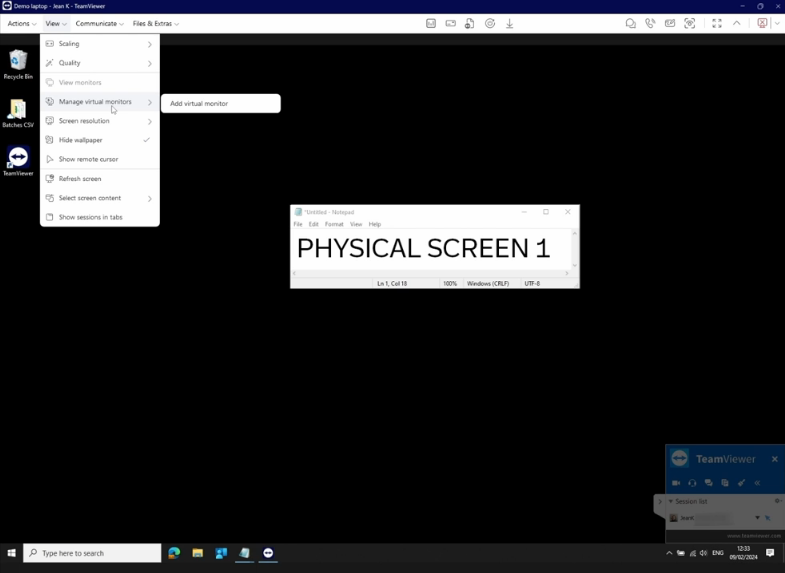
Step 4. If it's your first time, the system may prompt you to install the TeamViewer virtual display driver.
Step 5. Once added, go to View > View monitors to toggle between the physical and virtual screens.
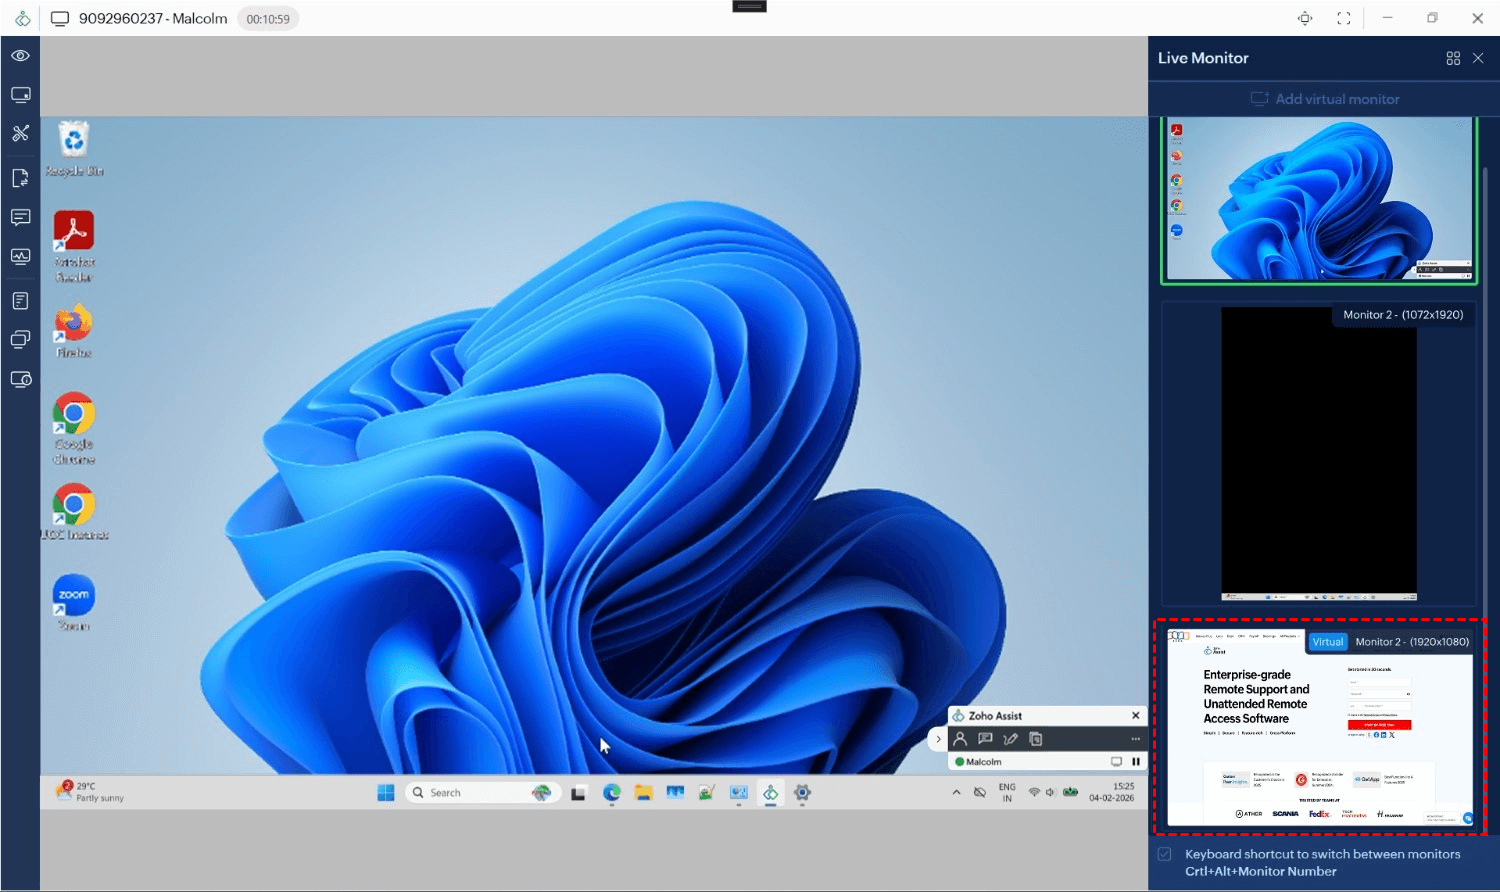
3. Zoho Assist: The Troubleshooting Specialist
Zoho Assist is tailored for on-demand support and unattended access. Its virtual monitor feature is a lifesaver for technicians who connect to servers or laptops with closed lids that otherwise show a blank "black screen."
Key Features:
- Automatic Driver Setup: The ZAVirtualDisplayDriver is automatically configured to ensure smooth rendering.
- Blank Screen Fix: Overcomes the issue of laptops not displaying a signal when the lid is closed.
- Support for Headless Devices: Specifically optimized for servers and specialized industrial PCs.
Steps to Create a Virtual Screen in Zoho Assist:
Step 1. Connect to a remote device configured for unattended access (Windows 10 or higher).
Step 2. Go to the Session tab in the top menu or the Monitors panel on the right side.
Step 3. Click Add Virtual Monitor.
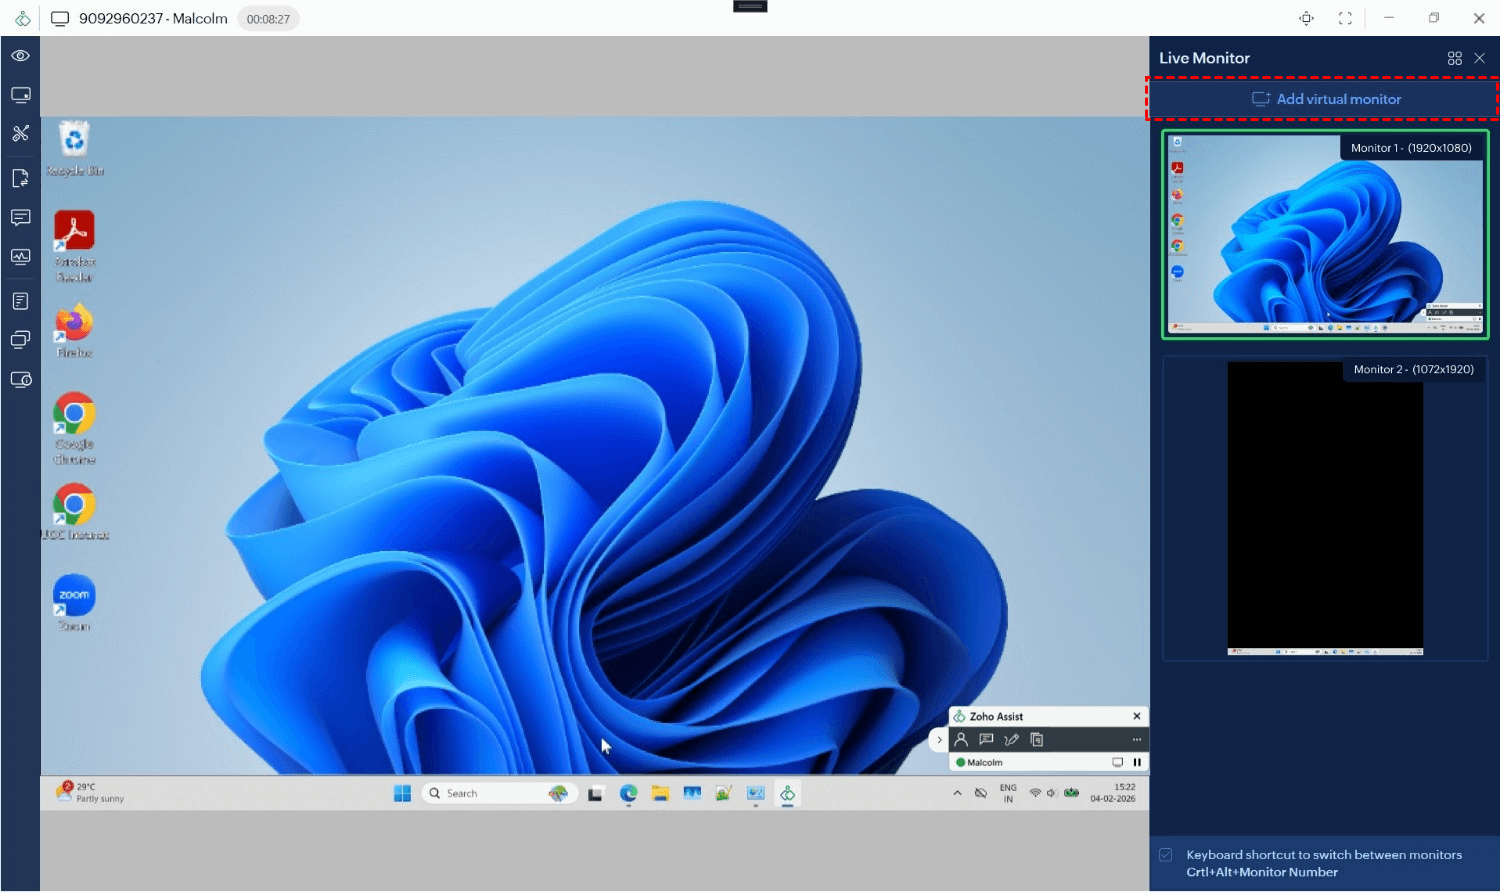
Step 4. A prompt will appear on the remote machine (or happen automatically if pre-approved) to install the display driver.
Step 5. Once the driver is active, the new monitor will appear in your layout. You can now drag windows to it or switch your view to this new virtual workspace.
Why You Need to Remote Into a Virtual Screen
There are several critical scenarios where a virtual display becomes a game-changer for IT professionals and remote employees:
- Managing Headless Servers: Many servers run without physical monitors. A virtual screen provides a graphical interface, allowing you to interact with applications as if a monitor were connected.
- Accessing Closed-Lid Laptops: When a laptop lid is closed, the display may go to sleep, causing a black screen during remote access. A virtual display simulates an active monitor so the system remains accessible.
- Creating a Multi-Monitor Workspace: If the remote computer only has one monitor, virtual screens can add extra workspace, making multitasking easier and more efficient.
Conclusion
The ability to remote into a virtual screen is an essential tool for overcoming hardware limitations. It simplifies your setup, reduces the need for physical dongles, and provides a flexible environment for remote support and high-end multitasking. By choosing a remote desktop provider that supports virtual monitors, you ensure that you can work efficiently on any device, anywhere, at any time.
