
How to Transfer Files from PC to PC using WiFi on Windows 10, 11
This post introduces how to transfer files from PC to PC using WiFi on Windows 10. We provide you with 3 options: Anyviewer, Google Drive, Nearby Sharing.
By AnyViewer / Updated on December 13, 2024
How can I transfer files from PC to PC via WiFi?
I have 2 PCs for work, and sometimes I have to work at home, but that's not a good idea to bring 2 PCs home once. I want to transfer my work files between the PCs using WiFi, but I don't know how to do it. Can anybody give me some suggestions?"
- Question from Reddit
How to transfer files from PC to PC using WiFi Windows 7, 10, 11 [3 options]
How do I transfer files from PC to PC using WiFi Windows 7/10/11? Here in the post, we offer you 3 options for you to choose from.
Option 1. Transfer files between PCs using WiFi via remote desktop software: AnyViewer [recommended]
How to transfer files from PC to PC using WiFi Windows 7/10/11? You can use is a highly appreciated remote desktop software: AnyViewer for the following reasons:
- Easy-to-use. It has easy operations to transfer files without limitations, you can transfer files from PC to PC directly if you’ve logged into the same account.
- Fast. It has a fast file transfer speed to improve your work efficiency and save time.
- Compatible. It supports several Windows versions, for example, it’s available on Windows 11/10/8.1/8/7.
- Multi-function. In addition to file transfer, you can also use AnyViewer to get unattended remote access to desktops, laptops, or servers without complicated settings, then you can achieve remote management, screen sharing, or remote game whenever you want.
Step 1. On the client computer, go to Log in on the left pane and then click Sign up (you can log in directly if you have already signed up).

Step 2. Fill in the sign up information. When you successfully logged in, your device will assign to the account.

Step 3. Log in to the same account on other devices.

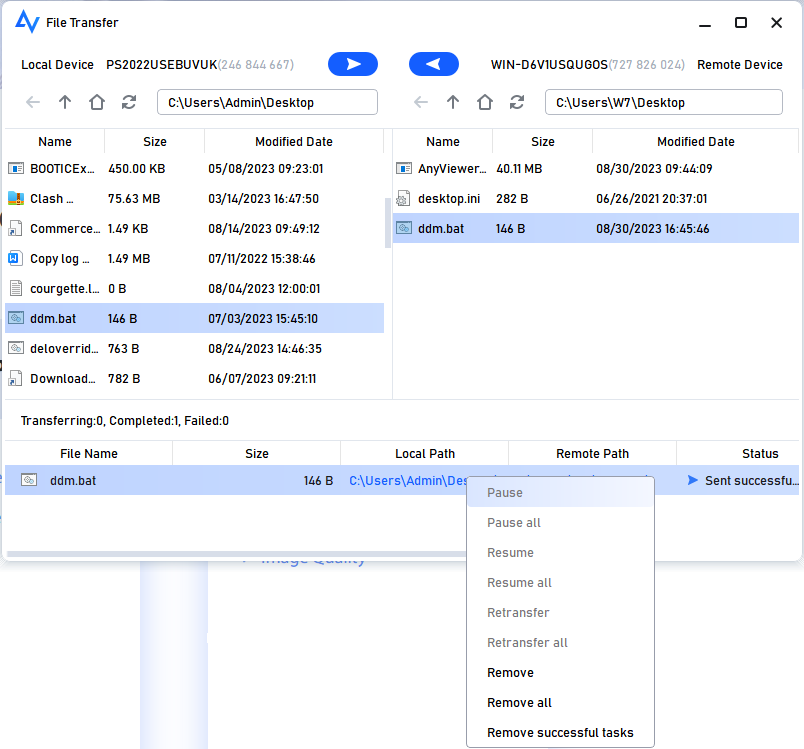
Step 4. Go to the Device interface, and you can see all assigned devices. Select the target device you want to transfer files to, and then click File Transfer.

Step 5. A File Transfer dialog box for transferring files between the PCs is now available. The right of the box presents the client PC, and the host PC is on the left. Select the files and click the right arrow to transfer them to the client PC. Select the files and then click the left arrow to transfer them to the host PC.

You can see the transfer status at the bottom of the box. Right-click to pause or remove the tasks.
- Notes:
- A single file smaller than 100 MB can be transferred using AnyViewer's free account, and you are only permitted to transfer up to 100 files at once. To transfer larger files, upgrade to a Professional or Enterprise plan. The following rights will thereafter be yours:
- Transfer multiple files all at once.
- Speedier file transfer. Transfer speed for a free account is 500 KB/s, but it can reach 10 MB/s for a paid account.
- Assign more devices to the same account to achieve direct file transfer.
- Connect to the host computer in privacy mode so that you can block the remote PC's keyboard and mouse and black its screen.
Option 2. Transfer files between PCs using WiFi via Google Drive
How to transfer files from PC to PC using WiFi Windows 10/11? You can use Google Drive to do this work. By putting the data in cloud drives, you have access to it on almost any device. Make sure you have a Google account to use before continuing to the next step.
Step 1. Open Google Drive, click My Drive in the left pane, and then choose Upload files or Upload folder from the context menu, depending on your needs.
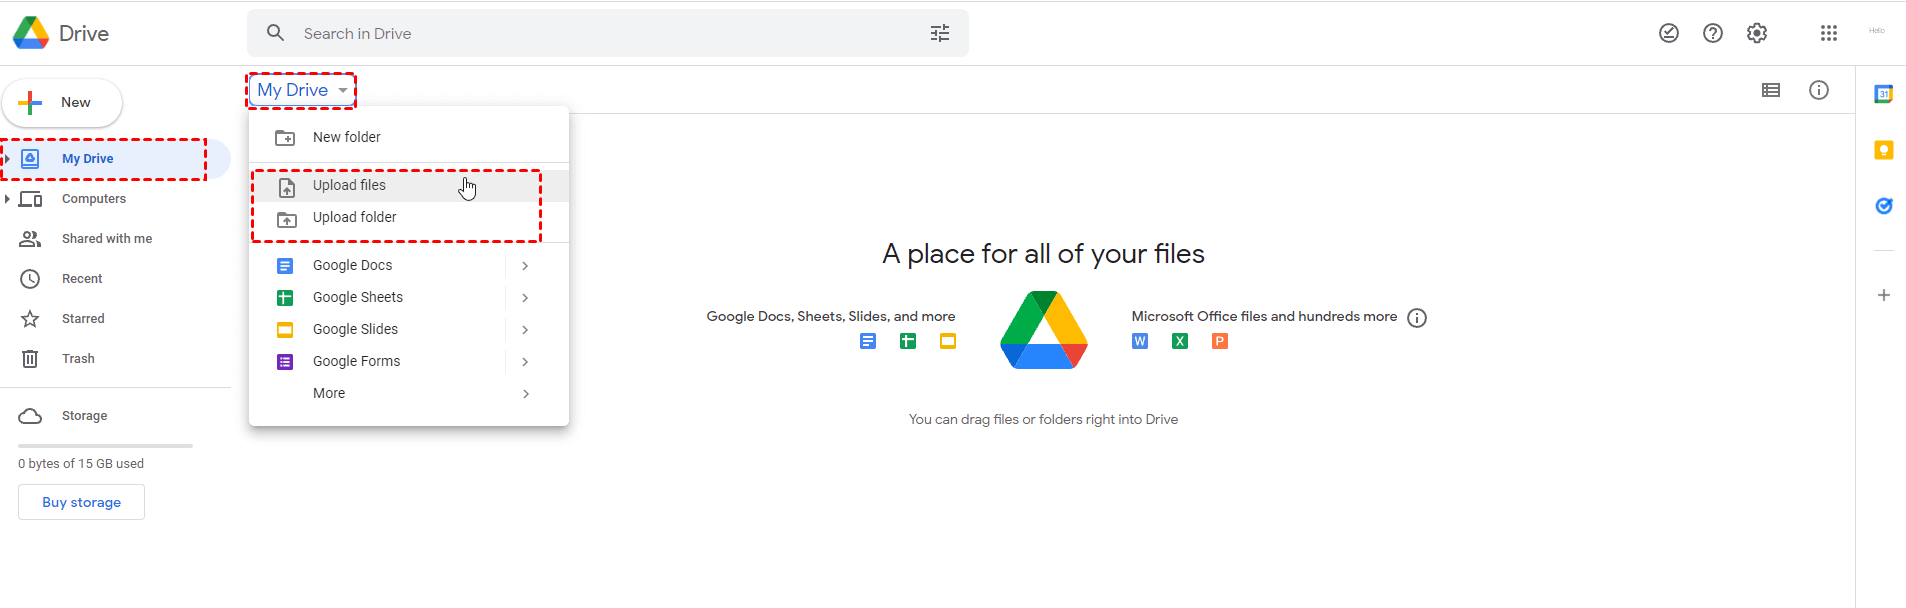
Step 2. If you want to upload files, for example, click Upload files, and you will see a pop-up window. Click Open after choosing the file you want to upload.

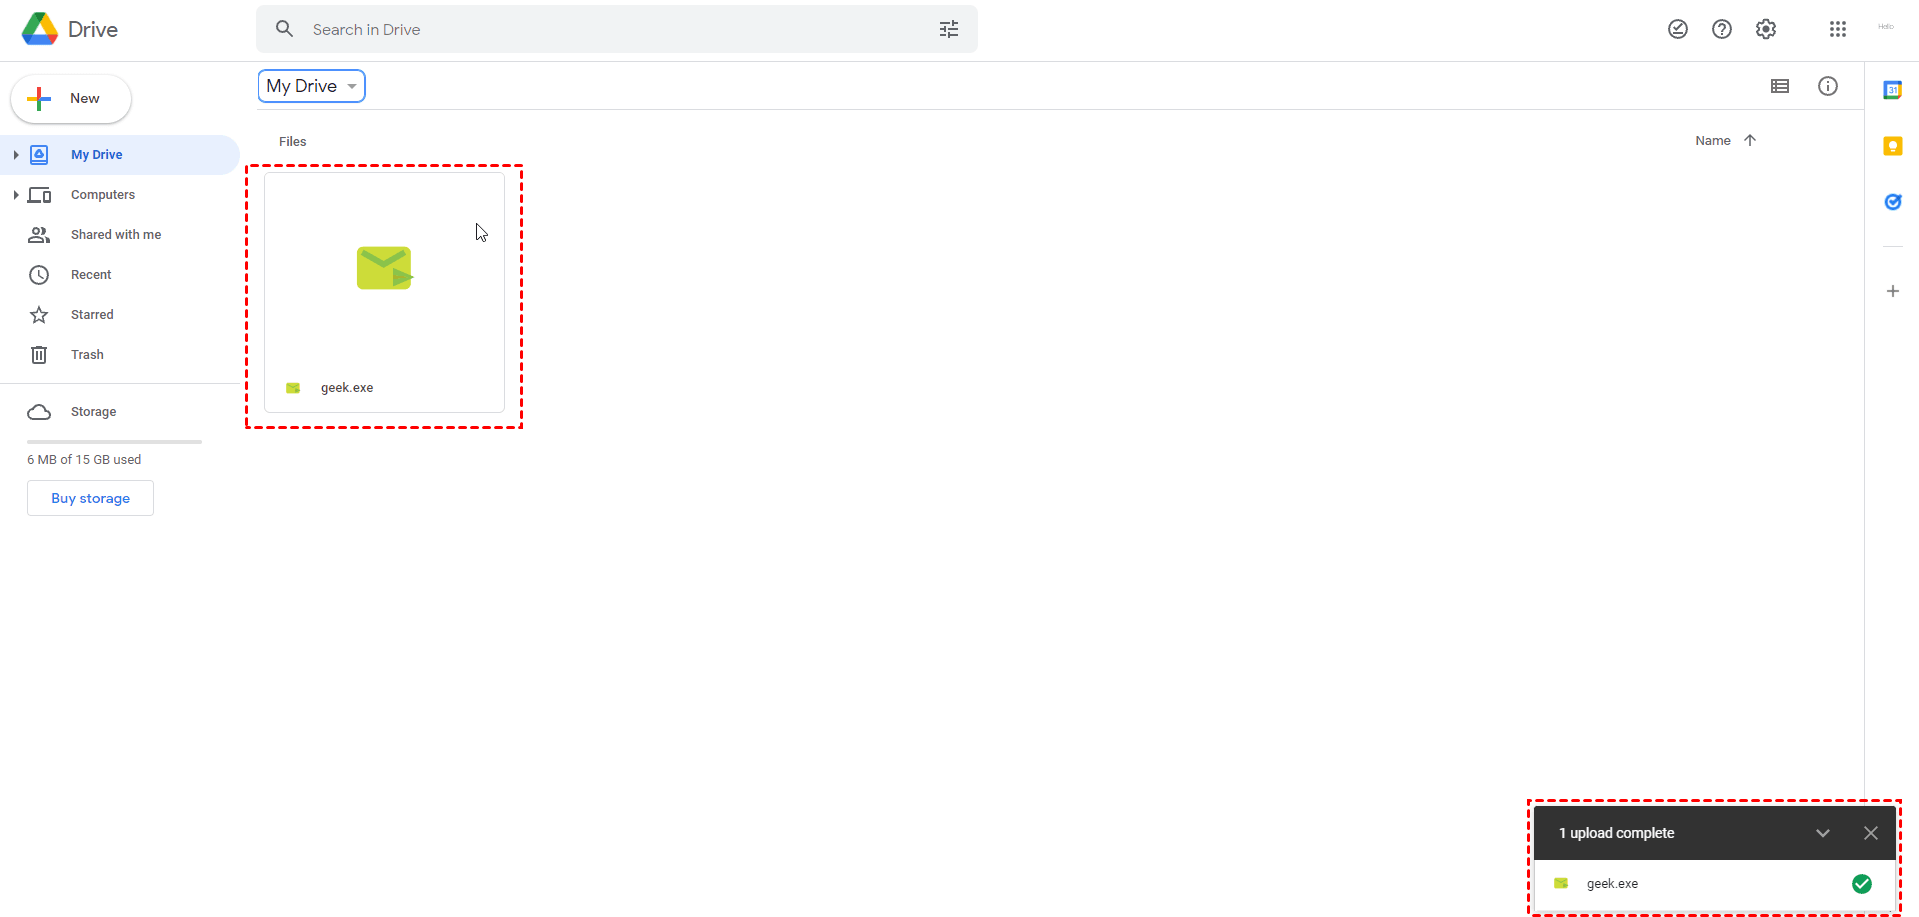
Step 3. The file upload progress is in the lower right corner. After the upload is completed, you can find the file in My Drive interface.
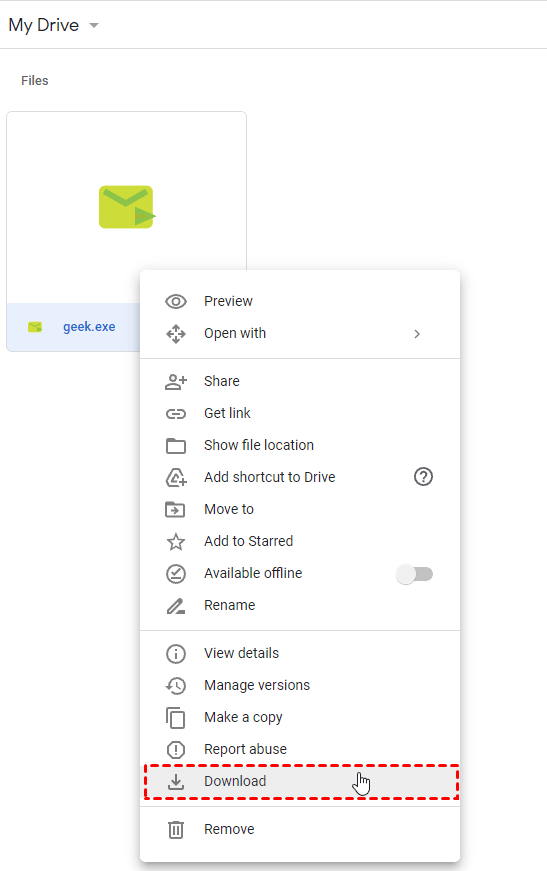
Step 4. Open Google Drive on the other computer and log in to the same Google account. Right-click the file you’ve uploaded, and then select Download to establish remote file transfer between different PCs.
Option 3. Transfer files between PCs using WiFi via Nearby Sharing
The third option is Nearby Sharing, a default tool that allows users to transfer files between computers on the same network on Windows 10/11. Before transferring files via Nearby Sharing, you have to make sure that your PCs are running Windows 10 or 11, and that both PCs are connected to the same WiFi connection.
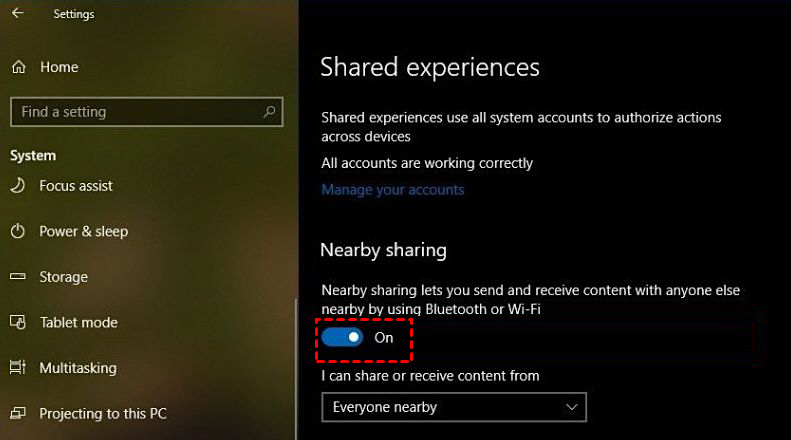
Step 1. Navigate to: Settings > System > Shared Experiences, and then turn on the Nearby sharing button.
Step 2. Select the sharing pattern based on your own need from the drop-down menu.
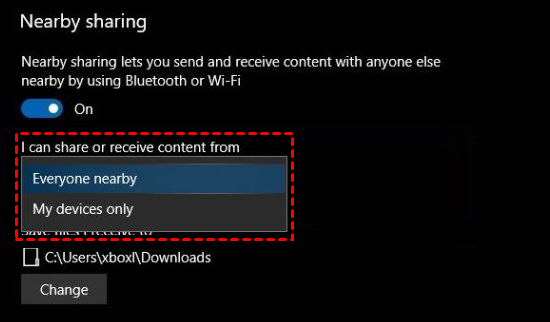
- Everyone nearby means your PC will share or receive content from all nearby devices.
- My devices only means your PC will share or receive content only with devices using the same Microsoft account.
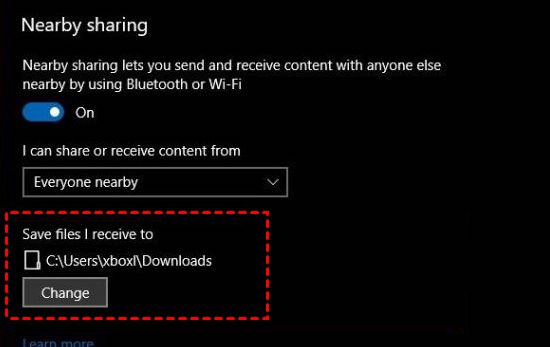
Step 3. You can click Change to choose the folder location where you prefer to store the files being transferred to your PC.
Step 4. Go to the file explorer, right-click the desired file you want to transfer, and then select Share in the context menu.

Step 5. Select the target device you want to transfer files to from the pop-up window.

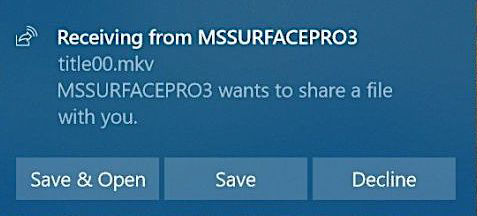
Step 6. Then the target device will receive a notification. Click Save & Open to start the file transfer.
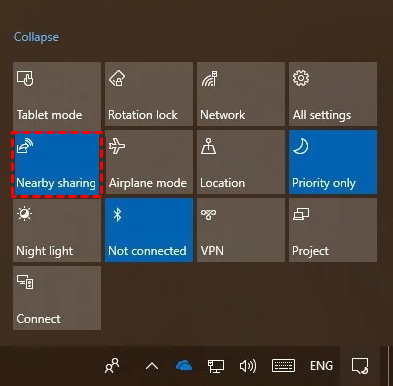
Press Win + A to evoke the Action Center menu, and then you will see the Nearby Sharing option. You can turn Nearby Sharing on or off by clicking on the button. The blue button means the sharing is on and vice-versa.
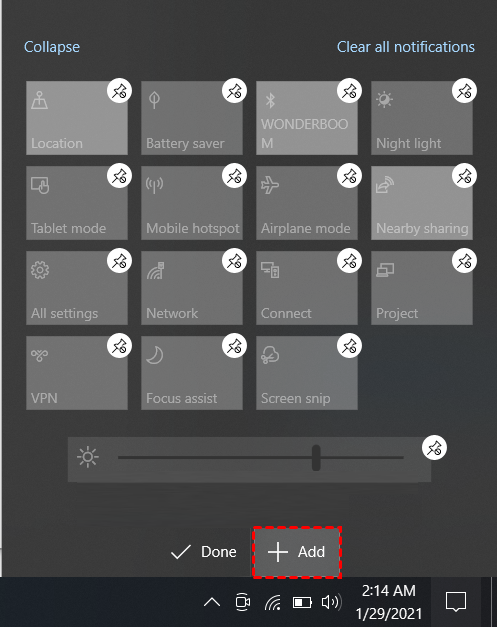
If you can’t see the Nearby Sharing option in the Action Center menu, click on the Expend option or follow the next steps to go to Settings to place it in the menu.
Step 1. Navigate to: Settings > System > Notifications & actions, and then select Edit your quick actions.

Step 2. The Action Center menu will appear on the right corner of the screen. Click +Add and a pop-up menu will open where you can find the Nearby Sharing option. Add it to the menu and you will be all set.
Conclusion
After reading the post, you may already have learned how to transfer files from PC to PC Using WiFi Windows 10/11 via AnyViewer, Google Drive, or Nearby Sharing. Google Drive and Nearby Sharing allows you to share files without extra downloading. However, Google Drive does not support direct file transfer files between devices, and Nearby Sharing only allows file transfer in the same local network. In this case, AnyViewer is a superior option if you're seeking a quick and effective approach to transferring files between devices over the Internet.
