
5 ways: How to Allow Someone to Remote Access My Computer
How to let someone control your computer remotely? You can follow this post carefully to get the 5 best solutions on remote control and remote support. You can use AnyViewer, Windows Remote Desktop and Remote Assistance, Chrome Remote Desktop, or Quick Assist. Keep reading to find the specific instructions.
By Ellie / Updated on December 13, 2024
How can I allow someone to access my computer remotely?

We sometimes want to allow someone to remote access our computers for various reasons, for example, to remotely access my computer to get the information they need, or to provide remote support to help troubleshoot computer issues.
How to give someone remote access to your computer? Remote control software and remote support software emerge as the times require. Normally, a free, easy, and stable tool would be of great help to users who want to allow someone to remote access their computers. Here we provide five ways to allow someone to remote access my computer, for remote control and remote support.
What happens if you give someone remote access to your computer?
When you do this, you give full control of your computer to this person. He or she can see your screen, control your mouse and keyboard, and almost do everything on your computer as you can from a different location. This sometimes can be risky, especially when you have important data on your computer. So, please be careful and only give remote access permission to the person you trust.
Allow someone to remote access my computer for remote control: 3 Ways
How to let someone control your computer? The third-party professional remote desktop software AnyViewer, the Windows built-in Remote Desktop Connection, and the Google extension Chrome Remote Desktop would help you allow someone to remote access your computer successfully.
Way 1. Give someone remote access to my computer via AnyViewer (2 quick steps)
AnyViewer is an excellent remote desktop software that provides secure remote access for almost all Windows versions and mobile systems. Compared with Remote Desktop Connection and other competitors, it has the following advantages:
- Easy to set up and use: Remote Desktop requires a series of setup processes. Users need to enable remote access, get the IP address, computer name, and computer password, and set up firewall settings to achieve remote connections. While AnyViewer is designed to be simple, with only a few steps, users can start unattended remote access from one device to another with one click.
- Remote access over the Internet: Remote Desktop requires that the two devices be on the same network, otherwise, users need to set up port forwarding, which is complicated. While AnyViewer can be used directly over LAN or the Internet.
- Full system support: Remote Desktop is unable to connect to Windows Home and Windows Standard systems. While AnyViewer is fully compatible with both versions. Moreover, AnyViewer provides iOS and Android apps for free remote access.
Step 1. Install and run AnyViewer on both computers. Sign up for an AnyViewer account (if you have already registered on the official website, you can log in directly). After logging into AnyViewer, your device will be assigned to the account.

Step 2. Log in to the same AnyViewer account on the two devices, then you can choose the remote computer and click One-click control to achieve a direct connection. You can also click View the screen to see another screen or click File transfer to share files between computers.

- Additionally, you can change your account's plan to Professional or Enterprise for the best remote access experience:
- Remote access more devices: More devices will be allowed to be assigned and connected to the same account for unattended remote access.
- Control multiple devices simultaneously: More connection channels for more devices to be able to start remote connection at the same time.
- Clean display: Enjoy seamless remote control with high-definition and high FPS.
- Access in privacy mode: Black the remote PC screen and disable the remote keyboard & mouse click to protect privacy.
- Superfast file transfer: Transfer 1 TB files at 10 MB/s.
Way 2. Allow someone to remote control my computer via Remote Desktop Connection
Remote Desktop Connection is the Windows built-in remote desktop program. Before using it, there is some preparation work to do.
Part 1. Windows Remote Desktop Preparation
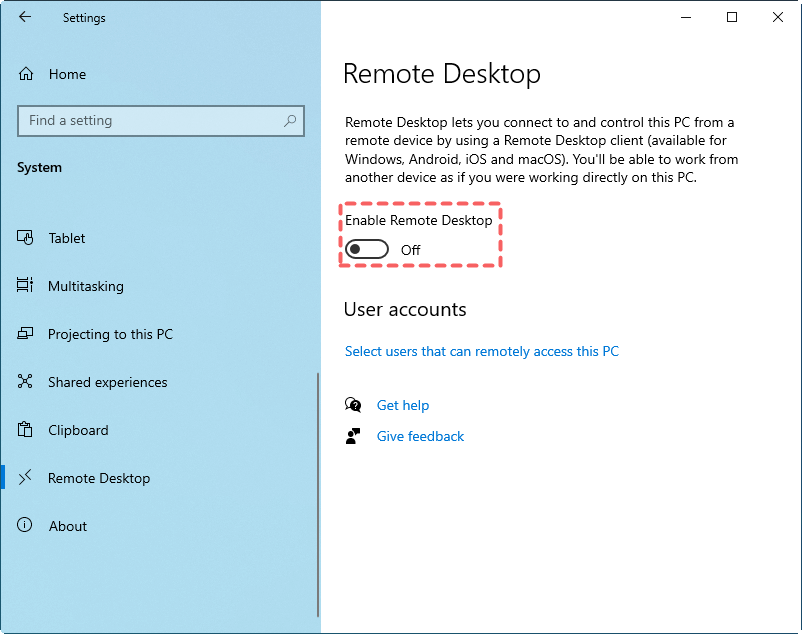
Step 1. Enable Remote Desktop in settings. Navigate to: Settings > System> Remote Desktop > Turn on the Enable Remote Desktop switch, and then click the Confirm button.
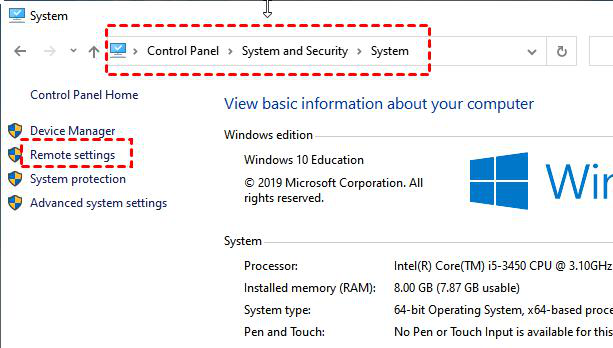
Step 2. Allow remote connections to this computer in the Control Panel. Select Control Panel > System and Security> System, under the “System” section, click Remote Settings.
Step 3. Select the box next to "Allow remote connections to this computer" and then click OK.

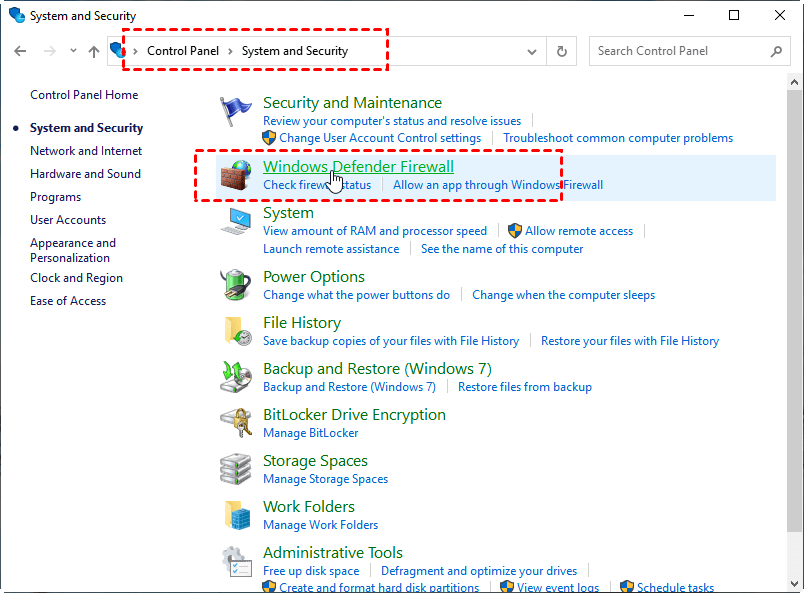
Step 4. Change Windows Firewall settings. On the remote computer, select Control Panel > System and Security > Windows Defender Firewall.
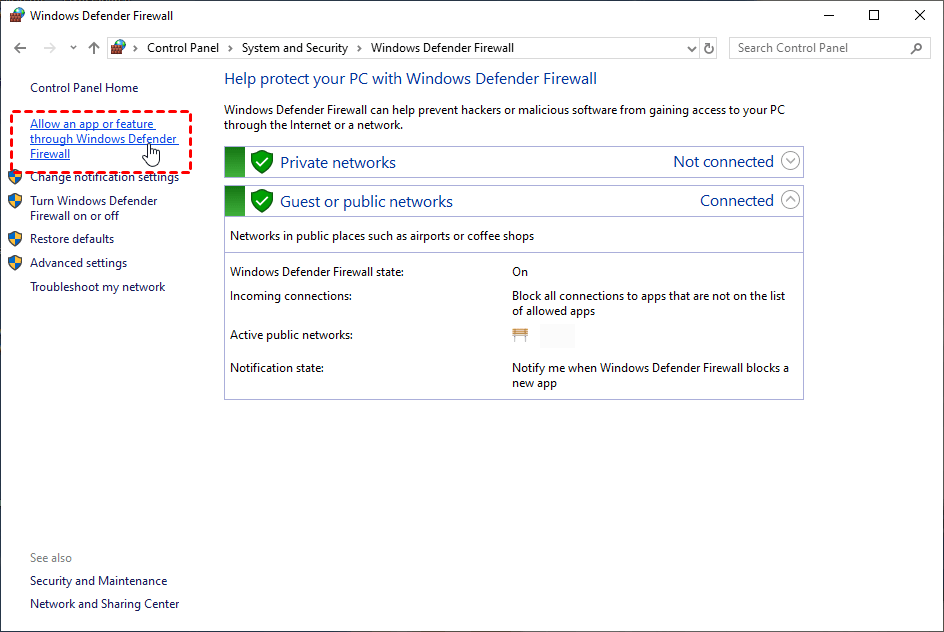
Step 5. Click “Allow an App or Feature Through Windows Defender Firewall” on the left navigation.
Step 6. Check “Remote Desktop” and hit OK.

Step 7. Get the IP address and computer name. Press Win + R on the remote computer to open the Run dialog box. Enter "cmd" and then hit OK.

Step 8. To get the IP address for Remote Dekstop, enter the command "ipconfig" and note the IPv4 Address.

Step 9. To get the PC name for Remote Desktop, type in “query user”, and you can see your PC name.

Part 2. Remotely access another computer via Remote Desktop
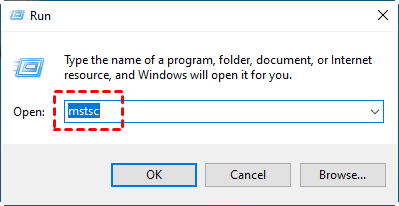
Step 1. On the local computer, press Win + R, and type “mstsc” in the Run Dialog box to open the Remote Desktop Connection.
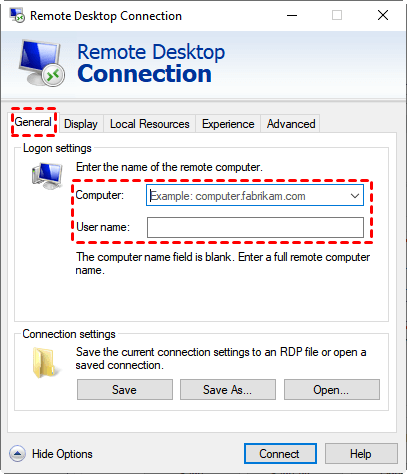
Step 2. Click Show Options, type in the IP address and name of the remote computer, and then click Connect.
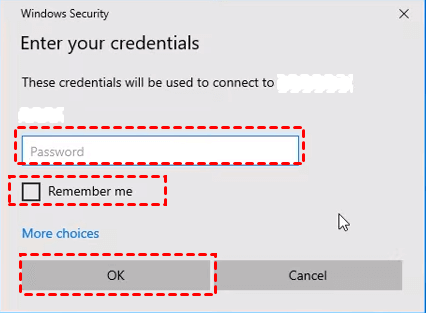
Step 3. Input the password of the remote computer in the pop-up window, and press OK.
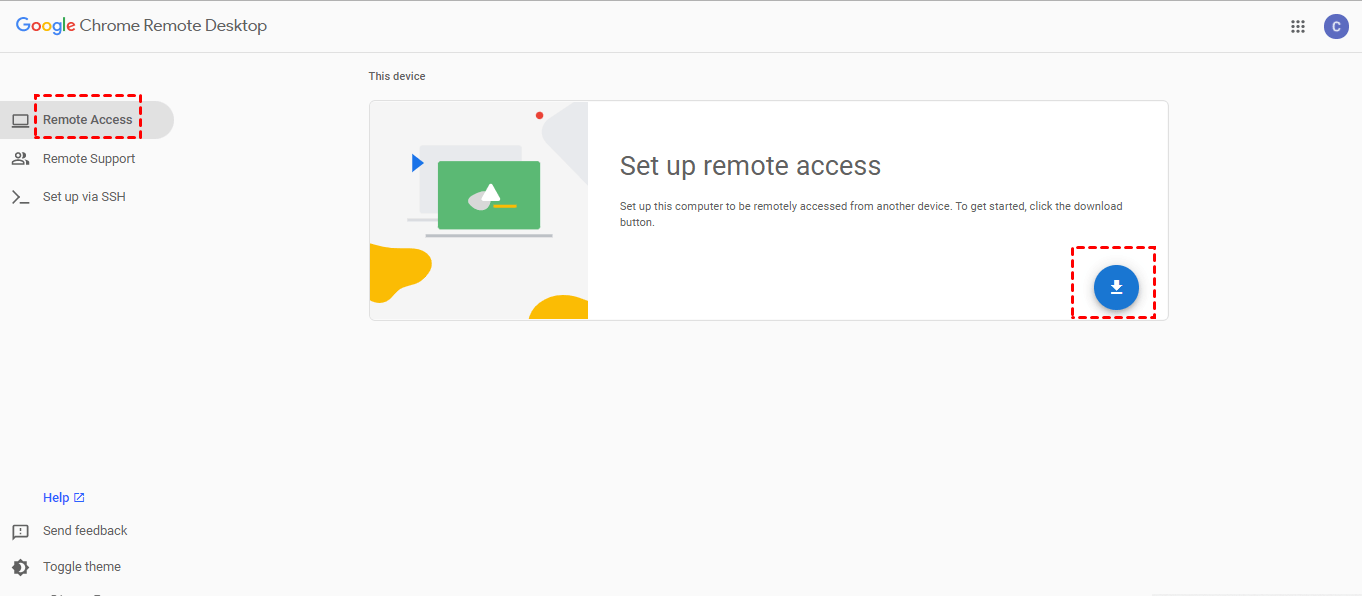
Way 3. Allow someone to access my computer remotely via Chrome Remote Desktop
Chrome Remote Desktop is a remote control software developed by Google. It requires users to have Google Chrome installed on both computers and have a Google account. Users can add Chrome Remote Desktop as an extension and start remote connection via it.
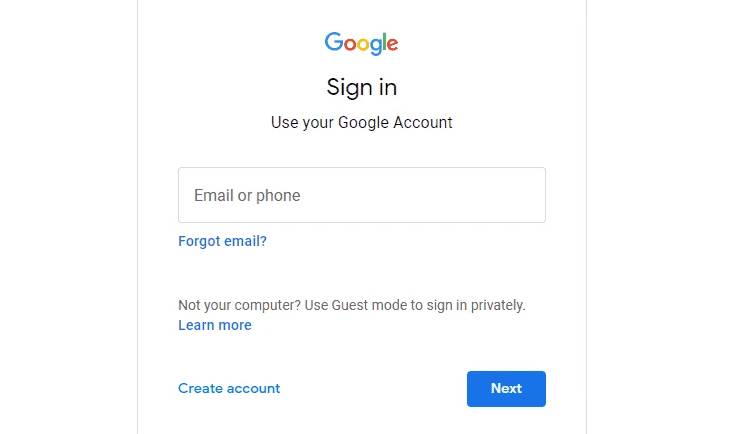
Step 1. On both computers, sign in to the same Google Account if you are not logged in. Then, open the Chrome Remote Desktop web page.
Step 2. Click Remote Access first and then click the blue download button.
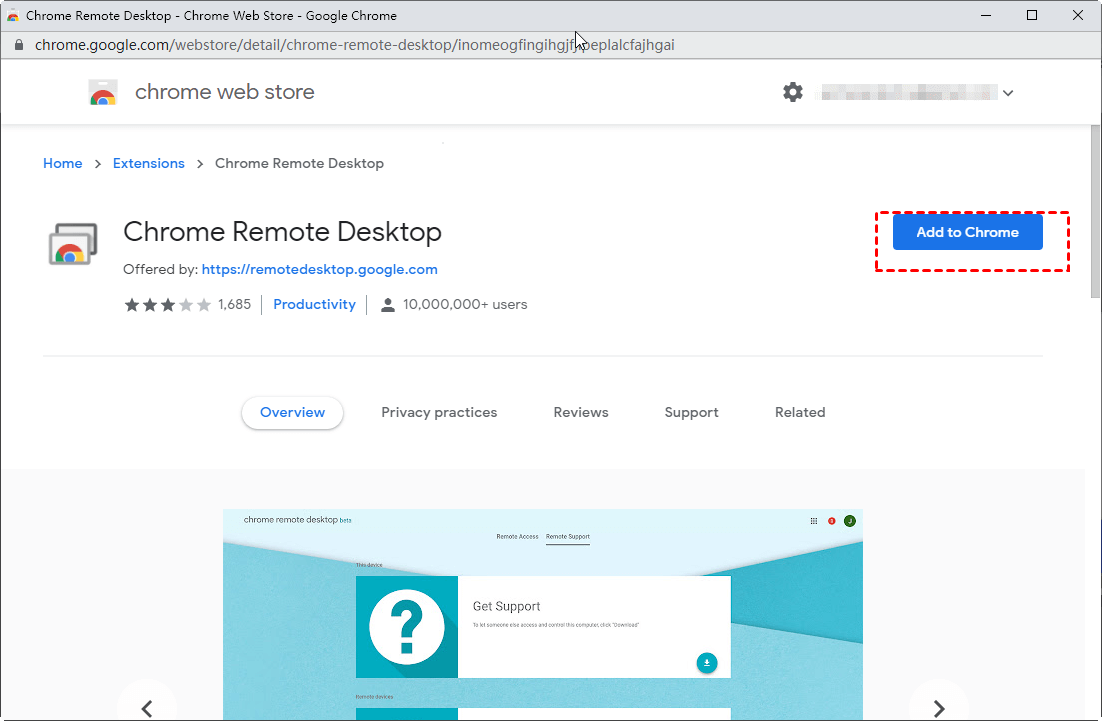
Step 3. Click on Add to Chrome to add the Chrome Remote Desktop in your Chrome browser. Then click Add extension to confirm the download.
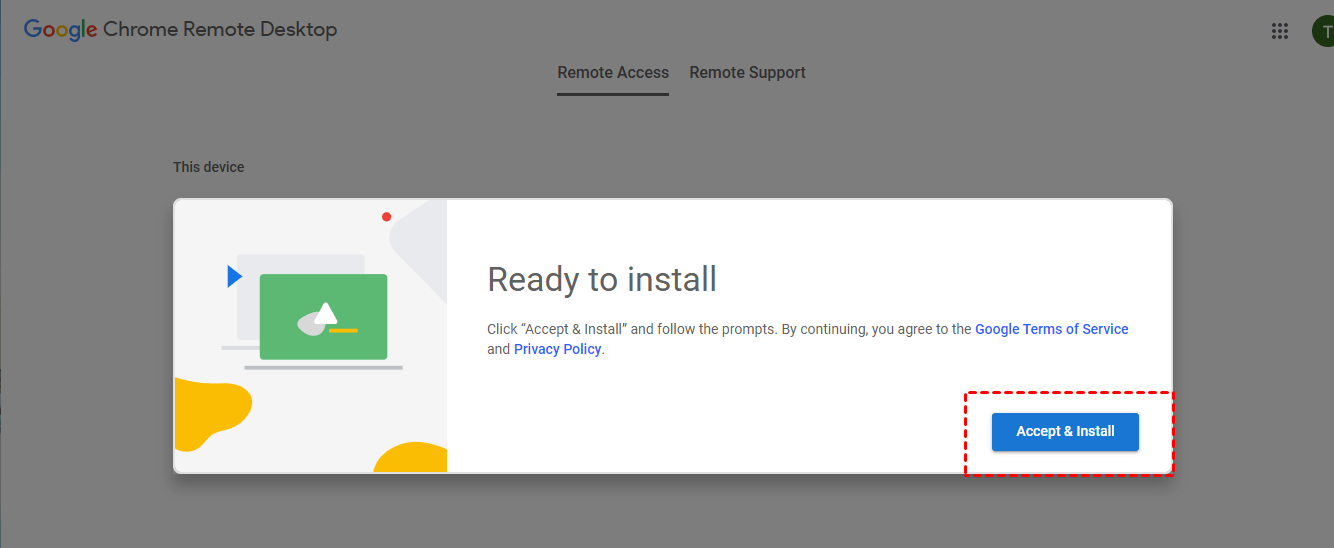
Step 4. Click Accept & Install.
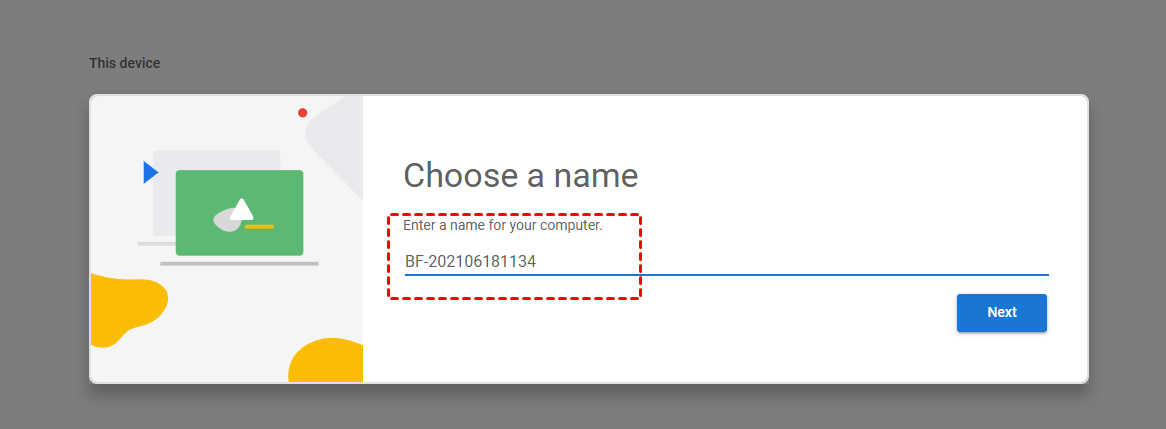
Step 5. Enter a name for your computer and then click Next.
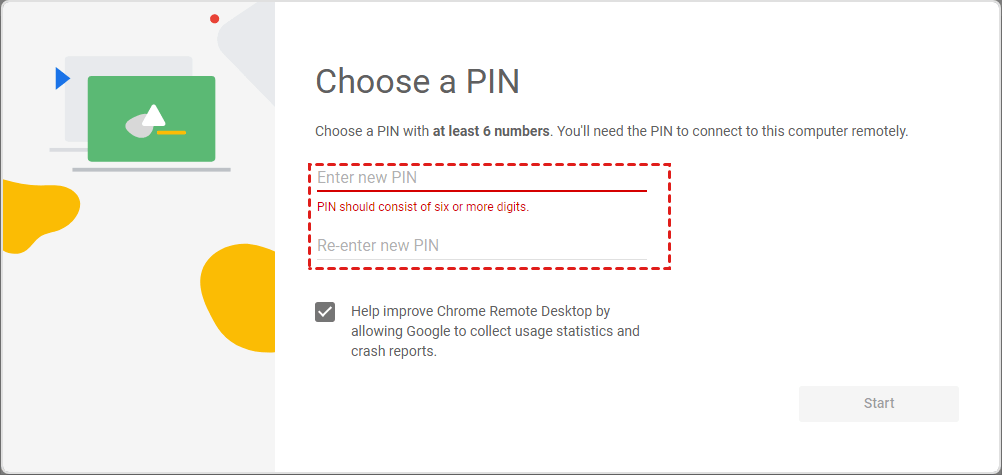
Step 6. Choose a PIN with at least 6 numbers, and then enter it twice to start the program.
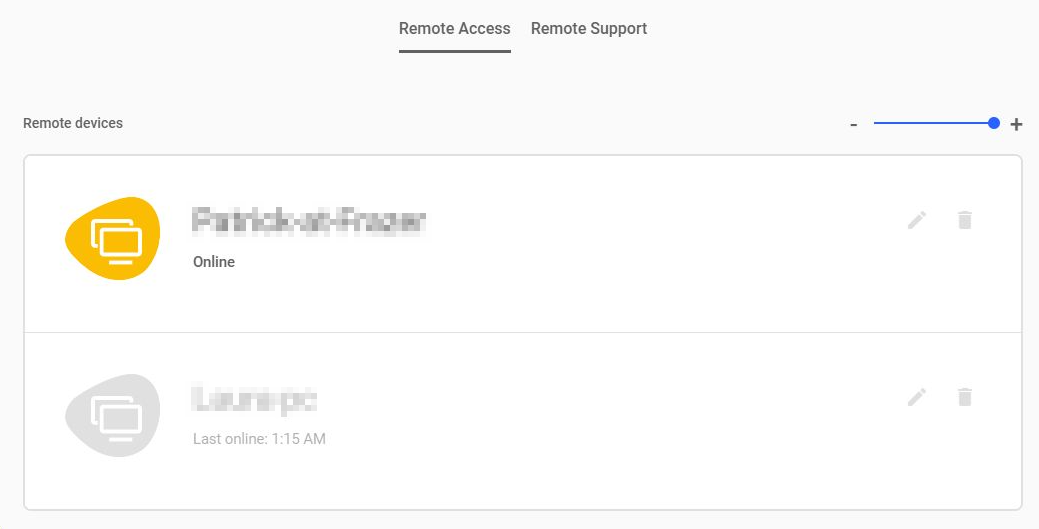
Step 7. After both computers have successfully created their PINs, you can see the available computers here on the client computer. Click the computer you want to connect to.
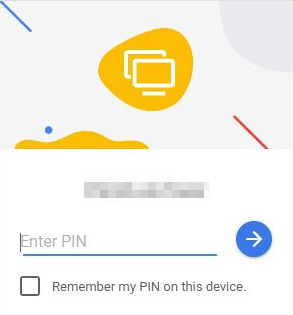
Step 8. Enter the PIN of the host computer, then click the blue arrow. Then you can start to control it.
Allow someone to remote access my computer for remote support: 2 Ways
If you want to allow someone to offer you remote support, you can use the Windows built-in features Remote Assistance or Quick Assist. Also, the mentioned software AnyViewer can also meet your needs.
Way 1. Invite someone to help you via Remote Assistance
Windows Remote Assistance works by sending the remote user an invitation file from the host machine and then providing remote assistance.
Part 1. Remote Assistance Preparation
Step 1. Right-click on This PC and then select Properties.
Step 2. Locate Remote settings on the left pane.
Step 3. Switch to the Remote tab, and then tick the option “Allow Remote Assistance to this computer”.
Part 2. Use Remote Assistance for remote support
Step 1. Press Win + R, then type in “msra” in the box, and hit OK to open Remote Assistance.
Step 2. Choose “Invite someone you trust to help you” on your PC and click “Save this invitation as a file”.
![]()
Step 3. Save this file on the desktop and a pop-up window that contains a password will appear. Send the file and password to the PC providing help.
Step 4. On the PC providing help, choose “Help someone who has invited you”, and then double-click on the file, enter the password, and click OK.
Step 5. Then a pop-up request will display on the computer receiving help, click on “Yes”.
Step 6. On the PC providing help, click on “Request control” and then a window will pop up on the computer receiving help.
Step 7. Click on OK on the PC providing help, and then you can assist.
Way 2. Get remote assistance from someone via Quick Assist
Quick Assist is a Windows built-in software that is only available on Windows 11 and 10. It enables users to share their screen with another person to receive or provide assistance via a remote connection.
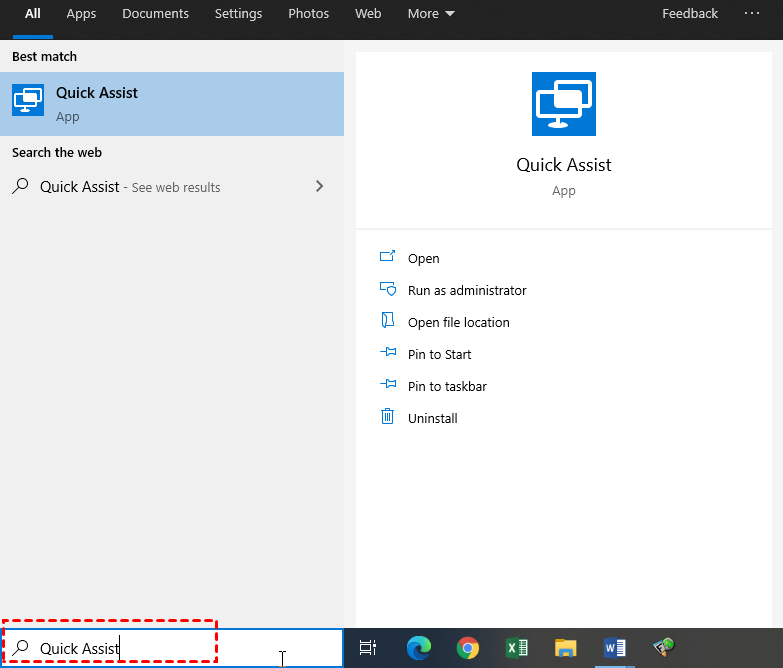
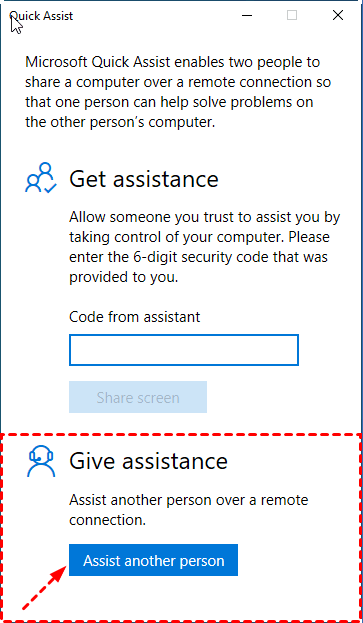
Step 1. In the PC that is used to offer support, type Quick Assist in the search box and run it.
Step 2. Click Assist another person under Give assistance. Then sign in to your Microsoft account.
Step 3. After successful login, you can see your security code. Please send it to the PC that needs help.
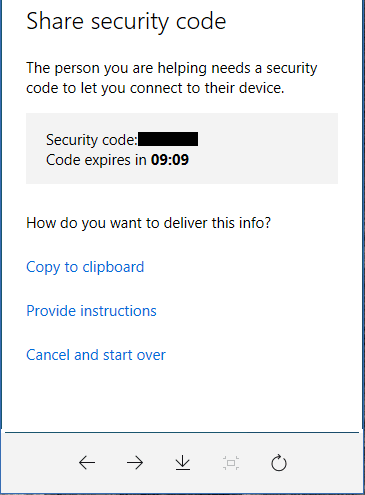
Step 4. In the computer that needs to be assisted, run Quick Assist, input the security code from the assistant under Code from assistance, and click Share screen.

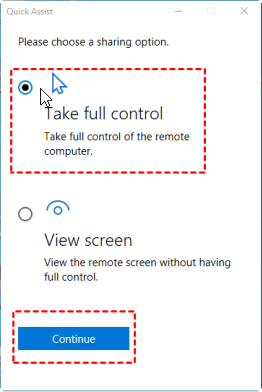
Step 5. In the helper end, two options: Take full control and View screen pop up. Choose Take full control to offer remote assistance and click Continue.
Step 6. The receiver will get a message saying that someone will be able to see the files and control the computer. Make sure that the one is trusted and click Allow.
Finally, the assistant can connect to the receiver's computer successfully. And the assistant can settle the PC's issues from far away.

Conclusion
How can I allow someone to remote access my computer? This post offers you 5 easy ways to perform remote control and remote support. Among all these solutions, we highly recommend AnyViewer. It is easy to set up and use. With it, you can quickly get started without any complicated steps.
