
All You Want to Know about Quick Assist [2026]
This post illustrates detailed process to offer or get remote help using Quick Assist in Windows 10 and introduce another remote desktop in case that you encounter Quick Assist not working problem.
By Ellie / Updated on December 26, 2025
What does Quick Assist do?
Quick Assist, developed by Microsoft, a Windows built-in feature, allows a Microsoft user to view/control a remote computer over the internet. Thus, a user can offer instruction to another one or troubleshoot issues directly on the target device from a far place.

Quick Assist download and install on Windows 11/10
By default, you don’t need to download and install Quick Assist on Windows 11/10 as it is a Windows built-in app. If you can’t find it on Windows 11/10 PC, you can follow the steps below to see how to get Quick Assist on Windows 11/10.
Way 1. Install Quick Assist from Microsoft Store
Step 1. Open Microsoft Store, search for Quick Assist in the app, and click the Get button.
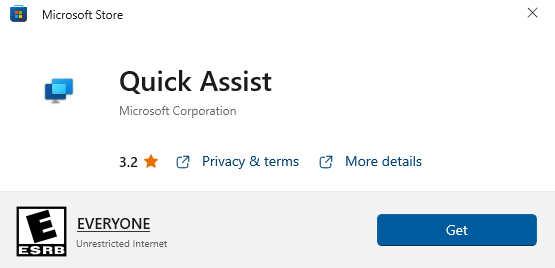
Step 2. Click Yes to allow Windows to download and install Quick Assist.
Way 2. Install Quick Assist from Apps & Features
Step 1. Click Start and go to Settings> Apps > Manage optional features.
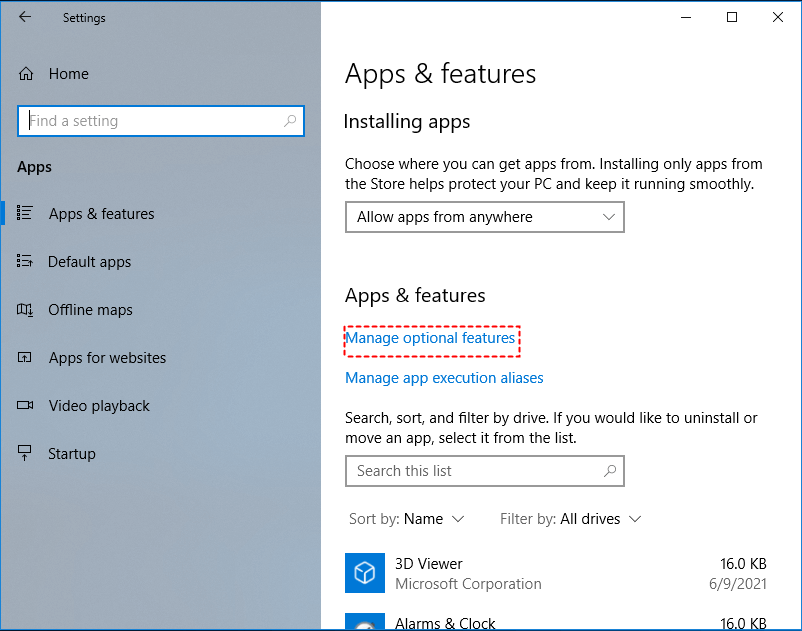
Step 2. Click Add a feature and search for Microsoft Quick Assist.
Step 3. Click the Install button and Windows will install it quickly.
How to start Quick Assist in Windows 11/10
After downloading and installing Quick Assist on your Windows 11/10, see how to use it to troubleshoot PC issues remotely.
Note: At first, please make sure both computers are running Windows 10 1607 or later. [To check out the edition of the running OS of the computer, press Windows + R, input winver, and click OK.
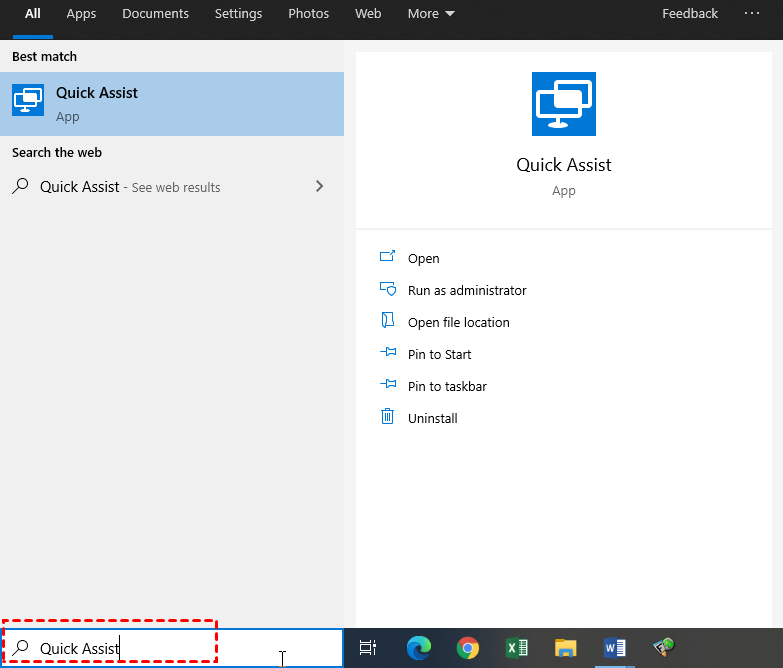
Step 1. In the PC that is used to offer support, type Quick Assist in the search box and run it.
Step 2. Click Assist another person under Give assistance.
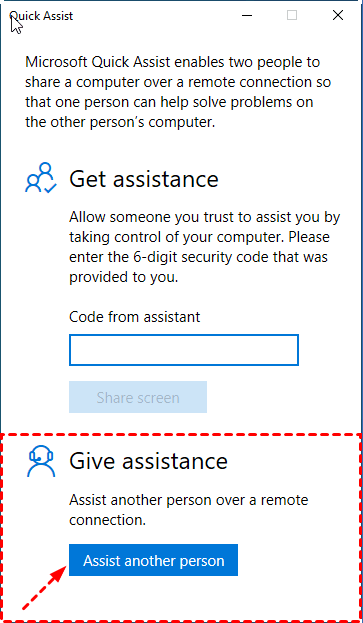
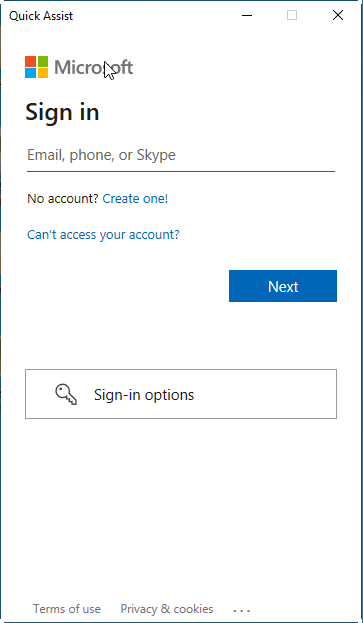
Step 3. Now, you need to sign in to your Microsoft account.
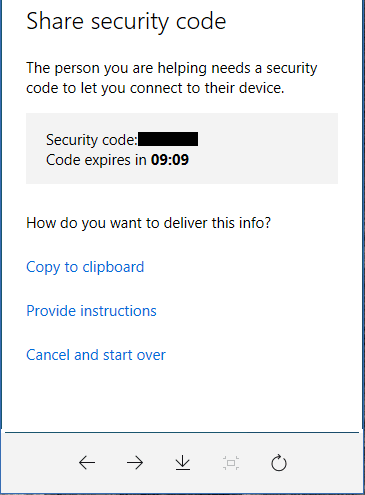
Step 4. After successful login, you can see your security code. Please send it to the PC that needs help.
Step 5. In the computer that needs to be assisted, run Quick Assist, input the security code from the assistant under Code from assistance and click Share screen.

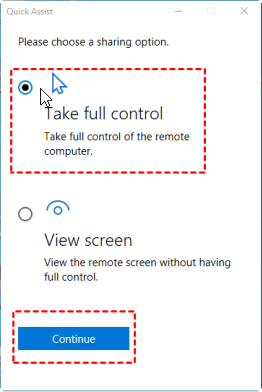
Step 6. In the helper end, two options: Take full control and View screen pop up. Choose Take full control to offer remote assistance and click Continue.
Step 7. the receiver will get a message saying that someone will be able to see the files and control the computer. Make sure that the one is trusted and click Allow.
Finally, the assistant can connect to the receiver's computer successfully. And the assistant can settle out the PC's issues from far away.

Quick Assist not working: What to Do?
Now, surely you have realized how to use Quick Assist to solve PC issues remotely in Windows 11/10. However, some users report they find Quick Assist not working with issues like being stuck on loading. If so, you can try to settle it out with different methods or directly switch to third-party remote access software, AnyViewer. See why we choose it.
✦ Support unattended access: The one that needs your help may not always be sitting in front of the PC for requiring support, thus it's important to have the ability to access an unattended computer.
✦ Fast installation and launch: You can complete AnyViewer installation and then fire up it within several seconds, saving you from the troubles like launch failure.
✦ High-standard encrypted: It uses Elliptic Curve Crptotoraphy encryption, which is even stronger than AES algorithm.
✦ Full compatibility: AnyViewer can be installed on Windows 11, 10, 8, 7 (all editions) & Windows Server 2022/2019/2016/2012 R2 (all editions).
Free download the overall remote access software and see how it works.
Option 1. Send a remote control request
This way can be suitable when there's one to accept your request on the other end.
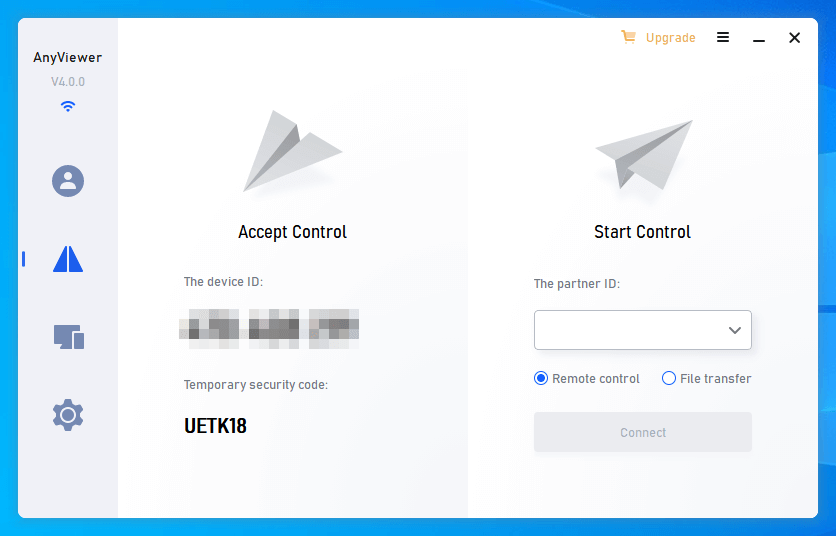
Step 1. On the computer that needs assistance, fire up AnyViewer, go to Connect, and locate the device ID of the computer.
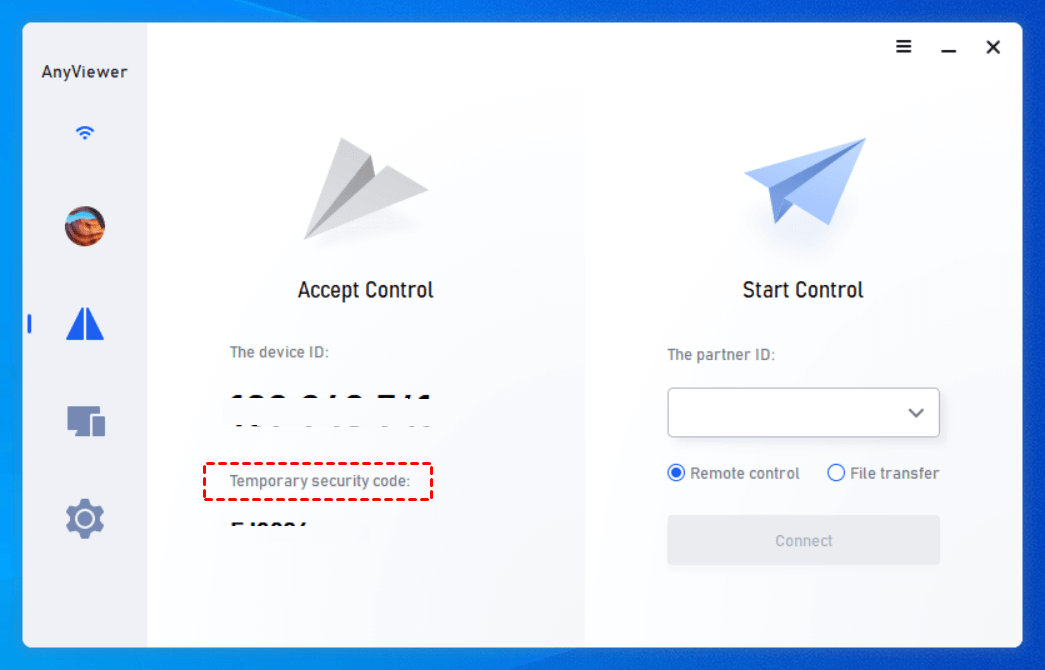
Step 2. On the computer where you offer help, create an AnyViewer account and log into it.
Step 3. Go to Connect, input the device ID of the target PC, choose Remote control and click Connect.
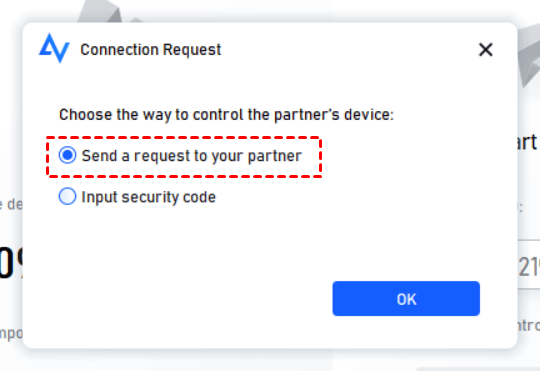
Step 4. Then, click Send a control request to your partner and click OK.
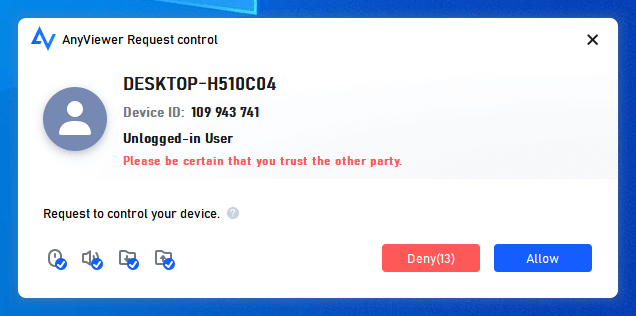
Step 4. The one who needs help will get a message: xxx Request to control your device. Once Allow is clicked, the PC can be fully controlled by the helper.
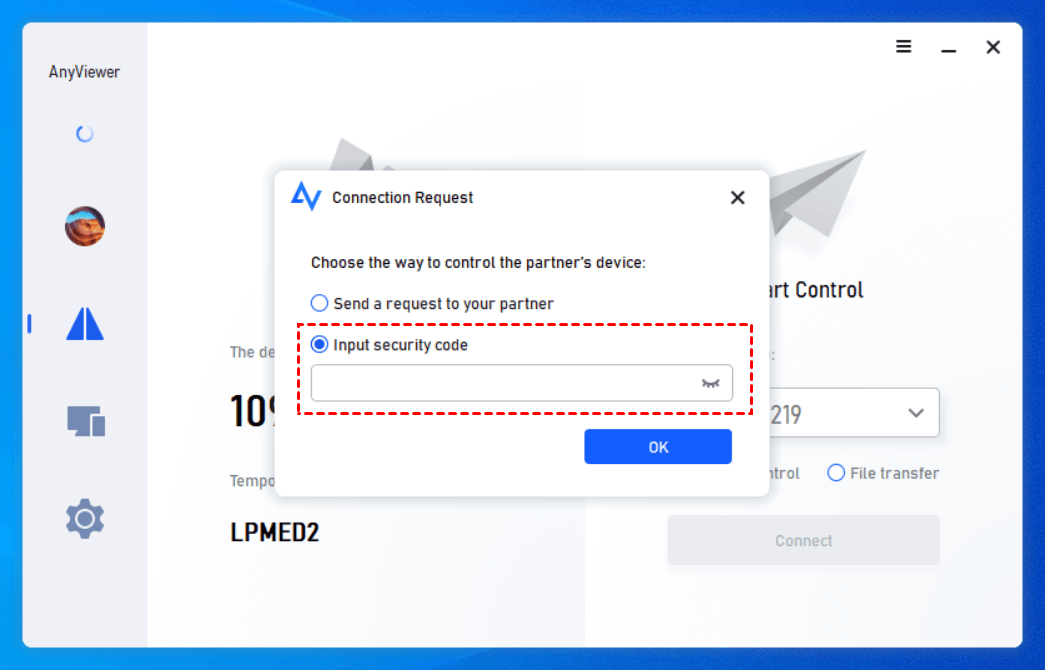
Option 2. Access via security code
If the remote computer is unattended, you can access via security code.
Step 1. Do the same thing in Step 1 of Option 1.
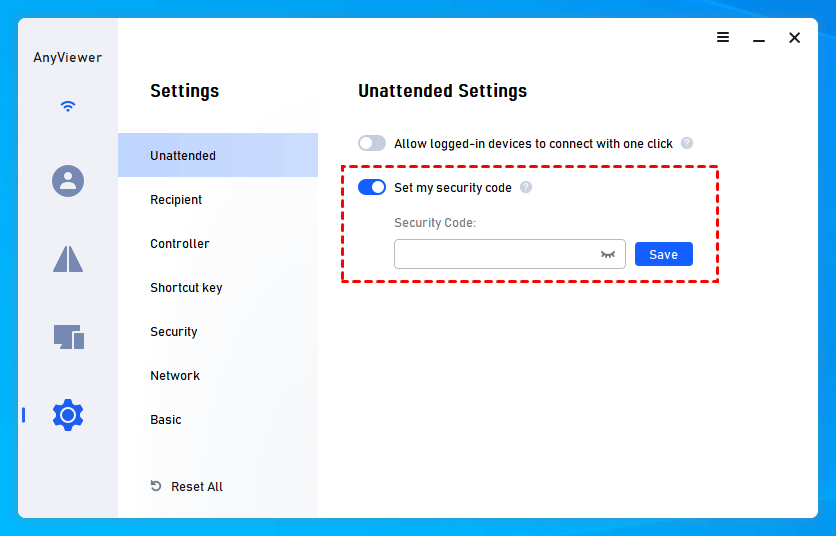
Step 2. Go to Settings > enable Set my security code > input a security code > click Save.
Step 3. On the PC from which help is offered, sign up and sign into an AnyViewer account.
Step 4. Go to Connect input the device ID of the target PC, choose Remote control, and click Connect.
Step 5. Choose Input security code and type in the code of the remote PC to control it. Then, click OK.
✍ Note: To control your own unattended PC regularly, it's recommended that to sign into the same account on the two devices and then you can start one-click unattended remote access.
Q & A: More details about Quick Assist
▶ 1. Is Quick Assist free?
Quick Assist is a free tool, offered in Windows 10 1607 and its later version.
▶ 2. Is Quick Assist the same as Remote Assistance?
Quick Assist is different from Remote Assistance. It is a cloud-based tool and RA is based on RDP.
▶ 3. Does Quick Assist support unattended access?
Quick Assist doesn't offer an option to complete unattended access.
▶ 4. Does Quick Assist work over the Internet?
Microsoft Quick Assist supports connecting two computers over the internet.
▶ 5. Can you use Quick Assist without a Microsoft account?
The assistant must have a Microsoft account and log in to it while the user who needs help doesn't need it.
▶ 6. Can I use Quick Assist in Windows 7?
Sorry, Quick Assist is unavailable in Windows 7.
