
Quick Assist vs Remote Assistance: How to Choose?
Quick Assist vs Remote Assistance, which one is better and what are the differences between them? Read the following text to make the best choice.
By Ellie / Updated on February 27, 2025
Brief introduction of Quick Assist and Remote Assistance
Quick Assist is a Windows built-in feature by which people can share their screen with another person to get help or give assistance over a remote connection. The one who gives assistance can troubleshoot, diagnose and take full control of the screen. The one who gets assistance can learn the instructions and operations.
Speaking of Remote Assistance, most users are not new to this feature. It is a previous version of Quick Assistance first introduced in Windows XP and is based on RDP. the remote user receives an invitation file from the host computer and later gives assistance remotely. Remote Assistance and Quick Assist have the same functionality, and the Quick Assist interface also has "Get Assistance" and "Give Assistance" options.
Quick Assist vs Remote Assistance: Compatibility, Speed, Security...
Windows 10 Quick Assist vs Remote Assistance, how to choose? Although they serve the same functionality, differences between them still exist. Read the following carefully to eliminate your confusion.
▐ Compatibility
Quick Assist is only supported for Windows 10, while Remote Assistance is available for all Windows versions. It’s worth mentioning that Remote Assistance is installed by default on Windows clients, but must be added manually on Windows Server 2008R2.
▐ Speed of connection
There’s not too much evidence to prove that the speed of Quick Assist is slower than that of Remote Assistance. But according to the feedback of many users, the speed of Quick Assist always annoys them, which wastes a large amount of time. For the Remote Assistance, the speed is kind of appreciating.
▐ Security
From the perspective of the foundation, Quick Assist is cloud-based and requires one outbound connection from the helper's PC to the Microsoft server, and there are no ports opened on the client device's firewall. While Remote Assistance establishes an RDP connection to the end user's computer and it requires TCP port 3389 to be opened on the client PC and needs a firewall/NAT/router. The one that doesn’t need a port is safer than the one that needs it. In conclusion, Quick Assist is relatively more secure than Remote Assistance.
▐ The way to connect
The way to connect with Remote Assistance is to send invitations to the one who offers help by email, Windows Messenger, or saving the invitation as a file and transferring the file. Chat, audio-video conversations, and file transfer are available. Unlike Remote Assistance, Quick Assist needs the person who gives assistance to log in to the Microsoft Account and then gets a security code.

▐ The way to control
In Remote Assistance, the computer can be controlled by both computers, the one who gives support connecting remotely as well as the one sending the invitation. Both sides can stop or pause the remote session, and both the host user and the remote user can view the same screen and participate in the process. But for the Quick Assist, Only the one who gives assistance has the option to pause or annotate.
▐ Operation
Windows 10 Remote Assistance vs Quick Assist, what are the differences in aspects of the operation? Now let's know more about it.
How to use Quick Assist?
Step 1. On your computer, search “Quick Assist” in the search box and open it. If you are the one who gives assistance, choose “Assist another person” under the “Give assistance”.
Step 2. Enter the email or phone number, click on “Next”, input the password and click "Sign in". Then you will get a security code valid for 10 minutes.
Step 3. For the one who gets assistance, enter the security code in the main interface of the Quick Assist, and click "Share Screen".
Step 4. Choose "Full Control" or "View Screen", and then click "Continue". On the remote PC, click on "Allow".
Step 5. Now, you can provide help remotely.
How to use Remote Assistance?
Step 1. Open Run box, type” msra” and press Enter to open Windows Remote Assistance.
Step 2. On the host PC, choose“ Invite someone you trust to help you” and click “Save this invitation as a file”.
Step 3. Save this file on the desktop and double-click on it and then the password will appear. Send the file and password to the client PC.
Step 4. On the client PC, choose “help someone who has invited you”, and then double click on the file, enter the password and click on OK.
Step 5. Then a pop-up request will display on the host computer, click on “Yes”. Then the screen on both sides is the same.
AnyViewer: An efficient way to offer or get assistance
Quick Assist vs Remote Assistance, what are the differences between them and how to choose? After a careful comparison from the perspective of the operation, the way to connect, etc., I believe that you must have a thorough understanding of the differences between them.
We have to admit that we may come across many problems when using them, such as Remote Assistance request control not working, can’t opening Quick Assist on Win 10 and so on. And the user who wanna use the easy connect on Remote Assistance will be disappointed to find that the options are greyed out. When we need to give or get assistance remotely, it’s recommended to use a remote access software-- AnyViewer.
As free and secure software, AnyViewer can meet your needs at the same time with the easy and quick operation. It not only makes up the shortcoming of the Quick Assist and Remote Assistance but also gives you better feelings. It’s workable for multiple versions like Windows 11/10/8.1/8/7 and Windows Server 2022/2019/2016/2012 R2. Follow me and look at how it works.
Step 1. Install AnyViewer on 2 PCs. Sign up and fill in the information to create AnyViewer account. Once logged in, the PC will be assigned to the account automatically. (If you sign up on the official website, you can log in directly.)

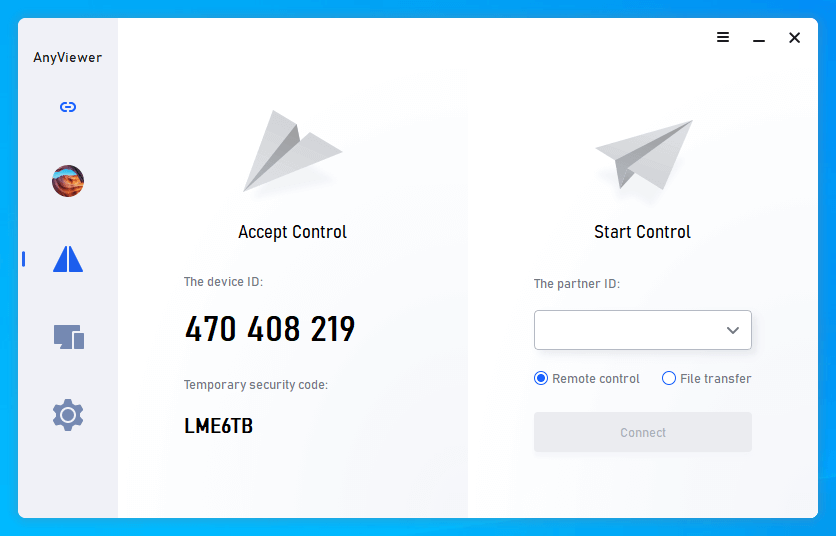
Step 2. After logging in, you can see your interface as the following picture.

Step 3. Go to the “Connect” tab, and then you can see the device ID. Ask your friends or family member to tell you the device ID of the host PC.
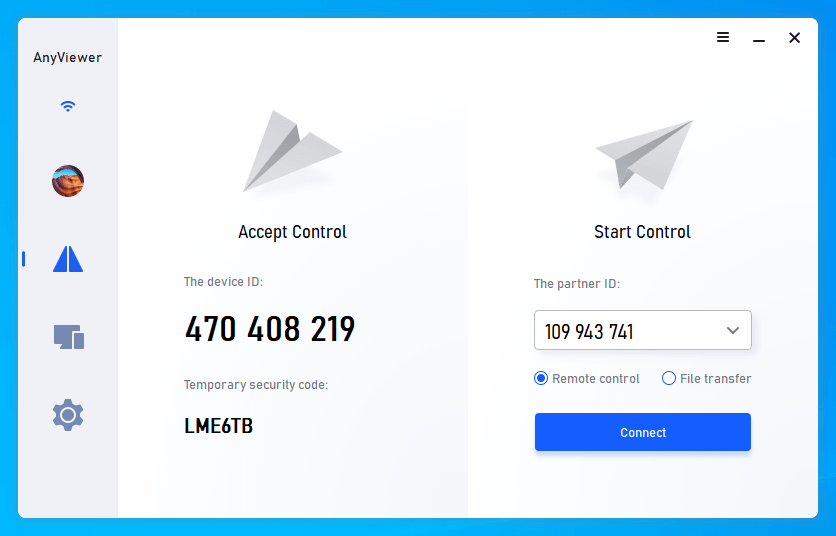
Step 4. Enter the device ID of the remote PC and then click on “Connect”.
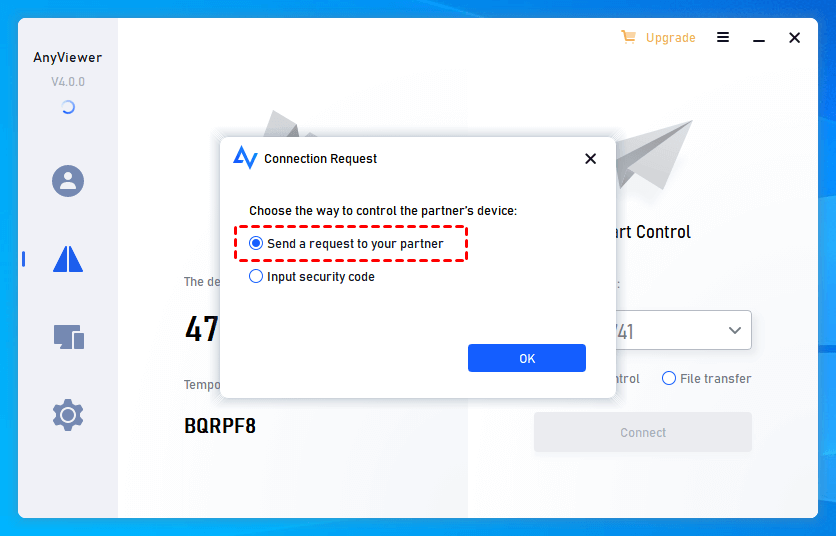
Step 5. For the 2 options, choose the first one “Send a control request to your partner”, and then click on “OK”.
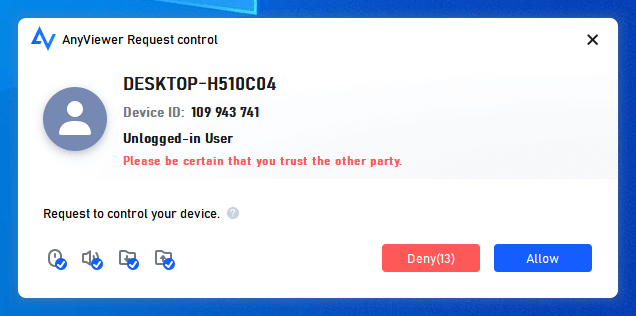
Step 6. There will be a pop-up window on the host PC. Click on “Allow” to receive remote support. And then the connection will be realized.
Note: If you want to gain clarity on how to offer Remote Assistance without permission, log into the AnyViewer account on the host PC, and then go to "Device" on the local PC, locate and click the PC that you need to control. And then click "One-click control" to achieve remote connection with one click.

Conclusion
Quick Assist vs Remote Assistance, how to choose between them? Here in this post we clearly introduce them including the function. However, when it comes to efficiency and effectiveness, AnyViewer could be your best choice.
