
[3 Simple Ways] How to Get IP for Remote Desktop
What do you need for an RDP remote connection? One of the requisites is an IP address. This post is a stepwise tutorial, teaching you how to get IP for Remote Desktop.
By Ellie / Updated on December 13, 2024
How do I find my IP address for Remote Desktop?
I’m planning to use Windows Remote Desktop Connection to remotely control my office computer, so I can do everything from home that I can do at my work computer. But it asks me to input the IP address of my work computer. How to get Remote Desktop iP address?”
How to get IP for Remote Desktop on Windows
Here in this part, we provide you with three options on how to find IP for Remote Desktop Connection on Windows 10/11, 8, and 7.
Option 1. Get IP address via Command Prompt
Step 1. Press Windows key + R to invoke the Run dialog box. Type in “cmd” and press OK.

Step 2. Then type “ipconfig” and press Enter. Now you can see a group of IP addresses, of which the IPv4 address is the one you need.

Option 2. Get IP address via PowerShell
Step 1. Search for Windows PowerShell in the search box, then run it as admin.
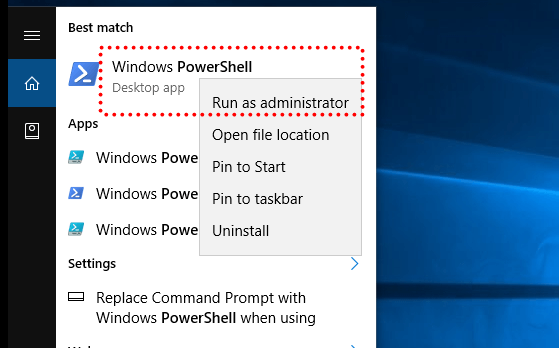
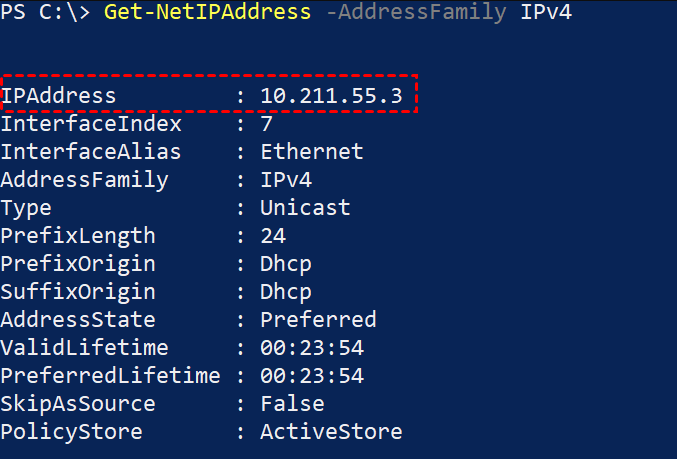
Step 2. Type in the following line, and then press Enter:
Get-NetIPAddress -AddressFamily IPV4
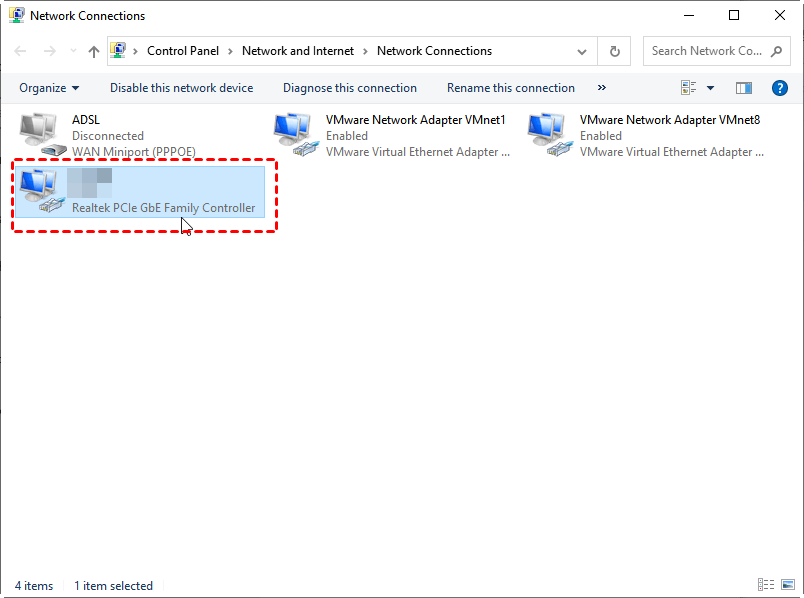
Option 3. Get IP address via Network Connection
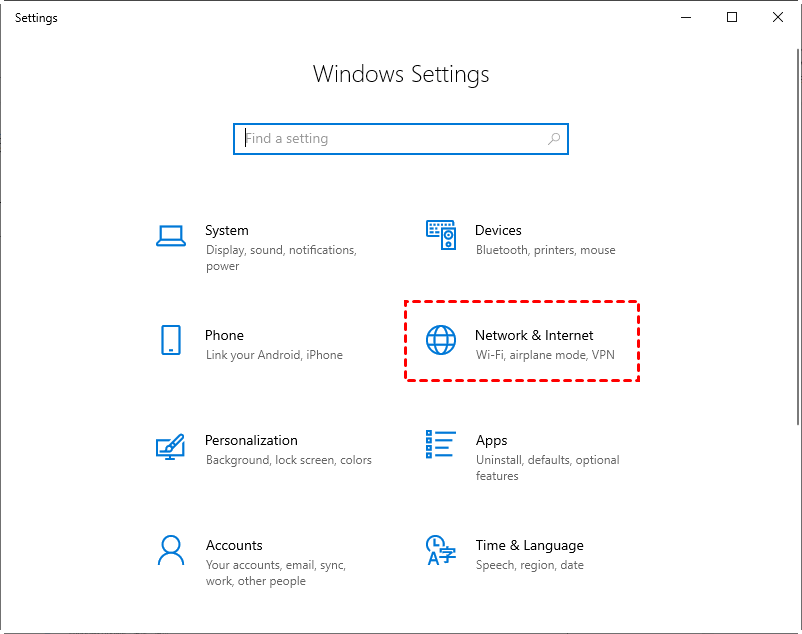
Step 1. Click Start and then click Settings. Find Network & Internet and then click it.
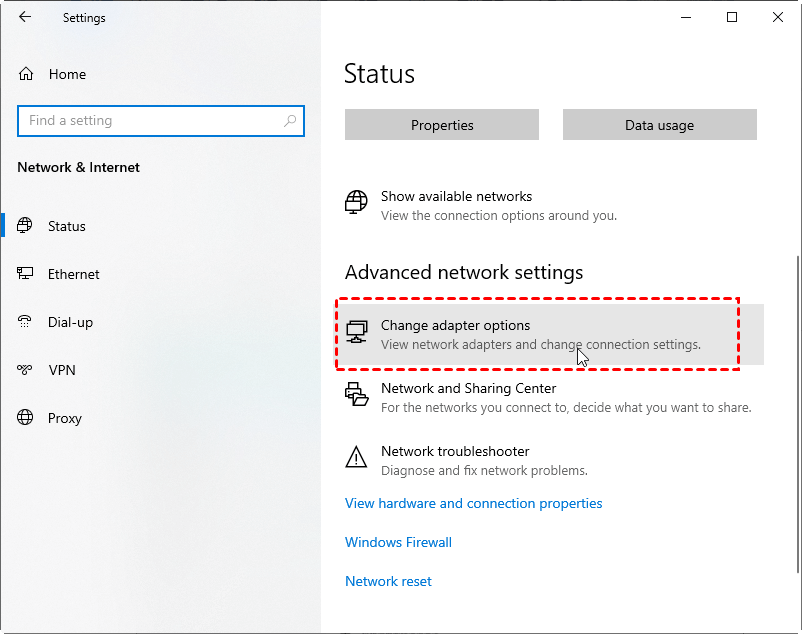
Step 2. On the Network & Internet interface, find Advanced network settings, click Change adapter options below.
Step 3. In the automatically pop-up Network Connections window, find your network and double-click it.
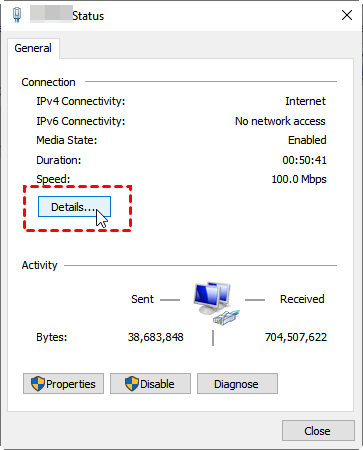
Step 4. On the General tab, find Details.
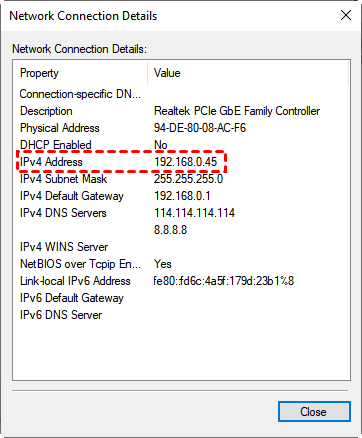
Step 5. In the Network Connection Details, find IPv4 Address. These are steps of Windows 11 and Windows 10 finding IP for Remote Desktop via Network Connection
How to use IP address to remotely control PC via RDP
After learning how to find IP for Remote Desktop, let’s learn how to use the IP address you found to remotely control PC via RDP.
Part 1. Set up the remote computer to accept Remote Desktop connections
First, you need to set up the remote computer to accept Remote Desktop connections. Normally, there are three steps to go, get the IP address, find the computer name, and enable Remote Desktop connection. you have already done the first step, so let’s start with finding the computer name.
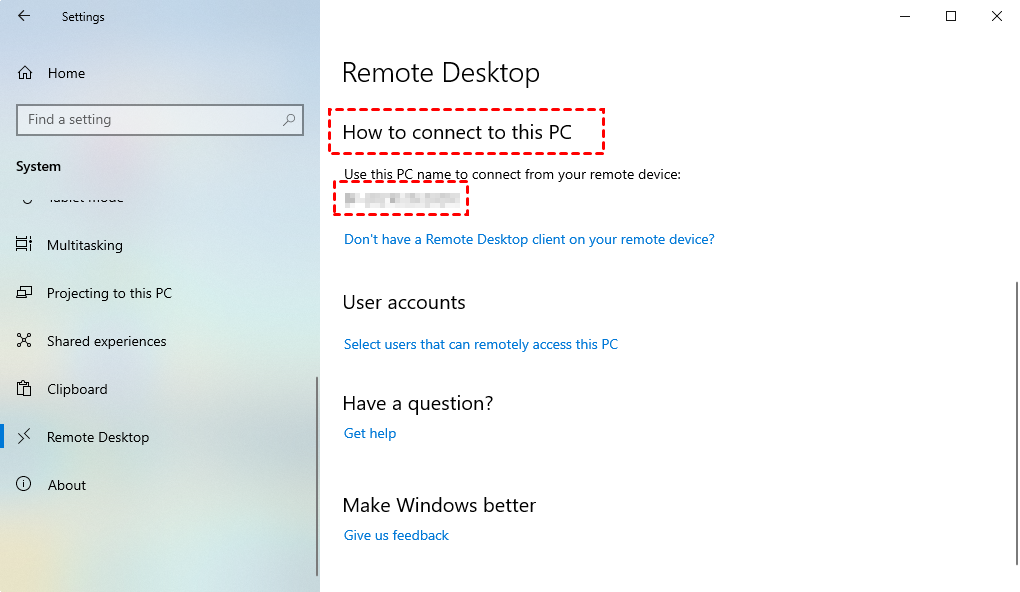
Step 1. Get the computer name
Navigate to Start > Settings > System > Remote Desktop, and your PC name is under the How to connect to this PC. Note down the PC name of your computer.
Step 2. Enable Remote Desktop connection
1. Press Win + R to open Run box. Type sysdm.cpl in the entry bar and press Enter to open System Properties.
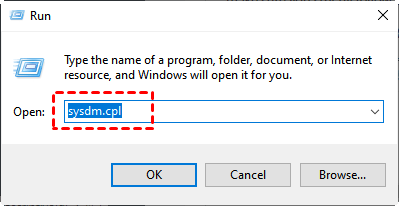
2. In the System Properties window, go to the Remote tab, and check “Allow remote connection to this computer”.

Part 2. Connect to the remote computer after enabling Remote Desktop
Depending on whether the two computers are on the same network, the steps to achieve remote connection via RDP are different.
Case 1. The two computers are on the same network
If the two computers are on the same network, you can achieve remote connection with the IP address and computer name you find directly.
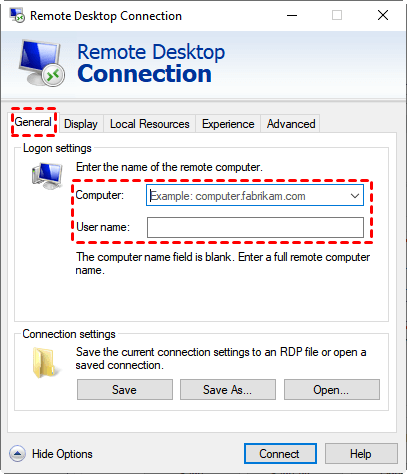
1. Press Win + R at the same time, type in mstsc to launch Remote Desktop Connection.
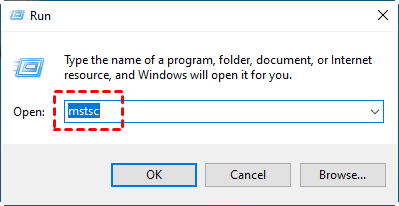
2. Click Show Options, type in the IP address and the computer name of the remote computer, and then click Connect.
3. In the pop-up window, you need to input the password of the remote computer and click OK to achieve a remote connection.
Case 2. The two computers are on different networks
If the two computers are on different networks, you have three steps to go:
- Find the public IP address (the router’s IP)
- Perform port forwarding
- Connect to the remote computer
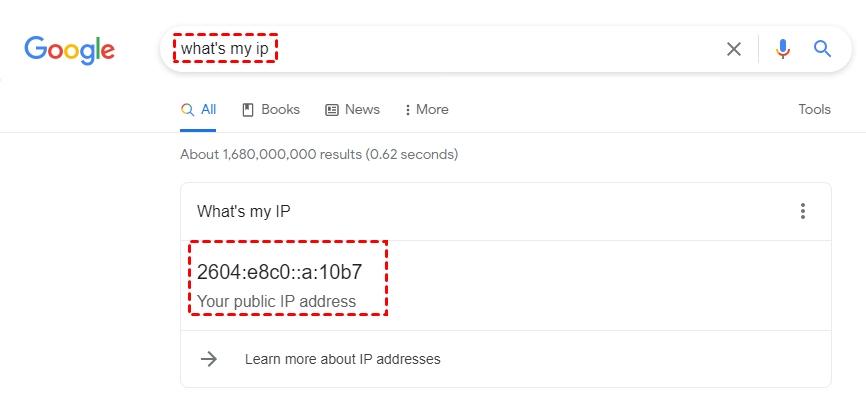
Step 1. Find the public IP address (the router’s IP)
First, open the Chrome browser, enter “what is my IP” in the search box, and then you can see the public IP address (remember not to share your public IP address with anyone to avoid security issues).
Step 2. Perform port forwarding
1. Open a web browser. Then type your router’s IP address into the address bar. A privacy warning will appear. Just click Advanced > Proceed to continue.

2. Next, enter your router’s username and password in the box. Click on Log in.

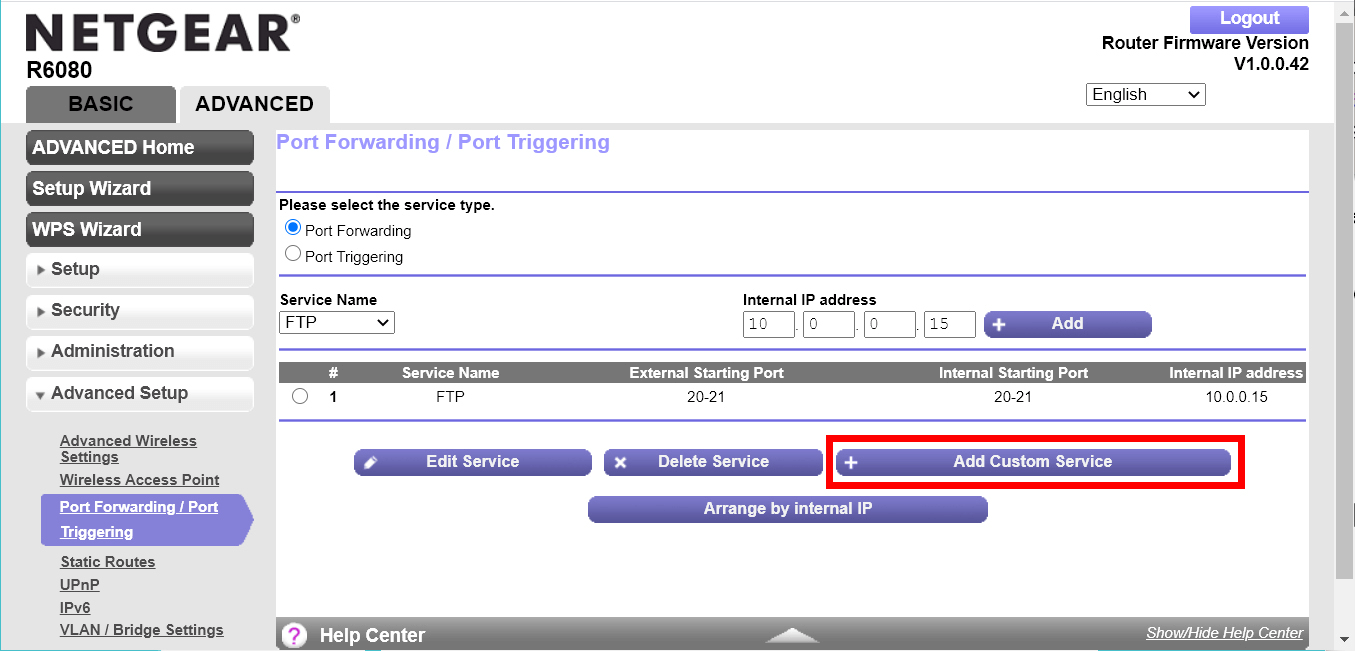
3. Click on Port Forwarding/Port Triggering on the left pane. Create a new port forwarding rule and click Add, and choose Add Custom Service.
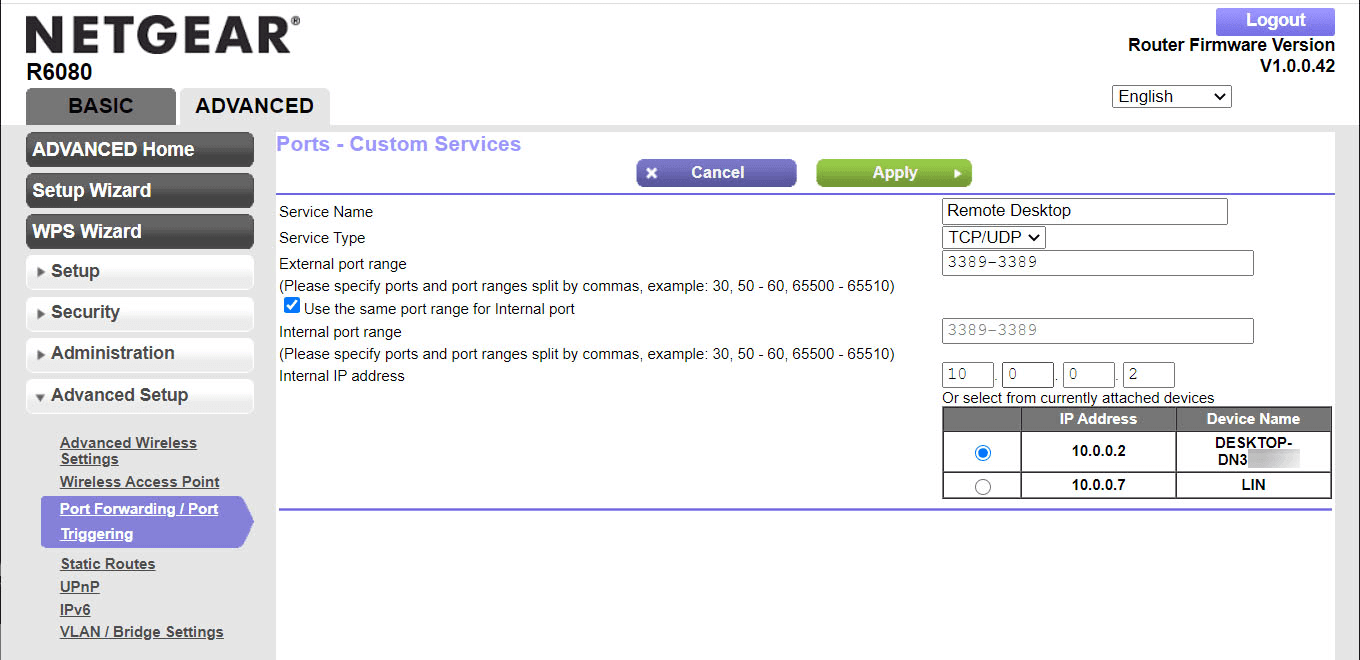
4. Enter a name for your device in the Port Forwarding interface, and enter the port you want to forward in the port field (if you are not sure of the protocol used, please select TCP/UDP or Both under Service Type). Then enter the IP address (IPv4 Address) of the device you want to port forward, and then click Apply to save the changes.
Step 3. Connect to the remote computer
Then follow the same process in Case 1 to achieve a remote connection to the remote computer.
Perform remote access without getting IP for Remote Desktop
Get the IP address and computer name, enable Remote Desktop connection, and set up port forwarding... The whole process of achieving remote connection via RDP is quite lengthy. Is there a simpler way to achieve a remote desktop connection?
The answer is YES! You can use the third-party remote desktop software AnyViewer, which is much easier to use compared to Remote Desktop. It has multiple advantages over RDP.
- No IP address required: It doesn’t require an IP address or computer name to achieve a remote connection.
- No extra configuration: It can be used to connect two devices that are on different networks without setting up port forwarding or using a VPN.
- Compatibility: It supports multiple Windows versions, including Windows 10 Home Edition, while RDP can’t be used to connect to Windows 10 Home Edition.
- File transfer supported: It can transfer files between computers remotely at a faster speed.
- Flexible access ways: It supports one-click access between the assigned devices, unattended access via security code, and attended remote access via request and you can choose one based on specific occasions.
Step 1. Click the button to free download AnyViewer on both devices. To control your PC from a phone or tablet, download AnyViewer mobile app from Google Play or APP Store.
Step 2. Create an AnyViewer account and log into it on both devices. Your device will automatically be assigned to the account you’ve logged in to.

Step 3. On your local device, go to Device, click the remote computer, and click One-click control to achieve unattended remote access.

✍ Note: To connect to your computer in privacy mode (the remote computer screen is black and the physical keyboard and mouse are disabled), you need to upgrade to advanced editions. After upgrading, you also can enjoy other rights, including assigning more devices for one-click access, controlling more computers from one computer at the same time, enjoying high-qaulity image, etc.
Conclusion
This post primarily introduces how to get IP for Remote Desktop in Windows 11 and 10. Actually, the steps are workable for Windows 7/8/8.1. Aside from that, it provides you with detailed steps on how to use the IP addresses to remotely control PCs via RDP on the same network or different networks. But if you would like to try an easier remote control tool, you can give AnyViewer a try.
