
Enable Remote Desktop on Windows 10, or 11 for Seamless Access
Our guide provides easy-to-follow instructions to enable Remote Desktop on Windows 11/10, empowering you to connect to your computer remotely, access files, and perform tasks from any location.
By AnyViewer / Updated on April 25, 2025
What is the remote desktop?
A remote desktop program is an app that can access a computer from a remote location without physical access, and then you can access files or run programs on the remote PC. A Remote desktop app works in client-server mode, where the remote PC acts as the server and the device from which you are connecting acts as the client. The Windows built-in Remote Desktop (client) is such an app. What you should know is that Windows basic versions like Windows 7 Standard or Windows 10 don't support the Remote Desktop feature.

5 quick ways to enable Remote Desktop on Windows 10 and 11
To access a remote PC (server) from a client machine, it's required to allow Remote Desktop on the server in advance. Now, see how to set up remote desktop functionality on the to-be-accessed computer with CMD, Registry, Powershell, etc.
Way 1. Enable Remote Desktop Windows 10/11 with CMD
Check out the two steps on how to allow remote access on Windows 10 and 11 with CMD.
Step 1. In the Search box, input "cmd", right-click the result, and choose "Run as administrator".
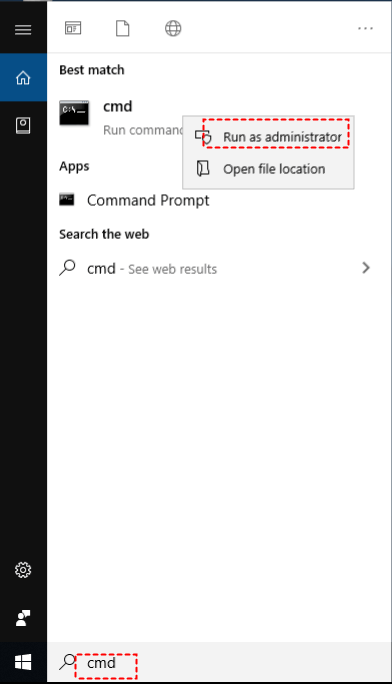
Step 2. In the Command Prompt window, type the following command and hit Enter.
reg add "HKEY_LOCAL_MACHINE\SYSTEM\CurrentControlSet\Control\Terminal Server" /v fDenyTSConnections /t REG_DWORD /d 0 /f

Way 2. Enable Remote Desktop Windows 10/11 with Registry
Follow these steps to enable the Remote Desktop feature on Windows 10 and 11 from the Registry Editor.
Note: Windows Registry modification can have serious consequences if not done correctly. You'd better back up the registry or Windows system before proceeding.
Step 1. Press Windows + R, input "regedit” and hit Enter to open Registry Editor.
Step 2. Navigate to the following Registry key:
HKEY_LOCAL_MACHINE\CurrentControlSet\Control\Terminal Server

Step 3. In the right pane, double-click on "fDenyTSConnections" entry and change the value data from "1" to "0". Then, click "OK".
Way 3. Enable Remote Desktop Windows 10/11 with PowerShell
Or you can use PowerShell to allow remote desktop access to the computer via these steps.
Step 1. In the search box, input "Powershell", right-click "Windows Powershell" and choose "Run as administrator".
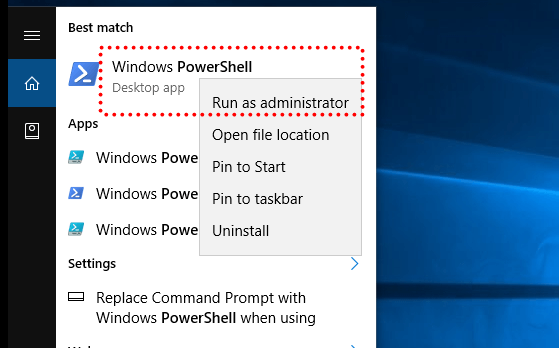
Step 2. In the Windows PowerShell window, input the following command and hit Enter.
Set-ItemProperty -Path 'HKLM:\System\CurrentControlSet\Control\Terminal Server' -name "fDenyTSConnections" -value 0

Way 4. Enable Remote Desktop Windows 10/11 from Settings
If you are unfamiliar with command-line tools or worry about inappropriate registry adjustments, you can set up the computer to allow remote access from the Windows Settings interface.
Step 1. Press Windows + S to open the Search box.
Step 2. Search “remote desktop settings” in the search box, and double-click it to open Remote Desktop Settings.
Step 3. Toggle the button to the On position to enable Remote Desktop on Windows 10 and Windows 11.
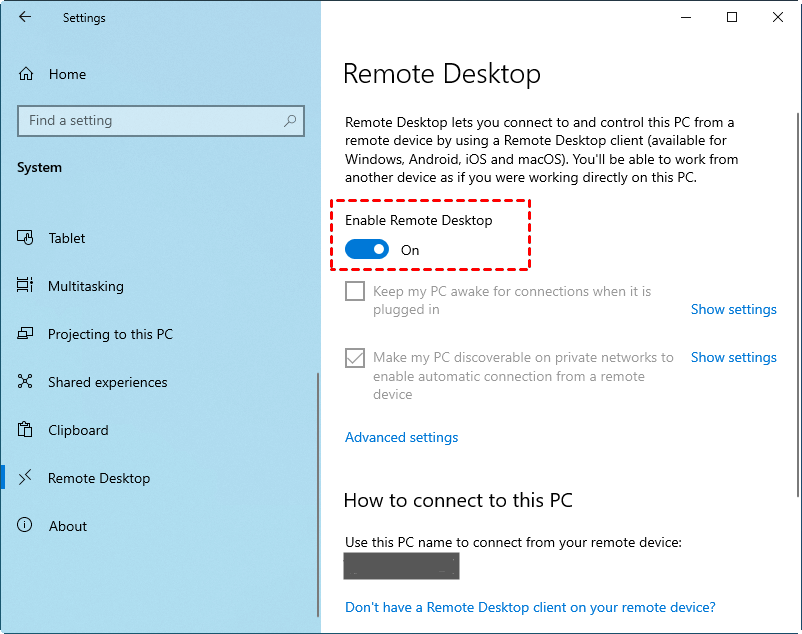
Note: Here you can see the PC name of this PC under "Use this PC name to connect from your remote device". Keep it in mind as you'll need it when you use Remote Desktop Connection from another computer to connect to this computer.
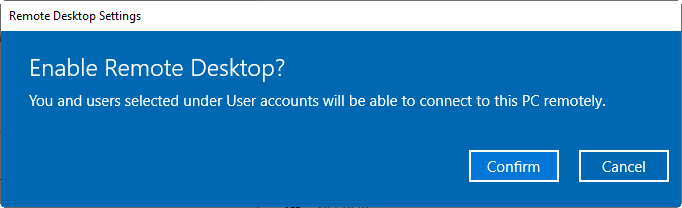
Step 4. You'll be asked to confirm whether to open the app; click "Confirm" to continue.
Way 5. Allow Remote Desktop from System Properties
Or you can allow remote connections to this computer from the System Properties interface.
Step 1. Press Windows + R to open the Run box. Type “sysdm.cpl” in the entry bar and press Enter to open System Properties.
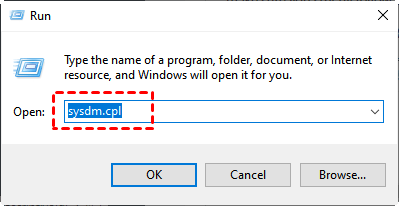
Step 2. In the System Properties window, go to the "Remote" tab, and check ”Allow remote connection to this computer”.

All five ways can help you turn on the Remote Desktop feature on Windows 10 and Windows 11, and you can choose the one that you like. You may also need to configure the firewall settings to allow Remote Desktop through Windows Firewall for a successful remote connection. Here is the instruction.
Step 1. Search for "Windows Security" and open the corresponding app.
Step 2. Click Allow apps to communicate through Windows Defender Firewall, and click "Change Settings".
Step 3. Scroll down, locate Remote Desktop, and make sure that the checkboxes are checked to allow RDP through the firewall.
Connect to Windows 10/11 with the Remote Desktop client app
After Remote Desktop is turned on and enabled through the Firewall on Windows 10/11, you can connect to the remote computer with a Remote Desktop client, like Remote Desktop Connection. Keep reading to realize the detailed steps.
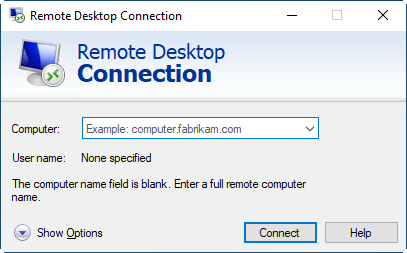
Step 1. Press Windows + R at the same time and type "mstsc" to launch Remote Desktop Connection on your local computer.
Step 2. Type in the IP address or the computer name of the remote computer that you want to connect and then click "Connect".
Step 3. In the pop-up window, you need to input the user name and the password of the remote computer account that you want to log in to and click "OK".
Notes:
- The steps are for accessing a Windows computer from another Windows computer. To access a Windows computer from an iOS device or an Android device, you need to download the RD client from the App Store or Google Play.
- The steps are suitable for accessing a PC over LAN; to access a computer over the internet via RDP, you need to perform port forwarding or set up a VPN, which can be complicated and time-consuming.
- If you have no idea about how to find out the IP address, computer name, or user name, press Windows + R, input cmd to open Command Prompt, run "whoami" and "ipconfig" commands, and you can find out what you need.
Can't connect to Remote Desktop Windows 10/11 - What to do?
However, there are some times that you may find you can't connect to the remote computer via the Remote Desktop client app. Usually, the Remote Desktop issue occurs as Remote Desktop hasn't been enabled, poor network, account permission problem, etc. Firstly, you should make sure that RDP is enabled and can be accessed through the firewall. Then, you can try one or more of the following fixes.
1. Check out the network conditions of both computers.
2. Temporarily disable any antivirus or security software on the to-be-accessed computer to check if they are blocking Remote Desktop connections.
3. Install the latest updates for your operating system.
4. Make sure that the user account you are using has been granted explicit permission to connect remotely.
5. Perform Port forwarding when you access the PC from an outside network.
Or you can switch to a great alternative to Windows Remote Desktop, AnyViewer. It enables you to remotely and securely access Windows 11/10/8.1/8/7 Standard, Home, or other editions over the internet/LAN without extra setup. What's more, it supports both unattended and attended remote access, and you can use the proper one by different situations. Now, click the following button to free download it and see how it works in accessing a remote computer.
Step 1. Install and run AnyViewer; create an AnyViewer account and log into the same account on all devices.

Step 2. On the device that you want to start a remote desktop session, click "Device" and locate the computer you want to control.
Step 3. Click the PC and click "One-click control". Immediately, you can see the desktop of the remote computer and use it without physical access.

✍ Notes:
◆ To offer one-time remote support, log in to an AnyViewer account only on the PC where you start the remote session and send a remote control request.
◆ To access a remote computer in privacy mode, enjoy high-quality images, or faster file transfer speed, you can upgrade to an advanced plan.
