
10 Tested Solutions for Remote Desktop Can’t Connect to the Remote Computer
This article analyzes why Remote Desktop cannot connect to the remote computer and guides you to fix the Remote Desktop can’t connect to the remote computer in Windows 11/10/8.1/8.7.
By Ellie / Updated on December 13, 2024
Why can't Remote Desktop connect to the remote computer?
Help! I have two computers on the same network. I’m trying to access my unfinished work file or folder on one Windows 10 computer from my laptop. But I only got the following error message. How come I cannot connect to my remote computer using Remote Desktop? How do I resolve the problem? Is there any suggestion? Thanks in advance!"
-Question from Reddit

Top reasons for "Remote Desktop can’t connect to the remote computer" error
The complete error message reads as follows:
Remote Desktop can’t connect to the remote computer for one of these reasons:
1) Remote access to the server is not enabled
2) The remote computer is turned off
3) The remote computer is not available on the network
The error message provides insights into potential causes, including:
- Remote Desktop availability: Ensure Remote Desktop is enabled on the host computer, a feature limited to Windows Pro and above versions.
- Antivirus software and firewall blocking: Check if antivirus or firewall settings are obstructing outgoing and incoming connections.
- Recent Windows updates: Recent updates might impact RDP functionality, necessitating manual troubleshooting.
- Lack of user permission: Ensure your account has sufficient permissions to initiate the connection.
- Other common reasons: Verify configurations of listening ports, RDC credentials, and address any network-related issues.
How to fix Remote Desktop can't connect to the remote computer [10 solutions]
Now that you're aware of the potential causes, let's delve into several solutions to address this "Remote Desktop can't connect to the remote computer" error on your PC.
Solution 1. Allow remote connection to the remote computer
If remote access to the host computer hasn’t been enabled, you won’t connect to your remote computer using a Remote Desktop client, like Remote Desktop Connection. Do as follows to enable remote access.
Note: Windows 10 or Windows 11 Home Edition doesn't support Remote Desktop. That is to say, you won't be able to connect to a Windows 11/10 home computer using Remote Desktop.
Step 1. On the host computer, press "Windows" + "R" to open the "Run" dialogue.
Step 2. Input “sysdm.cpl” and click “OK” button to open the “System Properties” window.
Step 3. Click the “Remote” tab and choose “Allow remote connection to this computer” and click "OK" to allow remote access to this computer.

▶ Note: If you want to use Remote Assistance to help the PC solve issues, check the “Allow Remote Assistance connection to this computer” as well. To realize the differences between Remote Assistance and Remote Desktop, refer to Remote Assistance vs. Remote Desktop.
Solution 2. Allow Remote Desktop on Windows firewall settings
Remote Desktop connection can be blocked by firewall. You can check out the following steps to allow Remote Desktop and try to connect to the remote computer again.
Step 1. In the Search box, input “Allow Apps to Communicate through Windows Firewall” and click it.
Step 2. Locate “Remote Desktop” and check the box before it.
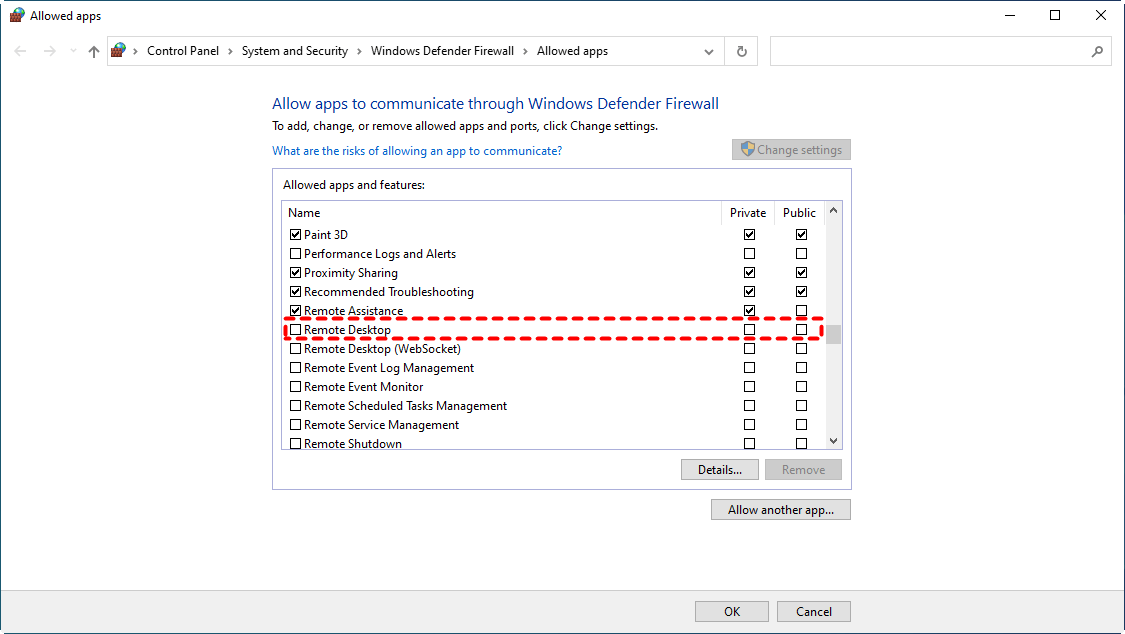
Step 3. Click “OK” to save the change.
Solution 3. Check the status of RDP services
If the Remote Desktop cannot connect to the remote computer issue isn’t related to the first two reasons, you can check the status of RDP services on the two computers. Do the following steps:
Step 1. Open Run window, input “services.msc” and hit Enter to open Services.
Step 2. Locate “Remote Desktop Services", right-click it, and choose “Prosperities”.
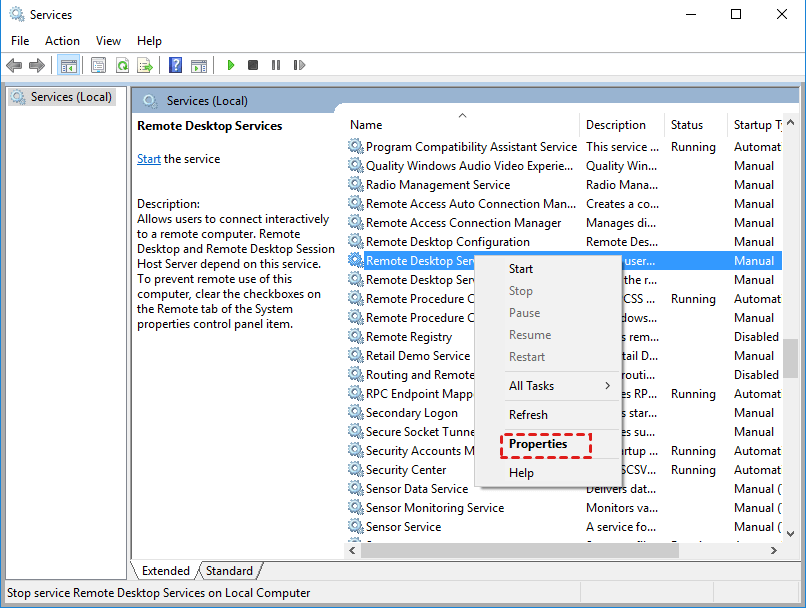
Step 3. Then you can check the status of RDP services.
Solution 4. Assign permissions to users from Group Policy Editor
If you have enabled remote access to the remote computer and the RDP services are enabled on the two computers but Remote Desktop is still not working, you can assign permission to users who access the computer.
Step 1. On the remote computer, enter “gpedit.msc” and click “OK” to open Group Policy Editor.
Step 2. Go to the following path:
Computer Configuration > Windows Settings > Security Settings > Local Policy > User Rights Assignment
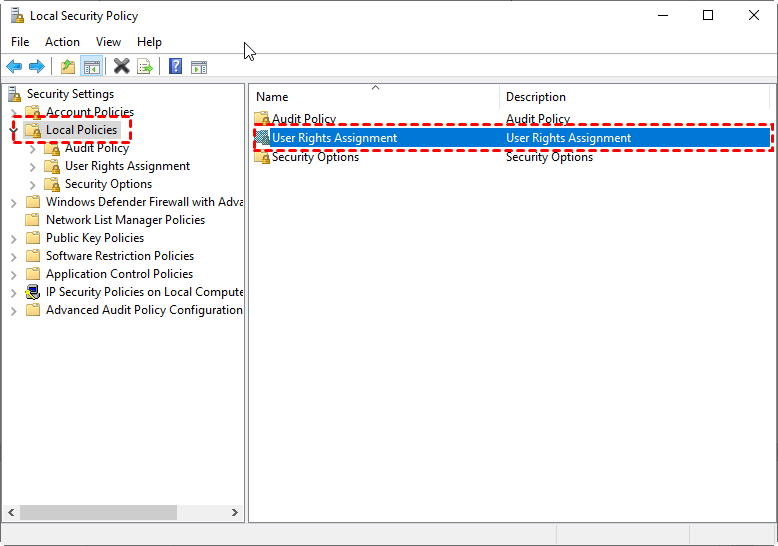
Step 3. Double-click “Allow log on through Remote Desktop Services”.
Step 4. Add the user or group and then click “OK”.
Solution 5. Remove your saved Remote Desktop credentials
If your Remote Desktop used to work smoothly in connecting to another computer but isn’t working somehow, try to remove misconfigured saved Remote Desktop credentials to fix the issue. Here are the detailed steps:
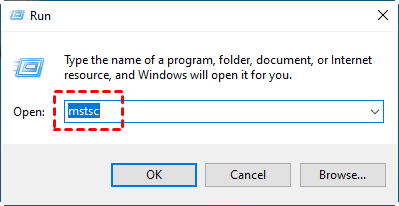
Step 1. Press “Windows” + “R”, input “mstsc.exe” and click “OK” to open Remote Desktop Connection.
Step 2. Type the remote computer’s IP address. Then you’ll be able to edit or delete these credentials for the remote computer. To remove the saved RDP credentials, just click “Delete”.
Step 3. Reconnect to the remote computer to see whether “Remote Desktop Can’t connect to the compute for one of those reasons…” disappears.
Solution 6. Add RDGClientTransport Key in Registry Editor
If the fixes above are not working for the RDP error, you can add the “RDGClienTransport” Key in Registry Editor to force RPD to use RPC/HTTP connection instead of HTTP/UDP.
Step 1. Launch Run window, input “regedit” and click “Enter” to open Windows Registry Editor.
Step 2. Navigate to:
HKEY_CURRENT_USER\Software\Microsoft\Terminal Server Client.
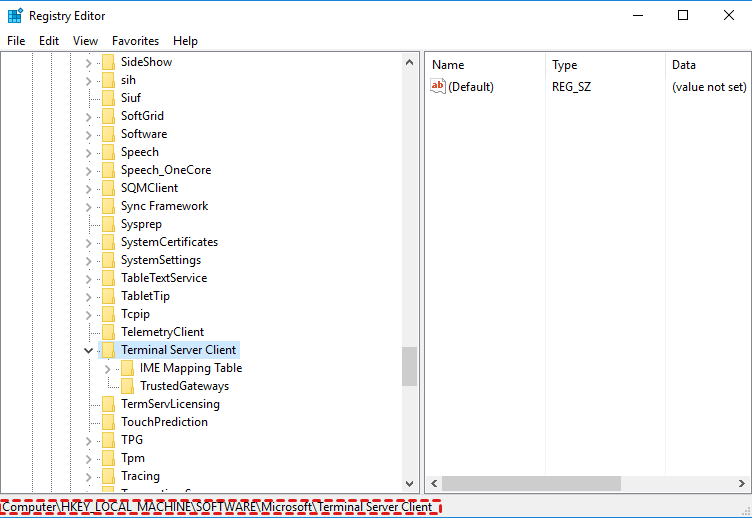
Step 3. Right-click the empty space on the right panel and choose“New” > “DWORD (32-bit) Value”. Then, name the value “DGClientTransport”.

Step 4. Double-click the new key, choose "Properties", set value data to 1, and click “OK”.
Step 5. Reboot your computer to make the change into effect
Solution 7. Run DISM.exe and SFC to fix corrupted system files
If the "Remote Desktop can't connect to the remote computer because one of those reasons" error happens after Windows update, corrupted system files caused by update might be the cause. Thus, you can run DISM.exe and SFC to fix corrupted system files and solve the RDP issue.
Step 1. On the search box, input “Command Prompt”, right-click it, and choose “Run it as administrator”.
Step 2. Then you can run DISM.exe and SFC on Command Prompt interface.
Run DISM.exe
- DISM.exe /Online /Cleanup-Image /CheckHealth
- DISM.exe /Online /Cleanup-Image /ScanHealth
- DISM.exe /Online /Cleanup-Image /RestoreHealth
Run SFC
- sfc/scannow
After executing the commands, restart your computer and see if you can connect to the remote computer with Remote Desktop.
If the commands aren’t useful in resolving RDP not connecting after the Windows update, you can restore your Windows to a previous point.
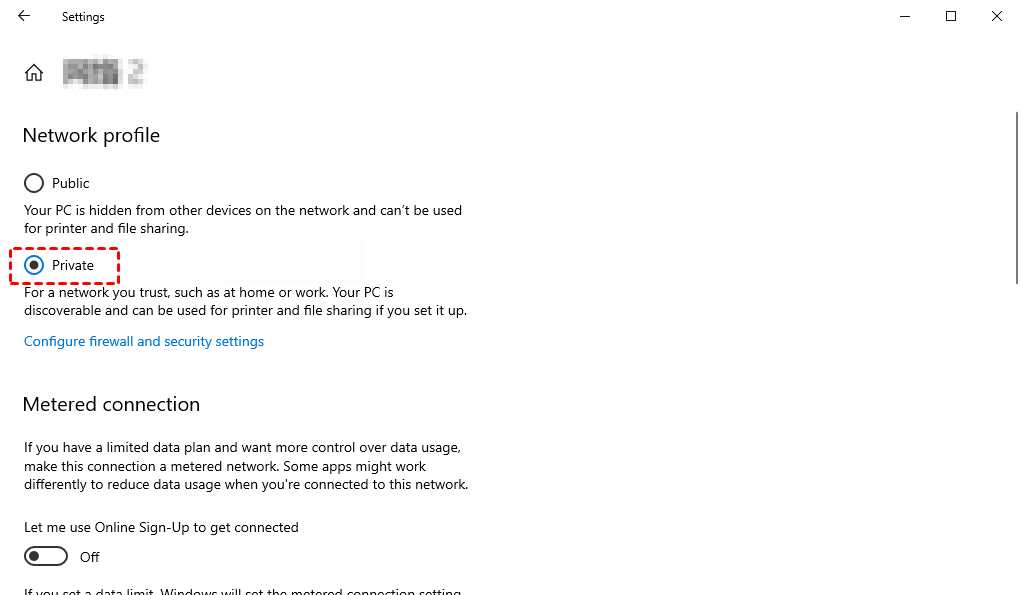
Solution 8. Change your network profile
In Windows 10, you have the option to set your network profile as either Public or Private. When set to Public, Windows disables the network discovery feature to conceal your computer from others on the network. You can try switching your network to Private to enable the network discovery feature and potentially establish a connection. Here's how to do it:
Step 1. Go to Control Panel > Network and Internet.
Step 2. Open the Status.
Step 3. Click on "Change Connection Properties" option, located in the right-hand pane.
Step 4. In the opened window, select the "Private" radio button, then close it.
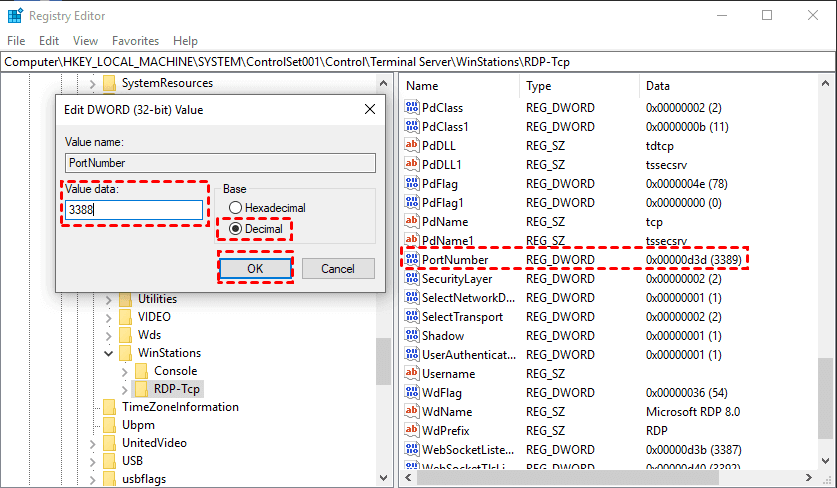
Solution 9. Check the RDP listener port
By default, the Remote Desktop service utilizes port 3389 unless modified. If another application occupies the same port, connecting may not be possible. To check the port currently used by Remote Desktop:
Step 1. Press Windows + R and in the dialog box, type "Regedit".
Step 2. Navigate to HKEY_LOCAL_MACHINE > System > CurrentControlSet > Control > Terminal Server > WinStations > RDP-Tcp.
Step 3. Check the value of "PortNumber" in the right-hand pane.
Step 4. If the value is 0x00000000d3d, it indicates the default port is configured, with a value of 3389.
Step 5. Change the value to 3388 and attempt to connect to the remote computer using the new port.
Solution 10. Switch to a Remote Desktop alternative
Don't want to deal with the hassle of troubleshooting the "Remote Desktop can't connect to the remote computer" error? An easier solution is to consider using a Remote Desktop alternative, such as AnyViewer. AnyViewer is a professional remote access software that offers a secure and user-friendly platform for managing multiple remote sessions simultaneously.
Here are several advantages of AnyViewer compared to Remote Desktop:
- Expanded Windows compatibility: In addition to Windows Pro and above, AnyViewer is compatible with a wider range of Windows editions, including Standard and Home editions, which are not supported by Remote Desktop.
- Enhanced features: AnyViewer offers a range of additional in-session features, including text chat, screen wall, mobile screen mirroring, and more, surpassing what's available in Remote Desktop.
- Supporting of multiple connections: AnyViewer supports multiple connections without requiring additional tools. This means multiple users can simultaneously connect to and control the same remote computer, or one user can connect to multiple remote computers at once.
Step 1. Download, install and launch AnyViewer on the host computer (the remote computer) and the client computer.
Step 2. Sign up for an AnyViewer account and log in to the same account on the two computers. After login, the PC will be assigned to the account automatically.

Step 3. On your local computer, click "Device", right-click the PC that you need to access, and choose "One-click control".Then, you can connect to the remote computer.

Notes:
If you choose to upgrade to a Professional or Enterprise plan, you'll gain the following privileges:
➤Increased login device limit: Assign multiple devices to a single account for seamless control.
➤Unlimited simultaneous sessions: Control multiple computers simultaneously from one device.
➤Enhanced privacy mode: Safeguard your privacy by blackening the screen of the remote PC and disabling its keyboard and mouse.
➤High-speed file transfer: Transfer an unlimited number of files at speeds of up to 10 MB/s.
➤Improved device management: Organize devices into groups and create additional screen walls for more efficient device management.
Conclusion
In conclusion, encountering the "Remote Desktop can't connect to the remote computer" error can be frustrating, but understanding its potential causes and implementing appropriate solutions can resolve the issue. Whether it's enabling remote access, adjusting firewall settings, checking RDP services, assigning user permissions, or exploring alternative remote desktop tools like AnyViewer, there are various avenues to explore. By following these steps diligently and adapting them to your specific scenario, you can efficiently troubleshoot and overcome connectivity hurdles, ensuring seamless remote access to your desired computer.
