
2 Options: How to Find PC Name for Remote Desktop on Windows 10, 11
This post mainly introduces how to find PC name for Remote Desktop on Windows 10, 11. Besides, it also walks you through how to use Remote Desktop Connection to connect to a Windows PC with the PC name you find.
By Ellie / Updated on December 13, 2024
How do I find my computer name for Remote Desktop on Windows 10 and 11?
I’m supposing to know the computer name of my office computer in order to remotely control it from another computer. How do I find my computer name for Remote Desktop on Windows 10, 11?”
- Question from Quora
How to find PC name for Remote Desktop on Windows 10, 11 [2 options]
When you use Remote Desktop Connection to connect remote desktop, PC name is necessary. Here in this post, we provide you with two easy options on how to find name of computer for Remote Desktop on Windows 10, 11. Or you can use a simple remote access app to connect without finding the PC name.
Option 1. Get the PC name via the Command Prompt
Step 1. Press Win + R to invoke the Run dialog box. Type in “cmd” and press OK to open Command Prompt.

Step 2. Then type “query user” to see the PC name.

Note: This way is also suitable for finding the PC name for remote desktop in Windows 8.1/8/7.
Option 2. Find the PC name in System
Navigate to Start > Settings > System > Remote Desktop, and your PC name is under the “How to connect to this PC”.

How to use Remote Desktop Connection to connect to a Windows PC
After learning how to find computer name for Remote Desktop on Windows 10, 11, let’s take a look at how to use the computer name you’ve just found to remotely control a PC via Remote Desktop Connection.
Part 1. Set up the remote computer to accept Remote Desktop connections
You have just found the PC name, there are three more things you need to do: get the IP address, and enable Remote Desktop Connection.
Step 1. Open Command Prompt and then type in “ipconfig” and press Enter. Now you can see a group of IP addresses, of which the IPv4 address is the one you need.

Step 2. Open the Run box and type in “sysdm.cpl” to open System Properties.
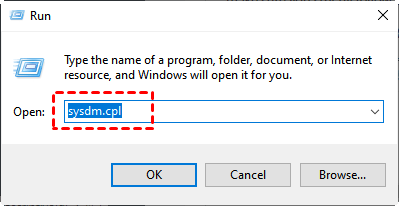
Step 3. In the System Properties window, go to the Remote tab, and check “Allow remote connection to this computer”.

Part 2. Connect to the remote computer after enabling Remote Desktop
After setting up Remote Desktop Connection on the remote computer, then you can start to connect to the remote computer from the local computer.
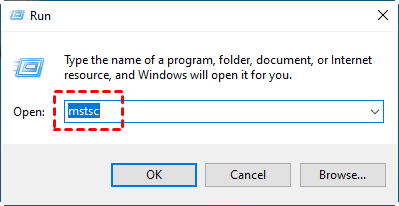
Step 1. Press Win + R at the same time, type in “mstsc” to launch Remote Desktop Connection.
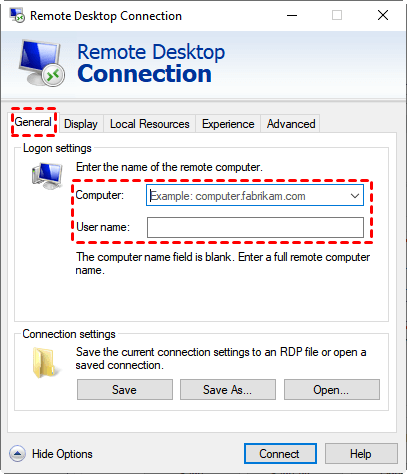
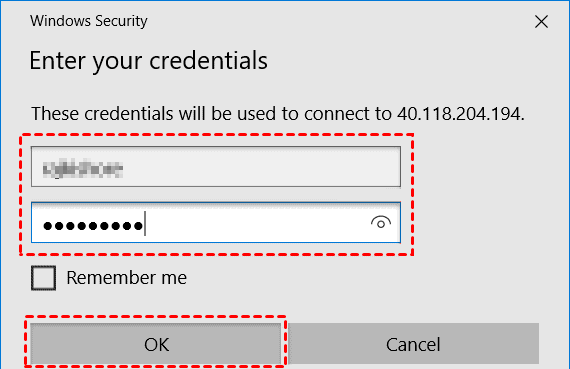
Step 2. Type in the IP address and the computer name of the remote computer, and then click "Connect".
Step 3. You’ll also need to enter the password of the remote computer to achieve a remote connection.
Note: If the two computers are on different networks, you’ll need to set up port forwarding or use a VPN.
How to: Set up remote connections with PC Name/IP address
Although the process of remote control via Remote Desktop Connection is pretty clear following the stepwise tutorial in this post, you can remotely connect to a Windows PC in a much easier way. You are recommended to use another remote desktop software, AnyViewer. Let’s see why AnyViewer is outstanding:
- Ultra-simple: No extra configuration, no IP address, and no computer are required.
- No network limited: Remote connections between computers connected to different networks are supported.
- No system version requirement: It can work with Windows 10 Home and Windows 7 Standard while RDP only works on advanced Windows Edition, like Windows Professional.
- Feature-rich: It supports transfer files between computers remotely, multiple-monitor switch, chat in session, and so on.
Download the tool and see how it works. To access PC from Android or iOS device, you need to download AnyViewer from Google Play or App Store.
Step 1. On the Controller computer, go to Log in, and then click Sign up. (If you already have signed up on its official website, you can log in directly.)

Step 2. Fill in the signup information and you can see you successfully logged in to AnyViewer. Your device will automatically be assigned to the account.

Step 3. Log in to the same AnyViewer account on the two devices, then you can achieve a direct connection by clicking One-click control to achieve unattended remote access.

✍ You can also upgrade your account to a Professional or Enterprise plan to enjoy more rights:
✓ Faster file transfer speed. Transfer speed for a free account is 500 KB/s, and for a paid account is up to 10 MB/s.
✓ More devices can be assigned to the same account for unattended remote access.
✓ Connect in privacy mode to protect privacy.
✓ Initial more concurrent connections to one computer.
✓...
Conclusion
This post primarily introduces how to find PC name for Remote Desktop on Windows 10/11. Besides, we also walk you through how to use Remote Desktop Connection to connect to a Windows PC with the PC name you find.If you would like an easier way to remote into another PC, you can try AnyViewer.
