
The Easiest Way to Remotely Control a PC
Let’s know the easiest way to remotely control a PC and ensure the stability and security of remote control at the same time.
By Ellie / Updated on December 26, 2025
What are the advantages of remote control a PC?
It was not until remote work re-entered the public’s vision that many people realized that it was so cool!
- What to do when you receive sudden overtime notice? Just remotely control the company PC!
- How to help girls repair their PCs if you are not allowed to enter the female dormitory? Just use remote control software for technical support!
- What to do if you want to upgrade your PC when you are away from home? Just use remote control to make your PC stay online and upgrade!
- What to do if you worry about the safety of your children online? Just use remote control software to guide them correctly!
The essence of remote control is that it saves money, labor, and time. But not everyone can be a master of remote control, especially for people who have little knowledge about computers. Thus, the most important is to find the easiest way to remotely control a PC.
This tutorial will provide the easiest way (AnyViewer) to remotely control a PC. It also allows you to achieve unattended remote access.
The easiest way to remotely control a PC: AnyViewer
AnyViewer is complete remote access, remote control, and remote support solution that allows you to remotely view and operate PCs located anywhere. It is compatible with Windows 11/10/8.1/8/7 and Windows Server 2022/2019/2016/2012 R2. Please download and install AnyViewer:
After confirming that AnyViewer is installed on both the client computer and the host computer, you need to set up both computers for remote control.
Step 1. Launch AnyViewer on both computers.
Step 2. Go to Log in, and then click Sign up. (If you already have signed up on its official website, you can log in directly.)

Step 3. Fill in the signup information.

Step 4. Then you can see you successfully logged in to AnyViewer. Your device will automatically be assigned to the account you've logged in to.

Step 5. Log in to the same AnyViewer account on the two devices, then click One-click control to achieve unattended remote access.

Tips: Upgrade to a Professional or Enterprise plan to enjoy more rights!
- Faster transfer speed. Transfer speed for a free account is 500 KB/s, and for a paid account is up to 10 MB/s.
- Increasing number of files transferred in a single time. The maximum number of files that can be transferred per time for a free account is 100.
- Larger size of a single file that can be transferred. The maximum size of a single file that can be transferred for the free account is 100 MB.
- More devices can be assigned to the same account for unattended remote access.
- More Currently connected devices are displayed for management.
- Connect in privacy mode to protect privacy.
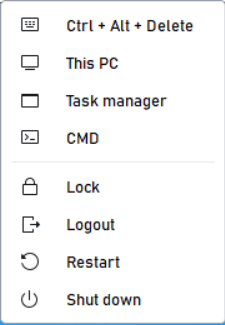
In addition, AnyViewer can also provide users with some practical functions for remote control after a successful connection. Such as lock, logout, restart, command prompt (cmd), etc., which are also unique advantages of AnyViewer.
Microsoft Remote Desktop
Microsoft Remote Desktop (RDP) is a free remote desktop solution developed by Microsoft. The instruction for using RDP can be divided into two parts. First, you need to set up computers for a Remote Desktop session. Then, you can start your remote control.
Enable Remote Desktop on host computer
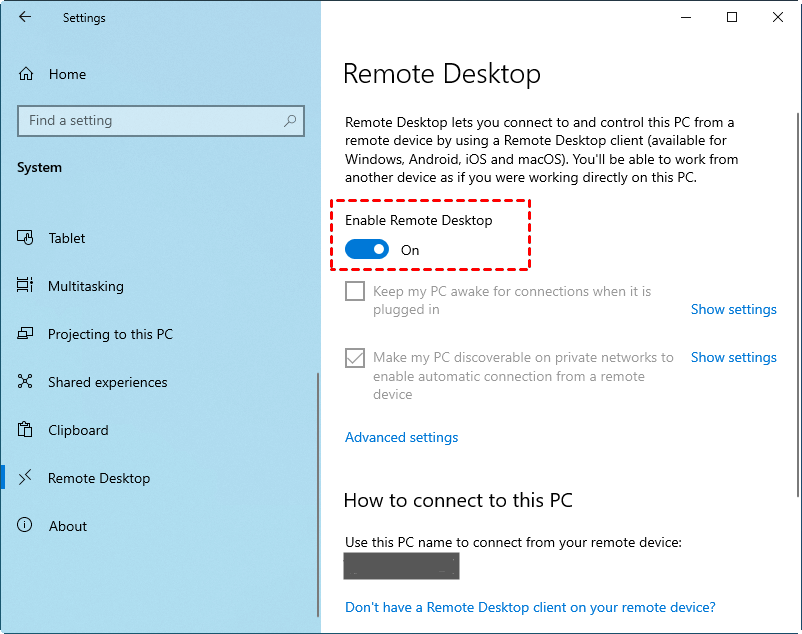
Step 1. Navigate here: Start > Settings > System > Remote Desktop, and turn on Enable Remote Desktop.
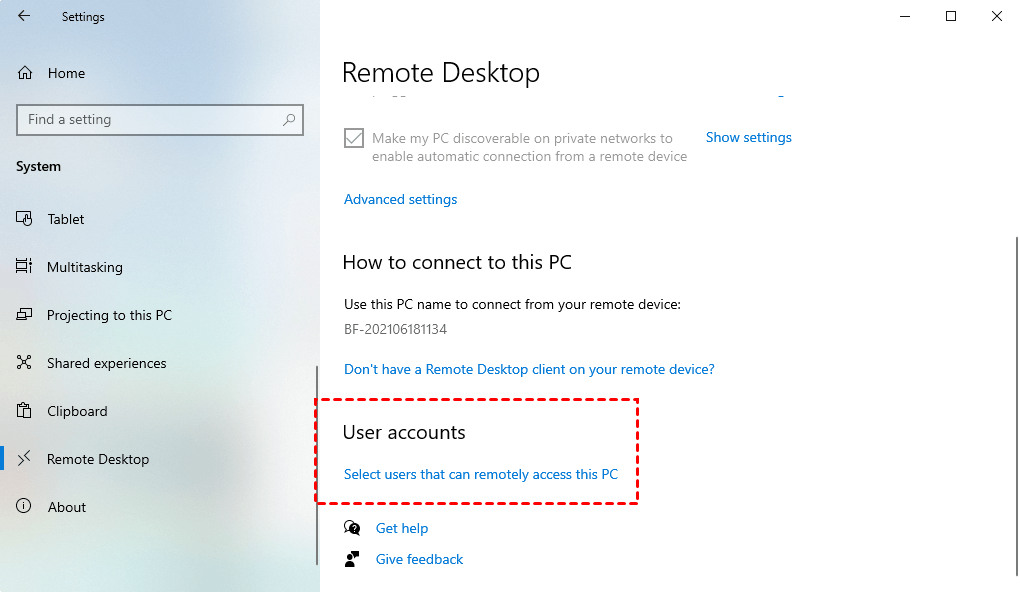
Step 2. Find User accounts and click Select users that can remotely access this PC.
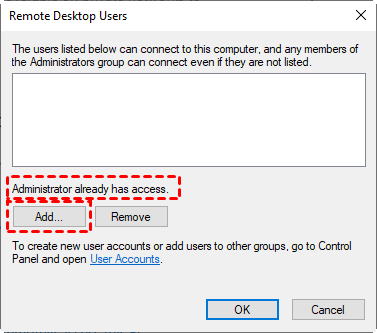
Step 3. After opening the Remote Desktop Users window, click Add to add users who are allowed to access this computer (you need to add already existing users to realize remote desktop).
Start remote control on client computer
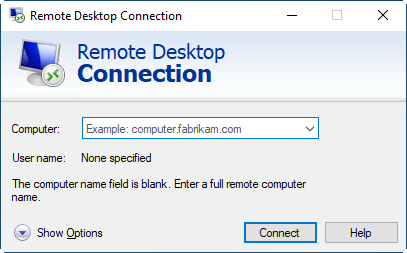
Step 1. The client computer doesn’t need any configuration. Just search for Remote Desktop Connection in the Search box. And then open it.
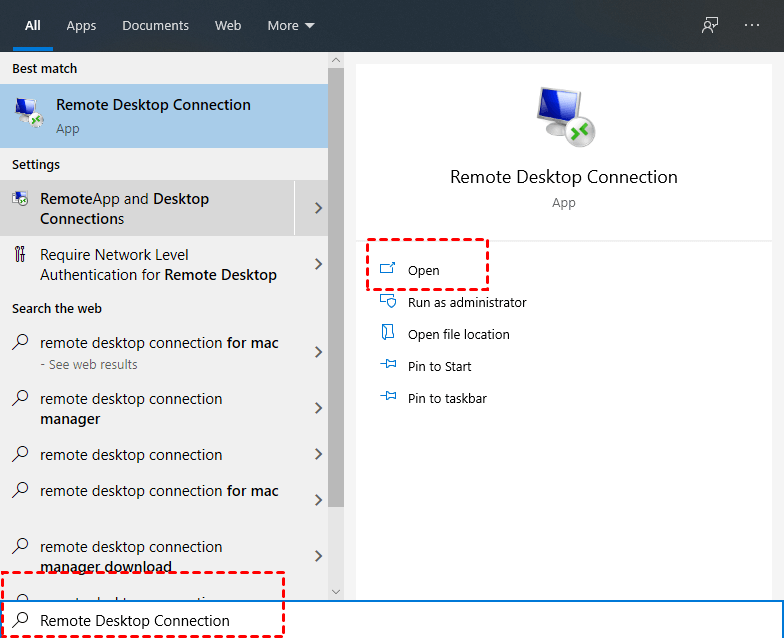
Step 2. Enter the IP address and user name in the Remote Desktop Connection interface to achieve connection (if you don’t know what your computer’s IP address and user name are, follow the tutorial below).
How to query IP address and user name?
Step 1. Press Windows key + R to invoke the Run dialog box. Type in “cmd” and press OK. Then type “ipconfig” at the blinking cursor and press Enter. Now you can see a group of IP addresses, of which the IPv4 address is the one you need.

Step 2. Then type “query user” to see the username.

Note: If the client computer and the host computer are not on the same network, and there is a firewall in the intranet of the host computer, you need to contact the relevant personnel to configure the network equipment first, and then use the port forwarding method (the remote desktop defaults to port 3389) to forward the connection of the client computer to the designated port. Only in this way, you can connect to the host computer normally.
In addition, your Windows version also matters. Windows 7 Starter Edition, Windows 7 Home Edition, Windows 8 Home Edition, Windows 8.1 Home Edition, and Windows 10 Home Edition do not support Remote Desktop Connection (RDP). If you want to use it, please upgrade to the Professional or Enterprise version.
Although this method does not necessitate the installation of extra software, the technical challenge is increasing since the host computer is in a more complex environment and port forwarding is required across various networks. Furthermore, network fluctuations have a significant impact on this method, which might result in significant delays when the network connection is poor. Problems like your credentials did not work when you log in may also appear. As a result, it is not advised for novice users.
Chrome Remote Desktop extension
Chrome Remote Desktop, developed by Google, is a free remote access program. It is accessible as a simple Chrome extension, providing users with a convenient way to start remote control. Let’s see how to set up Chrome Remote Desktop on both client computer and host computer.
Remote control on the host computer
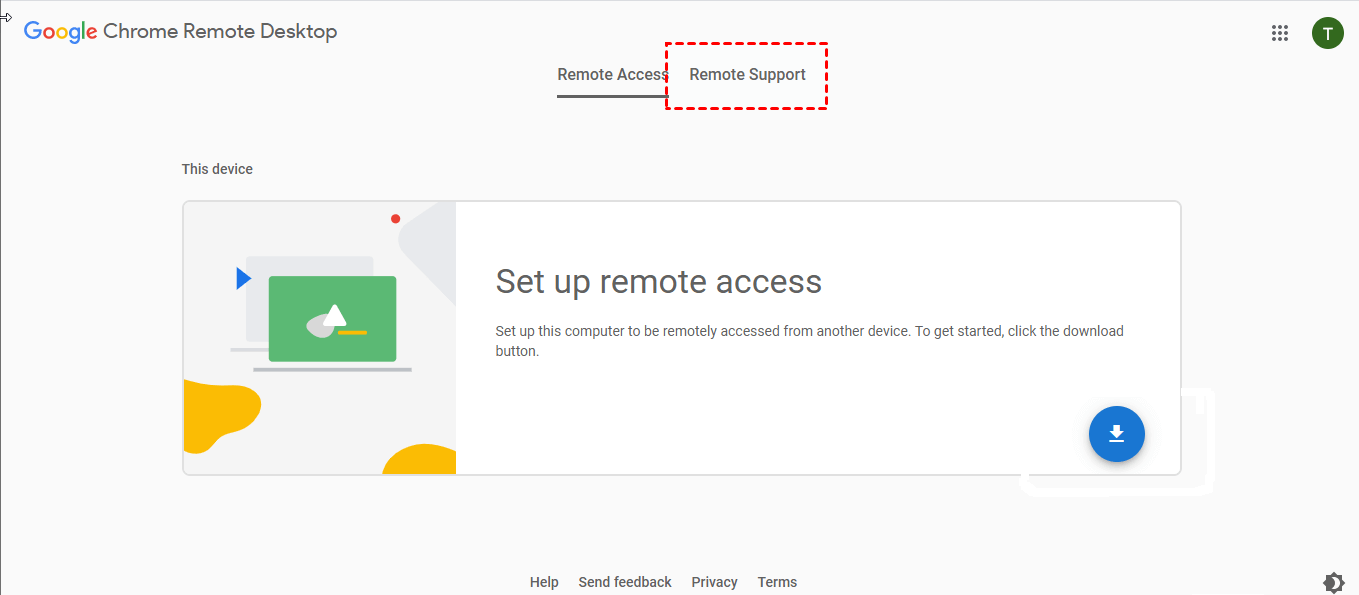
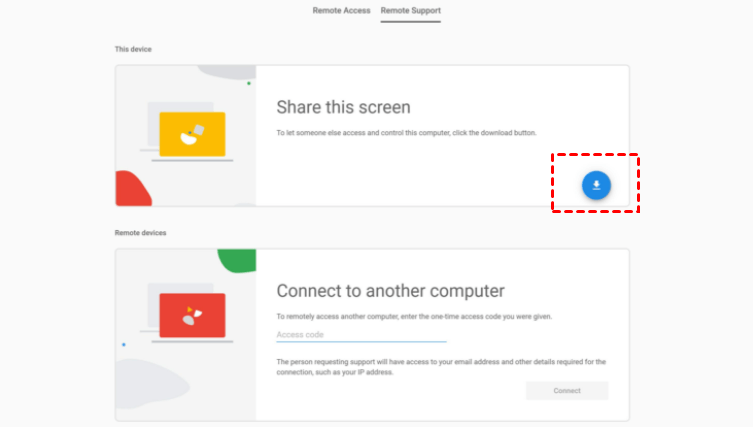
Step 1. Download Chrome and log in to your Google account after installation. Enter "remotedesktop.google.com/support" in the address bar at the top of the screen to enter the Chrome Remote Desktop website and switch to the Remote Support interface above.
Step 2. Click the blue Download button in the lower right corner of Share this screen.
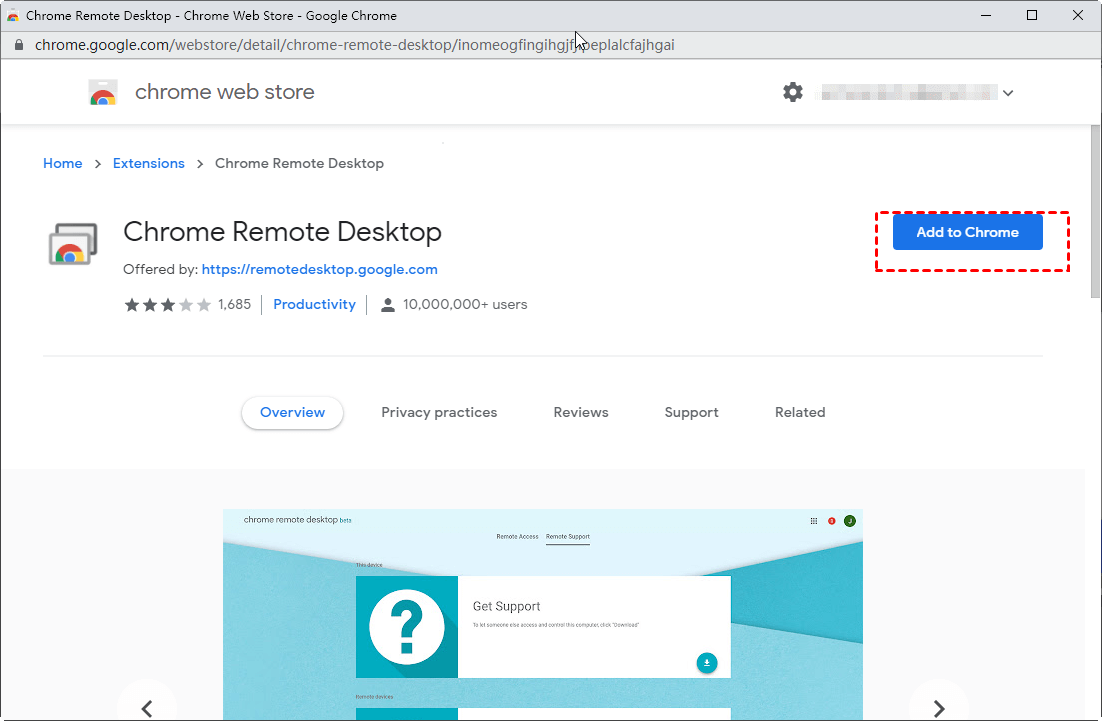
Step 3. Click on Add to Chrome to add the Chrome Remote Desktop in your Chrome browser.
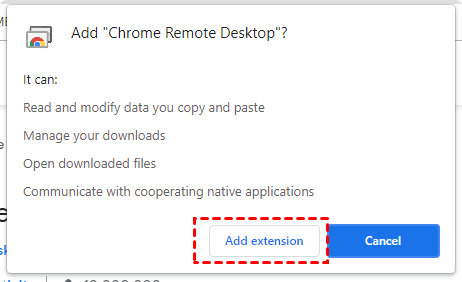
Step 4. Click Add extension in the pop-up window.
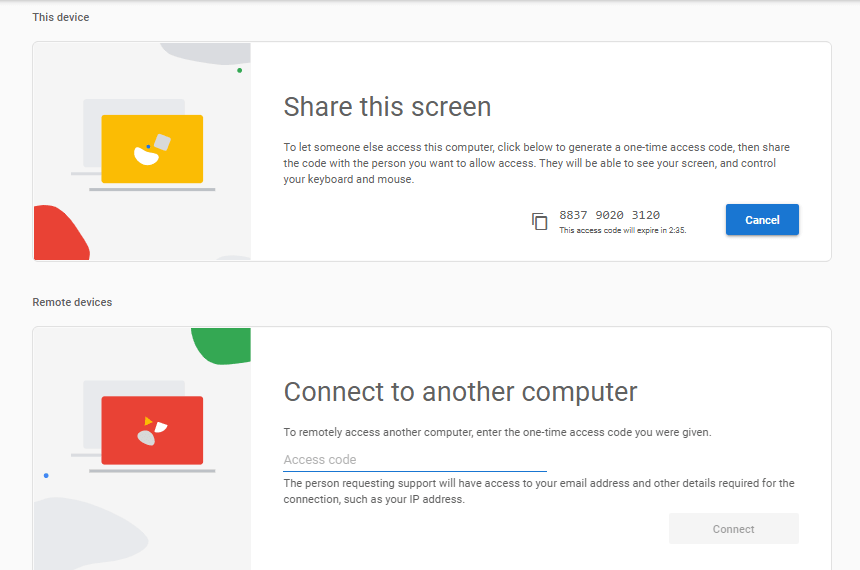
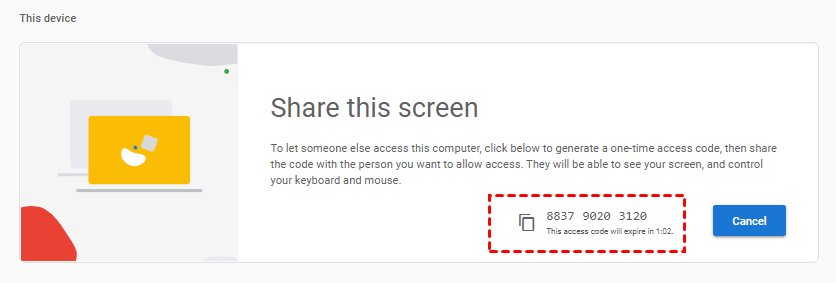
Step 5. Wait to automatically jump back to the Remote Support interface, click the blue Generate Code button in the pop-up window of Share this screen.
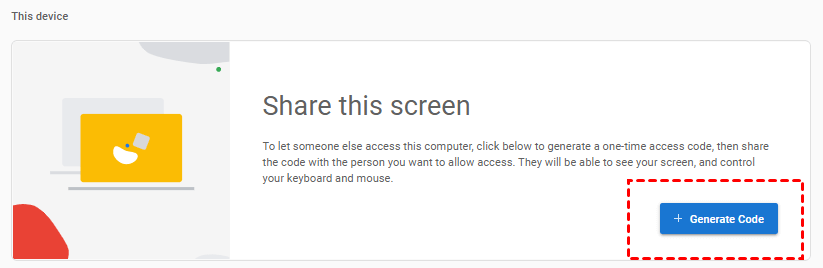
Step 6. A 12-letter code will automatically generate. You can choose to copy it or remember it (the access code will expire in 5 minutes).
Remote control on the client computer
Step 1. Download Chrome and log in to the same Google account like that on the host computer after the installation. Repeat the above-mentioned Chrome Remote Desktop download and installation steps.
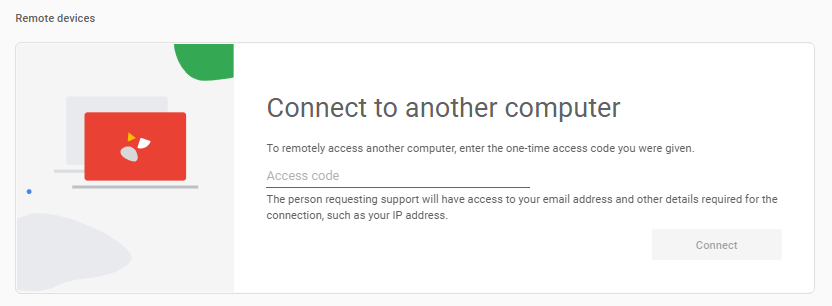
Step 2. After automatically jumping back to the Remote Support interface, find the Remote Device below. Enter the code automatically generated on the host computer before in the Access Code box.
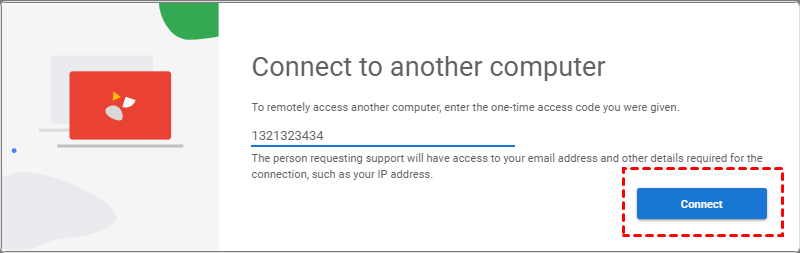
Step 3. Now you can see Connect button turn blue, click it.
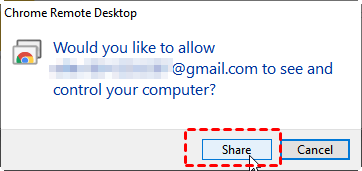
Step 4. The Chrome Remote Desktop window will automatically pop up on the host computer, just click Share.
This method is not very complicated in operation and can be well adapted to different network environments, but the shortcomings are also obvious. Firstly, you need to download the Chrome browser on both computers. Secondly, you need to log in to the same account. Thirdly, the automatically generated access code will expire only in 5 minutes. If you are not familiar with the operation, it will be difficult to complete within the time limit. It is not very friendly to novice users.
Conclusion
Compared with the Chrome Remote Desktop and Microsoft Remote Desktop, AnyViewer can adapt to more versions of Windows systems, there is no need to register an account, and the installation process is very simple. In addition, there is no time limit for the access code generated by AnyViewer. As long as both computers are running the software, it can be operated with better stability and security. If the network connection speed is better, it can provide a higher image quality. The default wallpaper hiding function makes the remote connection smoother!
On the whole, AnyViewer is the easiest way to remotely control a PC. Even novice users can easily master it, making their work and study more efficient from then on. To get it for free, simply click the link!
