
How to Fix Remote Desktop Taskbar Not Showing In Full Screen?
Remote Desktop taskbar not showing in full screen is a common problem in Windows. This guide explains the causes and gives simple fixes to restore the missing taskbar display.
By Irene / Updated on February 28, 2026
Why: The Remote Desktop taskbar not showing in full screen is usually caused by display mismatches, auto hide settings, fullscreen refresh issues, or focus conflicts. In most cases, the problem is related to resolution differences or incorrect taskbar configuration rather than a system failure.
Fix: You can fix the issue by toggling fullscreen mode to refresh the display, resetting taskbar settings, or adjusting the remote display resolution to match your local screen. These quick adjustments often restore the taskbar immediately.
Alternative: If the problem continues or happens frequently, switching to a more stable remote access tool like AnyViewer can provide a smoother fullscreen experience. It properly manages display scaling and taskbar visibility, helping you avoid recurring Remote Desktop taskbar issues and ensuring more reliable remote control.
How to Fix the Remote Desktop Taskbar Not Showing In Full Screen or Taskbar?
Fix 1. Toggle Fullscreen Mode
Sometimes when using Remote Desktop in fullscreen mode, the Windows taskbar may disappear or fail to show. This usually happens because Remote Desktop takes over the full screen, and occasionally the system doesn’t properly refresh the display of the taskbar. Toggling fullscreen mode forces the remote session to redraw the screen, which can restore the taskbar to visibility. If you encounter full screen mode not working, you can click to get solutions.
Step 1. Check if your remote desktop is in fullscreen mode.
Step 2. Press Ctrl+Alt+Pause/Break to switch fullscreen mode off and on again. This action refreshes the display and often brings the taskbar back.
Fix 2. Reset the taskbar
If the taskbar is missing during your remote session, resetting its settings can often solve the problem. This method focuses on refreshing the taskbar configuration through Windows Settings. By adjusting the auto hide option, you can restore normal taskbar visibility and prevent it from disappearing unexpectedly.
Step 1. Press Win + I and then open "Settings".
Step 2. Click on "Personalization".

Step 3. On the left pane, click on “Taskbar”. And then select “Automatically hide the taskbar in desktop mode”.
Fix 3. Change Display Settings
A common reason the taskbar might not show in Remote Desktop fullscreen is a mismatch between the remote and local display settings. If the resolutions don’t align, Windows can struggle to display certain interface elements, including the taskbar. Updating the display settings ensures the remote desktop fits correctly on your screen.
Step 1. On the remote desktop, right-click the desktop and choose “Display settings.”
Step 2. Check the display resolution and confirm it matches your local computer’s resolution.
Step 3. Adjust the resolution if necessary and apply the changes to make the taskbar visible.
Fix 4. Run AnyViewer
If the taskbar is still not showing after trying the fixes above, it may be time to use a more stable remote access solution. In some situations, built-in Remote Desktop settings cannot fully prevent issues such as local taskbar showing on Remote Desktop or remote desktop taskbar not showing in full screen. These problems can return even after adjusting display or resolution settings.
AnyViewer provides a simpler and more reliable alternative. It manages full screen sessions properly, so you can work on the remote computer without the local taskbar interfering or the remote taskbar going missing. The setup is straightforward, and you can connect to a remote PC in just a few clicks with stable performance.
It supports Windows 11, 10, 8.1, 8, and 7, as well as Windows Server 2022, 2019, 2016, and 2012 R2. It also allows remote access from iOS and Android devices to Windows PCs. If Remote Desktop taskbar issues keep appearing, using a dedicated tool like AnyViewer can help ensure a smoother and more consistent experience.
Step 1. Install and fire up it on the host computer and client computer. Create an AnyViewer account and sign in to the same account on the two computers. Once you've logged in, the device will be assigned to the account automatically.

Step 2. On your local computer, click "Device" and click the computer that you need to control. Then, click "One-click control" and you can get unattended access with one click from one computer to another computer. Apart from that, you are able to only view the screen of the remote computer, lock it, and so on.

✍ Note: If you upgrade to a Professional or Enterprise plan, you can get access in privacy mode and enjoy other privileges, including high-quality image, assigning more devices for one-click secure unattended access, managing the power of more remote computers, etc.
If you don't sign in to the same account on the two computers, you can get access by following these steps:
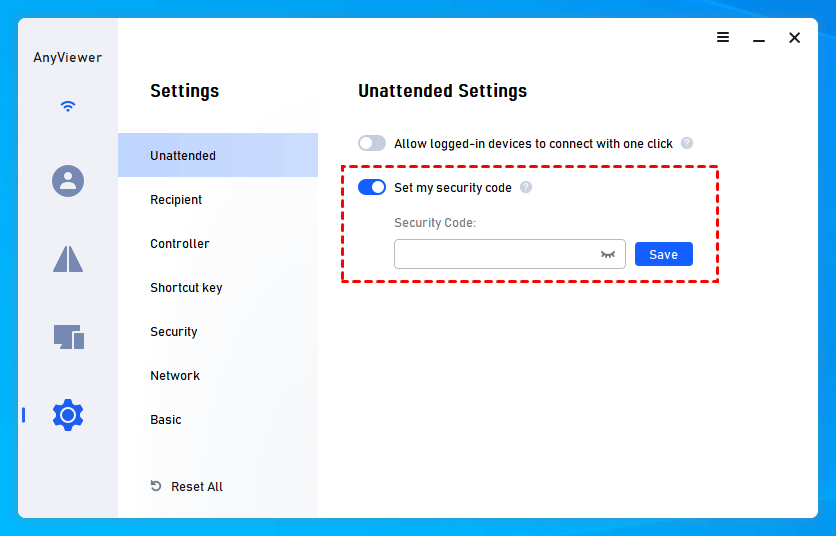
Step 1. On the remote computer, go to "Settings" and enable “Set my security code” to input the security code.
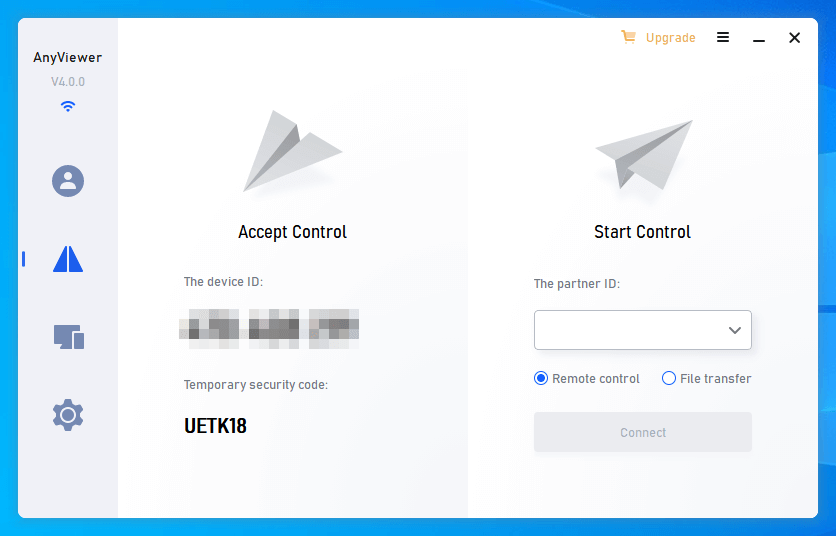
Step 2. On the client computer, click “Connect”, enter the ID of the host computer, and click “Connect”.
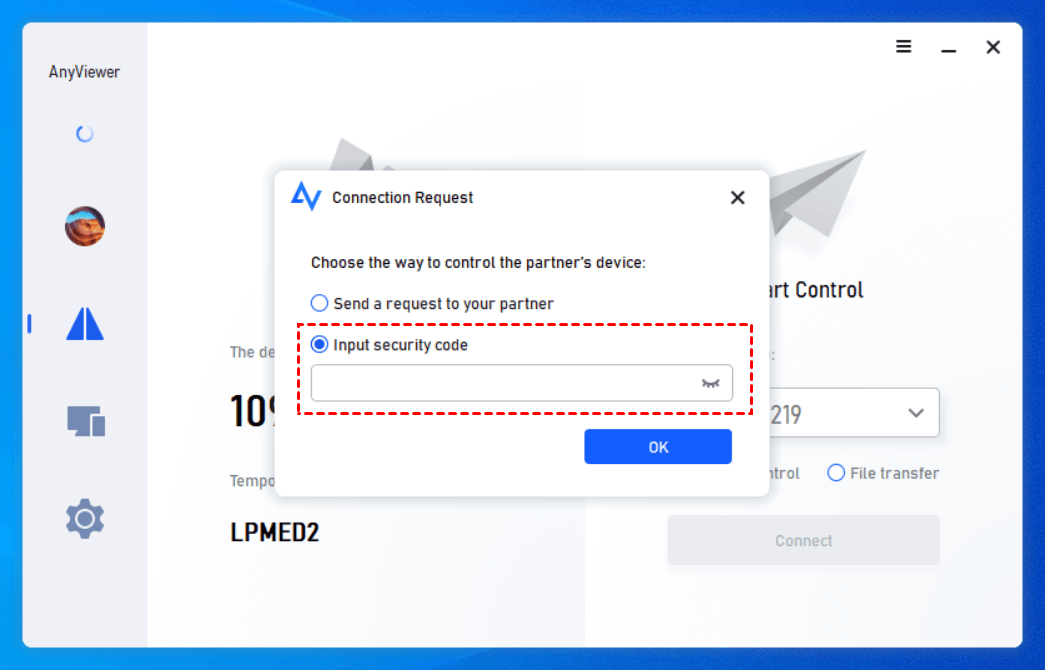
Step 3. To achieve unattended access, choose “Input security code” and type the security code of the host computer. Finally, click “OK” and the remote connection will be established.
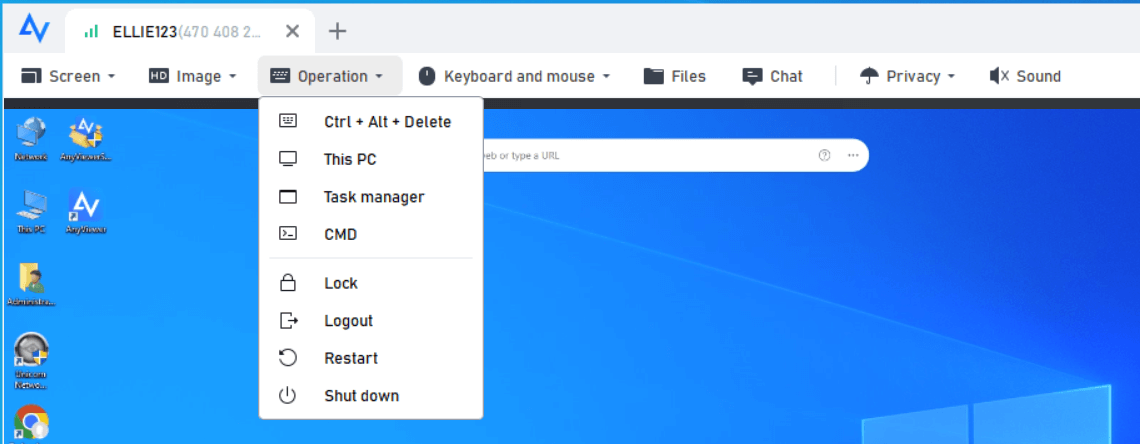
After connection, you can access the desktop of the remote computer, view files and run apps on the remote PC.
- ★Tips: Here are some tips to enhance your AnyViewer experience with a Professional or Enterprise plan:
- One-Click Control: Instantly connect to multiple devices with a single click for smooth and simple control.
- Privacy Mode: Increase your security by turning on Privacy Mode to keep your remote sessions fully private.
- Unlimited Device Management: Manage and access as many devices as necessary without restrictions.
- Faster File Transfers: Transfer files faster to improve efficiency and save time.
- Group Management: Create custom groups to easily organize and manage a large number of devices, ideal for business environments.
- Enhanced Image Quality: Experience sharper and more detailed visuals for a better remote control experience.
- ...
Why the Remote Desktop Taskbar Is Not Showing in Full Screen
When you use Remote Desktop in full screen, the taskbar may sometimes disappear. This usually happens because of the way Windows manages display settings and screen focus. If the taskbar is missing, it can make navigation harder and interrupt your work.
Common Causes of Taskbar Not Showing in Remote Desktop
| Cause | Explanation |
|---|---|
| Taskbar set to auto-hide | If the taskbar is set to hide automatically, it may not appear in a Remote Desktop session. |
| Display not truly full screen | The RDP window may be maximized instead of full screen, which can prevent the taskbar from showing. |
| Resolution mismatch | Different resolutions between the remote PC and your local monitor can cause the taskbar to be hidden or misaligned. |
| Focus issue | Sometimes the Remote Desktop session captures full focus, which hides the taskbar. |
| Multiple monitors | If you use more than one monitor, the taskbar may only appear on the primary screen, leaving it invisible in the RDP window. |
These reasons show that the problem usually comes from display settings, taskbar configuration, or focus conflicts. In the next section, we’ll go through practical steps to fix the Remote Desktop taskbar not showing issue so you can bring it back quickly.
Conclusion
The Remote Desktop taskbar may not show in fullscreen due to display mismatches, taskbar settings, or focus issues. You can fix this by toggling fullscreen mode, resetting the taskbar, adjusting display settings, or using a reliable tool like AnyViewer. AnyViewer offers fast, stable, and easy remote access, ensuring the taskbar displays correctly and improving your overall remote desktop experience.
FAQs
🗨️ Why does my taskbar disappear in Remote Desktop full screen?
When Remote Desktop Connection runs in full screen, the taskbar may be hidden due to auto hide settings, display scaling issues, or a resolution mismatch between the local and remote device. Sometimes the RDP session does not refresh properly, which makes the taskbar appear missing.
🗨️ How do I force the taskbar to show in RDP?
Move your mouse to the bottom edge of the screen and wait a few seconds. If it does not appear, press Ctrl + Esc or the Windows key to bring it up. You can also exit full screen mode and then re enter it. Restarting Windows Explorer in Task Manager inside the remote session can also restore the taskbar.
🗨️ Why is the taskbar missing only in remote sessions?
This usually happens because remote sessions use different display drivers and screen scaling settings. Network lag or RDP display configuration can also prevent the taskbar from loading correctly, even if it works normally on the local computer.
🗨️ Why is my Remote Desktop not showing taskbar?
If your taskbar is missing in Remote Desktop Connection, it is usually caused by display scaling conflicts, full screen mode glitches, or Windows Explorer not loading correctly in the remote session. This issue is more commonly reported on Windows 11, especially after system updates.
🗨️ How to prevent taskbar from auto hiding in remote desktop?
On the remote computer, right click the taskbar and open Taskbar settings. Turn off Automatically hide the taskbar. Also make sure the RDP window resolution matches your screen size. This reduces display conflicts and helps keep the taskbar visible during remote sessions.
