
7 Effective Ways to Fix Zoom Sharing Screen Not Working
Why is my Zoom sharing screen not working? If you have encountered this problem, don’t panic. Don't allow a minor technical problem to spoil your entire day. Zoom has its own bug and sometimes sharing the screen doesn't work. The good news is that this article will show you seven ways to fix this problem.
By Ellie / Updated on May 21, 2025
Why is my screen sharing not working on Zoom?
Zoom is a versatile video conferencing platform that allows virtual interaction via video, audio, or both. In addition, it doubles as a remote control tool, granting screen control access with the permission of other participants. This is a useful feature in an age where online meetings have become part of our lives.
![]()
However, sometimes errors do occur. Some users do experience disturbing things, such as Zoom sound not working, black screens, and participants on the other end not seeing screen sharing issues. In this article, we will focus on how to fix Zoom sharing screen not working effectively.
How to fix Zoom sharing screen not working on Windows & Mac [7 ways]
How to fix the Zoom screen sharing not working is critical to uninterrupted virtual meetings. If you are having problems with screen sharing, Zoom not working, this article will help. This post puts together 7 common solutions for Zoom screen sharing not working issues, with specific steps on how to apply them via multiple devices.
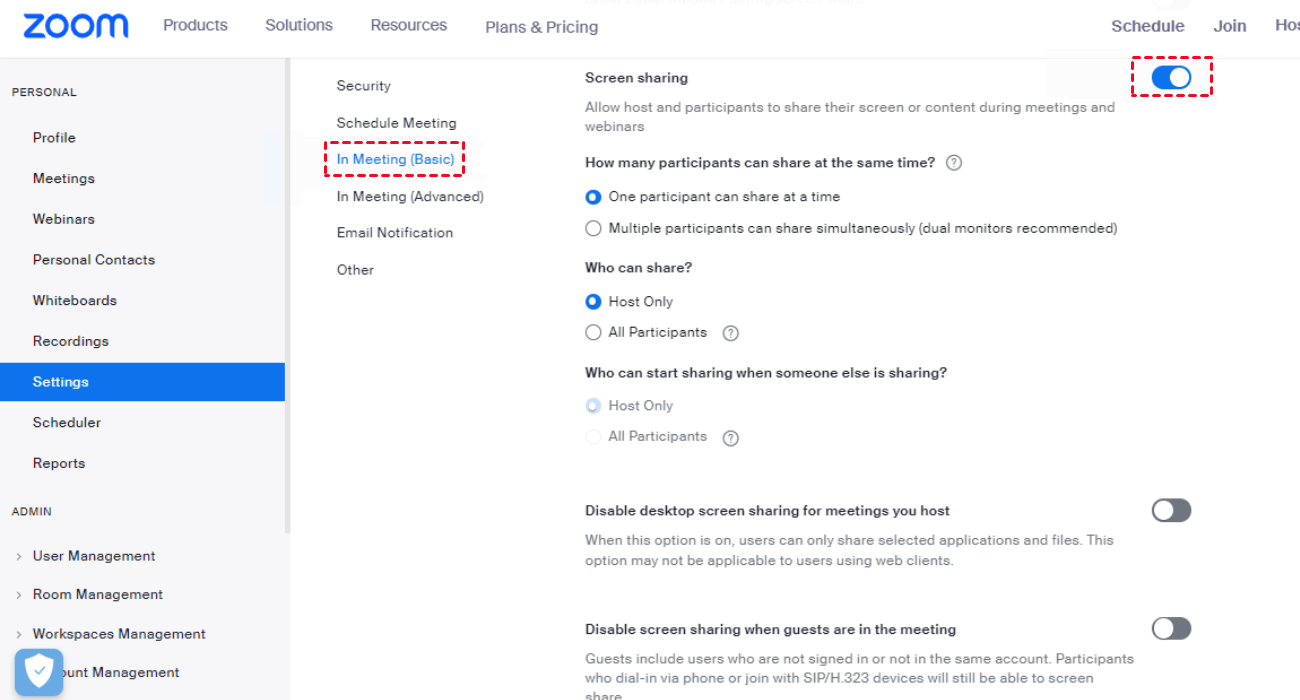
Way 1. Ensure the screen sharing feature is enabled
If screen sharing isn’t working on Zoom, it’s likely because the feature is disabled on your account. To resolve this, you'll need to verify and enable the screen sharing option. Here’s how to do it:
Step 1. Sign in to your Zoom account via the web portal.
Step 2. Navigate to Settings and select the Meeting tab.
Step 3. Scroll down to the In Meeting (Basic) section.
Step 4. Locate Screen Sharing and toggle the switch to Enable.
Step 5. Once enabled, you should be able to share your screen without encountering the error.
Way 2. Enable screen sharing for participants during a Zoom meeting
If you're having trouble with screen sharing while hosting a Zoom meeting, it might be because participants don’t have permission to share their screens. You can easily adjust this setting within the Zoom desktop client to allow others to share or keep the control to yourself.
Here’s how to enable screen sharing for all participants:
Step 1. Start or join a Zoom meeting as the host using the desktop app.
Step 2. On the meeting toolbar, click the upward arrow next to the Share Screen button.
Step 3. Select Advanced Sharing Options from the dropdown menu.
Step 4. In the pop-up window, find the Who can share setting.
Step 5. Choose All Participants to allow everyone in the meeting to share their screen.
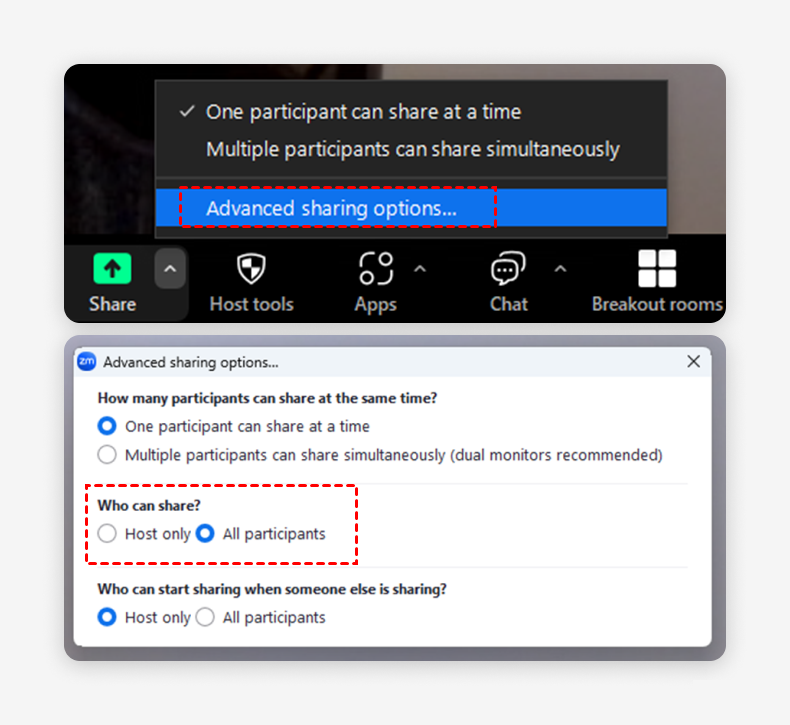
This should immediately resolve issues with screen sharing permissions during your session.
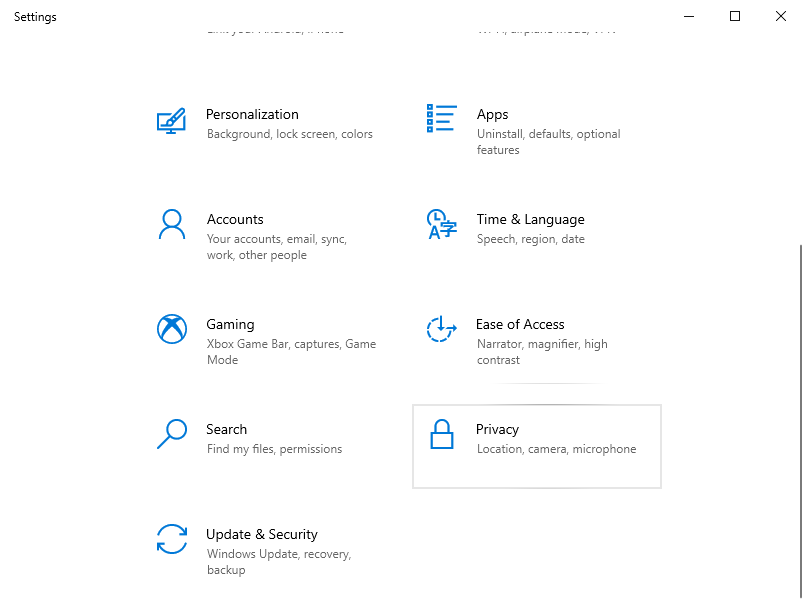
Way 3. Enable app permissions in System Settings
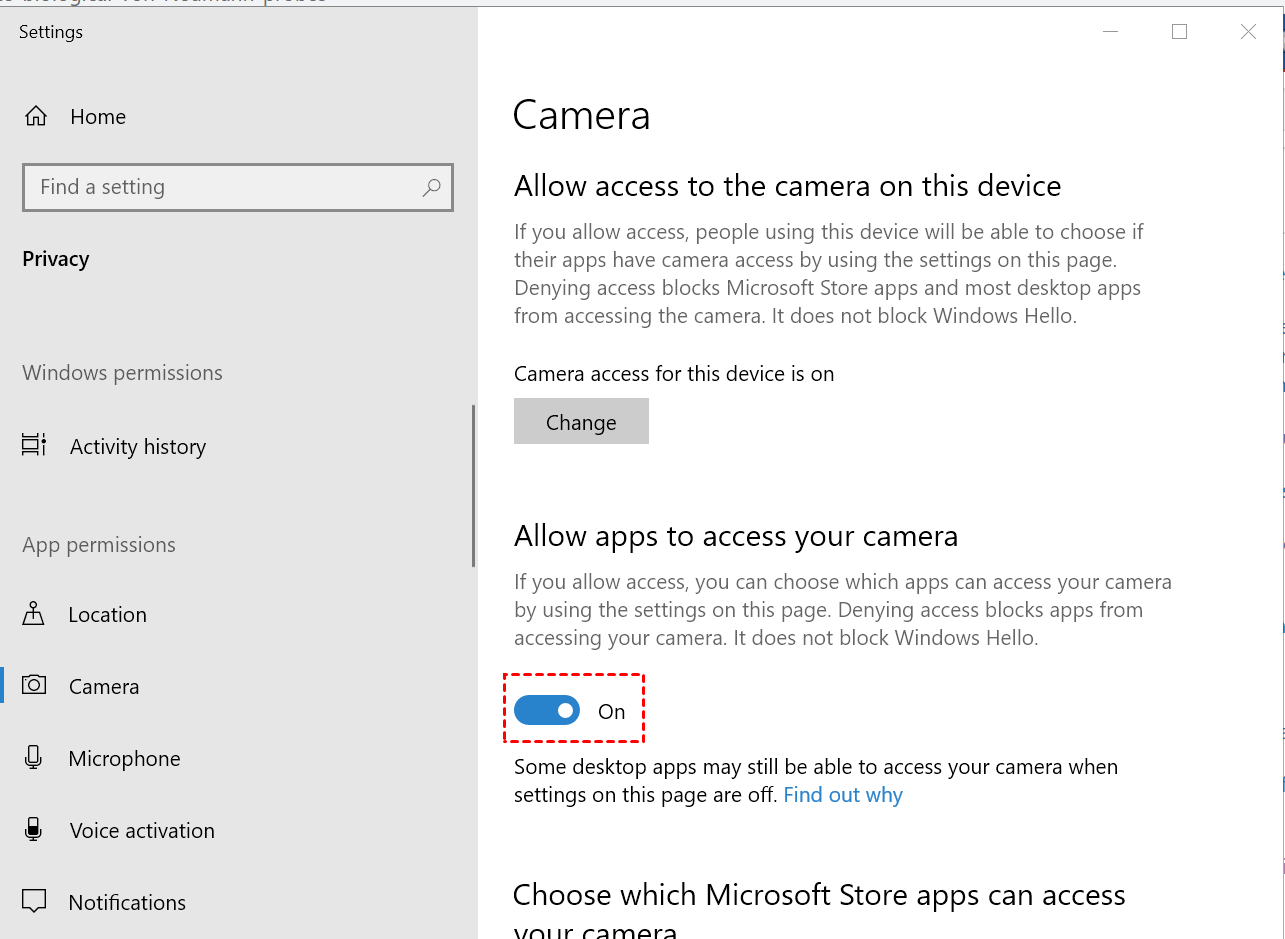
The Zoom screen sharing capability is dependent on device resources such as the camera and microphone. If any of these critical features are deactivated, Zoom may experience issues that prevent the screen sharing feature from working properly. Follow the steps below to enable all permissions to fix the Zoom sharing screen not working error on Windows and Mac.
On a Windows computer:
Step 1. In the search box, search for and open “Privacy setting”
Step 2. Navigate to the “Microphone” section and make sure the slider under “Allow apps to access your microphone” is enabled.
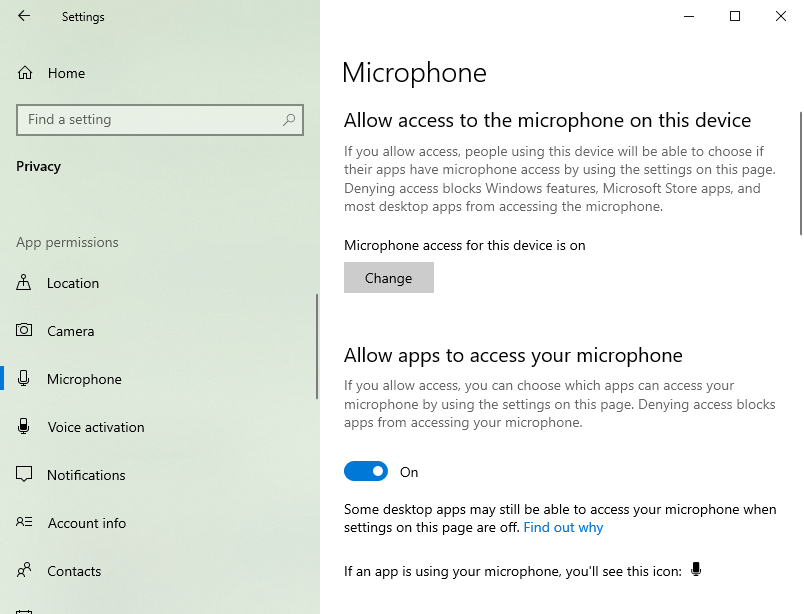
Step 3. Keep scrolling down to find the "Allow desktop apps to access the microphone" option and make sure it is also enabled.
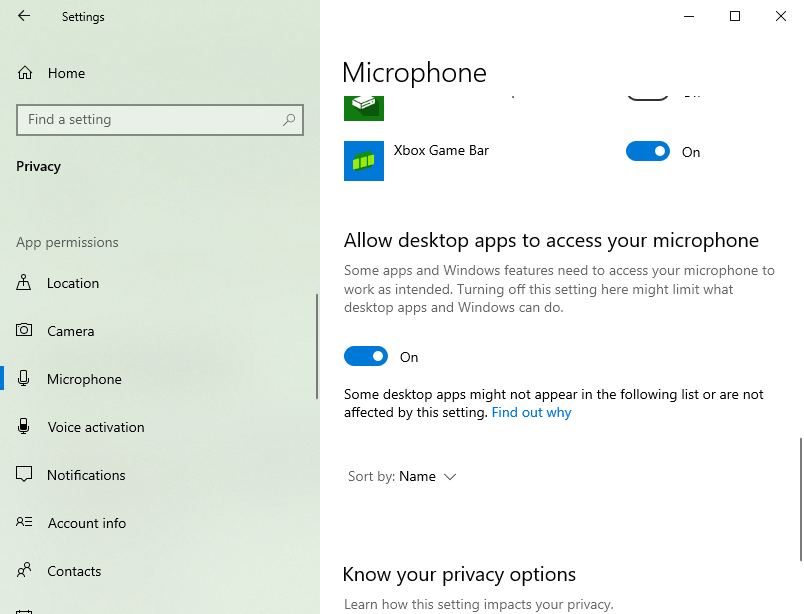
Step 4. Navigate to the “Camera” section and ensure the slider under “Allow apps to access your camera” is enabled.
On a Mac computer:
Step 1. Select "System Preferences" after clicking the Apple logo in the upper left corner of the screen.

Step 2. Find “Security and Privacy”> “Camera”. This step makes the Zoom icon appear on the Home screen.
Step 3. Unlock the "lock symbol" in the bottom-left corner of the screen to make adjustments. And then make sure Zoom's permissions are turned on with a check-mark.
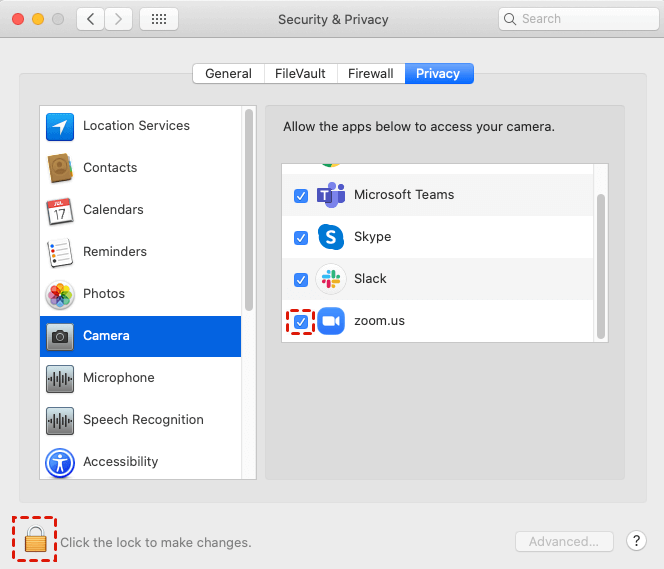
Use the same procedure to check that the microphone is turned on.
Way 4. Change the Preferred Graphics Processor
On laptops, GPUs often switch automatically to conserve battery life, but this feature can sometimes interfere with Zoom’s screen sharing, especially if you're using a dedicated GPU like an Nvidia card. This can lead to black screen issues while sharing your screen.
To fix this, adjust your graphics settings as follows:
Step 1. Open the Nvidia Control Panel from the Windows Control Panel.
Step 2. Go to Manage 3D Settings.
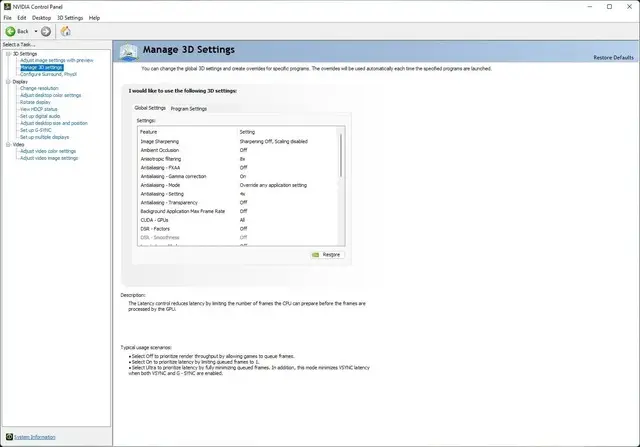
Step 3. Click the Program Settings tab under “I would like to use the following 3D settings.”
Step 4. Under “Select a program to customize,” click Add and locate Cpthost.exe.
Step 5. You can find it in the Zoom installation directory: C:\Users\YOURUSERNAME\AppData\Roaming\Zoom\bin
Step 6. Select Cpthost.exe and click Add Selected Program.
Step 7. In the “Preferred Graphics Processor” dropdown, choose Integrated Graphics.
Step 8. Click Apply to save your settings.
Now, restart Zoom and try screen sharing again. This should resolve any GPU-related display issues.
Way 5. Check for Zoom updates
If you are running an older version of the Zoom application, some features may not work properly, including screen sharing.
Step 1. Click on your profile picture and select “Check for Updates” to check if a newer version of Zoom is available for download.
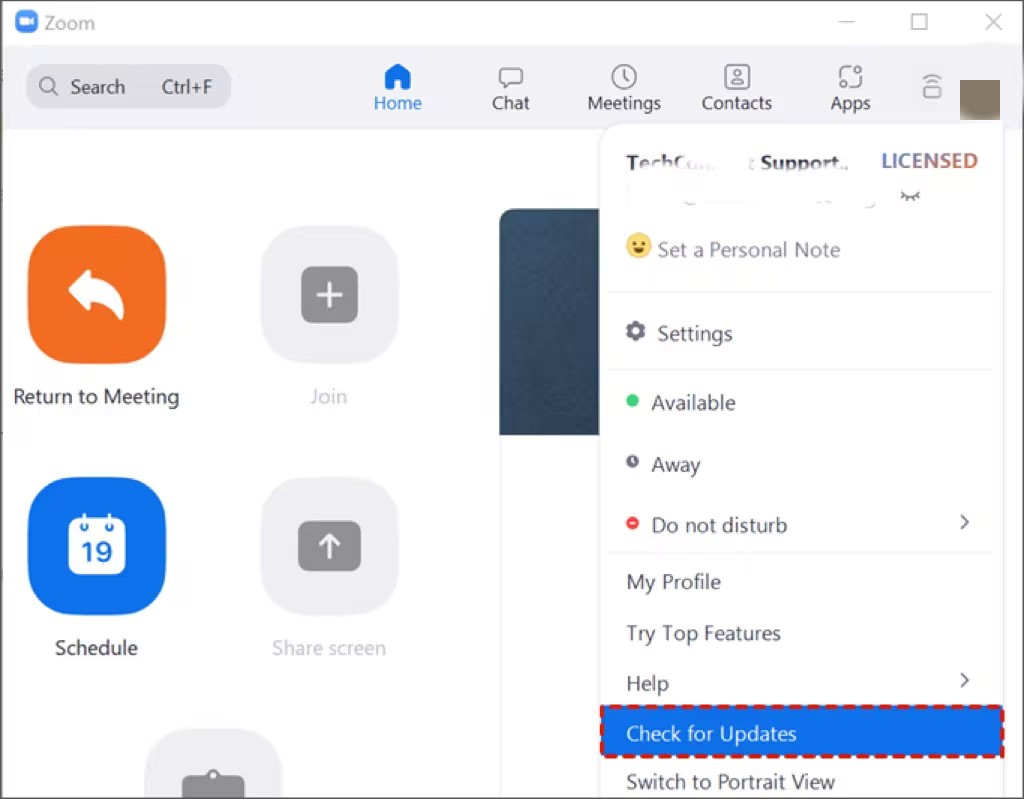
If a newer version of Zoom is available for download, please update and download the latest version before restarting Zoom.
Way 6. Reinstall Zoom
After performing all of the troubleshooting previously considered, if you are still experiencing the Zoom sharing screen not working error, try uninstalling and reinstalling the Zoom application. Doing so will cause Zoom to download new files when connecting to its servers, which will hopefully resolve the issue.
On a Windows computer:
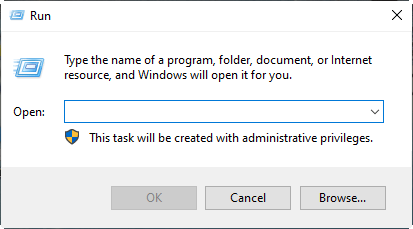
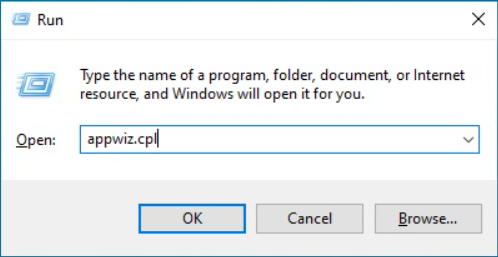
Step 1. Press “Win+R” simultaneously to open the Run prompt
Step 2. Enter “appwiz.cpl” and press “OK”.
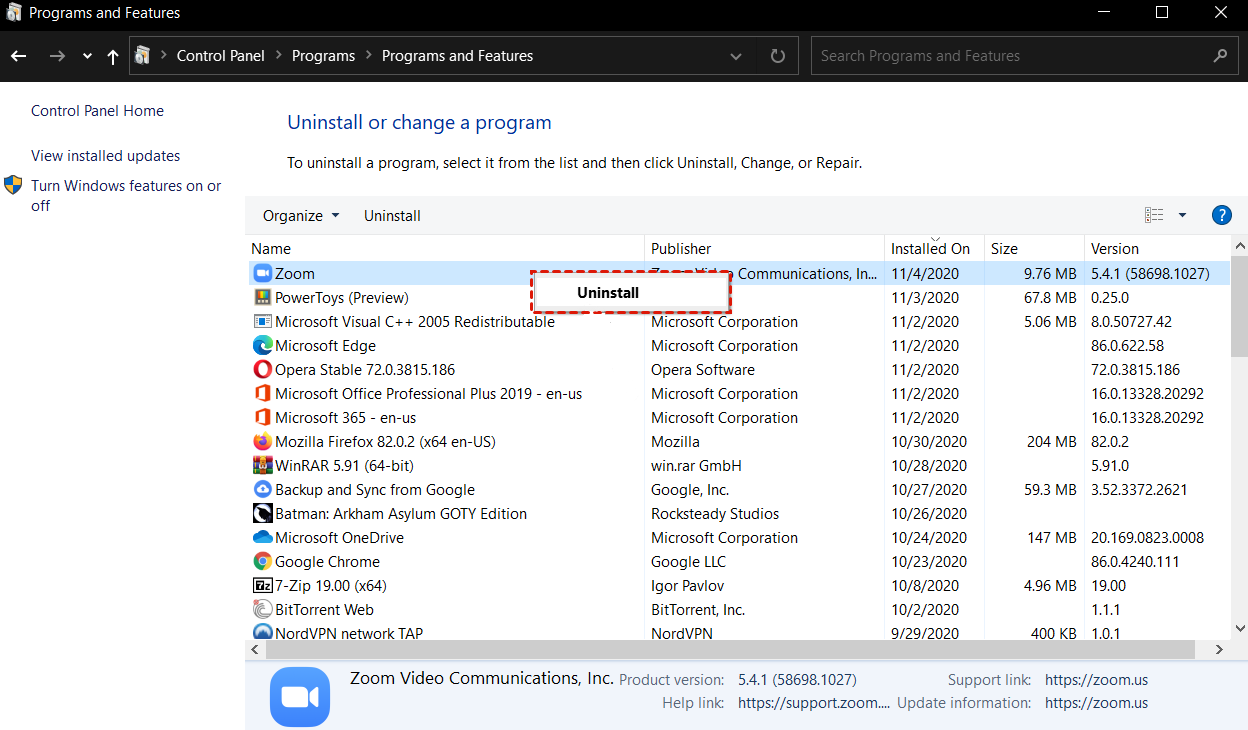
Step 3. Right-click Zoom and select “Uninstall”.
Step 4. Zoom can be downloaded via its official Download Center.
On a Mac computer:
Step 1. Click on the “Finder” icon in the Dock.
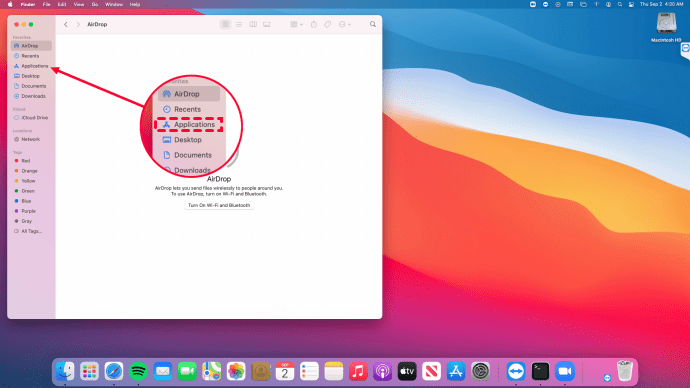
Step 2. Select "Applications" from the sidebar after clicking "Finder" in the Dock.
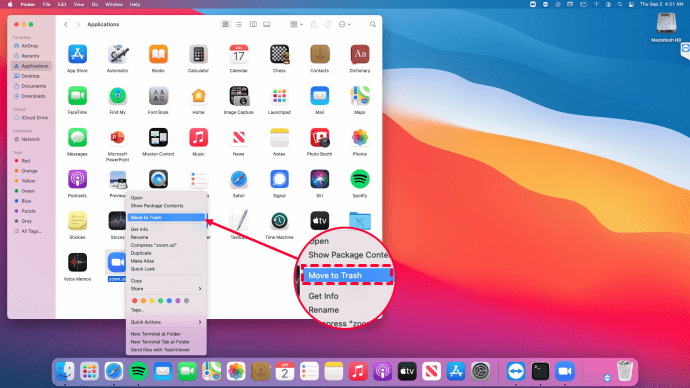
Step 3. Drag the Zoom icon to "Trash" after locating it in the folder. Alternatively, pick "File" and "Move to Trash" from the app's menu. (If you are asked to confirm that you want to delete, enter your account password.)
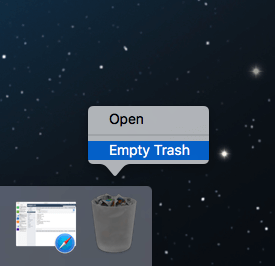
Step 4. Finally, select "Empty Trash" from the context menu when you right-click on the Trash icon.
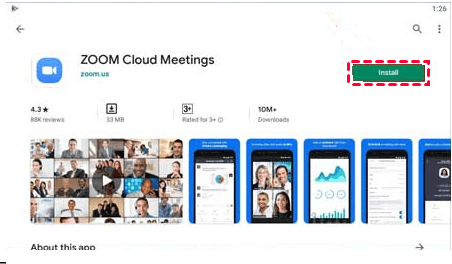
Step 5. From your Dock, select the App Store app.
Step 6. Search for the Zoom app in the store and then click on it. And click “Install” to download it.
Apart from that, you can also visit the official website of Zoom to download and install it.
Way 7. Check your internet connection
As a video conferencing application, Zoom itself requires moderate to strong internet speeds to function properly. You'll need at least a strong 3G network or a moderate 4G/LTE Internet connection to run Zoom with little to no connectivity issues. If your Zoom application restarts frequently or has minor crashes or delays, check your network connection for possible causes.
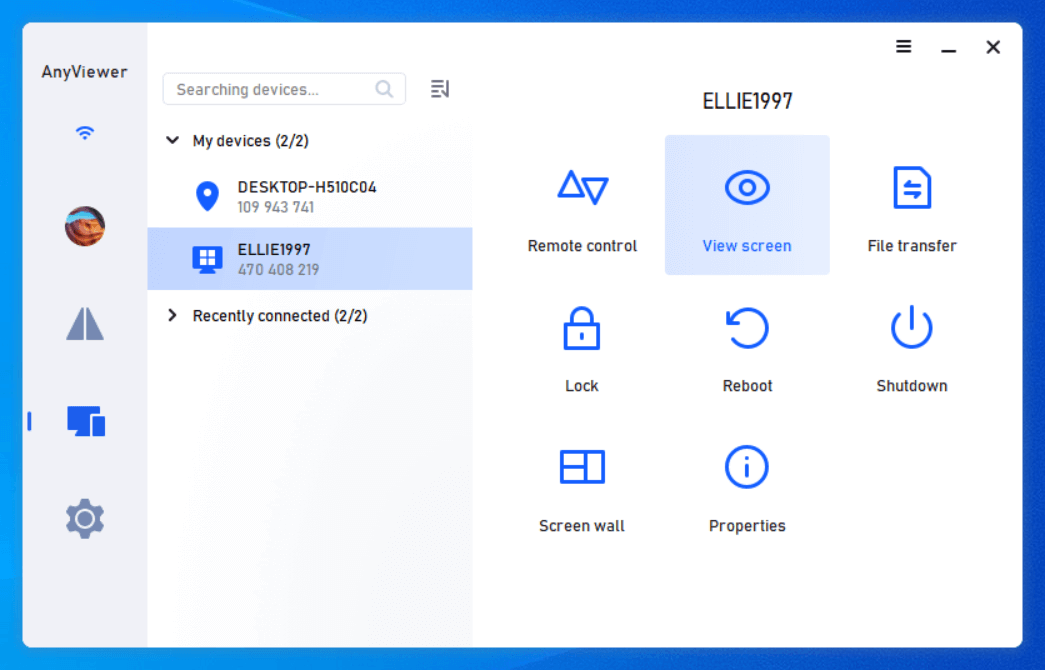
AnyViewer: Best free Zoom alternative for screen sharing
AnyViewer is a top-rated free alternative to Zoom for screen sharing, delivering a smooth, full-screen desktop-sharing experience across Windows, Mac, iOS, and Android. Whether you're sharing your screen between computers or with mobile devices, AnyViewer ensures a fast, stable, and high-quality connection.
It goes beyond screen sharing by offering robust remote control capabilities. If both devices are logged into the same AnyViewer account, you can establish a one-click remote session. It also supports unattended remote access, allowing you to control a device from anywhere as if you were sitting in front of it.
Additional features like file transfer, real-time text chat, and multi-session support make AnyViewer a comprehensive, all-in-one solution for remote collaboration and support, completely free to use.
Step 1. AnyViewer should be downloaded, installed, and launched on both of your devices.
Step 2. Go to "Login" on both computers and click "Sign up" (if you have previously registered on its official website, you can log in right away).

Step 3. Fill out the sign-up form and click "Sign up” to create an AnyViewer account.

Step 4. Upon successful login, Your device will be automatically assigned to the account you logged into.

Step 5. Then navigate to "Devices" and choose the computer to which you want to connect. Click on it and select "View the Screen" to view the remote screen without requesting permission.
- ★Tips: It is recommended to upgrade your account to a professional or enterprise plan. Then you’ll have the following rights:
- More devices can be added to the same account for unattended access.
- Multiple devices can be connected to the same device at the same time.
- At the same time, you can transfer an unlimited number of huge files (1TB per file).
- Enjoy numerous handy features, such as Privacy Mode, which lets you deactivate the keyboard and mouse on the remote PC and black out the remote screen.
- Enjoy high-image quality.
- ...
Conclusion
In short, the implementation of the above seven methods can effectively solve the problem of Zoom sharing screen not working. By enabling necessary permissions, adjusting app settings, updating apps, maintaining a stable Internet connection, and reinstalling apps, users can resolve issues related to screen sharing during Zoom sessions. In addition, using AnyViewer as a viable Zoom alternative provides users with advanced screen sharing and remote control capabilities for a smoother conferencing experience.
