
7 Effective Solutions to Fix Windows 11 RDP Not Working
What should we do when Windows 11 Remote Desktop not working? What are the reasons causing RDP not connecting? Here you can get possible reasons and useful solutions.
By Ellie / Updated on April 9, 2026
Remote Desktop is a built-in Windows feature that enables seamless remote access for work and technical support. However, users often encounter connection issues, such as the error shown below, when attempting to access a remote server.

According to the system diagnostics, these connection failures are typically caused by:
- Remote access to the server is not enabled
- The remote computer is turned off
- The remote computer is not available on the network
This guide provides a comprehensive troubleshooting path—from basic configuration checks to advanced registry fixes—to help you restore your remote connection quickly.
Quick Pre-Check: 3 Essential Conditions
Before diving into complex settings, ensure these conditions are met to rule out 50% of common connection failures:
- Check Windows Edition: RDP natively works as a host only on Windows 11 Pro or Enterprise. If the target PC runs Windows 11 Home, RDP is disabled by default.
- Power Settings: Ensure the remote PC is powered on and configured to never enter Sleep or Hibernate mode.
- Network Connectivity: Verify both devices are on the same local network, or that you have a functional VPN/Port Forwarding setup for external connections.
7 Solutions to Fix Windows 11 RDP Not Working
If you're unable to establish a remote connection, try these seven proven methods to troubleshoot and restore your Windows 11 RDP access.
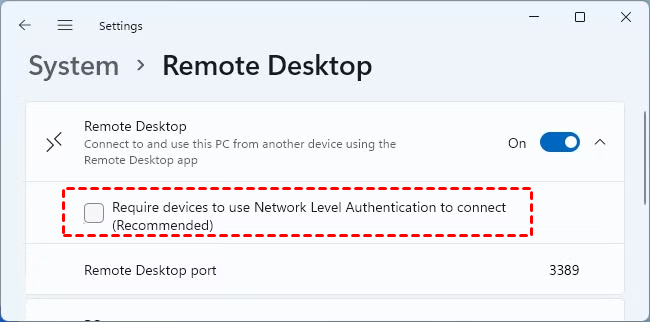
Solution 1. Enable RDP & Adjust NLA Settings
Windows disables RDP by default for security. Furthermore, NLA is a security layer that requires the user to be authenticated before a connection is established. While safer, it frequently causes "Credentials did not work" errors due to domain or account sync issues.
Step 1. Press Win + I to open Settings, and then find “Remote Desktop” on the right pane.
Step 2. Double-click on Remote Desktop and then tick the button to enable the RDP.
Step 3. Click the small dropdown arrow next to the toggle.
Step 4. Uncheck the box: "Require devices to use Network Level Authentication to connect."
Step 5. Click on Remote Desktop Users to verify that your user account has permission to connect.
Solution 2. Change network profile to "Private"
Windows categorizes networks as "Public" or "Private." On a Public network (like a coffee shop), Windows Firewall blocks all incoming RDP requests by default. Changing it to Private tells Windows you trust the devices on this network.
Steps:
Step 1. Open Settings on the Host PC.
Step 2. Navigate to Network & internet.
Step 3. Select Wi-Fi or Ethernet (whichever you are currently using).
Step 4. Under Network profile type, select Private.
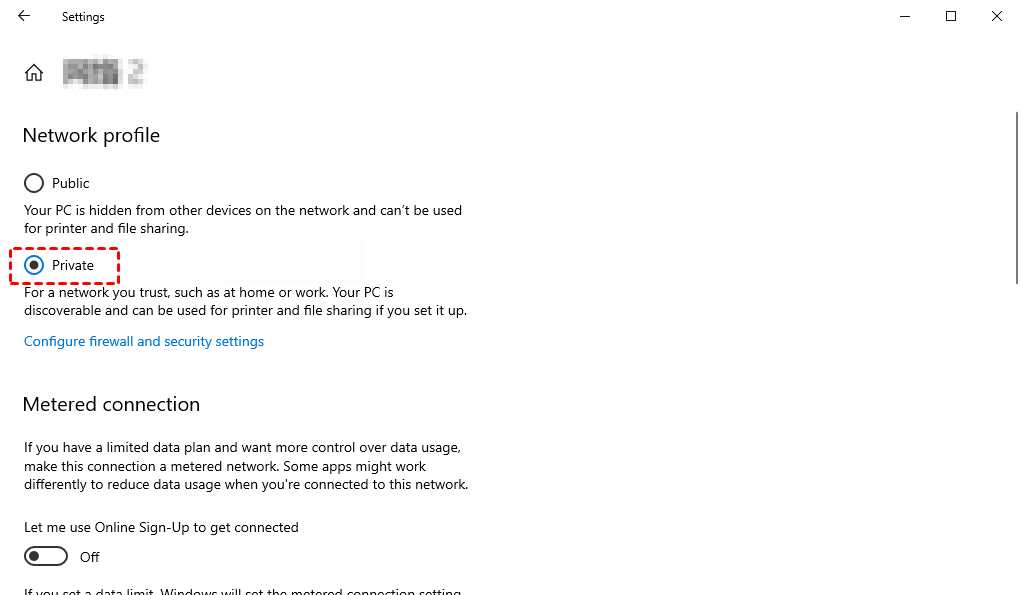
Step 5. Restart the Remote Desktop app on your local computer and try connecting again.
Solution 3. Verify Remote Desktop Services
If the background services aren't running, RDP cannot listen for requests.
Step 1. Press Win + R and then input services.msc to open the Services.
Step 2. Scroll down and locate “Remote Desktop Services”, and double-click on it.
Step 3. Locate Startup type, choose “Automatic” and then click on “OK”.
Solution 4. Turn on Network Discovery
Step 1. Search control and panel in the search box.
Step 2. Choose a category and then click on “Network and Internet”.
Step 3. Select Network and Sharing Centre, then click on “Change Advanced sharing settings”.
Step 4. Choose “Turn on network discovery” and then click on Save changes.
Solution 5. Add the host PC’s IP address
Step 1. Click on the File Explorer on the bottom line and then open the file in C: /Windows/ System32/ Drivers/etc and then find hosts. Click on hosts and right-click, choose “Open with”.
Step 2. Choose Notepad and click on “OK”.
Step 3. Type the IP address of the host computer and then click on “File” or “Save”.
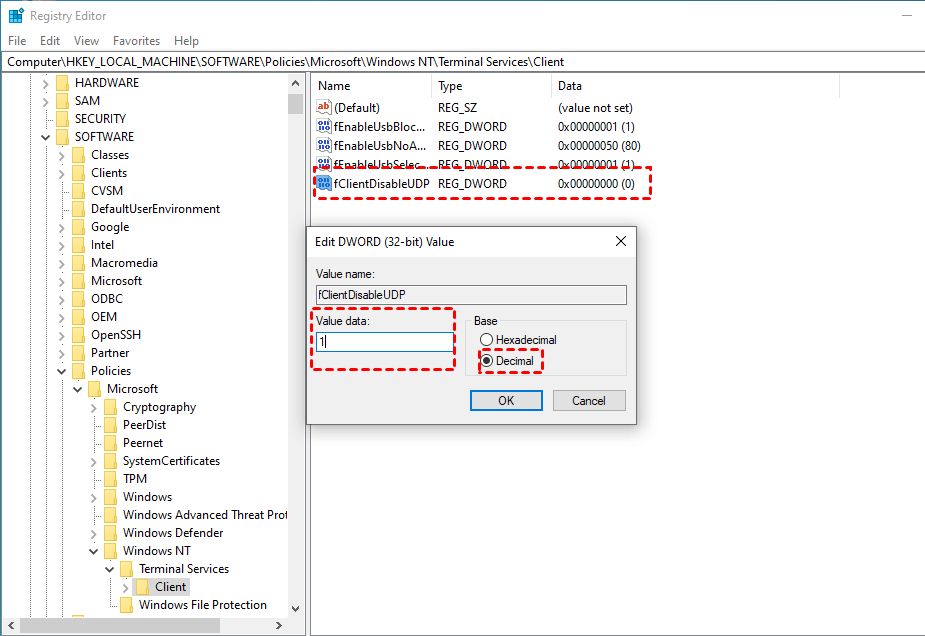
Solution 6. Disable UDP via Registry
A known bug in Windows 11 (especially version 22H2 and later) causes RDP to hang or fail due to UDP protocol issues. Disabling UDP forces RDP to use stable TCP.
Step 1. Press Win + R, type regedit, and hit Enter.
Step 2. Navigate to: HKEY_LOCAL_MACHINE > SOFTWARE > Policies > Microsoft > Windows NT > Terminal Services > Client
Step 3. Right-click on the right pane, create a new DWORD (32-bit) Value, and name it fClientDisableUDP.
Step 4. Set its Value data to 1.
Solution 7. Configure Windows Firewall Inbound Rules
Sometimes, even if RDP is enabled, the specific "Inbound Rule" that allows traffic through port 3389 (the RDP port) is disabled by third-party antivirus software or system updates.
Step 1. Search Windows Defender Firewall in the search box.
Step 3. Click on “Allow an app or feature through Windows Firewall" and then select Change Settings.
Step 4. Scroll down and locate “Remote Desktop”, ensure the box on the left is checked, and both the Private and Public columns are checked, and then click on OK.
Troubleshooting Other Windows 11 RDP Errors
While general fixes solve many connectivity problems, Windows often triggers specific error messages. Here is how to resolve the most common ones.
How to Fix "Your Credentials Did Not Work" in Win 11 RDP
When Remote Desktop denies your correct login details and displays the error "Your credentials did not work," it is usually due to account synchronization issues or security policy restrictions. Here are the most effective ways to fix it:
- Disable Network Level Authentication (NLA): As mentioned earlier, unchecking NLA in the Remote Desktop settings is the most common fix, as it allows for broader compatibility during the login phase.
- Modify Local Group Policy: Open gpedit.msc and navigate to: Computer Configuration > Administrative Templates > System > Credentials Delegation. Enable "Allow delegating default credentials with NTLM-only server authentication" and add TERMSRV/* to its server list.
- Adjust Windows Security Policy: In secpol.msc, navigate to Local Policies > Security Options. Find "Network access: Sharing and security model for local accounts" and ensure it is set to "Classic" instead of "Guest only."
- Change Windows Password Provider via Registry: If you use a Microsoft Account (rather than a local account), you may need to go to HKEY_LOCAL_MACHINE > SYSTEM > CurrentControlSet > Control > Lsa and set LimitBlankPasswordUse to 1.
- Clear Saved Credentials: Open Credential Manager on your local PC, find the Windows Credentials related to the remote IP, and remove them. Then, try to reconnect and re-enter your password manually.
How to Fix "The Server Security Layer Detected an Error" (0x80090304)
For the specific error "The server security layer detected an error (0x80090304) in the protocol stream," the issue usually stems from a mismatch in security protocols (TLS/SSL) or certificate corruption.
- Change RDP Security Layer via Group Policy: Open gpedit.msc and navigate to: Computer Configuration > Administrative Templates > Windows Components > Remote Desktop Services > Remote Desktop Session Host > Security. Find "Require use of specific security layer for remote (RDP) connections", set it to Enabled, and choose RDP from the dropdown menu (instead of Negotiate or SSL).
- Disable UDP Protocol: As this error often occurs during the handshake phase, forcing RDP to use TCP can bypass the error. Use the Registry Editor to set fClientDisableUDP to 1 (as described in the advanced fixes section).
- Update/Reinstall Network Adapter Drivers: An outdated network driver can cause corruption in the encrypted data stream. Ensure your network drivers on both the host and client are up to date.
- Reset Winsock and TCP/IP Stack: Open Command Prompt as Administrator and run the following commands to clear network conflicts:
- netsh winsock reset
- netsh int ip reset
- Delete Corrupted RDP Certificates: Open certlm.msc (Local Computer Certificates), go to Remote Desktop > Certificates, and delete the existing RDP certificate. Restart the Remote Desktop Services in services.msc to let Windows regenerate a fresh, valid certificate.
How to Fix "Local Security Authority Cannot Be Contacted"
This error typically occurs when the authentication request cannot be processed by the remote system's security subsystem, often manifesting as "The Local Security Authority cannot be contacted." You can resolve it using the following methods:
- Disable "Restricted Admin" Mode via Registry: This is the most common cause. Navigate to HKEY_LOCAL_MACHINE > System > CurrentControlSet > Control > Lsa in the Registry Editor. Create a new DWORD (32-bit) value named DisableRestrictedAdmin and set its value to 0.
- Enable Credential Guard (or Disable if conflicting): Credential Guard can sometimes block standard LSA communication. You can manage this via Group Policy under: Computer Configuration > Administrative Templates > System > Device Guard > Turn on Virtualization Based Security.
- Modify DNS Settings: If the client cannot resolve the domain controller or the host's security identifiers, the LSA contact will fail. Try switching to a stable DNS (like Google DNS: 8.8.8.8) or flushing your DNS cache using ipconfig /flushdns.
- Check Domain Membership: If you are on a corporate network, ensure both the host and client computers are still correctly joined to the domain. Re-joining the domain can often refresh the security trust relationship.
- Adjust Security Support Provider (SSP): Ensure that the NTLM and Negotiate providers are active in the Windows Registry under the Security Packages key to allow the LSA to negotiate the connection successfully.
Frustrated with RDP? Try AnyViewer — The Simple RDP Alternative

While the manual fixes above can solve most Windows 11 RDP issues, they are often time-consuming, highly technical, and limited by your network environment or Windows edition.
If you find registry edits too risky or are frustrated by Windows Home Edition limitations and the lack of a Public IP, it’s time to switch to AnyViewer. AnyViewer is a free, professional remote desktop software designed to work where RDP fails.
Why Choose AnyViewer Over Standard RDP?
AnyViewer eliminates the technical hurdles of traditional remote access, providing a seamless experience without complex manual configurations:
- Supports All Windows Editions: Unlike RDP, which requires the Pro or Enterprise version, AnyViewer fully supports Windows 11/10 Home—no expensive upgrades or system hacks required.
- Bypass Port Forwarding & VPNs: Access your PC from anywhere in the world instantly. AnyViewer handles the connection for you, so you don't have to worry about static IPs, routers, or firewall inbound rules.
- Zero-Config, One-Click Connectivity: Forget about NLA settings or Group Policy edits. Achieve a stable, high-speed connection with a single click.
- Bank-Level Security: Your sessions are protected by ECC (Elliptic Curve Cryptography) encryption, keeping your data safe from the vulnerabilities often associated with open RDP ports.
Get Connected in 3 Simple Steps
Step 1. Download & Install: Run AnyViewer on both your local and remote computers.
Step 2. Sign Up: Create a free account and log in on both devices.

Step 3. One-Click Control: Navigate to "Device," select your target PC, and click "One-click control" to start your session instantly.

- More Devices: Assign more PCs for one-click unattended access.
- Multi-Channel: Control multiple remote devices at the same time.
- Privacy Mode: Secure your work by blacking out the remote screen and locking the keyboard.
- High-Speed Transfer: Move large files faster with significantly higher speeds.
- HD Quality: Enjoy crystal-clear visuals for a "locally present" experience.
Conclusion
Troubleshooting Windows 11 RDP not working can be a tedious process, ranging from adjusting firewall rules to editing the registry. While the steps above resolve most local connection issues, they often fall short for users on Windows Home or those without a public IP. For a faster, more reliable experience that works across all networks and Windows editions, AnyViewer remains the most efficient one-click RDP alternative to keep you connected without the configuration headache.
