
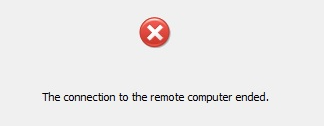
Fixed: The Connection to the Remote Computer Ended Windows 10
This post provides you with tested solutions to fix the problem of “The connection to the remote computer ended” on Windows 10 under different situations. Choose the solutions according to your situation.
By Ellie / Updated on December 26, 2025
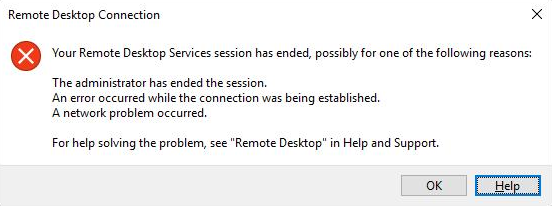
Error “The connection to the remote computer ended”
There are two situations where you might receive the error message “The connection to the remote computer ended” on Windows 10.
On the one hand, you may get it when you are trying to use Windows Remote Desktop to control another PC remotely, as shown in the following. In this case, you can’t connect to other computers successfully as your Remote Desktop Services session has ended.
On the other hand, you may get it when they are trying to connect to VMware virtual machines using Windows Remote Desktop. In this case, your remote connections to the virtual machine will not work as expected which means you are unable to access a virtual machine remotely.
Then how to troubleshoot Your Remote Desktop Services session has ended problem and VMware Horizon Client the connection to the remote computer ended on Windows 10 problem? Here in this post, we provide you with solutions respectively.
How to fix “The connection to the remote computer ended” error
The solutions to the problem of “The connection to the remote computer ended” are divided into two parts. If you’re getting into trouble when using RDP to connect to other computers, then read Part 1. If you’re getting into trouble when connecting to VMware virtual machines using Windows Remote Desktop, then read Part 2.
Part 1. Troubleshoot Remote Desktop error
For this part, we provide you with two solutions to troubleshoot the problem encountered when using RDP to connect to other computers.
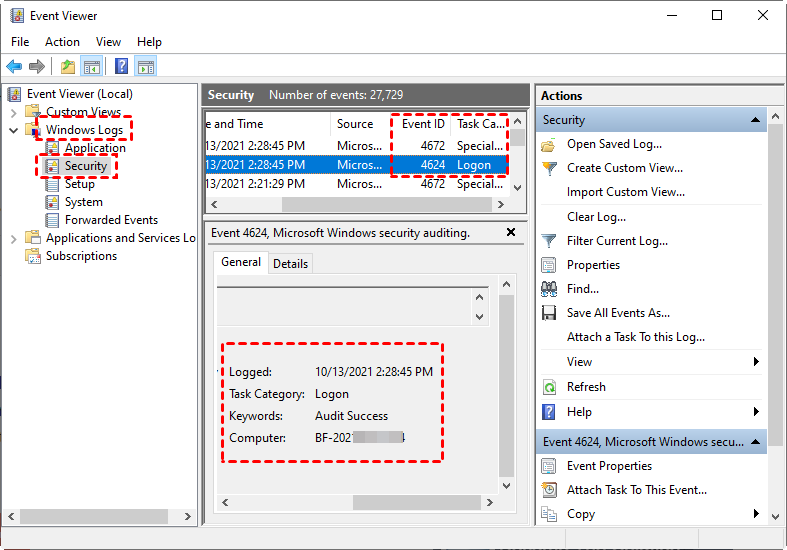
Solution 1. Check logs for Remote Desktop
This problem may be due to someone else having forcefully knocked you out of your remote session or you mistakenly remote twice into the same computer and forcefully closed your original remote session. Therefore, you can check to see who is attempting to log in and override your remote session in the remote machines.
Search for Event Viewer in the search box and open it. Expand Windows Logs and then click Security. Search for Event ID 4624. Then you can identify who is logging in around the time you are being kicked out.
Solution 2. Disable restriction on Remote Desktop session
You can also change the Group Policy setting to allow users to make unlimited simultaneous remote connections by using Remote Desktop Services.
Step 1. Navigate here: Computer Configuration > Administrative Templates > Windows Components > Remote Desktop Services > Remote Desktop Session Host > Connections. On the right pane, find Restrict Remote Desktop Services users to a single Remote Desktop Services session and double-click it.
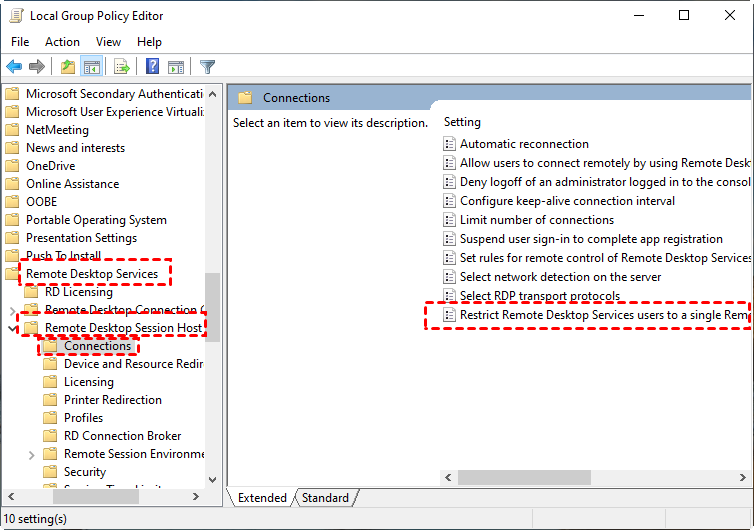
Step 2. Then disable the policy setting.

Alternative solution: third-party remote connection software – AnyViewer
If your RDP doesn’t work very well, then you can use the third-party remote connection software, AnyViewer. It is a free yet professional remote control software for multiple Windows versions, including Windows 11/10/8.1/8/7 and Windows Server 2022/2019/2016/2012 R2. With the same account logged in to the two computers, you can easily achieve unattended remote access with just one click.

Part 2. Troubleshoot VMware remote connection error
For this part, we provide you with three solutions to troubleshoot problem encountered when connecting to VMware virtual machines using Windows Remote Desktop.
Solution 1. To configure virtual machine with a bridged connection
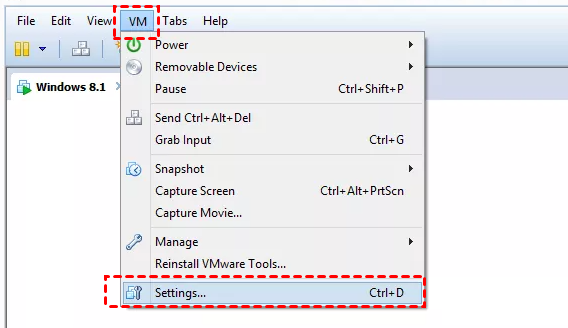
Step 1. Open your VMware Workstation, click VM and then click Settings.
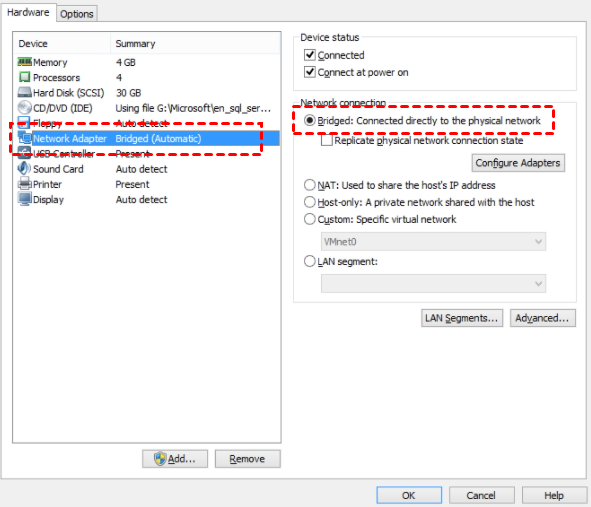
Step 2. In the Hardware tab, highlight the Network Adapter and then select Bridged: Connected directly to the physical network.
Solution 2. To configure port forwarding on the NAT connection for virtual machine
You can also configure your virtual machine to be connected to a physical network via a NAT connection.
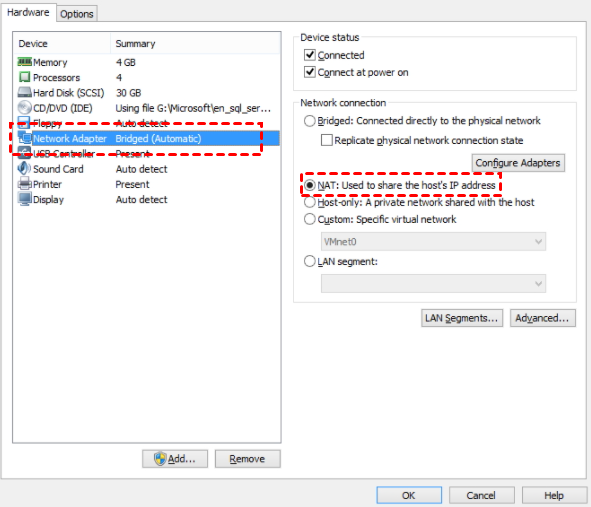
Step 1. Open your VMware Workstation, click VM and then click Settings. In the Hardware tab, highlight the Network Adapter and then select NAT: Used to share the host’s IP address.
Step 2. Press Win + R to invoke the Run dialog box. Type in “cmd” and press OK. Then type “ipconfig” and press Enter. Now you can see a group of IP addresses, note down the IPv4 address.

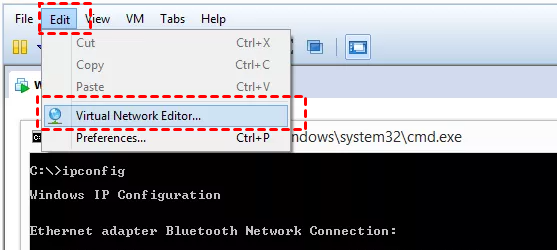
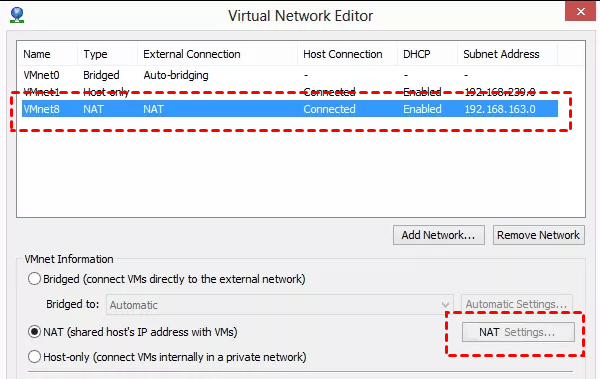
Step 3. Click Edit and then click Virtual Network Editor.
Step 4. Select the network adapter that is set to the NAT interface, By default, this is VMnet8. Then click NAT Settings.
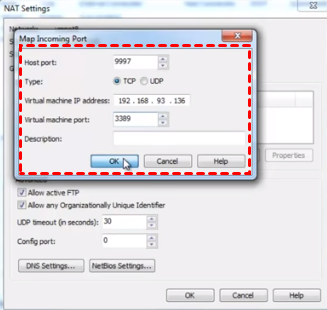
Step 5. Click the Add button within the NAT Settings dialog box. In the Map Incoming Port dialog box, fill in these details and click OK:
- The host port needs to be an unused port. For example, you can use port 9997.
- The virtual machine port needs to be 3389, unless you have changed it.
- The virtual machine IP address needs to be the IP address assigned to the virtual machine you wish to connect to NAT connection.
Conclusion
This post primarily introduces two situations where you might encounter a "The connection to the remote computer ended" error and provides you with the solutions to each situation. If you're facing this problem right now, this post may help you out.
