
How to Control My Parent’s Computer Remotely [Windows/Mac]
This post provides a concise introduction on how to control my parent's computer remotely, regardless of whether it's Windows to Windows, Mac to Mac, or using other computer systems. If you're interested, read on for more details.
By Ellie / Updated on December 26, 2025
How can I remote in to my parents' computer?
I have difficulty trying to help my mother load information from her thumb drive to her hard drive. Even this simple task is next to impossible as my mother cannot explain to me what she’s doing and the state of her desktop, and also cannot understand what I'm saying. This really drives me crazy. Is there free or cheap safe remote access software that would let me access her laptop from far away?
- Question from AnandTech Forums
Most of us have grown up with computers, making it second nature to operate them. However, our parent's generation had limited exposure to computers, making them reliant on us for tech assistance. Guiding them over the phone can be frustrating, but you might be wondering if there's a way to remotely access their computers from anywhere. Is it possible to lend them a hand more effectively?
Luckily, with the help of remote access and remote support software, you can easily control your parents' computer from anywhere and help them fix the computer remotely. Here are five effective ways of how to control my parents' computer remotely. Keep reading.
How to control my parents' computer remotely [5 effective ways]
Here are five effective ways of how to help parents with computers remotely, regardless of whether it's Windows to Windows, Mac to Mac, or using other computer systems.
For Windows to Windows remote connections
When both you and your parents are using Windows, there are several tools you can explore, the easy-to-use third-party or built-in tools. The most suitable option may vary based on the specific version of the operating system you are running. However, if you're not on the same version, simplicity should be the guiding factor in choosing the right tool for your situation.
Way 1. Free all-in-one remote control application AnyViewer
If you are in need of reliable and free remote desktop software, AnyViewer is an excellent choice. It caters specifically to Windows, iOS, and Android users, providing a comprehensive solution for remote access and support. Additionally, AnyViewer boasts a wide array of impressive features, such as file transfer, screen sharing, multi-session capabilities, and more. The software also facilitates quick access to CMD, This PC, and Task Manager, which greatly benefit the remote support process.
Pros:
- It supports attended remote support and unattended remote access.
- The software offers a stable and fast connection, irrespective of whether you're using it over WiFi or a network.
- Setting up remote connections is generally simple, with clear instructions and guides provided.
- Your remote sessions are secured with end-to-end Elliptic Curve Cryptography (ECC) encryption.
- An optimized connection algorithm ensures faster and smoother performance.
Cons:
- Currently, the software is only available for Windows and does not support Mac and Linux operating systems.
► Here's how to remotely access my parents’ computer via AnyViewer:
Step 1. Now both your and your parents’ computers have successfully downloaded AnyViewer. Fire it up and you’ll see the following interface.
Step 2. On your computer, go to Log in, and then click Sign up. (If you already have signed up on its official website, you can log in directly).

Step 3. Fill in the signup information.

Step 4. Then you can see you successfully logged in to AnyViewer. Your device will automatically be assigned to the account you've logged in to.

Step 5. Log in to the same AnyViewer account on your parents' computer, then click One-click control to achieve unattended remote access and provide remote support.

- ★Tips:
- In addition to its standard features, AnyViewer offers tailored plans for business purposes at competitive prices. You have the option to choose either Professional or Enterprise plan, granting you additional benefits such as:
- More concurrent remote sessions for increased productivity.
- Expanded device assignment to manage multiple connections efficiently.
- Faster file transfer speeds, streamlining data sharing between devices.
- Enhanced security with the inclusion of privacy mode, ensuring confidential interactions during remote sessions.
Way 2. The built-in Microsoft Windows Remote Desktop Connection
Windows Remote Desktop Connection is a native Windows program developed by Microsoft, designed to facilitate remote connections without requiring any additional downloads. Its client is available for Windows, macOS, Android, and iOS, but the host is available for Windows, which means you can use Windows, macOS, Android, and iOS to control a Windows computer.
Pros:
- Free for Windows Pro or above users.
- Offers excellent performance.
- Supports clients for Windows, macOS, Android, and iOS.
Cons:
- By default, it allows connections only on the LAN, or you need to set up Remote Desktop port forwarding.
- Remote Desktop server-side functionality is restricted on Windows Home/Standard editions, requiring an upgrade to Pro/Enterprise.
- Limited to controlling Windows computers only.
► How to help parents with computers remotely via Microsoft Remote Desktop Connection:
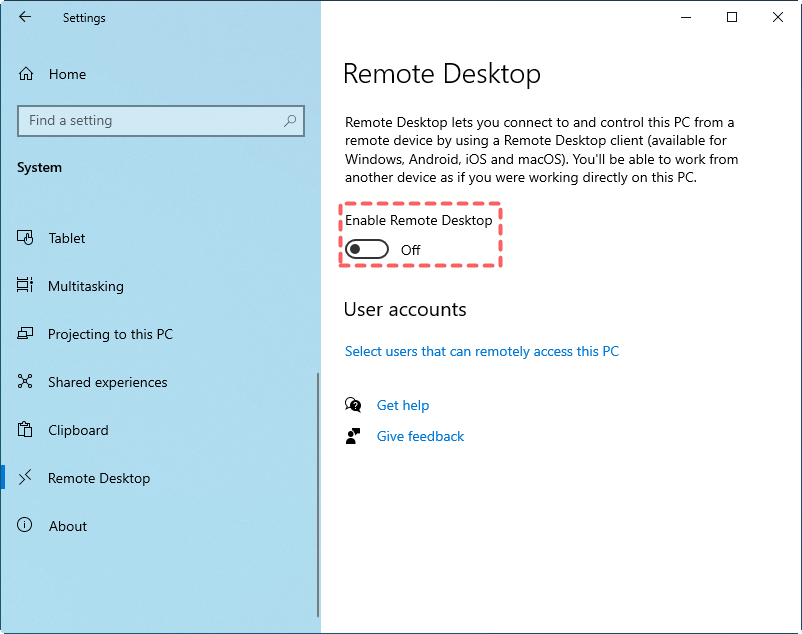
Step 1. On your parents' computer, go to Settings > System > Remote Desktop, turn On Remote Desktop option, and click Confirm.
Step 2. Navigate to: Control Panel> System and Security > Windows Defender Firewall > Allowed apps. Click Change settings, tick Remote Desktop, and click OK.

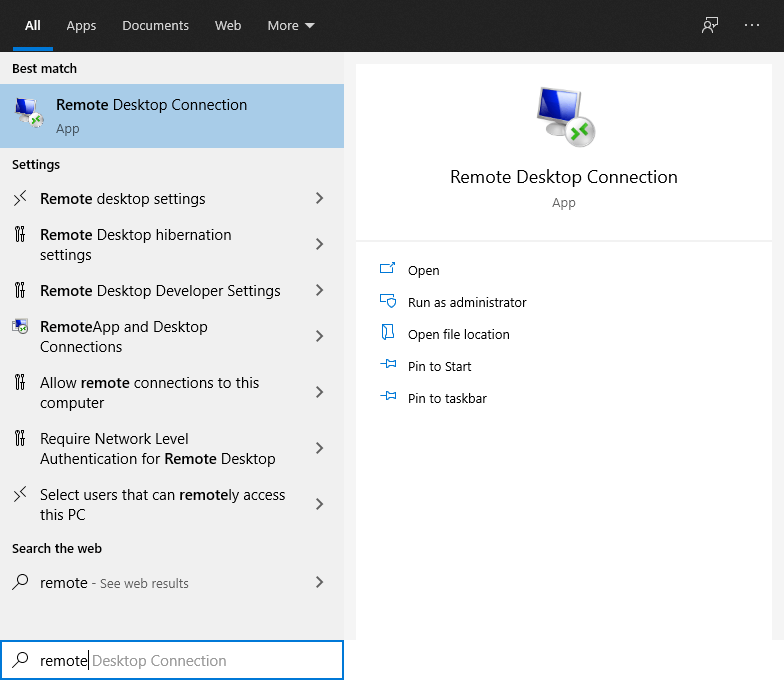
Step 3. On the your computer, open Remote Desktop Connection from the start menu.
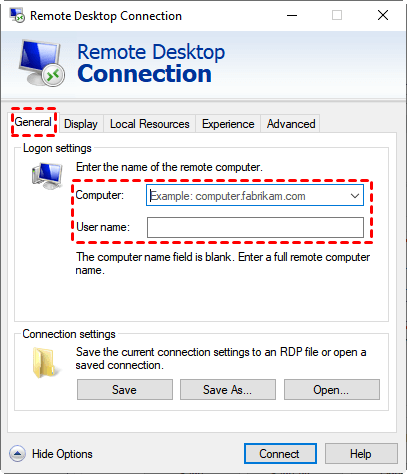
Step 4. Enter the IP address and username of your parents' PC, then click Connect to start the session.
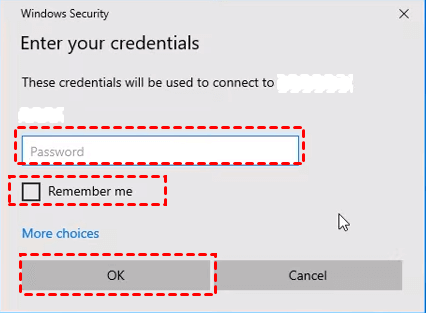
Step 5. If prompted, enter your credentials and click OK.
Way 3. Built-in Quick Assist for Windows 10 & 11
Quick Assist is a built-in feature in Windows, that allows remote connections between PCs. However, it is only compatible with Windows 10 and 11. If you are using other systems or Windows versions, consider alternative options. Here are its pros and cons:
Pros:
- It is free to use.
- No external installation is needed as it comes pre-installed in Microsoft Windows-supported versions.
- It supports multiple machines on a target machine.
- You can quickly launch it by pressing the Windows + Ctrl + Q keys.
Cons:
- Quick Assist only offers attended access, requiring an end-user to be present to accept a remote connection. Unattended remote access is not available.
- It supports remote connections only between Windows 10/11 computers; other OS and mobile devices like Android cannot use Quick Assist.
- Quick Assist lacks various practical features, such as file transfer, remote restart, and clipboard sharing.
► How to help parents with computers remotely via Quick Assist:
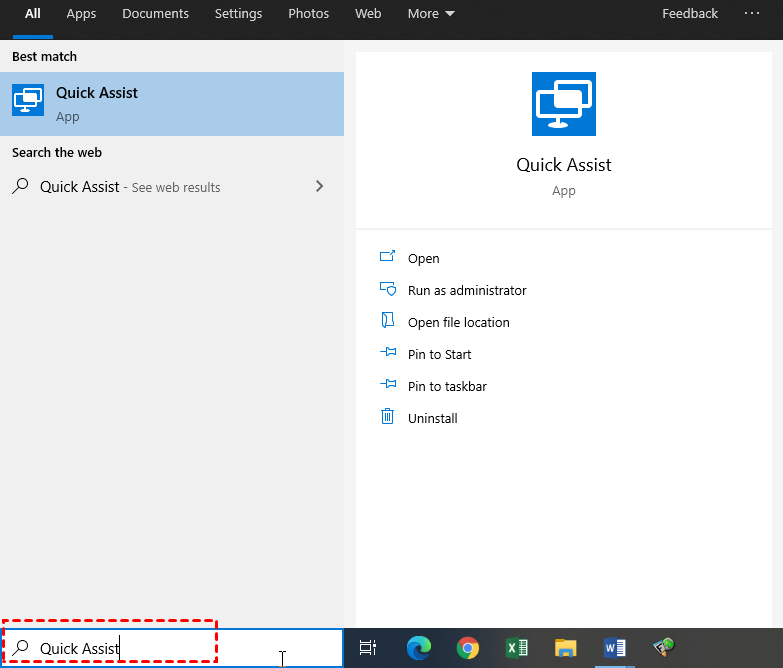
Step 1. Open Quick Assist from the Search box.
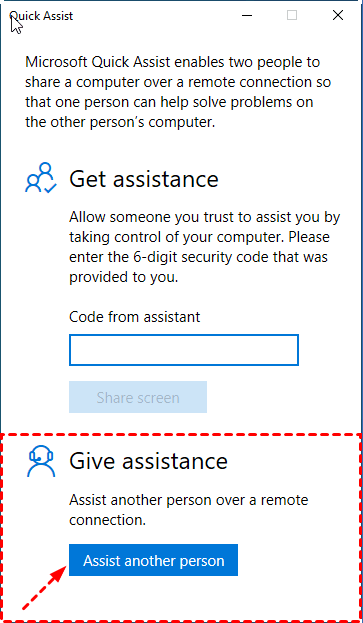
Step 2. On your computer, click Assist another person.
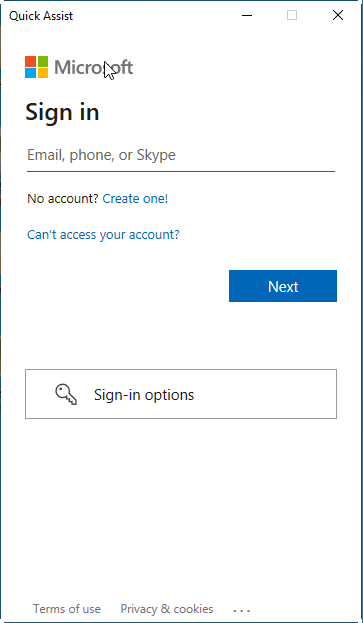
Step 3. Sign in to your Microsoft account and click Next.
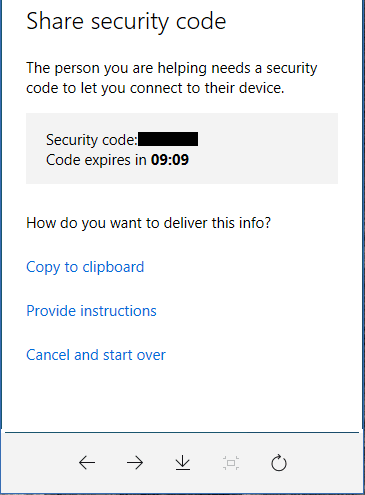
Step 4. You will get a security code when you successfully log in. Please send it to your parents on the remote side.
Step 5. On your parents' computer, launch Quick Assist, enter the security code, and click Share screen.

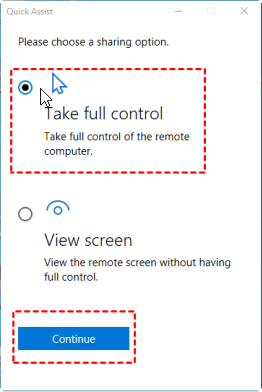
Step 6. On your computer, tick Take full control and click Continue.
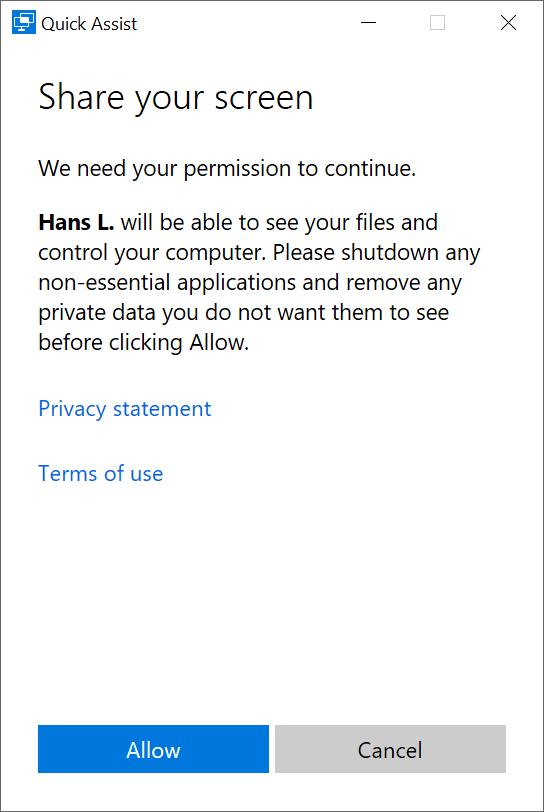
Step 7. Your parents' computer will receive a request, click Allow.
Step 8. When the connection is established, you can manage the device remotely.

For Mac to Mac remote connections
For Mac users seeking to share screens and provide remote assistance, built-in options within Messages and FaceTime are available. Let's take Messages as an example. To utilize this feature, both Macs involved in the remote assistance should have Apple ID accounts and be logged into the Messages app. This allows for seamless screen sharing and collaboration.
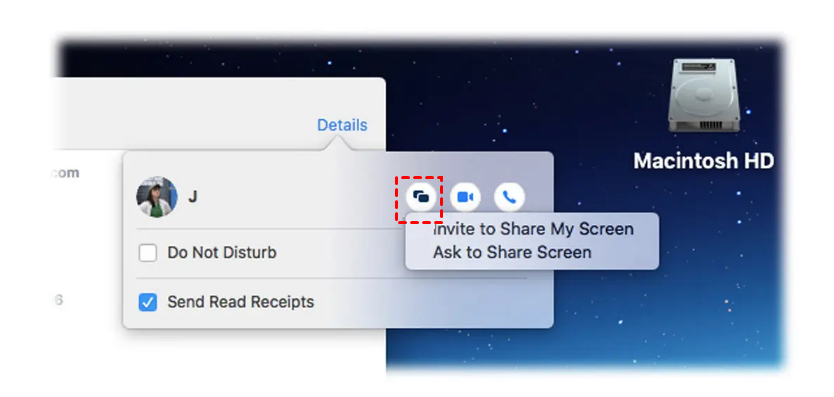
Step 1. Launch Messages on your Mac and start a conversation with your parents. Click the Details button in the upper right corner of the window. Then, click the Screen Share button (two overlapping rectangles) and select Ask to share screen.
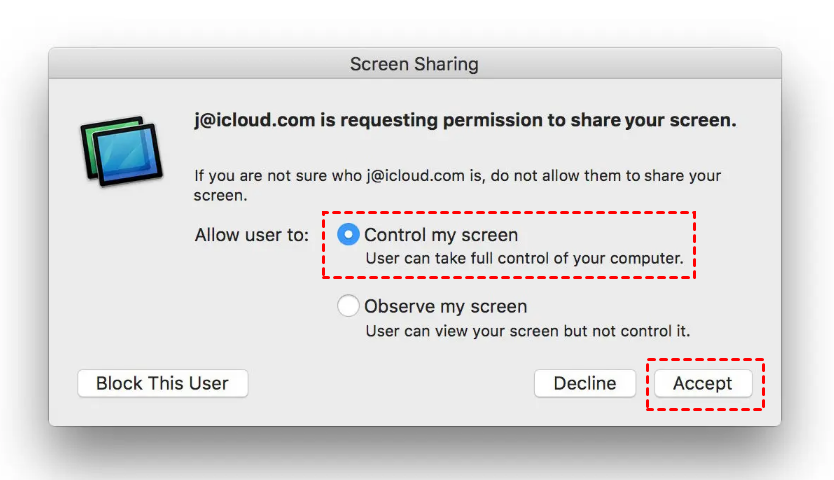
Step 2. On your parents' Mac, they need to check Control my screen and click Accept to initiate the screen-sharing session.
If you're the one in need of help, you can also initiate the screen sharing by reaching out to a Messages buddy and using the "Invite to Share My Screen" option. This allows the other person to view and control your screen for assistance.
For cross-platform remote connections
For Windows users aiming to control a Mac, the above-mentioned options may not be suitable. However, there are cross-platform software solutions available that can assist in this situation. Chrome Remote Desktop, for instance, is a viable option that allows you to control a Mac from your Windows system.
Pros:
- Quick installation process.
- Supports multiple monitors for enhanced productivity.
- Frequent updates to ensure optimal performance.
- Continues to function even when the host user is logged off, maintaining uninterrupted access.
- Compatible across different operating systems, promoting versatility.
Cons:
- File transfer functionality can be cumbersome and may not be as seamless.
- The software lacks the ability to print remote files to a local printer, which can be inconvenient.
- No chat capability for communication between users during remote sessions.
- Limited usage to Chrome browsers only, restricting access for users on other browsers.
- Requires a Google account, making it mandatory to utilize the remote desktop service.
Step 1. Open Google Chrome on both computers and log in using the same Google account.
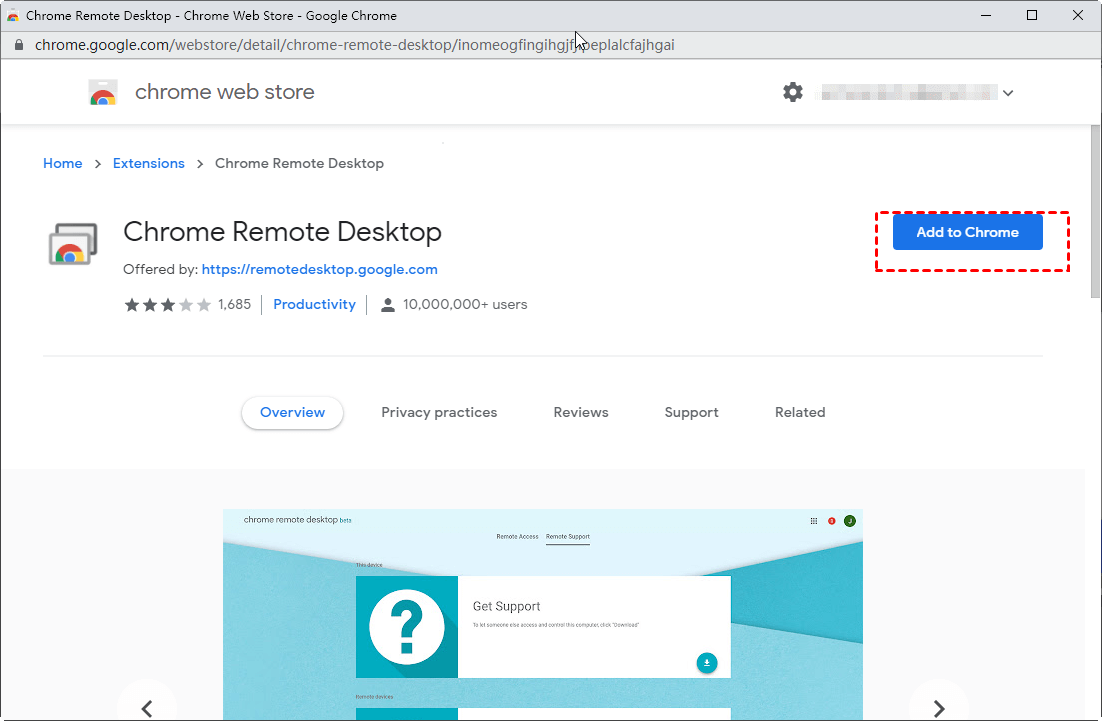
Step 2. Find Chrome Remote Desktop in Google extensions and click Add to Chrome.
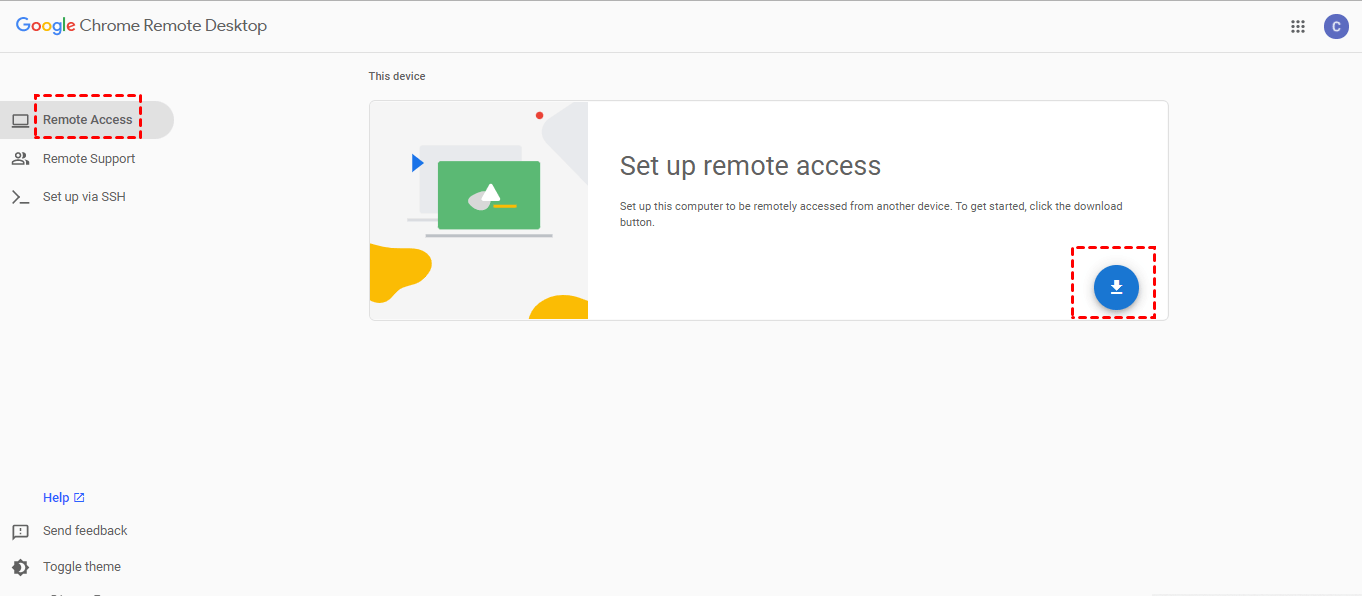
Step 3. Once added, click Remote Access and select the download button.
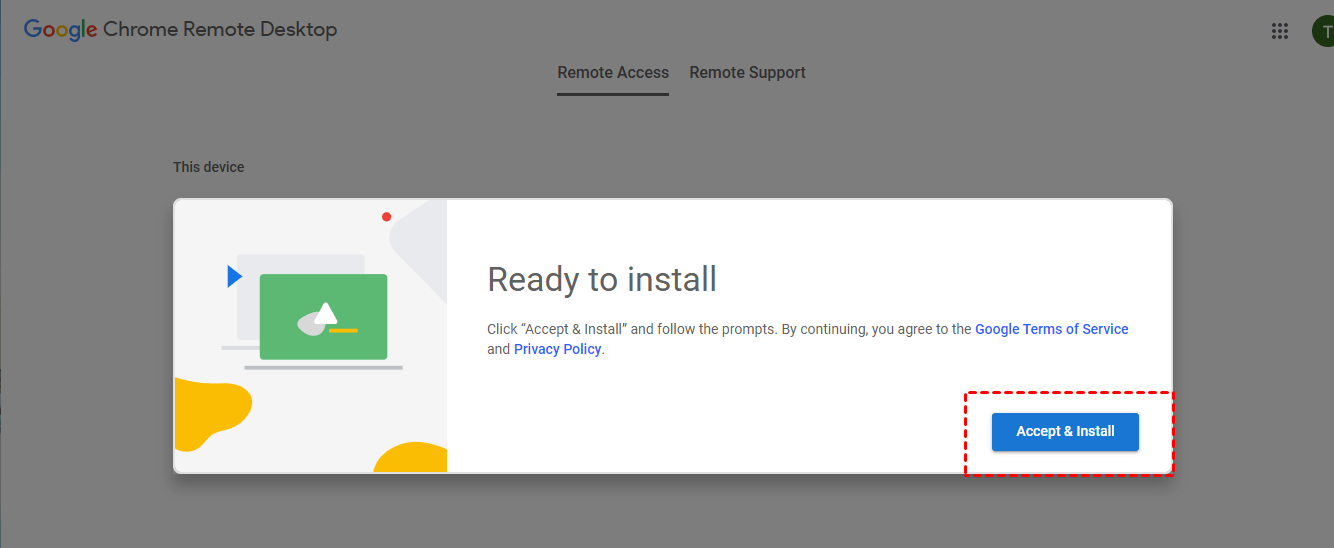
Step 4. Click Accept & Install to proceed with the installation.
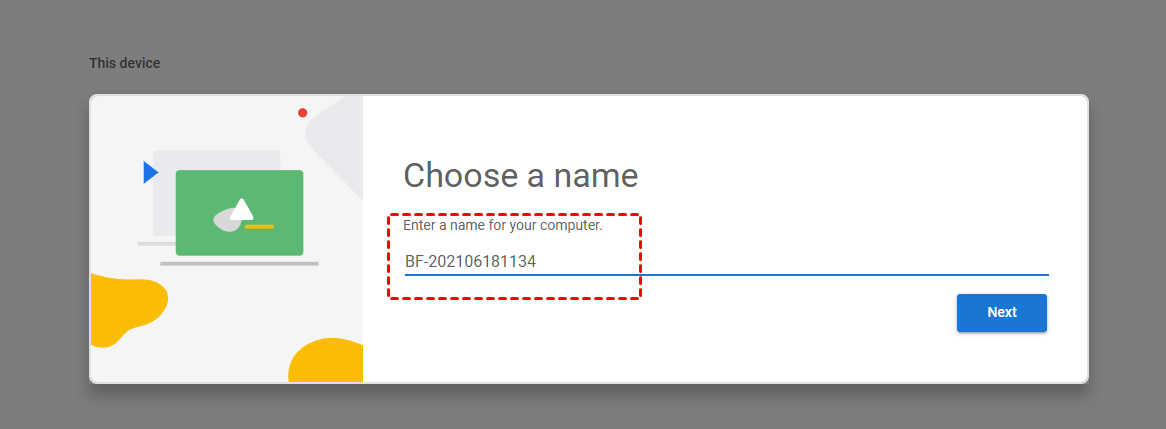
Step 5. Enter a name for the computer and click Next.
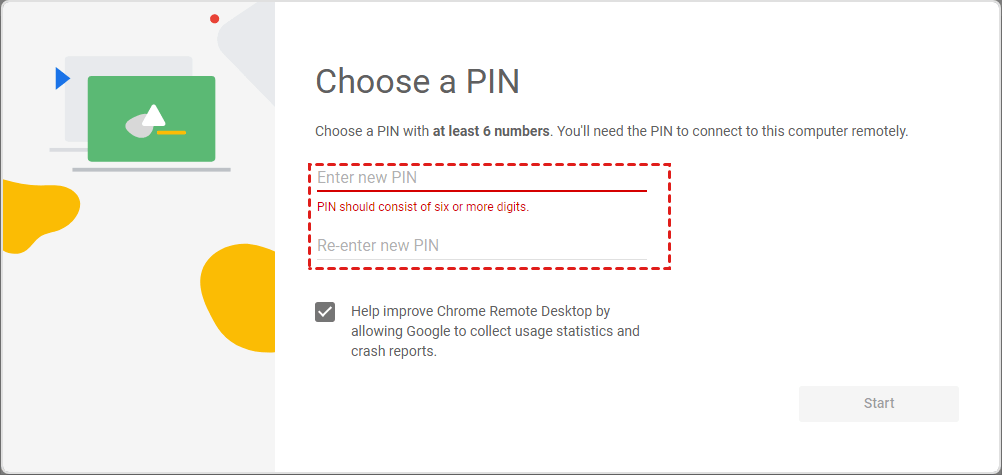
Step 6. Set a PIN and confirm it by re-entering, then click Start.
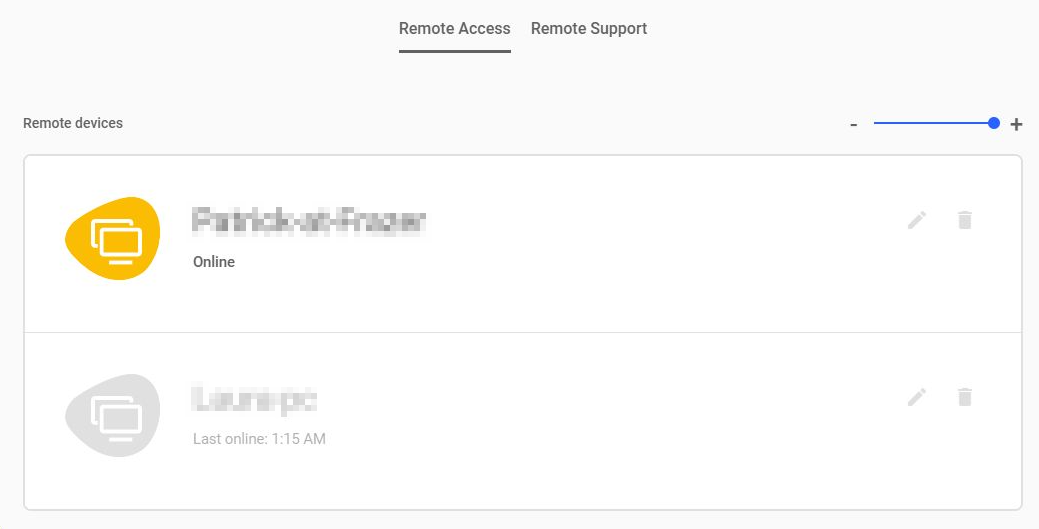
Step 7. On your computer, you will see available devices. Choose your parents' computer.
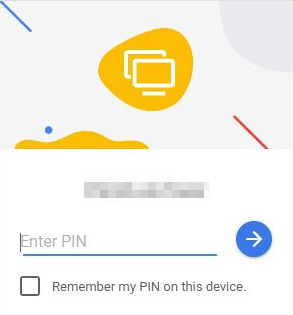
Step 8. Enter the PIN of your parents' computer, and finally, click the blue arrow to initiate the remote session.
Conclusion
It highlights five effective methods, catering to various scenarios, such as Windows-to-Windows, Mac-to-Mac, and cross-platform remote connections. Choose the option that best suits your specific needs and preferences.
