
How to Create a Virtual Display on Remote Desktop in Windows 10
This guide explains how to create virtual screen Windows 10 using virtual display software. It also introduces practical ways to use multiple monitors in remote desktop for better remote work experience.
By Irene / Updated on March 4, 2026
🌟Quick Summary:
This article explains what a virtual display is and why it is important for remote desktop environments. A virtual display is a software generated screen that works like a physical monitor, allowing users to extend desktops, adjust resolution, and run applications even when no real monitor is connected. It is especially useful for headless systems, servers, testing environments, and multitasking scenarios.
The guide also shows how to create virtual displays on Windows 10, Windows 11, and Windows Servers using tools like AnyViewer. By enabling the Virtual Screen feature, users can add multiple software based monitors during a remote session without extra hardware. This improves productivity, fixes resolution limitations, and ensures stable screen output.
In short, virtual displays provide a flexible, efficient, and reliable way to enhance remote work, support multi monitor simulation, and maintain smooth remote desktop performance.
What is a virtual display?
A virtual display is a software generated screen that works like a real monitor but does not require physical hardware. It is created by the operating system or a display driver and appears as an additional monitor in your system settings. Even though you cannot see or touch it physically, your computer treats it as a normal screen.
- ★To better help to understand it, here are the key points:
- It is created by software: A virtual display is generated by a driver or system feature, not by plugging in a cable or adding a monitor.
- It behaves like a real monitor: You can extend your desktop, move windows to it, adjust resolution, and set display preferences just like with a physical screen.
- It supports remote access: Virtual displays are often used in remote desktop tools to ensure a stable screen output, especially when no monitor is connected to the remote computer.
- It is useful for headless systems: Servers or computers running without a physical monitor can still load a graphical interface through a virtual display.
- It helps with testing and multitasking: Developers and IT administrators use virtual displays to simulate multi-monitor setups or test different screen resolutions without extra hardware.
In short, a virtual display removes the need for additional physical monitors while still providing the same display functionality. It offers flexibility for remote management, development, streaming, and many other professional tasks.
How to create virtual display on Windows 10, 11 and Servers?
When working remotely on Windows 10, Windows 11, or Windows Servers, one common problem is limited screen space. Even if your local computer has multiple monitors, a traditional remote session often shows only one screen. You have to switch between windows again and again, which slows down your work, especially during long remote sessions.
A practical solution is to create virtual displays through a reliable Windows virtual display software like AnyViewer. With its Virtual Screen feature, you can add extra screens in a remote session without connecting any physical monitors. These screens are created by software, so no additional hardware is required on the remote computer.
After enabling the Virtual Screen feature, you can open multiple virtual displays and use them independently. For example, one screen can run business systems or work programs, another can handle files or reference materials, and a third can be used for communication tools or personal tasks. Each screen works separately, so activities on one will not affect the others. This setup makes multitasking much easier and more efficient.
- ★ 3 Preparations:
- Install and Connect: Make sure AnyViewer is installed and running on both devices, and a remote control session has been successfully established.
- Check Permissions: Confirm that the controlling account has permission to use the Virtual Screen feature. This feature is available in the Pro or higher version.
- Ensure Device Readiness: Verify that the controlled device is working normally. Virtual Screens are software based and do not require extra physical monitors.
Step 1. Start a remote control to your target PC via AnyViewer with signed up and log in. Then click One-click control.


Step 2. Go to the Screen tab in the top toolbar of the remote window, then click Virtual screen, and choose how many virtual monitors you want to set up (for example, 2 or 3 screens).
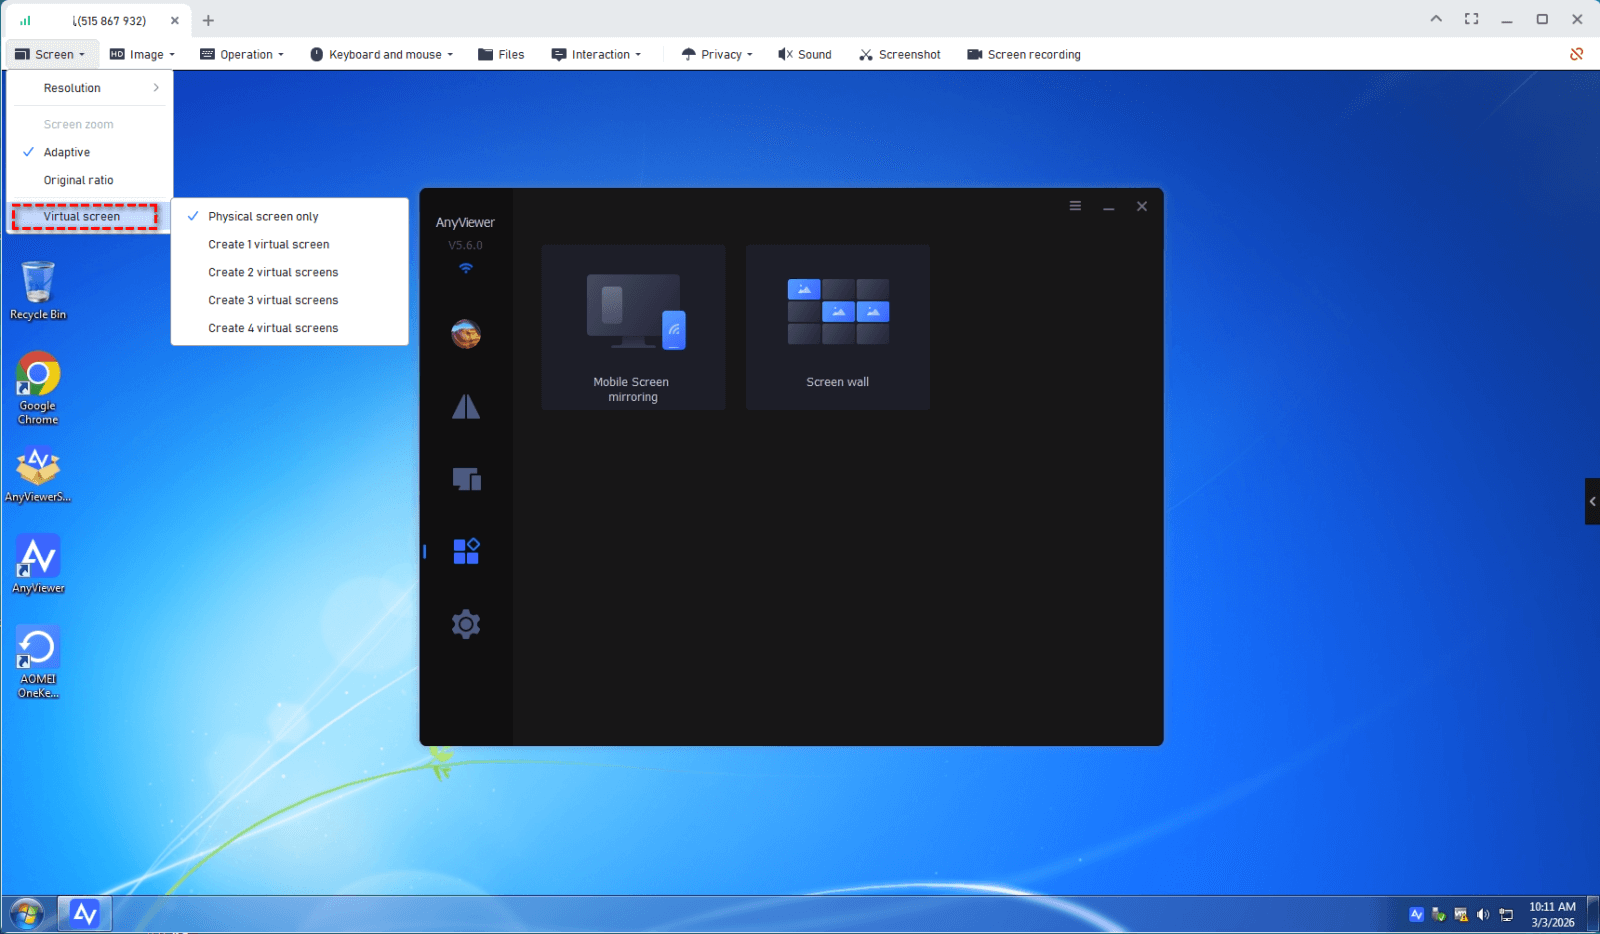
Step 3. Your virtual screens are now created, and you can easily switch between them.
The Virtual Screen feature offers an affordable way to enhance productivity for IT professionals, designers, and remote workers, allowing a broader workspace view without needing multiple physical monitors. It’s especially useful for multitasking, testing applications on different screens, managing multiple projects simultaneously, or collaborating with teams across locations.
- ✍ The professional edition allows you to enjoy more powerful remote desktop experience:
- Expanded Management: Assign more devices to a single account for seamless, one-click unattended access.
- Greater Capacity: Increase simultaneous connection channels and control multiple remote devices at once.
- Enhanced Privacy: Secure your work by turning on privacy screen—instantly black out the remote screen and disable the remote keyboard/mouse.
- High-Speed Transfers: Experience significantly faster file transfers with support for larger file sizes. You can also use it to transfer large files over the internet.
- Premium Visuals: Enjoy crystal-clear, high-image quality for a "locally present" feel.
Why do you need to create virtual display on remote desktop?
When using remote desktop software, the remote computer does not always have a physical monitor connected. In this situation, creating a virtual display becomes very important. It ensures the system can still provide a stable and complete graphical interface during the remote session.
Here are the main reasons why you may need to create a virtual display on remote desktop:
-
Ensure stable screen output
If no monitor is plugged into the remote computer, the system may lower the resolution or stop sending proper display signals. A virtual display keeps the screen active and stable. -
Fix resolution and scaling issues
Without a physical monitor, remote sessions may be limited to low resolutions. A virtual display allows you to set higher resolutions and adjust scaling for a clearer viewing experience. -
Support headless computers and servers
Many servers run without monitors. A virtual display allows the operating system to load the full graphical desktop environment so you can manage it remotely without problems. -
Enable multi-monitor simulation
If you need multiple screens for multitasking, a virtual display lets you simulate extra monitors during the remote session. You can use it to extend Remote Desktop to two monitors for a better work setup. -
Improve compatibility with remote tools
Some remote access tools work better when a display driver is active. Creating a virtual display helps avoid black screens, frozen desktops, or missing taskbars.
In short, creating a virtual display on remote desktop ensures smoother control, better resolution, and a more reliable remote working environment. It is especially useful for IT administrators, remote workers, and anyone managing systems without physical monitors.
Conclusion
A virtual display is a practical solution for expanding screen space without adding physical monitors. It works like a real screen, supports remote access, and keeps systems running smoothly even when no monitor is connected. This makes it especially valuable for remote desktop sessions, headless servers, and professional multitasking.
By creating virtual displays on Windows 10, Windows 11, and Windows Servers with tools like AnyViewer, users can improve productivity, fix resolution issues, and simulate multiple monitors with ease. Whether you are an IT administrator, developer, designer, or remote worker, virtual displays provide a flexible and efficient way to manage your workspace and maintain a stable remote environment.
FAQs
🗨️ How to create a virtual display in Windows?
You can create a virtual display by using virtual display software such as AnyViewer or a compatible virtual display driver. After installing the tool, start a remote session, enable the Virtual Screen feature, and choose how many virtual monitors you want to add. The system will recognize them as additional displays.
🗨️ How to make RDP dual screen?
Open Remote Desktop Connection, click Show Options, go to the Display tab, and check Use all my monitors for the remote session. Then connect to the remote computer to use dual or multiple screens.
🗨️ How to enable virtualization in RDP?
Virtualization itself is enabled in the computer BIOS or UEFI, not directly inside RDP. Restart the computer, enter BIOS settings, and turn on Intel VT x or AMD V. After that, RDP can access virtual machines running on the host.
🗨️ How do I turn on virtual virtualization?
Restart your PC, enter BIOS or UEFI setup, find CPU or Advanced settings, and enable hardware virtualization such as Intel Virtualization Technology or SVM Mode. Save changes and reboot the system.
🗨️ How to access VM through RDP?
First, make sure Remote Desktop is enabled on the virtual machine. Then open Remote Desktop Connection on your local computer, enter the VM IP address, and log in with the VM account credentials. Ensure the VM network settings allow remote connections.
