
2026 Top 4 VNC File Transfer Tools [Free]
VNC is a remote access protocol. This post primarily introduces the top four VNC file transfer tools and gives a stepwise tutorial on how to use them. Keep reading and choose the option that suits you the most.
By Ellie / Updated on December 26, 2025
Overview: What VNC is
You have several options for taking the remote control of a computer. VNC (Virtual Network Computing) is one of the most used remote access protocols besides RDP. VNC is a graphical desktop-sharing system that provides high-quality remote desktop monitoring using the remote frame buffer protocol.
You can remotely control a computer or access files using VNC from a mobile device or another computer anywhere on the Internet. The two computers don't need to be the same type; for example, you could use VNC to view a Windows desktop at work on a Mac or Linux machine at home.
Best 4 VNC file transfer tools [free]
Much remote access software with a file transfer feature uses the VNC protocol. Choosing a VNC file transfer program can be complex, as many different types of VNC file transfer programs are available.
We choose four free software that uses the VNC protocol and support file transfer, e.i., AnyViewer, TightVNC, UltraVNC, and TeamViewer.
Option 1. AnyViewer [highly-recommended]
AnyViewer is a free Windows remote desktop software with a file transfer feature that uses the VNC protocol. The following are the benefits of AnyViewer file transfer:
- Fast file transfer speed. AnyViewer's max file transfer speed is 10 MB/s. And it has four threads of the file transfer.
- Large file transfer. AnyViewer allows the max size of a single file to be 1 TB, and the max number of files at one time is unlimited.
- Flexible file transfer ways. AnyViewer transfers files by moving files through a file manager or dragging and dropping.
- Secure file transfer. AnyViewer is based on Elliptic Curve Cryptography (ECC) encryption and fulfills the latest security standards, protecting your files safely.
Note: Some of the above benefits are for users of professional and enterprise plans only.
Next, you'll learn how to transfer files via AnyViewer in different ways. Before that, you'll need to set up AnyViewer on both computers. Follow the steps below.
Step 1. Download, install, and run AnyViewer on your devices.
Step 2. Create an AnyViewer account and sign into it on both devices.

Step 3. On your local device, go to Device, and you’ll see the devices here.
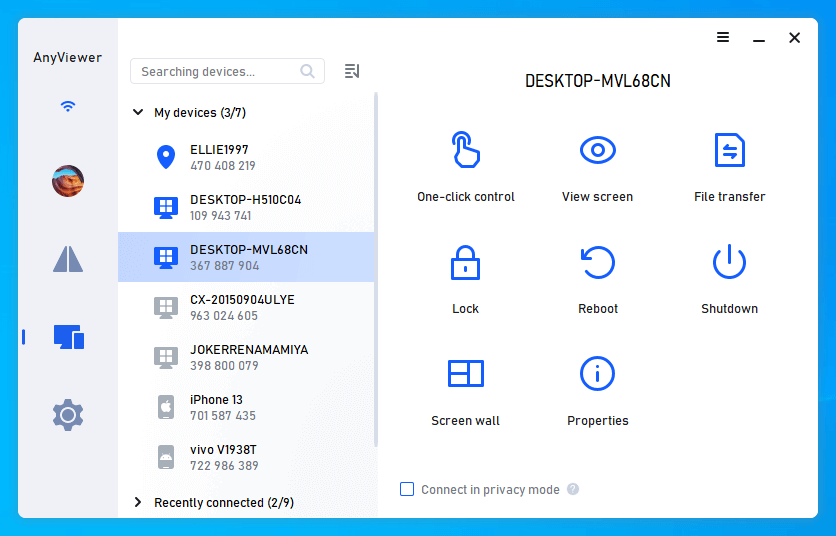
Method 1. Transfer files directly
To transfer files directly, select your destination computer and click File Transfer to open the file manager.
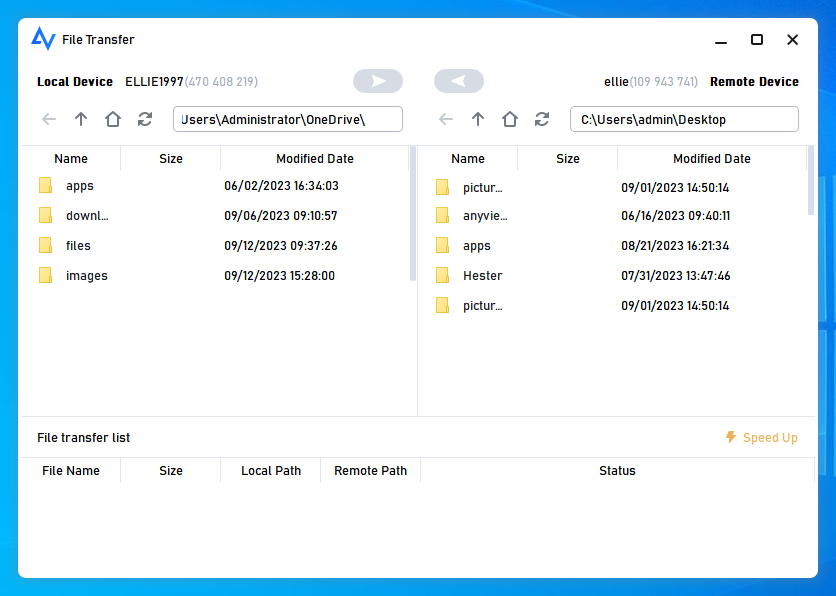
The file path of the local computer is shown on the left pane, and the file path of the remote computer is shown on the right. You can freely transfer files between devices by clicking the arrows after selecting the target files.
Method 2. Transfer files during a remote session
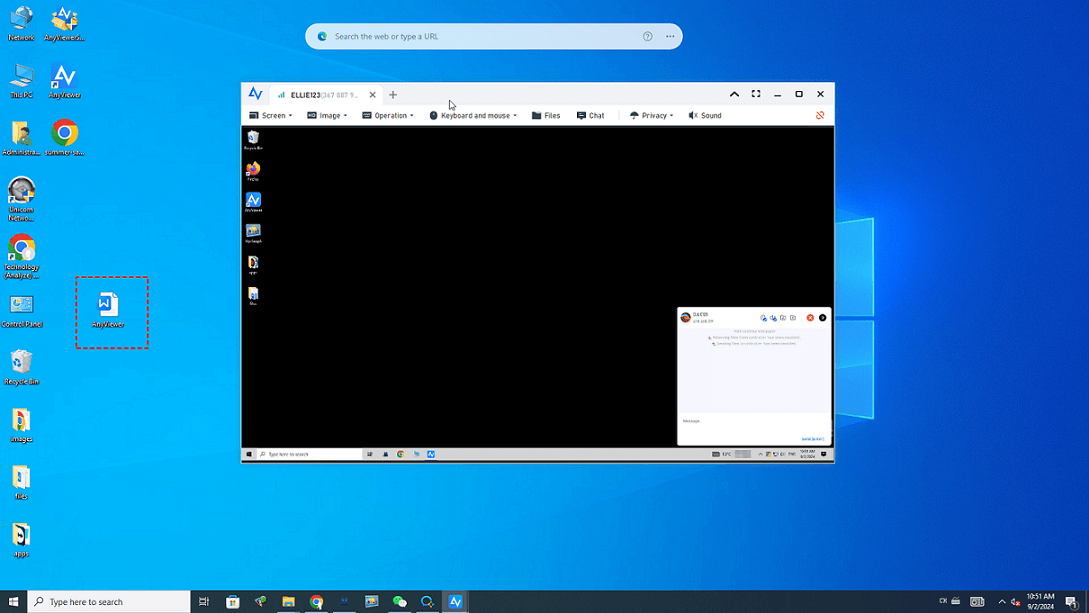
During a remote session, AnyViewer also allows you to transfer files. Select the One-click control to gain unattended remote access to the remote computer. Then, click the Files button in the menu bar whenever you need to transfer files.

You can also drag and drop files during a session to transfer them.
Option 2. TightVNC
TightVNC is another free tool that provides remote access and file transfer services for Windows computers. It has a fast file transfer speed, compressing the files and folders before transfer to maximum flexibility with minimal bandwidth.
But the whole TightVNC file transfer process is more complicated compared to AnyViewer. Here we divided the process into three parts.
Part 1. Prepare TightVNC Server on the remote computer
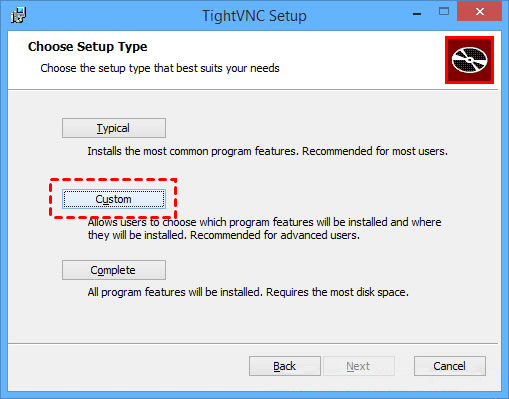
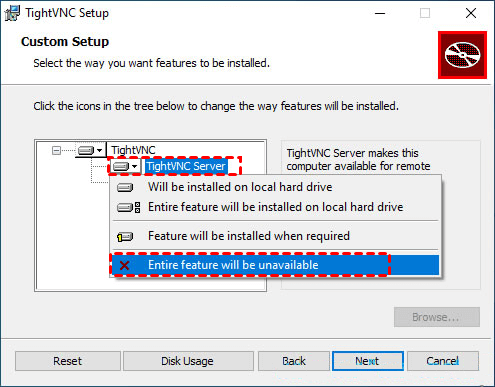
Step 1. Run the downloaded installer for TightVNC after downloading it from the official website. Next, select Custom.
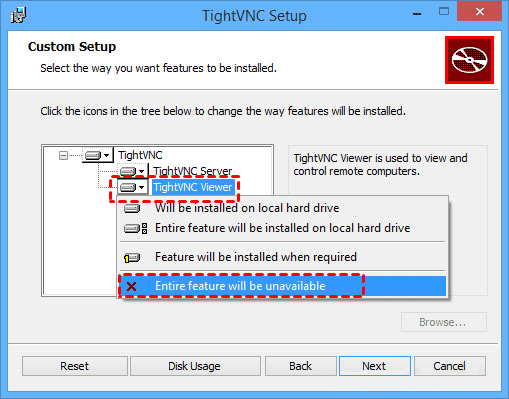
Step 2. The TightVNC Server and the TightVNC Viewer are installed by default. But you'll only need the server on the remote computer. So, select Entire feature will be unavailable by clicking on the hard drive icon to the left of TightVNC Viewer.
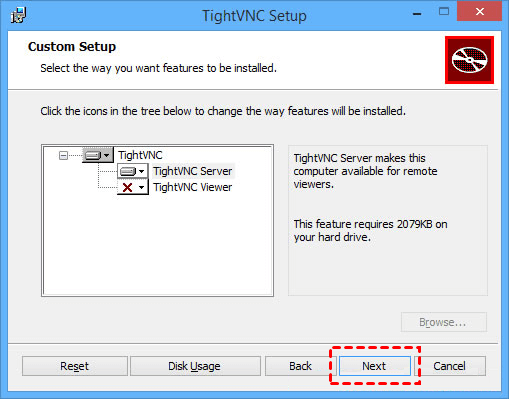
Step 3. Then, click on Next.
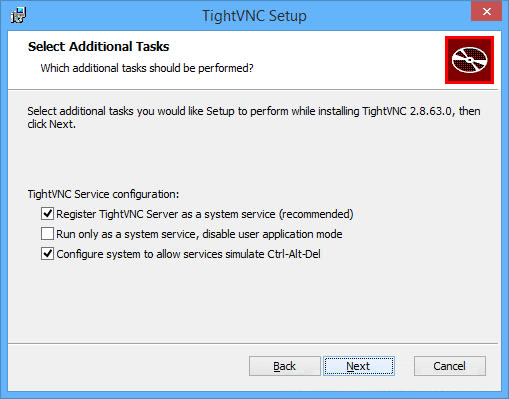
Step 4. Leave the default settings alone.
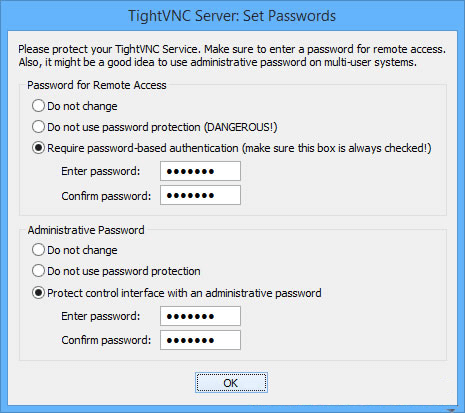
Step 5. Enter 2 different passwords, one for Password for Remote Access, and another for Administrative Password.
You'll need the remote computer's name (NetBIOS name) or IP address to connect. So let's find out the computer name and IP address before the connection.
Step 1. To open the Run dialog box, press Win + R. Enter cmd and OK.

Step 2. Then type "ipconfig" and hit the Enter key. You should now see a list of IP addresses; note down the IPv4 address.

Step 3. Right-click Properties on This PC.
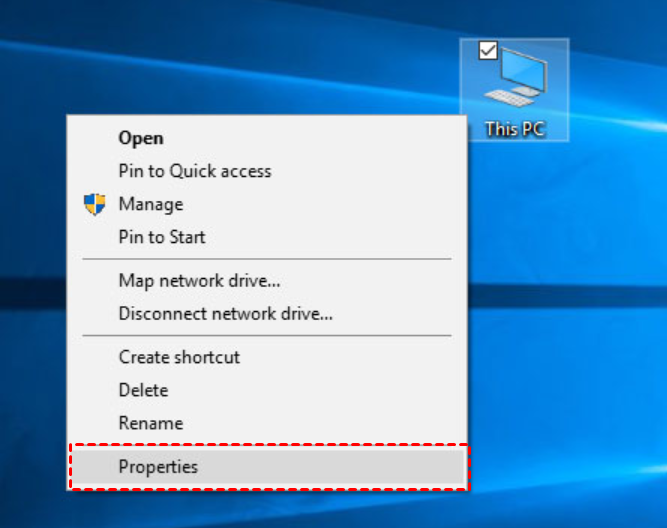
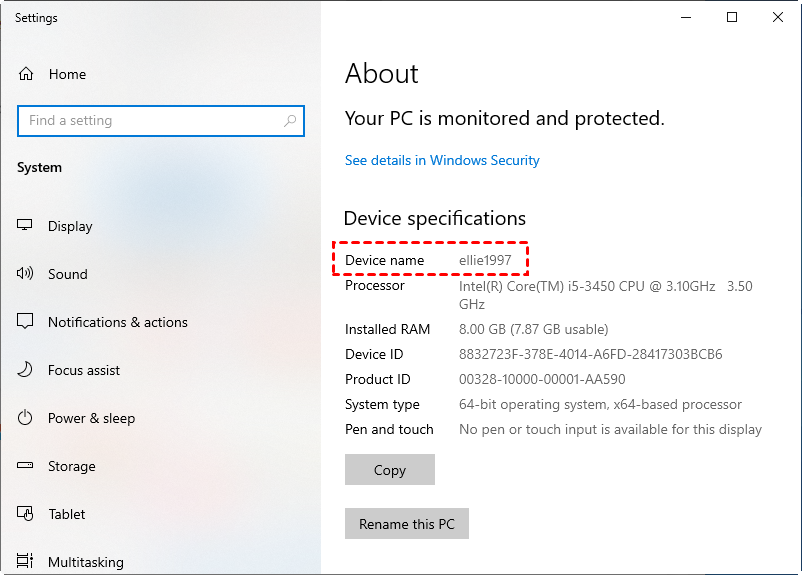
Step 4. The name of the remote computer appears.
Part 2. Prepare the TightVNC Viewer on the local computer
Step 1. Run the downloaded installer for TightVNC after downloading it from the official website. Just like the above Step 1 shows.
Step 2. You will need the Viewer (client) this time. So, select Entire feature will be unavailable by clicking on the icon to the left of TightVNC Server. Then press the Next button.
Part 3. Connection to the remote computer and transfer files via TightVNC
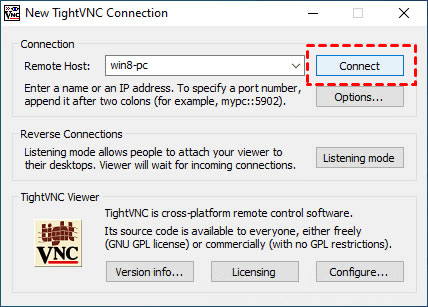
Step 1. On your local computer (source), launch TightVNC Viewer. Click Connect after entering the remote computer's name or IP address in the Remote Host box.
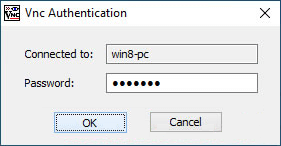
Step 2. Specify the Password for Remote Access in the "Vnc Authentication" window that appears.
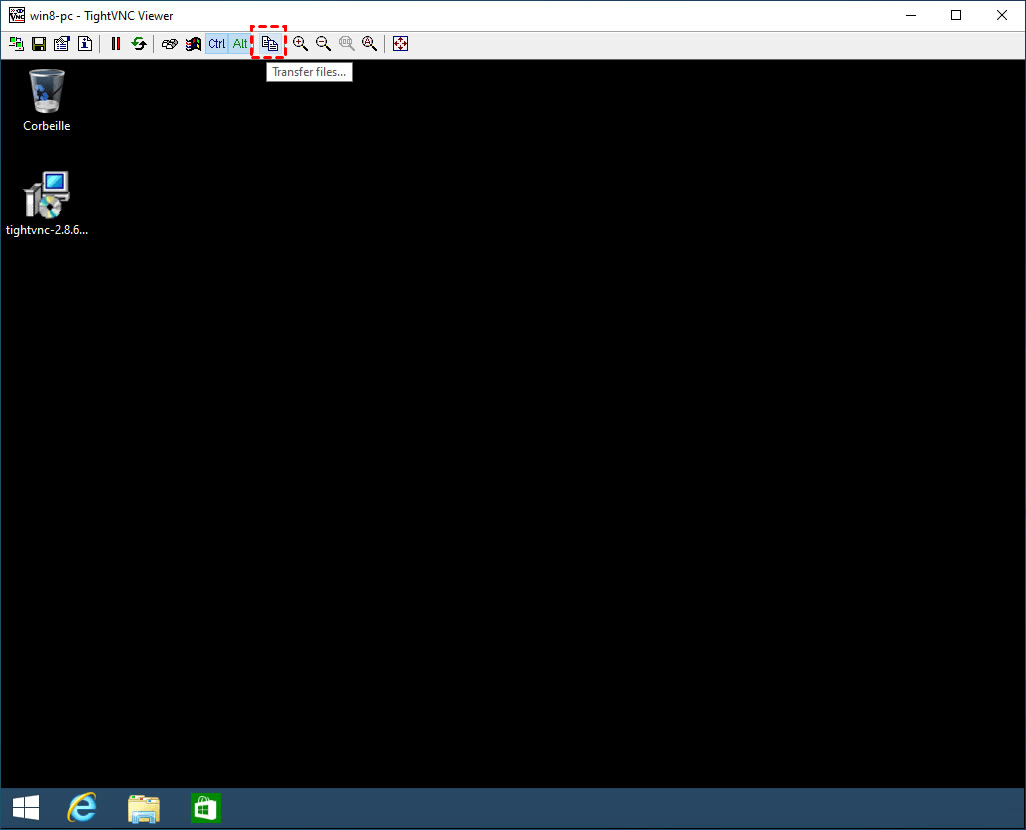
Step 3. The remote computer screen appears. Click on the icon representing 2 files to achieve file transfer.
Step 4. By default, a "TightVNC File Transfer" window appears, displaying the partitions of the local computer (on the left) and the remote computer (on the right). Please select the desired file on the left to transfer it from your local computer to the remote computer. Then, press the ">>" key.
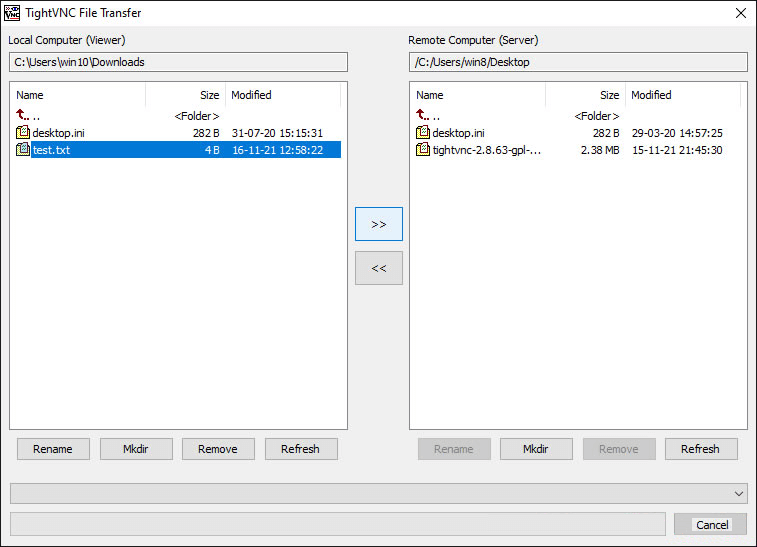
Note: TightVNC does not support copying and pasting files when transferring files between local and remote computers.
Option 3. UltraVNC
UltraVNC is another free VNC remote access software that supports file transfer. Like TightVNC, the whole UltraVNCfile transfer process has divided into three parts.
Part 1. Prepare UltraVNC Server on the remote computer
To use UltraVNC, you also need to know the IP address of the remote computer. So, follow the steps above to get the IP address before using UltraVNC.
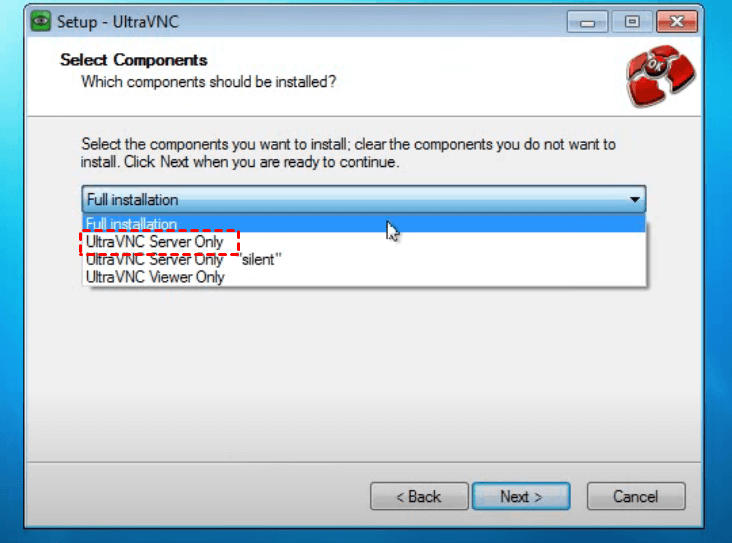
Step 1. Download UltraVNC from the official site and follow the installation setup guide. Please note, when asked which components should be installed, choose UltraVNC Server only (of course, you can also install both UltraVNC Server and Viewer on the remote computer).
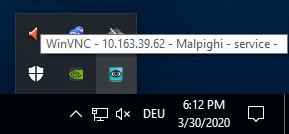
Step 2. After the installation, go to the lower right corner of the screen, right-click the UltraVNC icon (eye with cyan background), and select Admin properties.
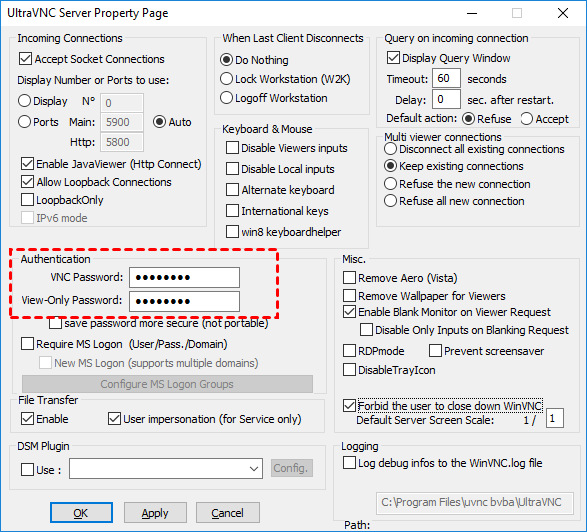
Step 3. On the Property Page, set both passwords. Then, click OK.
Part 2. Prepare theUltraVNC Vieweron the local computer
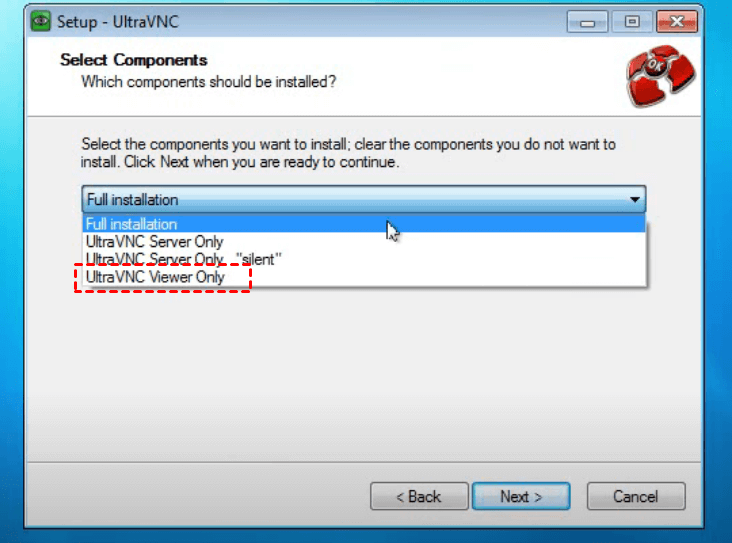
Step 1. Download UltraVNC from the official site and install UltraVNC Viewer on your local computer.
Step 2. Then you’ll see UltraVNC Viewer installed on the local computer.
Part 3. Connection to the remote computer and transfer files via UltraVNC
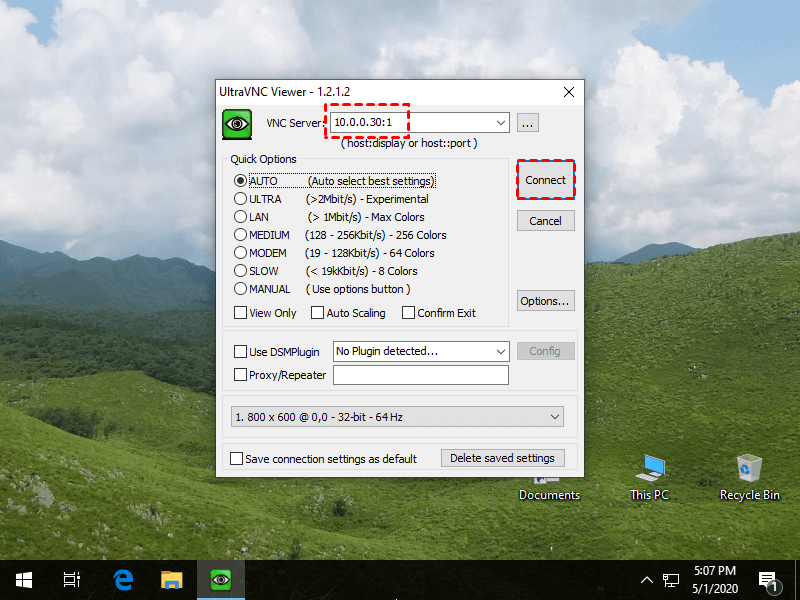
Step 1. Launch UltraVNCV Viewer on your local computer. Enter the IP address of the remote computer and then click Connect.
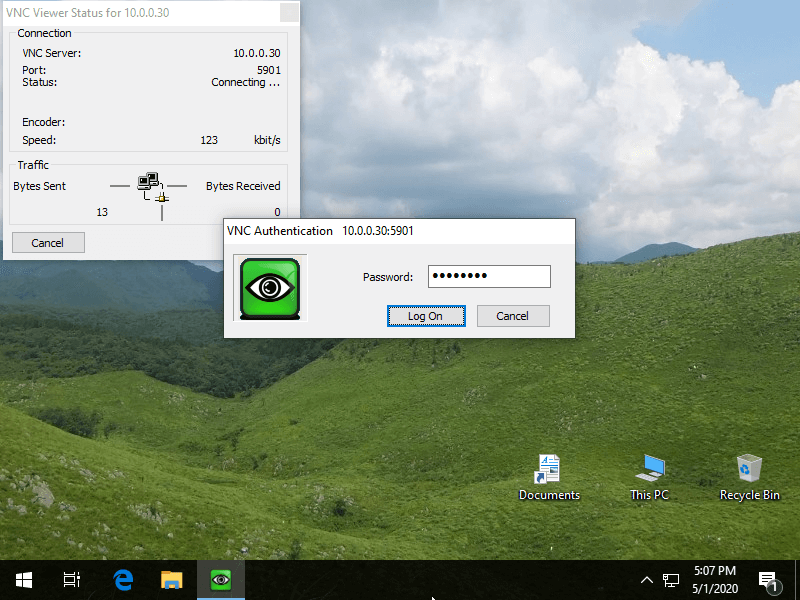
Step 2. A password is required. Input the VNC password you set before and click Log on.
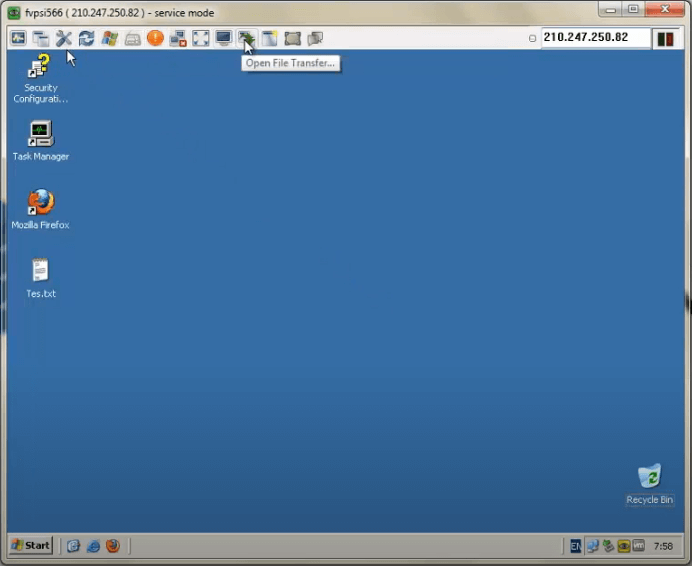
Step 3. Connection succeed. Click the Open File Transfer button.
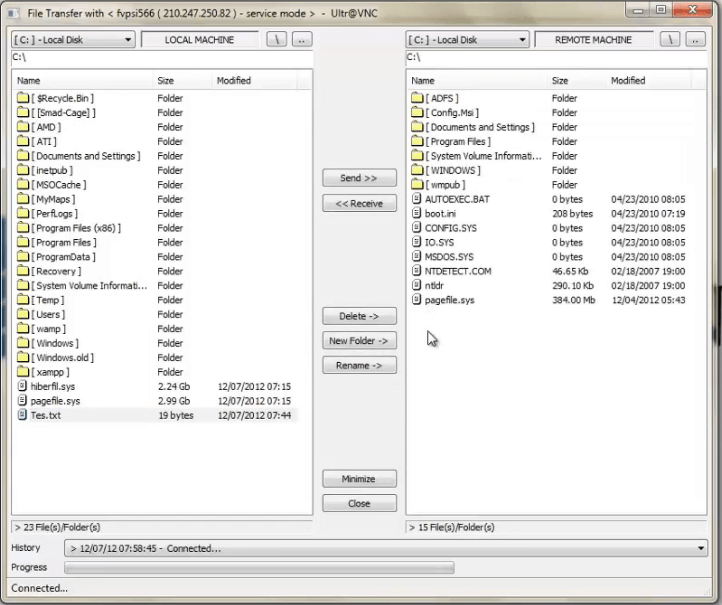
Step 4. Choose the file you want to transfer, specify the save location, then click Send.
Option 4. TeamViewer
TeamViewer is also a VNC-based remote access and file transfer software. It is free for private use. But many users have complained that TeamViewer blocked their connection even though they used it at home to connect a second computer to a TV. So please be careful when using it.
Part 1. Preparation work: install and sign up
To perform TeamViewer file transfer from remote to local, firstly you need to install and sign up for TeamViewer.
Step 1. On the TeamViewer Setup interface, choose the using purpose based on your own needs and then click Finish. In this post, we take the free version for personal use as an example.

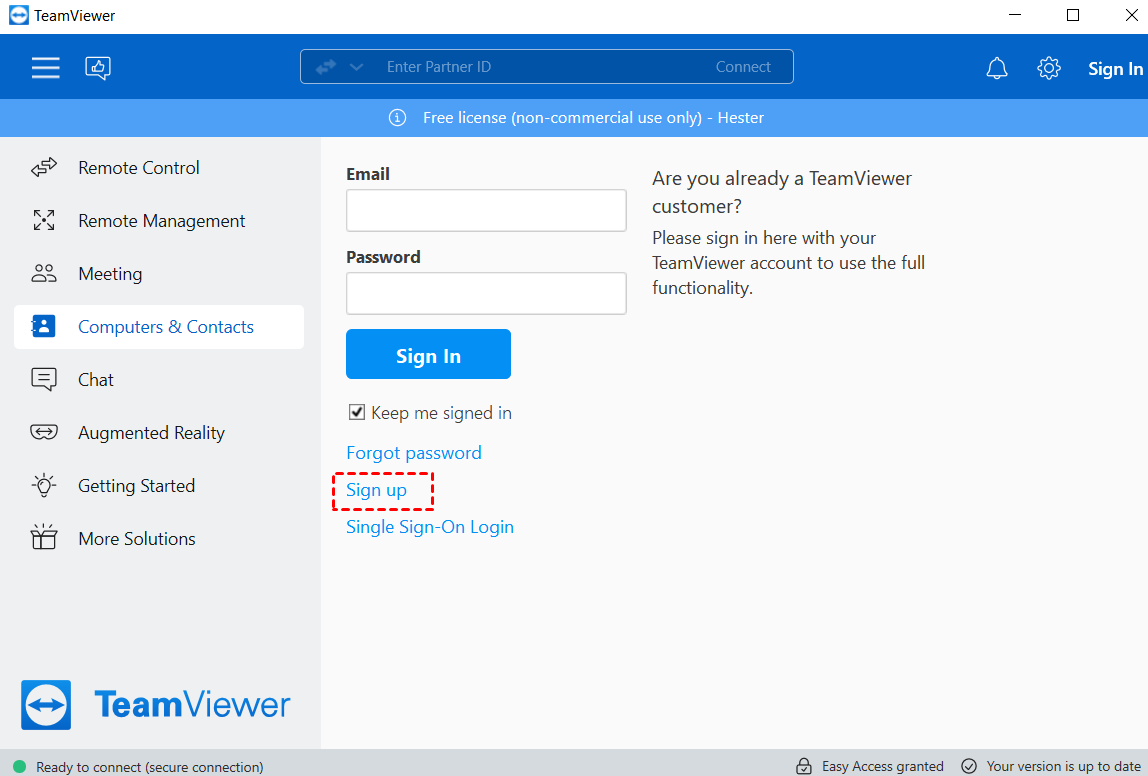
Step 2. Navigate to Computers & Contacts interface and select Sign up to create your own TeamViewer account.
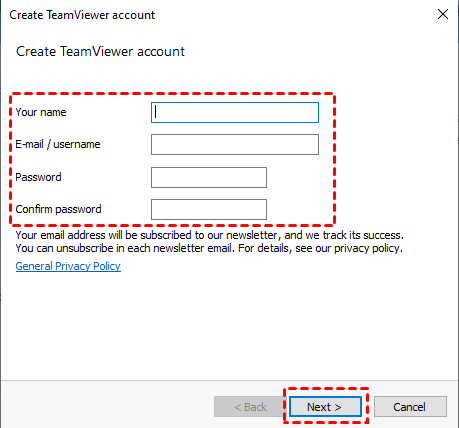
Step 3. Fill in the information and click Next.
Part 2. Transfer files via TeamViewer in 2 ways
In this part, we offer you two ways to transfer files using TeamViewer; choose the one that fits you most.
Way 1. Transfer files in remote session via TeamViewer
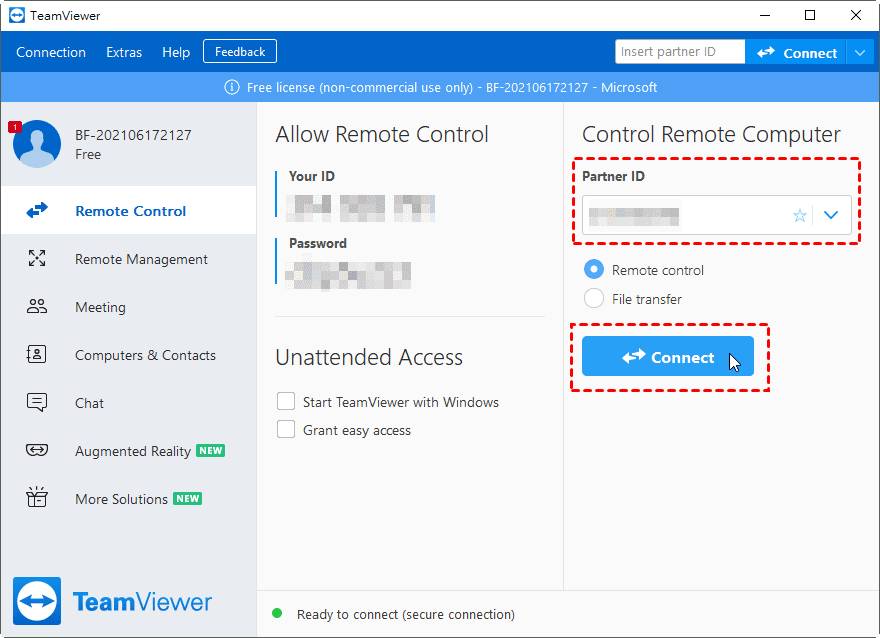
Step 1. On the client PC, go to Remote Control interface on the left pane, enter the ID of the host computer under Partner ID, and then click Connect.
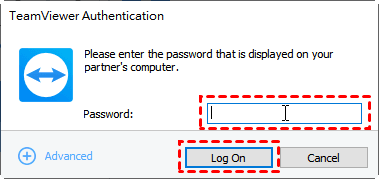
Step 2. In the pop-up window, type in the password of the host PC to establish remote control.
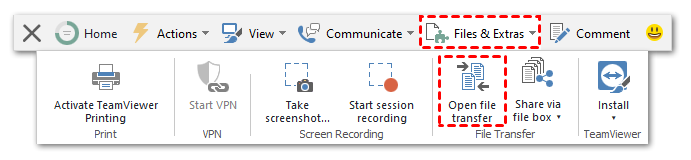
Step 3. When your PCs are connected successfully, click Files & Extras > Open file transfer to transfer files from PC to PC.
Way 2. Transfer files by file transfer mode with TeamViewer
Step 1. On the client PC, go to the Remote Control interface, click the Remote Control tab, and then select File transfer mode in the drop-down menu.

Step 2. Enter the ID of the PC you want to perform file transfer and then click Connect.
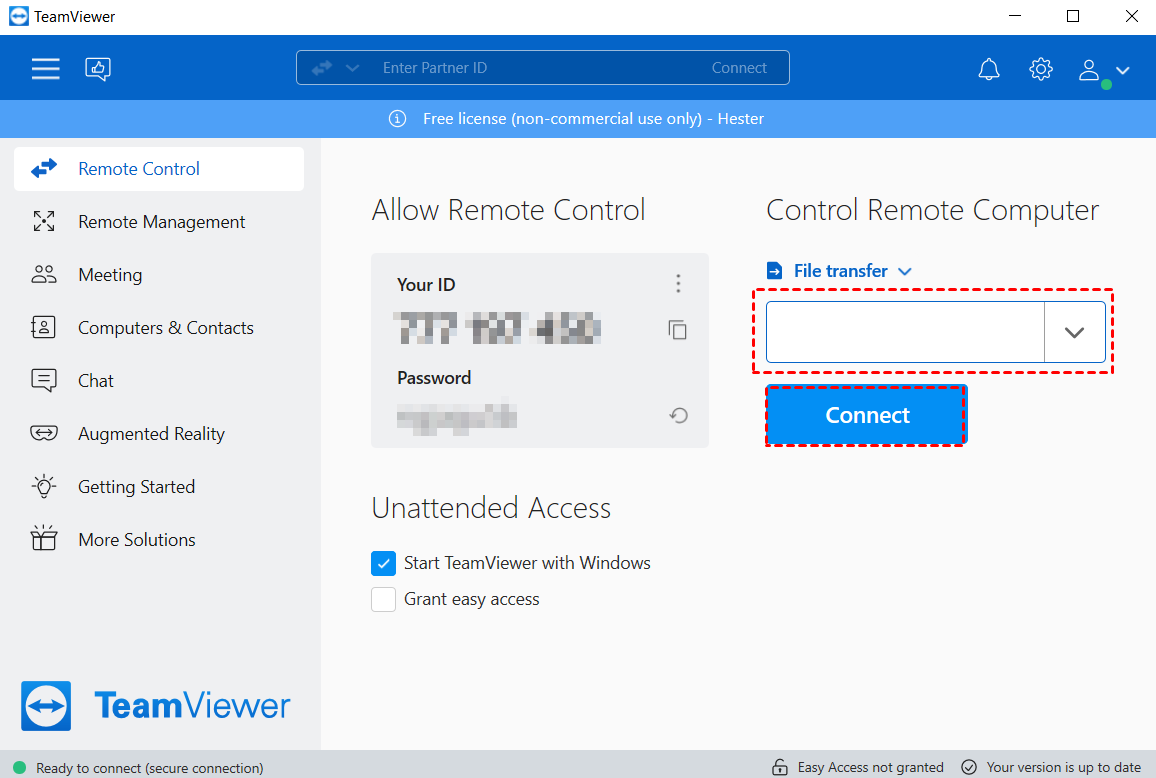
Step 3. Type in the password of the host PC in the pop-up window and click Log On.
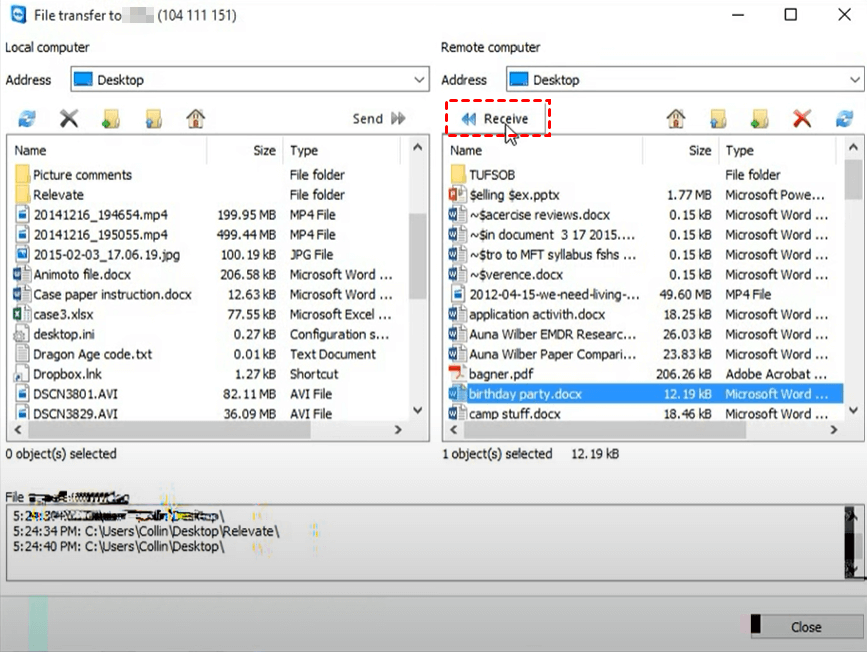
Step 4. On the left is the local computer and on the right presents the remote computer. For example, if you want to transfer files from remote to local, choose the address you want to store the files, select the target files on the remote computer, and then click Receive, or vice versa.
The bottom line
This post primarily introduces the top four VNC file transfer tools. But there’s nothing perfect. Even the top tools have limitations. For example, UltraVNC and TightVNC don’t support drop-and-drop file transfer. AnyDesk and TeamViewer are easy to be blocked from commercial users.
Therefore, among the four options, AnyViewer is highly recommended. It is free for both personal and business users. Besides, it supports drag-and-drop file transfer. Try it right now.
