
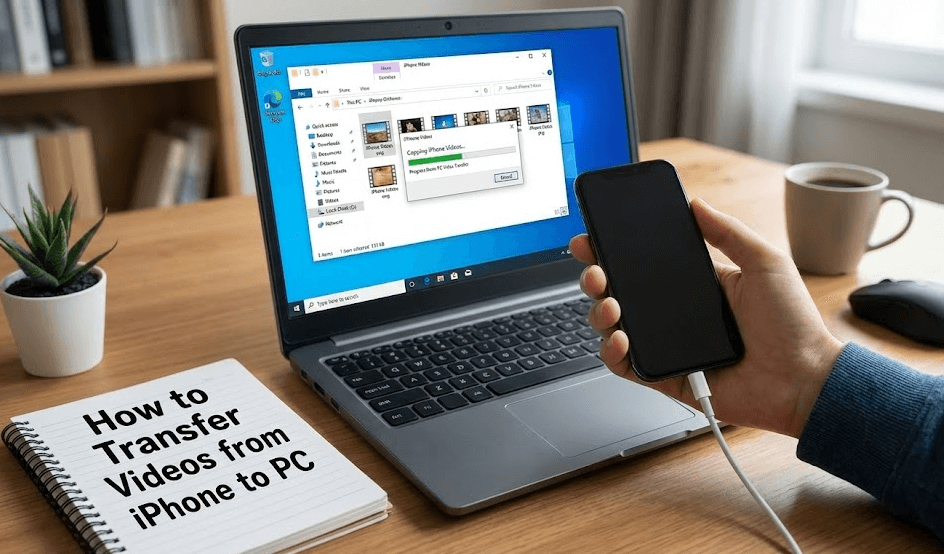
Best Ways to Transfer Videos from iPhone to PC
Looking for the easiest way to transfer videos from iPhone to PC without losing quality? This complete guide walks you through simple wired and wireless methods, with step-by-step instructions suitable for beginners.
By Ellie / Updated on January 13, 2026
Why is transferring iPhone videos to PC confusing?
If you’ve recently switched to a Windows 10 PC, you’re not alone in feeling a bit overwhelmed. Many iPhone users store hundreds of videos on their devices, family memories, work clips, or creative content, and want to back them up or view them on a larger screen.
However, transferring videos from iPhone to PC can feel tricky, especially if you’re not tech-savvy. Questions like “Should I use iTunes?”, “Do I need special settings?”, or “Will my video quality be reduced?” are very common.
The good news? There are simple and reliable ways to transfer videos from iPhone to PC, even without a USB cable.
Common ways to transfer videos from iPhone to PC
Before diving into the best solution, let’s briefly look at the most common options available for moving videos between an iPhone and a Windows computer.
Way 1. Transfer videos from iPhone to PC wirelessly (Best option)
When you want to transfer videos from iPhone to PC, what if you don’t have your USB cable with you, or the cable simply isn’t working? In this case, wireless transfer with remote file transfer technology becomes the most practical and reliable solution.
Why Choose a Wireless Method?
- No USB cable required
- No driver or iTunes installation
- Works anywhere with an internet connection
- Less technical and ideal for beginners
One of the best tools for this purpose is AnyViewer. As a professional remote desktop software, AnyViewer allows you to remotely access your PC from an iPhone while securely transferring files between devices over the internet. It is a free yet professional remote device management tool that enables file access and transfer across devices without physical connections.
Why AnyViewer Is a Great Choice for Remote File Transfer?
- Supports remote desktop control from iPhone to PC
- Built-in remote file transfer for fast wireless data movement
- No USB cable, no iTunes, and no complex configuration
- End-to-end encrypted connections ensure data security
- Preserves original video quality during transfer
- Supports videos, photos, music, documents, and other file types
Unlike cloud-based services, AnyViewer does not rely on cloud storage limits, making it an excellent option for transferring large video files directly between your iPhone and PC.
Step-by-Step: Transfer Videos from iPhone to PC Using AnyViewer
Step 1. Download and install AnyViewer on your Windows PC. Create an AnyViewer account and sign in.

Step 2. Open the App Store on your iPhone, search for “AnyViewer”, then download and install the app. Log in using the same AnyViewer account.
Step 3. On your iPhone, tap your connected PC from the device list and select “File Transfer”. This activates AnyViewer’s remote file transfer mode.
Step 4. Choose the videos, photos, or files you want to transfer, then tap the Send button to start transferring files wirelessly.
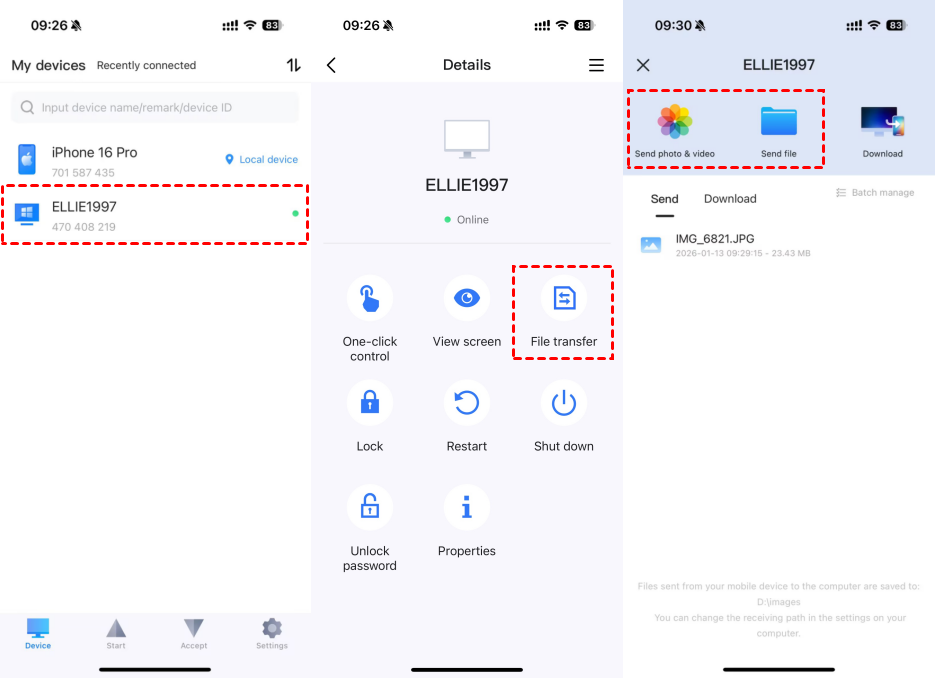
Step 5. Once the transfer is complete, the videos will be saved directly to your PC. You can change the default save location by going to Settings > Basic in AnyViewer.

Way 2. Transfer videos from iPhone to PC using iTunes (USB cable required)
If you prefer to transfer videos from iPhone to PC with cable, iTunes is Apple’s official solution. It’s often the first option users consider, though it may not be ideal for beginners.
How to Transfer Videos Using iTunes
Step 1. Download and install the latest version of iTunes for Windows from Apple’s website.
Step 2. Connect your iPhone to your PC using a USB cable.
Step 3. Unlock your iPhone and tap “Trust This Computer” when prompted.
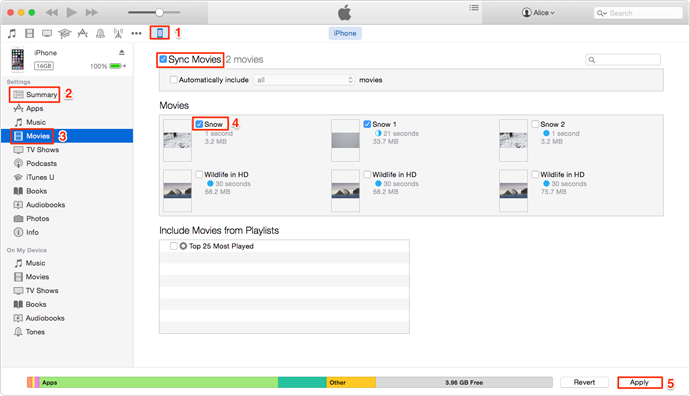
Step 4. Open iTunes and click the device icon in the top-left corner.
Step 5. Go to Movies or TV Shows, select the videos you want, and click Sync.
Limitations of Using iTunes
- Complicated interface that can confuse first-time users
- Syncing may overwrite or remove existing media on your iPhone
- Requires a USB cable at all times
- Limited control over selective video transfers
- Does not support all video formats stored on the iPhone
Because of these limitations, iTunes is better suited for basic syncing rather than quick, flexible video transfers.
Way 3. Transfer videos from iPhone to PC using the Windows Photos app
Windows comes with a built-in Photos app that allows you to import photos and videos from external devices, including iPhones. This method is simple but can be unreliable for large video collections.
How to Transfer Videos Using the Photos App
Step 1. Connect your iPhone to your PC with a USB cable.
Step 2. Unlock your iPhone and allow access when prompted.
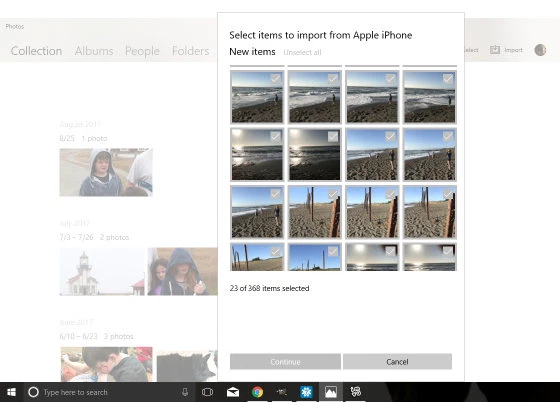
Step 3. Open the Photos app on your PC.
Step 4. Click Import > From a USB device.
Step 5. Select the videos you want to import and click Continue.
Drawbacks of the Photos App Method
- Requires a stable USB connection
- Often fails to detect all videos, especially large or long recordings
- Large transfers may freeze, stop, or result in errors
- Limited control over file organization and formats
This method works best for small video transfers but may frustrate users dealing with large or high-resolution files.
Way 4. Transfer videos from iPhone to PC using iCloud
iCloud allows you to sync videos wirelessly between your iPhone and PC, making it a convenient option if you prefer cloud-based transfers. However, storage limitations can quickly become a problem.
How to Transfer Videos Using iCloud
Step 1. On your iPhone, go to Settings > [Your Name] > iCloud > Photos.
Step 2. Enable iCloud Photos.

Step 3. On your PC, sign in to iCloud for Windows using your Apple ID.
Step 4. Download the synced videos from iCloud to your PC.
Disadvantages of Using iCloud
- Only 5GB of free storage is available
- Videos consume storage space very quickly
- Requires a paid subscription for larger video libraries
- Upload and download speeds depend heavily on the internet performance
- No direct device-to-device transfer
While iCloud is convenient, it is not ideal for transferring large numbers of videos without upgrading your storage plan.
Final thoughts
If you’re looking for the best way to transfer videos from iPhone to PC, wireless solutions clearly stand out. While traditional methods like iTunes and USB transfers still work, they can be slow, confusing, and unreliable.
AnyViewer offers a modern, cable-free alternative that’s perfect for beginners and advanced users alike. With its simple setup, secure connection, and support for large video files, transferring videos from iPhone to PC has never been easier.
Whether you’re backing up memories or freeing up iPhone storage, AnyViewer gets the job done, quickly, safely, and completely free.
FAQs
How can I send a video from my iPhone that is too long?
For long or large videos, wireless tools like AnyViewer work best. They allow you to transfer large files directly from your iPhone to your PC without size limits or quality loss.
How to transfer videos from iPhone to PC with USB-C?
Connect your iPhone to your PC using a USB-C cable, then use iTunes or the Windows Photos app to import videos. Keep in mind that USB transfers can be unstable with large files.
How to transfer a file from iPhone to PC without iTunes?
You can use wireless methods such as AnyViewer or iCloud. AnyViewer is easier because it doesn’t require cloud storage or complex setup.
How to easily get videos from iPhone to PC?
The easiest way is to use a wireless transfer tool like AnyViewer. It requires no cables and works well for beginners.
How to transfer iPhone slow-motion video to computer?
Slow-motion videos can be transferred like normal videos. Use a tool that keeps the original format, such as AnyViewer, to avoid quality issues.
