
5 Easy Ways to Share Files Between Windows and iPhone
Discover 5 reliable methods to transfer files between Windows and iPhone. From Apple's native apps and SMB protocols to the high-speed wireless capabilities of AnyViewer, find the perfect solution for your workflow.
By Ellie / Updated on January 21, 2026
How can I share files between iPhone and Windows?
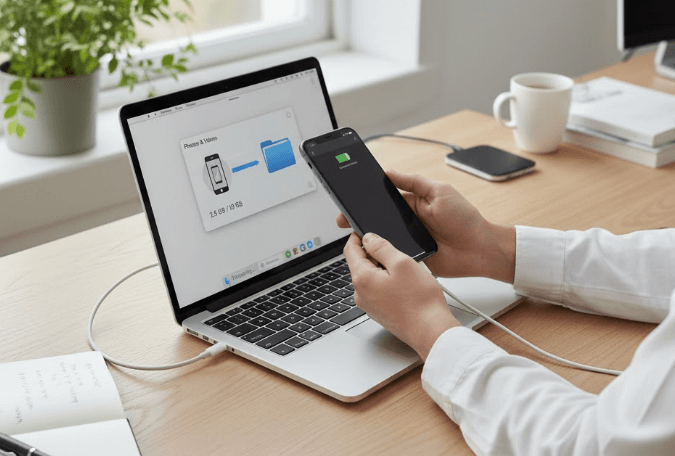
In today’s hyper-connected world, the need to share files between Windows and iPhone is a daily occurrence for millions. Whether you are a professional photographer moving 4K videos to your PC for editing, or a student who needs to transfer files between Windows and iPhone to read lecture notes on the go, the bridge between Apple’s closed ecosystem and Microsoft’s open platform can sometimes feel like a gap.
While macOS users enjoy the luxury of AirDrop, Windows users often face technical hurdles, slow sync speeds, or the frustration of "unsupported file types." In this comprehensive guide, we will explore the best ways to bridge this gap in 2026, featuring the ultimate solution to share files between Windows and iPhone wirelessly: AnyViewer.
Why is it difficult to share files between Windows and iPhone?
Before we dive into the "how," it is important to understand the "why." Windows and iOS use fundamentally different file systems.
- Windows uses an open file management system (NTFS), allowing users to browse almost any directory.
- iOS uses a "sandboxed" system (APFS), where apps live in isolated environments and cannot access each other's data without permission.
Because of this architectural disparity, simple "plug-and-play" doesn't always work like a standard USB flash drive. To effectively transfer files between Windows and iPhone, you need a middleman—software that speaks both "Apple" and "Windows."
5 methods to share files between Windows and iPhone
Explore the following five proven solutions to find the one that best fits your specific speed, security, and convenience needs.
Method 1: The pro choice – AnyViewer for seamless file transfer
If you are looking for the most efficient way to share files between Windows and iPhone wirelessly, AnyViewer is the premier file transfer choice in 2026. While primarily known for its world-class remote desktop capabilities, its built-in file transfer engine is a powerhouse designed for users who value time and security.
Why AnyViewer Stands Out
Unlike traditional methods that feel like "workarounds," AnyViewer offers a dedicated, enterprise-grade pipeline. It is widely considered the best way to transfer files between Windows and iPhone for professionals:
- Zero-Distance Transfer: Whether your iPhone is right next to your PC or you are traveling abroad, AnyViewer’s unattended access allows you to grab files from your home/office computer anytime, anywhere.
- Bank-Level Security: Your data is protected by Elliptic Curve Cryptography (ECC) 256-bit encryption. Unlike cloud services that store your files on third-party servers, AnyViewer creates a secure tunnel directly between your devices.
- No "App Support" Barriers: Forget worrying about whether an app supports "File Sharing." AnyViewer gives you full access to the Windows file system, allowing you to move any file type, from .exe to .zip and 4K RAW video, without restrictions.
- Lightning Fast: By bypassing the slow upload/download cycle of cloud storage, AnyViewer utilizes optimized network protocols to reach speeds of up to 10MB/s, ensuring even massive folders transfer in seconds.
How to Share Files Using AnyViewer (Step-by-Step)
Step 1. Set up PC: Download and install AnyViewer for Windows. Create an account and log in.
Step 2. Set up iPhone: Install the AnyViewer app from the App Store and log in with the same account.
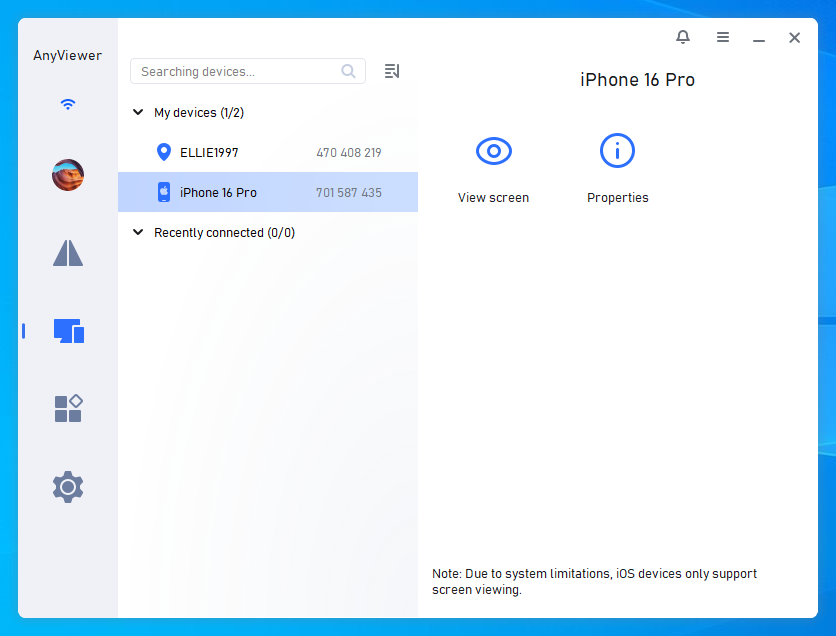
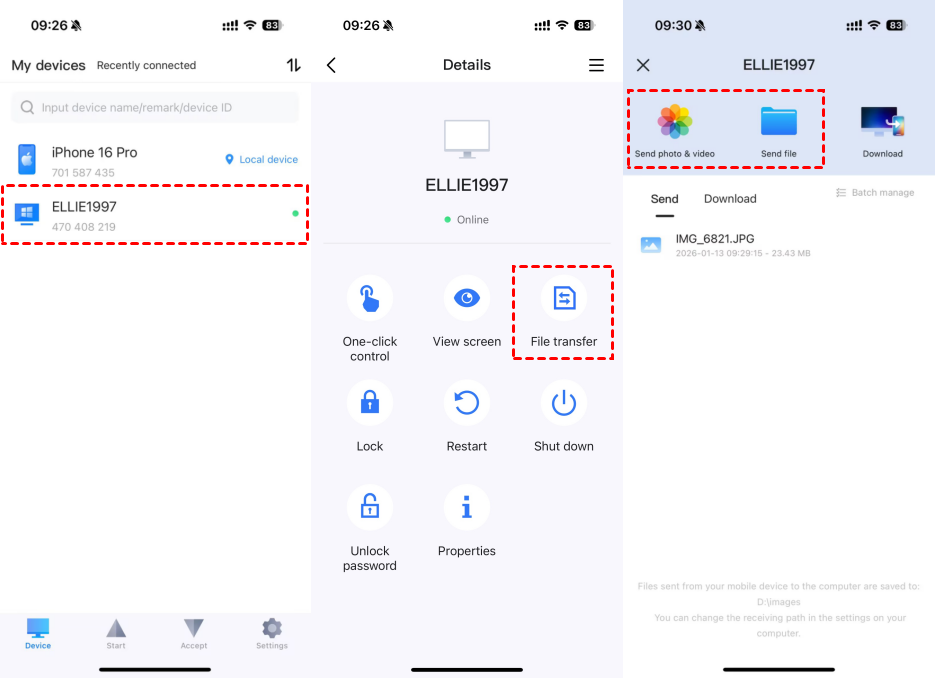
Step 3. Initiate Connection: On your iPhone, go to the device list, select your PC, and tap File Transfer.
Step 4. Manage Files: To transfer files from iPhone to Windows, tap Send photos & videos or Send files. To transfer files from Windows to iPhone, tap Download. Simply select the files you need and move them instantly.
Method 2: Using the "Apple Devices" App (The iTunes Successor)
Apple has replaced the bloated iTunes with the streamlined Apple Devices app on Windows. It is the "native" way to share files between Windows and iPhone via a physical connection.
Detailed Steps:
Step 1. Install: Download the "Apple Devices" app from the Microsoft Store.
Step 2. Connect: Plug your iPhone into your PC using a certified USB-C or Lightning cable. Tap "Trust This Computer" on your iPhone screen.
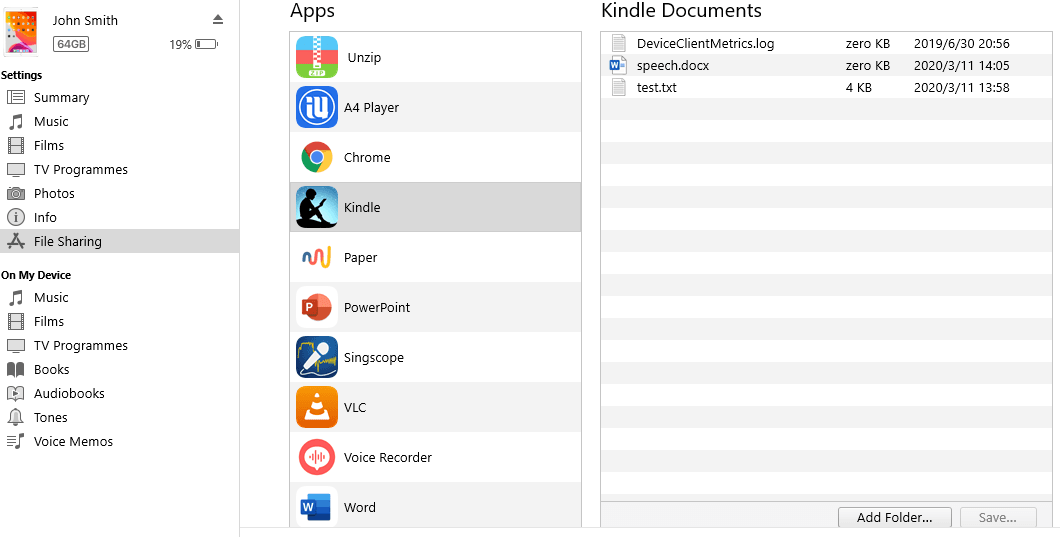
Step 3. Navigate: Open the app and click your iPhone’s icon in the sidebar. Select the Files tab.
Step 4. Transfer: You will see a list of apps that support file sharing. Drag a file from your Windows File Explorer and drop it onto the name of an app (e.g., VLC, Word, or Keynote).
Pros:
- Direct wired connection;
- Nointernet required;
- Higherstability for large local backups.
Cons:
- Requires a physical cable;
- Extremely restrictive (can only move files into specific app "silos");
- Interface can be buggy on older Windows versions.
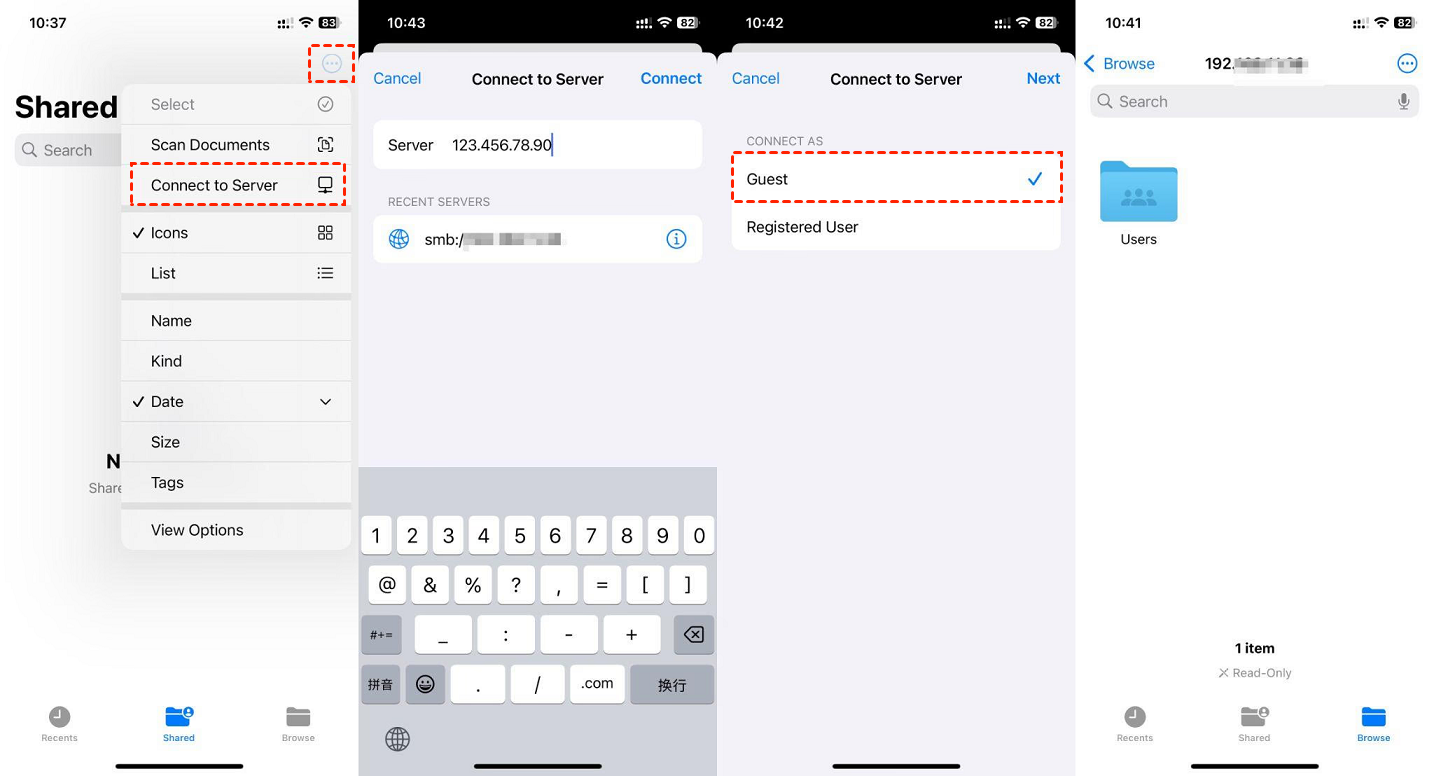
Method 3: SMB Protocol (Network Drive Sharing)
The SMB protocol allows you to share files between Windows and iPhone wirelessly by turning a folder on your PC into a network drive.
Detailed Steps:
Step 1. On Windows: Right-click your target folder > Properties > Sharing > Share. Select "Everyone" from the dropdown, click Add, and change Permission Level to Read/Write.
Step 2. Get IP Address: Press "Win + R", type "cmd", and enter "ipconfig". Note your IPv4 Address (e.g., 192.168.x.x).
Step 3. On iPhone: Open the Files app > Tap the three-dot menu (...) > Connect to Server.
Step 4. Connect: Enter "smb://[Your IP Address]". Choose "Registered User" or "Guest" and enter your Windows username and password. You can now copy-paste files between the PC folder and your iPhone.
Pros:
- No third-party software required;
- Completely free;
- Works wirelessly.
Cons:
- Both devices must be on the same Wi-Fi network;
- Complex setup for non-technical users;
- Often fails due to Windows Firewall settings.
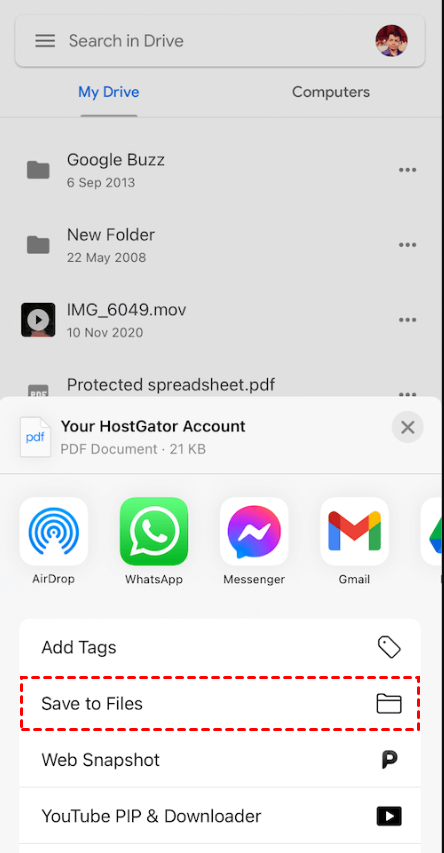
Method 4: Cloud Services (iCloud, OneDrive, Dropbox)
Cloud storage and file sharing service acts as a virtual bridge. You upload the file from Windows, it goes to a server, and you download it on your iPhone.
Detailed Steps:
Step 1. On Windows: Open your browser and go to iCloud.com or OneDrive.com.
Step 2. Upload: Drag your files into the browser window. Wait for the upload progress bar to finish.
Step 3. On iPhone: Open the corresponding app (Files, OneDrive, or Dropbox).
Step 4. Sync/Download: Locate the file. Tap to open or long-press to "Save to Files."
Pros:
- Files are backed up safely.
- Easy to share links with other people.
- Very user-friendly.
Cons:
- Relies heavily on internet upload speeds;
- Limited free storage (e.g., 5GB for iCloud);
- Recurring monthly subscription costs for high-volume users.
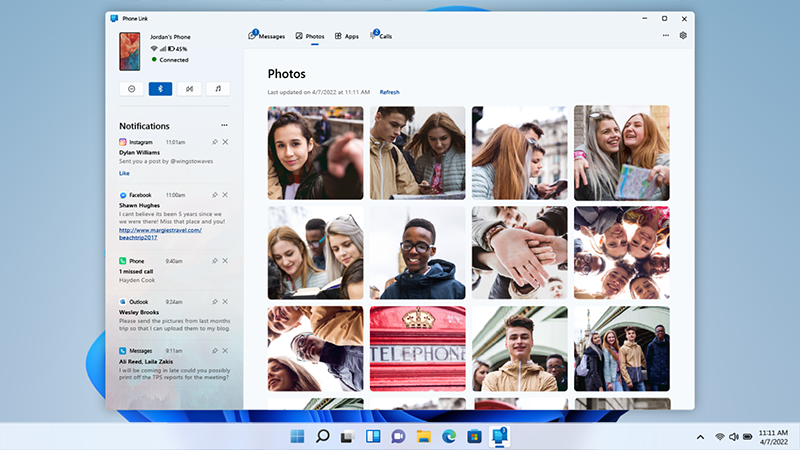
Method 5: Using Microsoft "Phone Link"
Microsoft’s Phone Link is designed for integration rather than heavy-duty transfer, but it’s useful for quick photo sharing.
Detailed Steps:
Step 1. On Windows: Open the Phone Link app (built into Windows 11).
Step 2. On iPhone: Install Link to Windows from the App Store. Follow the QR code instructions to pair via Bluetooth.
Step 3. Transfer Photos: Once connected, click the Photos tab in the Windows app. You can see your iPhone's recent photos.
Step 4. Save: Right-click any photo and select Save As to move it to your PC.
Pros:
- Wireless and automatic;
- Greatfor messages and notifications;
- Pre-installed on Windows.
Cons:
- Very limited;
- Cannot transfer documents, PDFs, or large videos;
- The pairing process can be finicky.
Conclusion
Sharing files between Windows and iPhone doesn't have to be a headache. While Apple and Microsoft have built walls around their systems, tools like AnyViewer have built the doors. By combining remote desktop technology with high-speed file transfer, AnyViewer offers a level of flexibility that traditional cables and cloud services simply cannot match.
Whether you're sending a single PDF or a 10GB video project, choosing the right tool will save you hours of frustration. Ready to simplify your digital life? Try AnyViewer for free todayand experience the fastest way to share files remotely between Windows and iPhone!
Frequently Asked Questions
1. Can I use AirDrop to share files from Windows to iPhone?
No, AirDrop is a proprietary Apple technology exclusive to macOS and iOS. Windows users must use alternatives like AnyViewer to share files between Windows and iPhone wirelessly.
2. Is it safe to transfer sensitive files over Wi-Fi?
It depends on the method. Public Wi-Fi is risky, but using AnyViewer is safe because it employs ECC 256-bit encryption, ensuring that even if you transfer files between Windows and iPhone on a public network, your data remains private.
3. Why can't I see my iPhone in Windows File Explorer?
Windows usually only sees the "DCIM" (Photos) folder of an iPhone. To access all files, you need the Apple Devices app or a comprehensive file management tool like AnyViewer.
4. Does transferring files via the cloud consume my data plan?
Yes. When you share files between Windows and iPhone via iCloud or OneDrive, you are uploading and downloading data from the internet. If you are not on Wi-Fi, this will use your mobile data.
5. What is the fastest way to move a 10GB video from PC to iPhone?
A wired connection or a direct wireless tool like AnyViewer is best. Cloud services are often too slow for large files due to limited internet upload speeds.
