
How to Share Desktop Between Two Computers [5 Methods]
A step-by-step guide on how to share desktop between two computers using the top 5 software and hardware solutions, featuring AnyViewer for fast, free remote access.
By Ellie / Updated on June 16, 2026
Managing multiple computers can quickly become a hassle. If you are constantly switching between a laptop and a desktop, or trying to help a colleague across the office, you know the frustration of moving files, swapping cables, or physically changing seats. Learning how to share desktop between two computers is the ultimate fix to boost your productivity.
Whether you need to control a powerful workstation from your couch, transfer files instantly, or provide remote IT support, learning how to share screens between two computers bridges the gap between your devices.
In this comprehensive guide, we will break down the absolute best ways to connect your screens, look at the benefits of doing so, and give you clear, actionable steps to get started today.
Top 5 Methods to Share Desktop to Another Computer
When looking at how to share desktop to another computer, you have a few native options and several third-party tools. Let's look at the five most reliable and efficient methods available today.
Method 1: The Best Overall Solution – AnyViewer (Fast & Free)
For a seamless, high-performance experience, we highly recommend AnyViewer. It is a robust, free remote desktop software designed for Windows, iOS, and Android. Unlike native tools that often require complex network configurations or premium Windows editions, AnyViewer works instantly out of the box.
With its newly added "Mirror screen" feature, AnyViewer allows you to mirror your current screen to another device in real time. This makes it an exceptional tool for easier presentations, instant screen sharing, online collaboration, and fluid media viewing without any lag.
- Ideal Use Cases: Fast remote work from home, accessing an unattended office PC, cross-network remote troubleshooting, and secure large file transfers.
- Pros: 100% free for personal use; end-to-end ECC encryption; blazing-fast file transfer; works flawlessly across different networks without port forwarding.
- Cons: Requires an active internet connection; third-party software installation is mandatory on both ends.
Beyond traditional remote control, its high-frame-rate screen mirroring capability ensures that everyone in your meeting or presentation sees exactly what is on your screen simultaneously, making cross-device teamwork completely effortless.
AnyViewer Setup Guide:
Step 1. Download and Install: Download AnyViewer on both computers you wish to connect. Follow the on-screen prompts to install the software.
Step 2. Create a Free Account: Launch AnyViewer on the host computer, click "Log in," and sign up for a free account. Log in to this same account on the client computer.

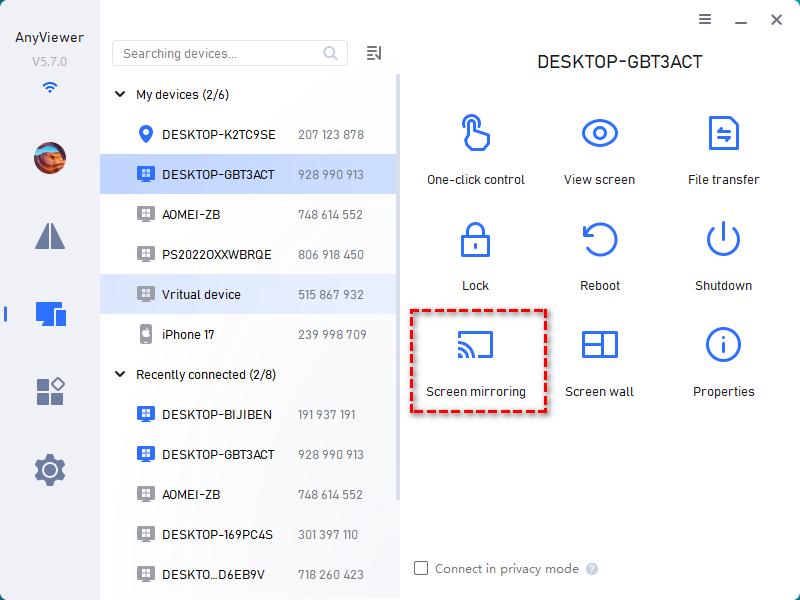
Step 3. Connect Instantly: On your local client computer, go to the Device tab. You will see a list of your assigned devices.
Step 4. Start Sharing or Mirroring: Click on the target computer you want to connect with.
- To fully control the PC, select One-click control.
- To use the real-time presentation feature, select Screen Mirroring button to trigger the Mirror screen mode from the menu toolbar to broadcast your display instantly.
Method 2: Using Built-in Windows Remote Desktop (RDP)
Windows includes a native tool called Remote Desktop (RDP). While it is stable and requires no third-party installations, it has a major catch: the host computer must be running Windows Pro, Enterprise, or Education editions. Windows Home edition cannot act as an RDP host.
- Ideal Use Cases: Managing computers within the same Local Area Network (LAN), or IT admins managing professional Windows environments.
- Pros: Built directly into Windows (no third-party downloads required); excellent resource integration (local printing, audio redirection); near-zero lag over local networks.
- Cons: Host computer must be Windows Pro or higher; setting it up over the internet requires complex VPNs or risky router port forwarding.
Windows RDP Setup Guide:
Step 1. Enable RDP on the Host PC: Go to Settings > System > Remote Desktop and toggle "Enable Remote Desktop" to On.
Step 2. Note the PC Name: Under the same settings menu, write down the exact name of the computer.
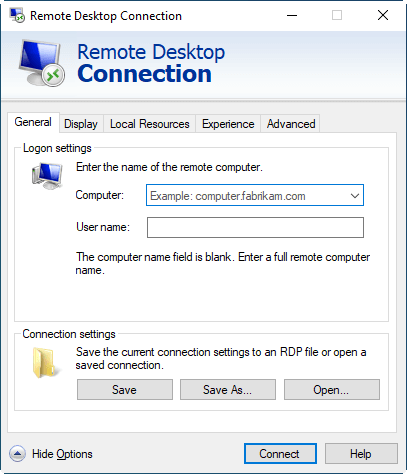
Step 3. Launch RDP on the Client PC: Open the Start Menu on your second computer, type Remote Desktop Connection, and open the app.
Step 4. Enter Connection Details: Type in the name or IP address of the host computer and click Connect.
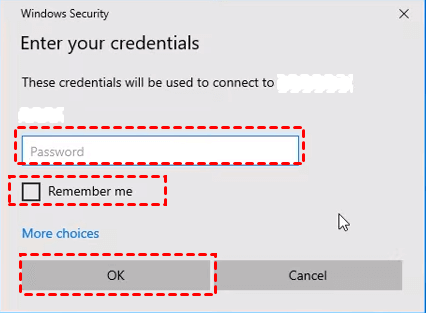
Step 5. Authenticate: Enter the Windows username and password of the remote computer to log in.
Method 3: Using Chrome Remote Desktop (Cross-Platform)
If you are trying to bridge different operating systems (like sharing a Windows desktop with a Mac or a Chromebook), Chrome Remote Desktop is a reliable, web-based alternative that operates inside your browser.
- Ideal Use Cases: Quick, cross-platform screen sharing (e.g., Mac to Windows), and users who already rely heavily on the Google Chrome ecosystem.
- Pros: Completely free; works across Windows, macOS, Linux, and ChromeOS; very easy setup tied to your Google account.
- Cons: Lacks advanced features like clipboard file transferring; requires the Google Chrome browser to be running; performance can drop with multiple displays.
Chrome Remote Desktop Setup Guide:
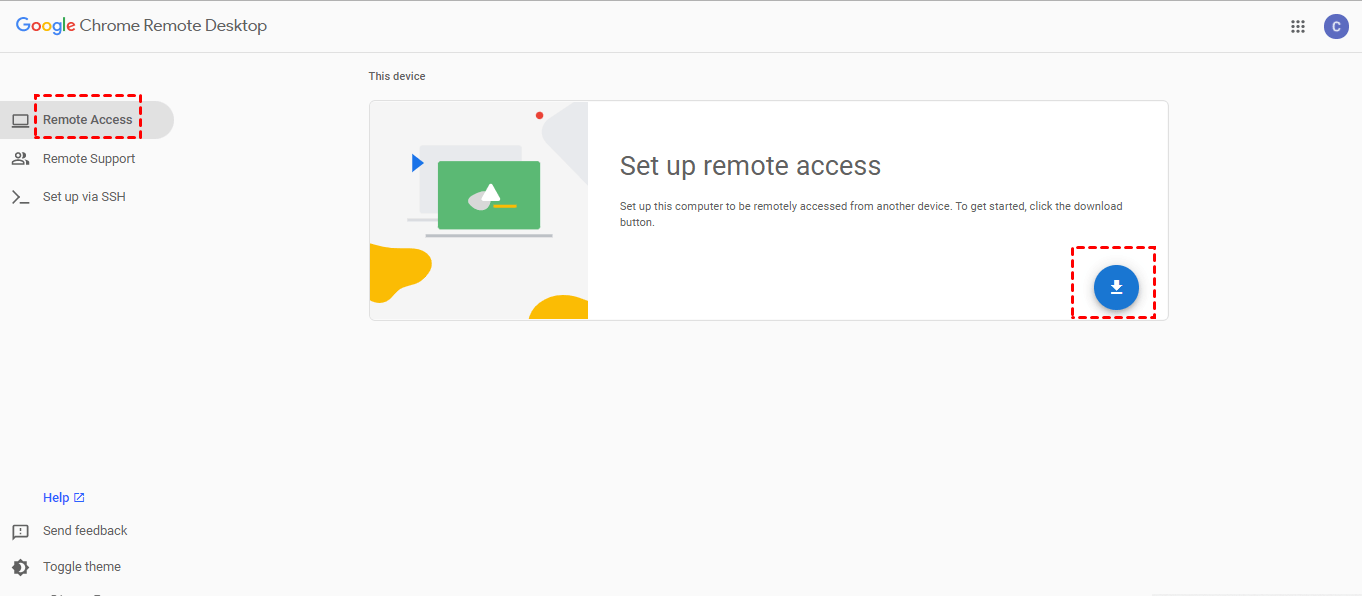
Step 1. Install the Extension: Open Google Chrome on the host computer, visit the Chrome Remote Desktop website, and download the setup extension.
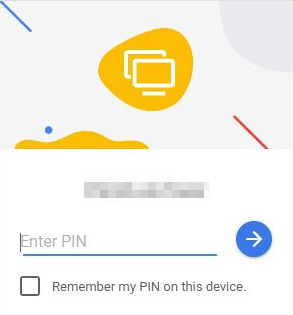
Step 2. Set Up Access: Click Turn On under the "Set up remote access" section. Name your computer and create a secure 6-digit PIN.
Step 3. Access from the Client PC: On the second computer, open Chrome, log into the same Google account, and visit the Chrome Remote Desktop page.
Step 4. Start the Session: Click on your host computer's name, enter the 6-digit PIN, and your desktop sharing session will begin.
Method 4: Use Windows Miracast Wireless Display
If you want to extend or mirror screens wirelessly between two laptops without messing with HDMI cables, Windows Miracast is a convenient built-in solution. It allows wireless projection and display sharing over the same Wi-Fi network.
- Ideal Use Cases: Creating a temporary wireless dual-monitor setup, projecting one laptop to another for side-by-side meetings, or sharing visuals during presentations.
- Pros: No software installation required; supports both "Duplicate" and "Extend" display modes; clean, cable-free wireless connection.
- Cons: Both devices must support Miracast hardware; connection stability drops if the local Wi-Fi network is unstable or crowded.
Press Win + P on your keyboard. If you see "Connect to a wireless display," your device supports Miracast. If your devices are on different networks or platforms, using a software solution like AnyViewer will provide a much smoother, cross-system sharing experience.
Miracast Setup Guide:
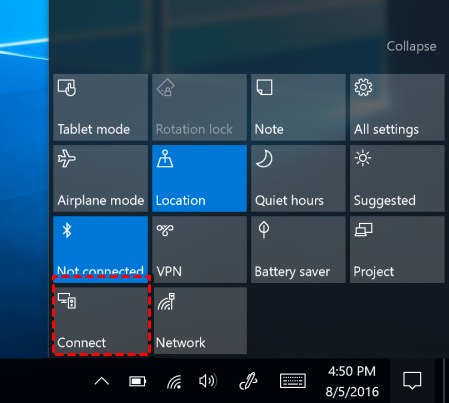
Step 1. Open the Connection Panel: Click the Notification Center icon or press Win + K to open the "Connect" menu.
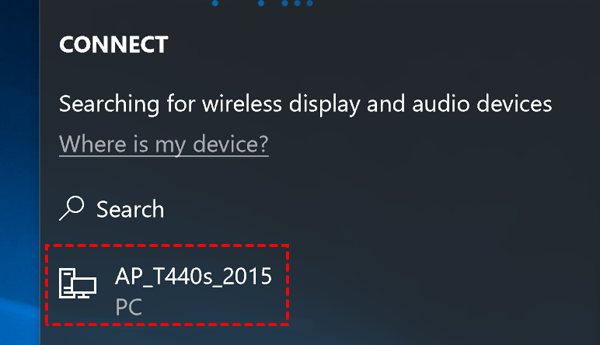
Step 2. Find Available Devices: Select your target device from the list of nearby Miracast-enabled PCs.
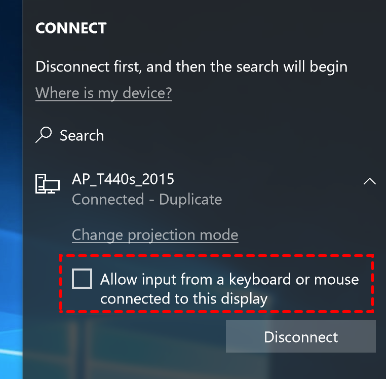
Step 3. Enable Input Control: Check the box for "Allow input from a connected device" to enable keyboard and mouse control across the screens.
Method 5: Use a KVM Switch (Hardware Solution)
If you want both PCs to share a single physical monitor and use the same keyboard and mouse, consider a KVM (Keyboard, Video, Mouse) switch. This hardware device connects two computers via physical cables, allowing you to switch displays instantly.
Many users search for how to share screen between two laptops using HDMI cables. However, the vast majority of laptop HDMI ports are "Output Only," meaning you cannot directly connect them with a single cable to share displays. In this case, a physical KVM switch or a software solution such as AnyViewer is the ideal alternative.
- Ideal Use Cases: Users who want to control two separate PCs (like a work laptop and a personal gaming tower) using just one monitor, keyboard, and mouse setup.
- Pros: Simple plug-and-play setup; zero network latency (perfect for high-end gaming and 4K media use); absolutely no software overhead or background processes.
- Cons: Requires an upfront hardware purchase; clutters the desk with multiple HDMI/DisplayPort and USB cables; cannot share desktops over a distance.
Most laptops only support HDMI output, not input, meaning you cannot use a laptop screen as a monitor for another PC via a simple cable. To bypass this hardware limitation easily, downloading AnyViewer is the best alternative for software-based multi-PC control, with no extra cables required.
KVM Setup Guide:
Step 1. Connect the Peripherals: Plug your primary monitor, keyboard, and mouse into the console ports of the KVM switch.
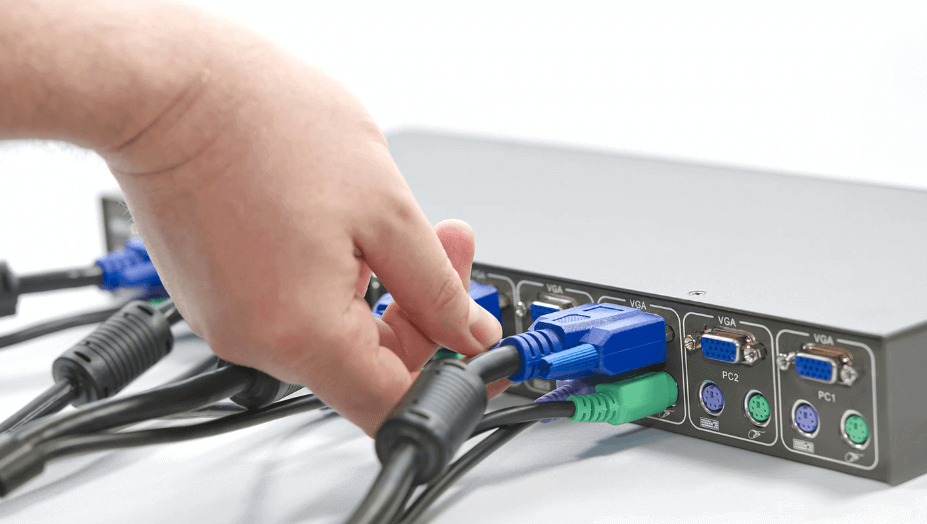
Step 2. Connect Your Computers: Use HDMI/DisplayPort and USB cables to connect each PC to the input slots on the KVM switch.
Step 3. Switch Inputs Instantly: Use one of the following methods to toggle between your two desktops:
- Panel Button: Press the physical button on the KVM switch box.
- Keyboard Shortcut: Double-tap the Scroll Lock key + a number key.
- Mouse Gestures: Use advanced mouse movements (supported by high-end KVM models) to swap screens.
Why Should You Share Your Desktop? The Key Benefits
If you haven't set up screen sharing yet, you are missing out on serious workflow optimizations. Here is why cross-computer desktop sharing is a game-changer:
- Maximized Productivity: No more emailing files to yourself or carrying USB drives around. You can access everything from a single monitor.
- Seamless Remote Work: Leave your heavy work computer at the office and access its full processing power using a lightweight laptop from home.
- Cost Efficiency: Instead of buying expensive hardware licenses or duplicates for both machines, you can just log into the primary computer that already has the software installed.
- Instant Technical Support: Easily troubleshoot issues on a family member's or colleague's PC without needing to travel to their location.
- Decluttered Workspace: Say goodbye to multiple keyboards and mice cluttering your desk. You can control two distinct systems using one set of peripherals.
Conclusion
Learning how to share desktop to another computer saves you time, declutters your workspace, and unlocks the flexibility you didn't know you had. While Windows features built-in tools like RDP, restrictions like Windows Home limitations, and network barriers can get in the way.
If you want a hassle-free, highly secure, and incredibly fast experience, download a dedicated tool like AnyViewer to get your devices connected in just a few clicks.
