
Remote Desktop Session Host Configuration Missing in Server 2012 R2: What to Do?
This post mainly introduces two ways to adjust remote settings even the Remote Desktop Session Host Configuration missing in Server 2012 R2.
By Ellie / Updated on December 13, 2024
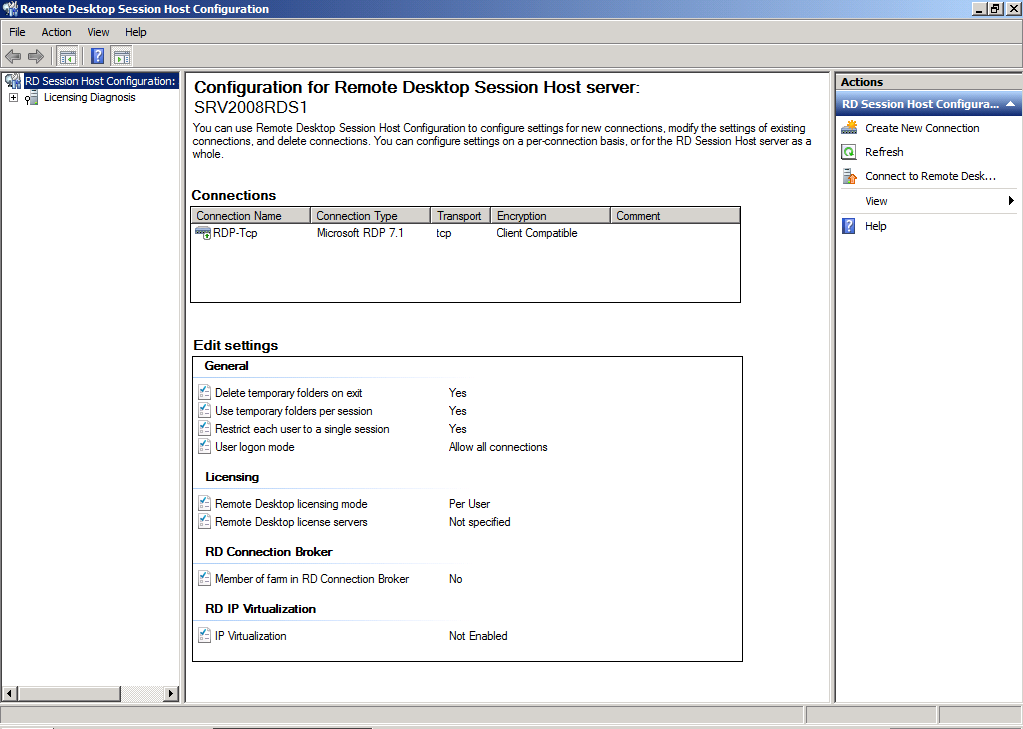
About Remote Desktop Session Host Configuration
What is Remote Desktop Session Host Configuration? In Windows Server 2008 R2, it is normally used to configure specific settings in remote sessions such as Color Depth, Session Settings, licensing options, etc. Users can use it to either configure the settings on the local Remote Desktop Session Host server or to connect to another RD Session Host server and configure the settings for that RD Session Host server remotely.
Remote Desktop Session Host Configurations is missing in Windows Server 2012 R2
However, we regret to tell some of you, especially users of Windows Server 2012 R2, 2016, 2019, that the Remote Desktop Session Host Configuration tool no longer exists in Windows Server 2012 R2, 2016, and 2019.
Then how to configure Remote Desktop since the Remote Desktop Host Configuration is missing in Server 2012 R2, 2016, and 2019?
How to change settings without Remote Desktop Session Host Configurations
Here in this part, we provide you with two ways to configure Remote Desktop settings.
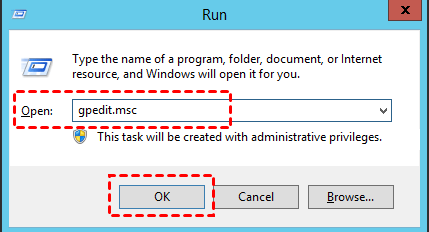
Solution 1. Change settings through the Local Group Policy
Step 1. Press Win + R and then type in “gpedit.msc” to open the Local Group Policy.
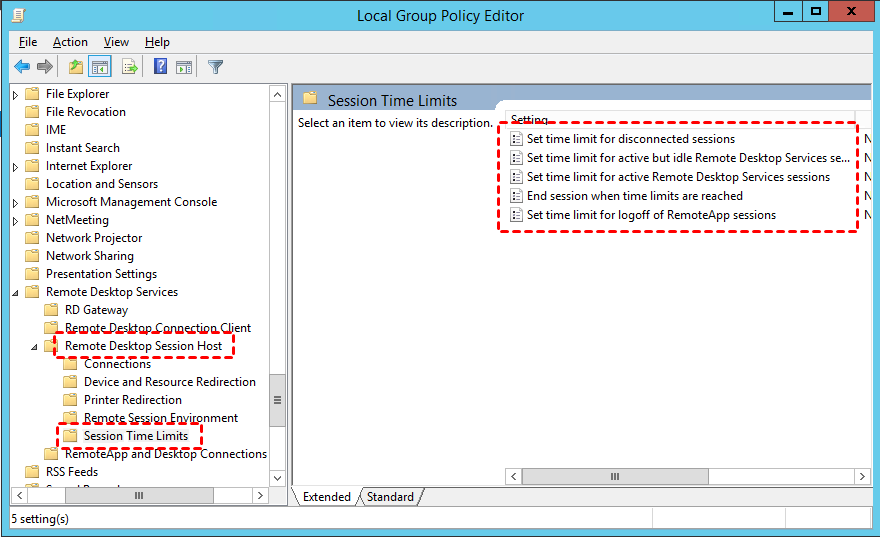
Step 2. Navigate to Computer Configuration > Administrative Templates > Windows Components > Remote Desktop Services > Remote Desktop Session Host. You can make the changes you want there.
For example, if you want to change the session time limits. Just click Session Time Limits. On the right pane, you can also configure timeout and reconnection settings.
Solution 2. Change settings through the Registry
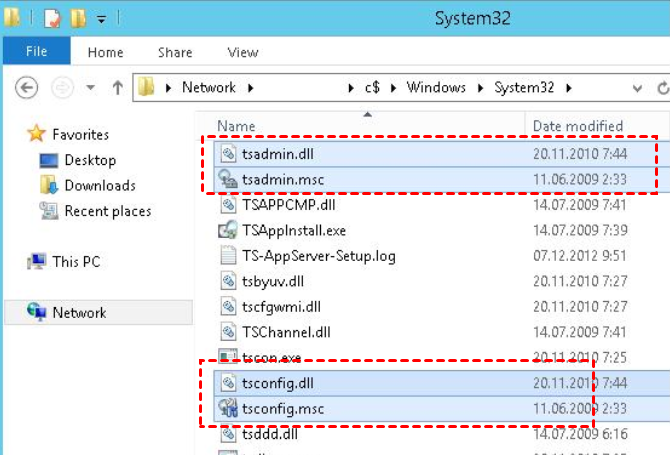
Users could also enable TSConfig in Windows 2012 R2 (2016/2019) from older Windows 2008 R2 TSConfig.
Step 1. From a System32 folder on Windows 2008 R2 Server, copy tsadmin.dll, tsadmin.msc, tsconfig.msc, tsconfig.dll, and wts.dll to the same folder on Windows 2012 R2.
Step 2. On Server 2012 R2, press Win + R and then type in “regedit” to open the Registry editor.

Step 3. Then follow the four paths respectively in the form. The keys and values in the form are exported from Server 2008 R2. Copy and paste them to Server 2012 R2 and import them into the Registry in the same locations. The ways to import and export keys and values are similar: first, click File in the upper-left corner and then click Import/Export.

|
HKEY_LOCAL_MACHINE > SOFTWARE > Microsoft > MMC > SnapIns > FX:{80aaa290-abd9-9239-7a2d-cf4f67e42128} “ApplicationBase”=hex(2):43,00,3a,00,5c,00,57,00,69,00,6e,00,64,00,6f,00,77,00,\73,00,5c,00,53,00,79,00,73,00,74,00,65,00,6d,00,33,00,32,00,00,00 “About”=“{00000000-0000-0000-0000-000000000000}” “VersionStringIndirect”=“@C:\\Windows\\System32\\umcRes.dll,-107” “ProviderStringIndirect”=hex(2):40,00,43,00,3a,00,5c,00,57,00,69,00,6e,00,64,\00,6f,00,77,00,73,00,5c,00,53,00,79,00,73,00,74,00,65,00,6d,00,33,00,32,00,\5c,00,75,00,6d,00,63,00,52,00,65,00,73,00,2e,00,64,00,6c,00,6c,00,2c,00,2d,\00,31,00,30,00,32,00,00,00 “SmallFolderBitmapIndirect”=hex(2):40,00,43,00,3a,00,5c,00,57,00,69,00,6e,00,\64,00,6f,00,77,00,73,00,5c,00,53,00,79,00,73,00,74,00,65,00,6d,00,33,00,32,\00,5c,00,75,00,6d,00,63,00,52,00,65,00,73,00,2e,00,64,00,6c,00,6c,00,2c,00,\2d,00,31,00,32,00,30,00,00,00 “NameString”=“Remote Desktop Session Host Configuration” “HelpTopic”=hex(2):25,00,73,00,79,00,73,00,74,00,65,00,6d,00,72,00,6f,00,6f,00,\74,00,25,00,5c,00,68,00,65,00,6c,00,70,00,5c,00,74,00,73,00,63,00,63,00,2e,\00,63,00,68,00,6d,00,00,00 “AssemblyName”=“tsconfig” “RuntimeVersion”=“v2.0.50215” “Description”=“Configure Remote Desktop Session Host settings” “DescriptionStringIndirect”=hex(2):40,00,43,00,3a,00,5c,00,57,00,69,00,6e,00,\64,00,6f,00,77,00,73,00,5c,00,53,00,79,00,73,00,74,00,65,00,6d,00,33,00,32,\00,5c,00,75,00,6d,00,63,00,52,00,65,00,73,00,2e,00,64,00,6c,00,6c,00,2c,00,\2d,00,31,00,30,00,31,00,00,00 “LinkedHelpTopics”=“%systemroot%\\help\\tscc.chm” “NameStringIndirect”=hex(2):40,00,43,00,3a,00,5c,00,57,00,69,00,6e,00,64,00,6f,\00,77,00,73,00,5c,00,53,00,79,00,73,00,74,00,65,00,6d,00,33,00,32,00,5c,00,\75,00,6d,00,63,00,52,00,65,00,73,00,2e,00,64,00,6c,00,6c,00,2c,00,2d,00,31,\00,30,00,30,00,00,00 “IconIndirect”=hex(2):40,00,43,00,3a,00,5c,00,57,00,69,00,6e,00,64,00,6f,00,77,\00,73,00,5c,00,53,00,79,00,73,00,74,00,65,00,6d,00,33,00,32,00,5c,00,75,00,\6d,00,63,00,52,00,65,00,73,00,2e,00,64,00,6c,00,6c,00,2c,00,2d,00,31,00,31,\00,30,00,00,00 “FxVersion”=“2.0.1.7” “Type”=“Microsoft.TerminalServices.Configuration.SnapIn.TSConfigSnapIn, tsconfig, Version=6.1.0.0, Culture=neutral, PublicKeyToken=31bf3856ad364e35” “FolderBitmapsColorMask”=dword:00000000 “ModuleName”=“tsconfig.dll” “Provider”=“Microsoft Corporation” |
| HKEY_LOCAL_MACHINE > SOFTWARE > Microsoft > MMC > SnapIns > FX:{80aaa290-abd9-9239-7a2d-cf4f67e42128} > NodeTypes |
| HKEY_LOCAL_MACHINE > SOFTWARE > Microsoft > MMC > SnapIns > FX:{80aaa290-abd9-9239-7a2d-cf4f67e42128} > NodeTypes > {f86e6446-aaff-11d0-b944-00c04fd8d5b9} |
| HKEY_LOCAL_MACHINE > SOFTWARE > Microsoft > MMC > SnapIns > FX:{80aaa290-abd9-9239-7a2d-cf4f67e42128} > Standalone |
After following the steps above, you can successfully restore the administrative console on your Windows 2012 R2.
AnyViewer: an easy remote access software applicable to Server 2012 R2
Remote Desktop Session Host Configurations missing in Windows Server 2012 R2 can be a pretty annoying problem. And the two ways to configure Remote Desktop settings are not that easy. If you are looking for remote access software that requires fewer configurations, you can use AnyViewer.
AnyViewer is compatible with Windows Server 2022/2019/2016/2012 R2. It is easy-to-use software. Compared with Remote Desktop, it is easier in both setup and use. Next, let’s see how to use AnyViewer to remotely control another PC.
Step 1. Download, install, and launch AnyViewer on both computers.
Step 2. Go to Log in, and then click Sign up. (If you already have signed up on its official website, you can log in directly.)

Step 3. Fill in the signup information.

Step 4. Then you can see you successfully logged in to AnyViewer. Your device will automatically be assigned to the account you've logged in to.

Step 5. Log in to the same AnyViewer account on the two devices, then click One-click control to achieve unattended remote access.

- ✍ Notes: Free edition of AnyViewer allows you to remotely control two computers simultaneously. If you want to control more computers simultaneously, you can upgrade your account to a Professional or Enterprise plan. Then you'll have the following rights:
- Assign more devices to achieve unattended remote access to more devices.
- Connect to another computer in privacy mode, which means you can black the screen and block the mouse and keyboard of the remote computer.
- Faster file transfer speed. Transfer speed for a free account is 500 KB/s, and for a paid account is up to 10 MB/s.
In conclusion, this post mainly introduces two ways to adjust remote settings even the Remote Desktop Session Host Configuration missing in Server 2012 R2. But if you would like an easier way to achieve remote control, you can try AnyViewer.
