
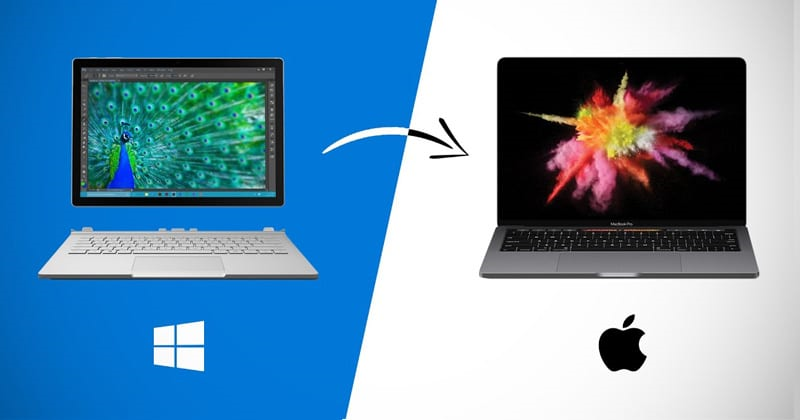
How to Transfer Photos from PC to Mac [5 Methods]
Transferring photos from PC to Mac is easy. This guide shows you five simple ways, including using AnyViewer for quick and secure transfers, plus other methods like external drives and cloud storage.
By Ellie / Updated on April 2, 2025
What is the easiest way to transfer photo files from PC to Mac?
When you first get a Mac, one of the main questions you'll have is how to move your files, especially photos, from your PC to your new Mac. After all, photos are often the most important items people want to transfer between these two systems.
The good news is that most image, video, and audio formats can be opened and viewed on both PCs and Macs without issue. Formats like JPEG, PNG, and BMP are compatible with both operating systems, so you won't run into trouble when transferring photos.
The most straightforward and practical method is often to use an external USB hard drive. However, USB drives come with their own limitations, such as requiring direct access to both devices.
In this guide, we'll cover five easy ways to transfer your photos from a PC to a Mac, each suited for different needs and circumstances. Choose the one that best fits your situation.
How to transfer photos from PC to Mac [5 methods]
Here's how to transfer photos from PC to Mac easily with the following five methods.
Method 1. With remote file transfer software - AnyViewer
The easiest way to transfer photos between a PC and a Mac, especially if the devices are far apart, is by using remote file transfer software like AnyViewer. This method eliminates the need for cables, external drives, or network configurations. Simply install AnyViewer on both your PC and Mac, establish a secure connection, and you can transfer your photo files directly between the two systems with ease. Plus, AnyViewer supports high-speed transfers, making it a reliable solution for large photo collections.
How to transfer photos from PC to Mac using AnyViewer:
Step 1. Install AnyViewer on both your PC and Mac.
Step 2. Create an account on AnyViewer or log in if you already have one.

Step 3. Launch the AnyViewer app on your PC, then click on "Device" to see your connected devices. Locate your Mac under "My Devices" and select it. Next, click on "File Transfer" to open the file transfer manager.
Alternatively:
For unattended Mac access during the transfer, choose "One-click control" to remotely connect to your Mac. Once connected, you can easily manage the file transfer from the toolbar within the remote session.
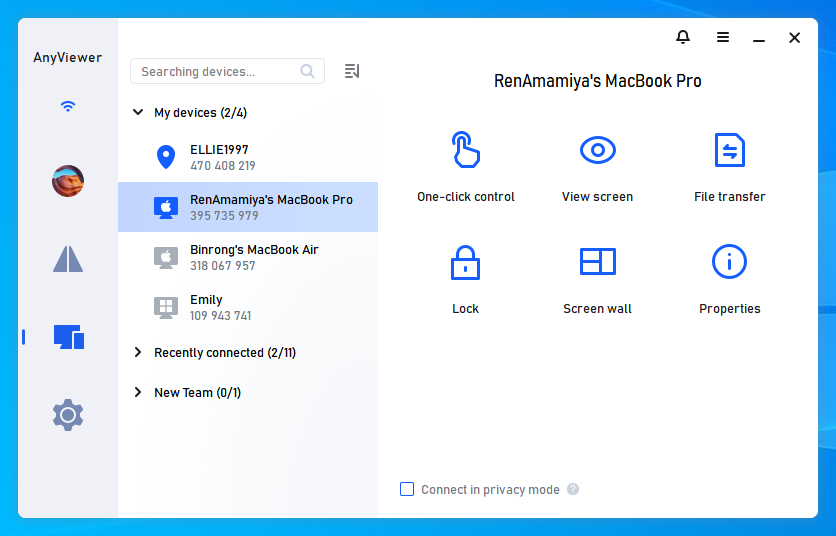
Step 4. In the file transfer manager, pick the photos you want to transfer and click the arrow to begin the transfer.

Key advantages:
- Secure file transfer: It uses strong encryption to protect your photos while transferring them, making sure your files are safe.
- File transfer and remote access in one: You can not only transfer files but also control your Mac from your PC remotely, giving you more flexibility.
- High transfer speeds: AnyViewer offers quick file transfers, so you don't have to wait long, even for large files.
- No need for physical hardware: You don't need USB drives or external hard drives. Everything is done over the internet.
- User-friendly interface: The interface is simple and easy to understand, even if you're not tech-savvy.
- Multi-device support: You can transfer files between more than one device at once, making it perfect for managing multiple devices.
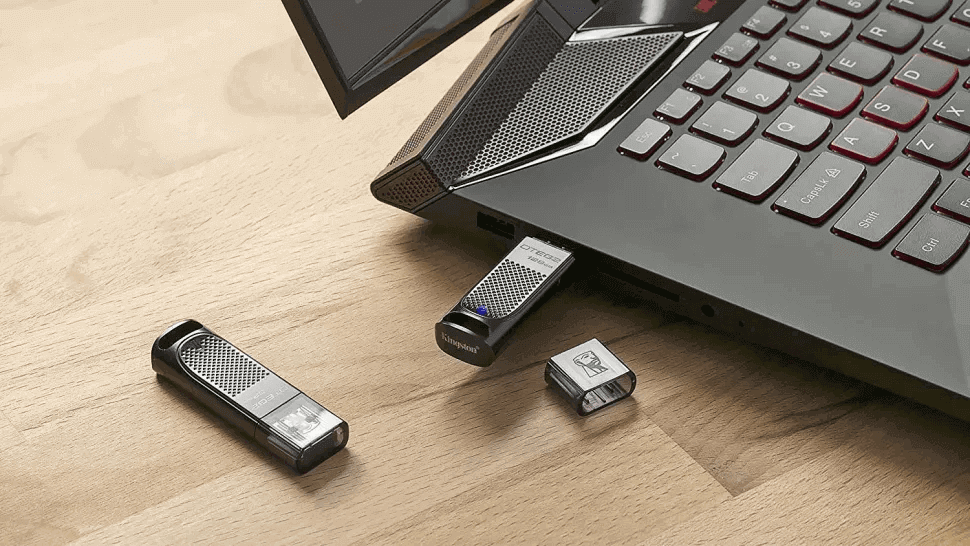
Method 2. Using an External Hard Drive
For those who prefer physical media, using an external hard drive is a great choice. Simply connect your hard drive to your PC, copy the photo files over, and then connect the same drive to your Mac to transfer the files. This method is perfect for transferring large amounts of data without relying on the internet. However, remember to ensure the external drive is formatted in a way that's compatible with both Windows and macOS, such as exFAT or FAT32, for smooth file access.
How to import photos from PC to Mac using an external hard drive or USB drive:
Step 1. Ensure your external hard drive is compatible with both Windows (NTFS, FAT32, or exFAT) and macOS.
Step 2. Plug the external hard drive into your PC.
Step 3. Copy your photo files from your PC into the drive.
Step 4. Once done, safely eject the external drive from your PC and plug it into your Mac.
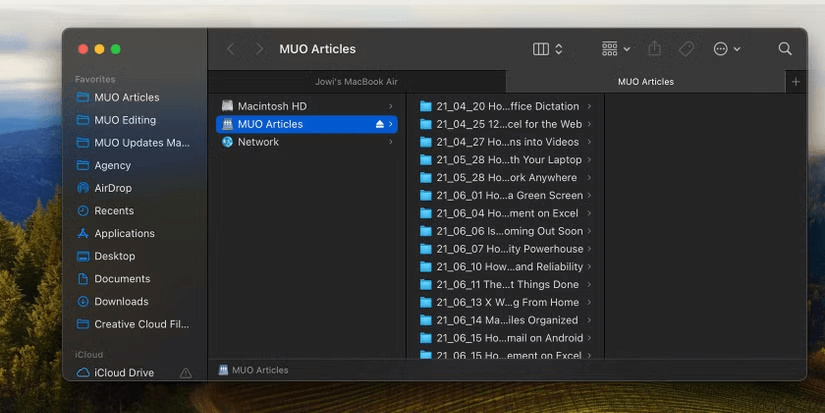
Step 5. Open Finder on your Mac, access the external hard drive and drag the photo files to a folder on your Mac.
Advantages:
- Works offline: No internet connection is needed.
- Large file transfer: Ideal for transferring large amounts of data quickly, without worrying about cloud storage limits.
- Simple setup: No need for complex software installations.
Disadvantages:
- Physical device needed: You need to have the external hard drive with you, which can be inconvenient if you're transferring files between devices in different locations.
- File system compatibility: The external drive must be formatted in a way that works with both Windows and macOS.
Method 3. Through Apple's Migration Assistant
Apple's Migration Assistant is a built-in tool designed to help users transfer data from a Windows PC to a Mac. By using a network or an external storage device, this method makes the transfer process easy and automated. After installing the Migration Assistant on both your PC and Mac, follow the on-screen instructions to transfer your photos along with other files. While it's primarily geared toward new users setting up a Mac, it's a quick and reliable method.
How to transfer photo files from PC to Mac using Migration Assistant:
Step 1. Download and install Windows Migration Assistant 3 on your PC, which is necessary for macOS Sonoma 14.4 or newer. For older macOS versions, use the corresponding Migration Assistant version.
Step 2. On your Mac, navigate to Applications > Utilities and open Migration Assistant, or use Spotlight to search for it.
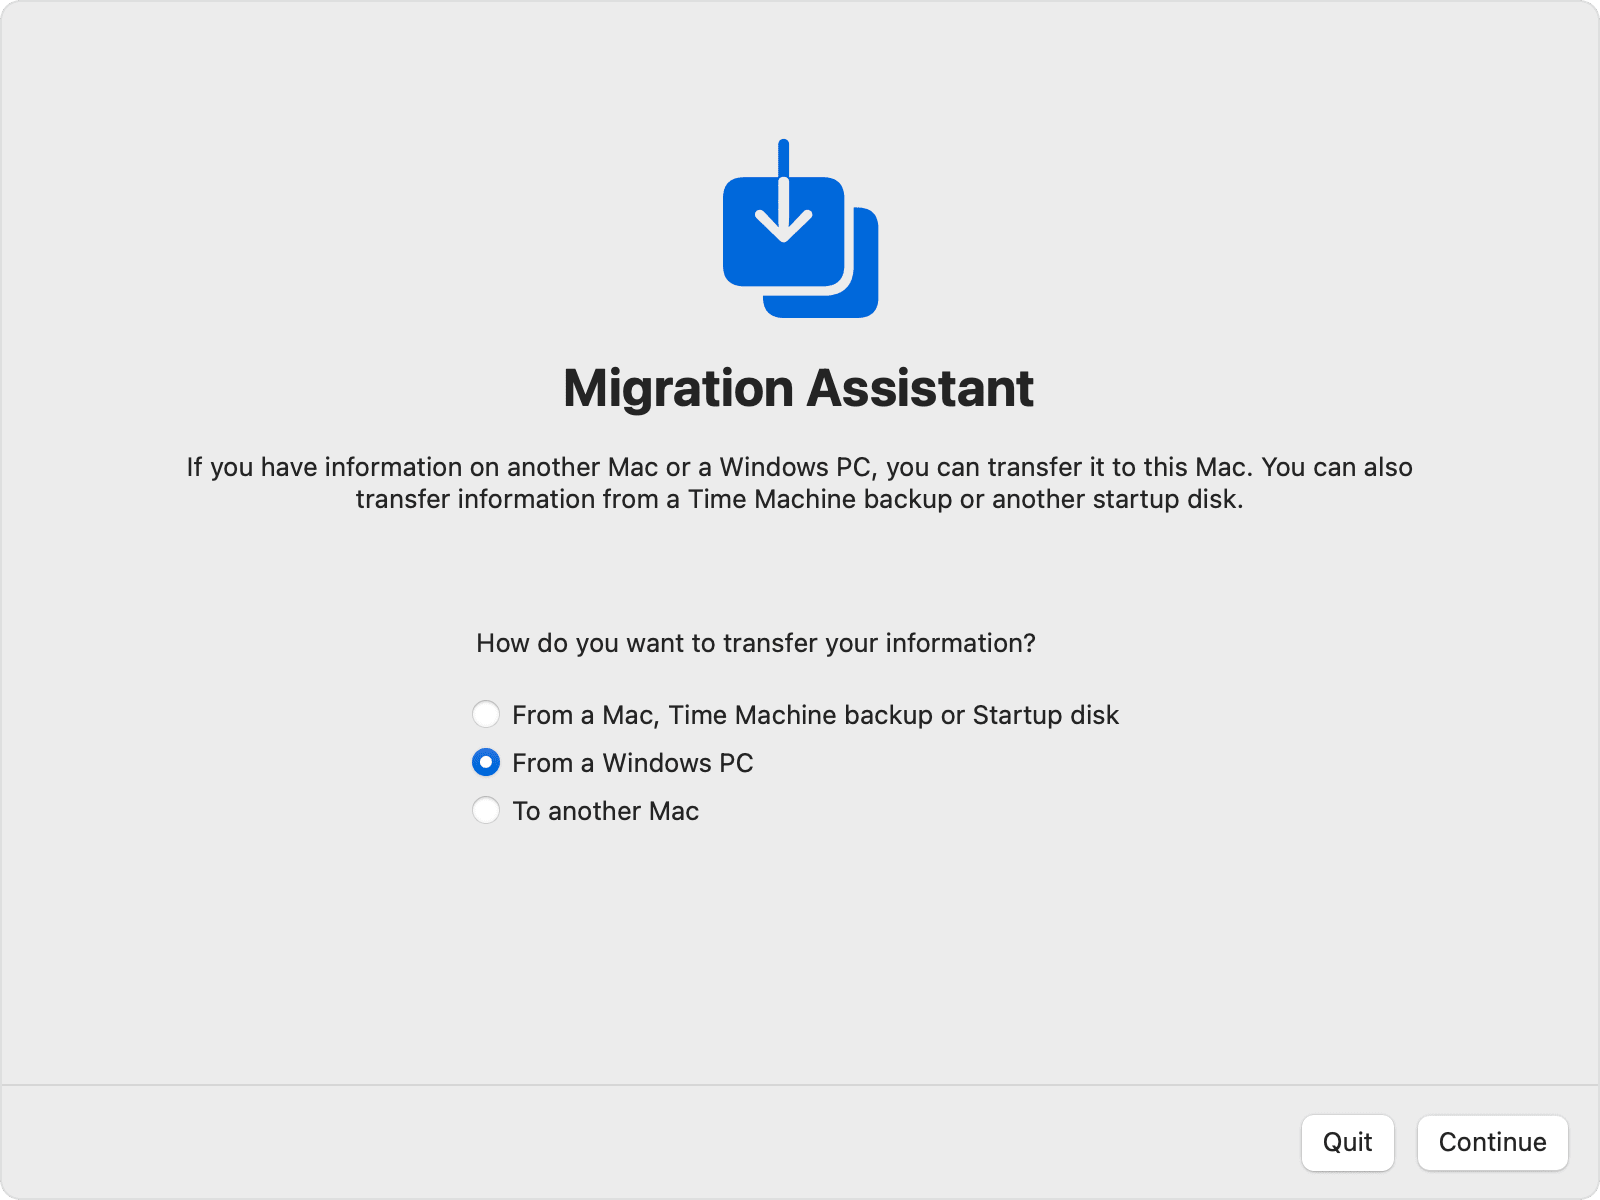
Step 3. Follow the on-screen instructions until you're asked to choose a transfer method. Select "From a Windows PC" and click Continue.
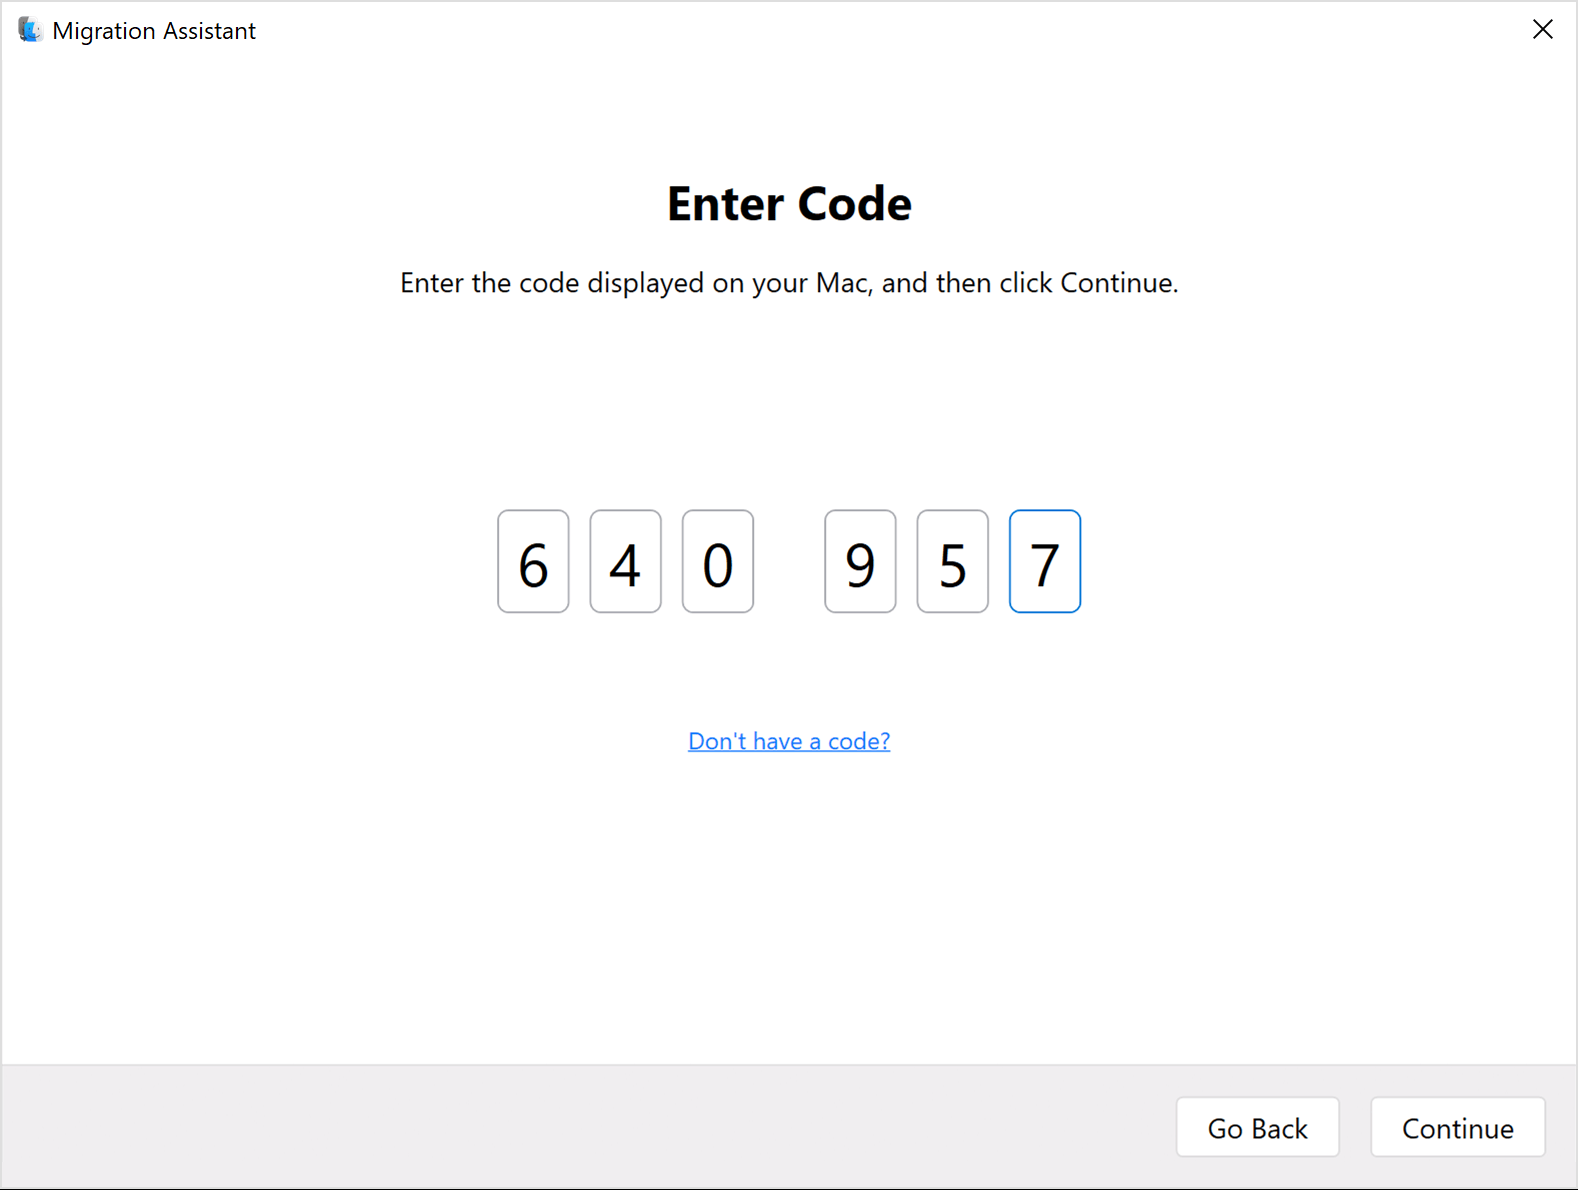
Step 4. A code will appear on your Mac. Open Migration Assistant on your PC and enter the code displayed on your Mac.
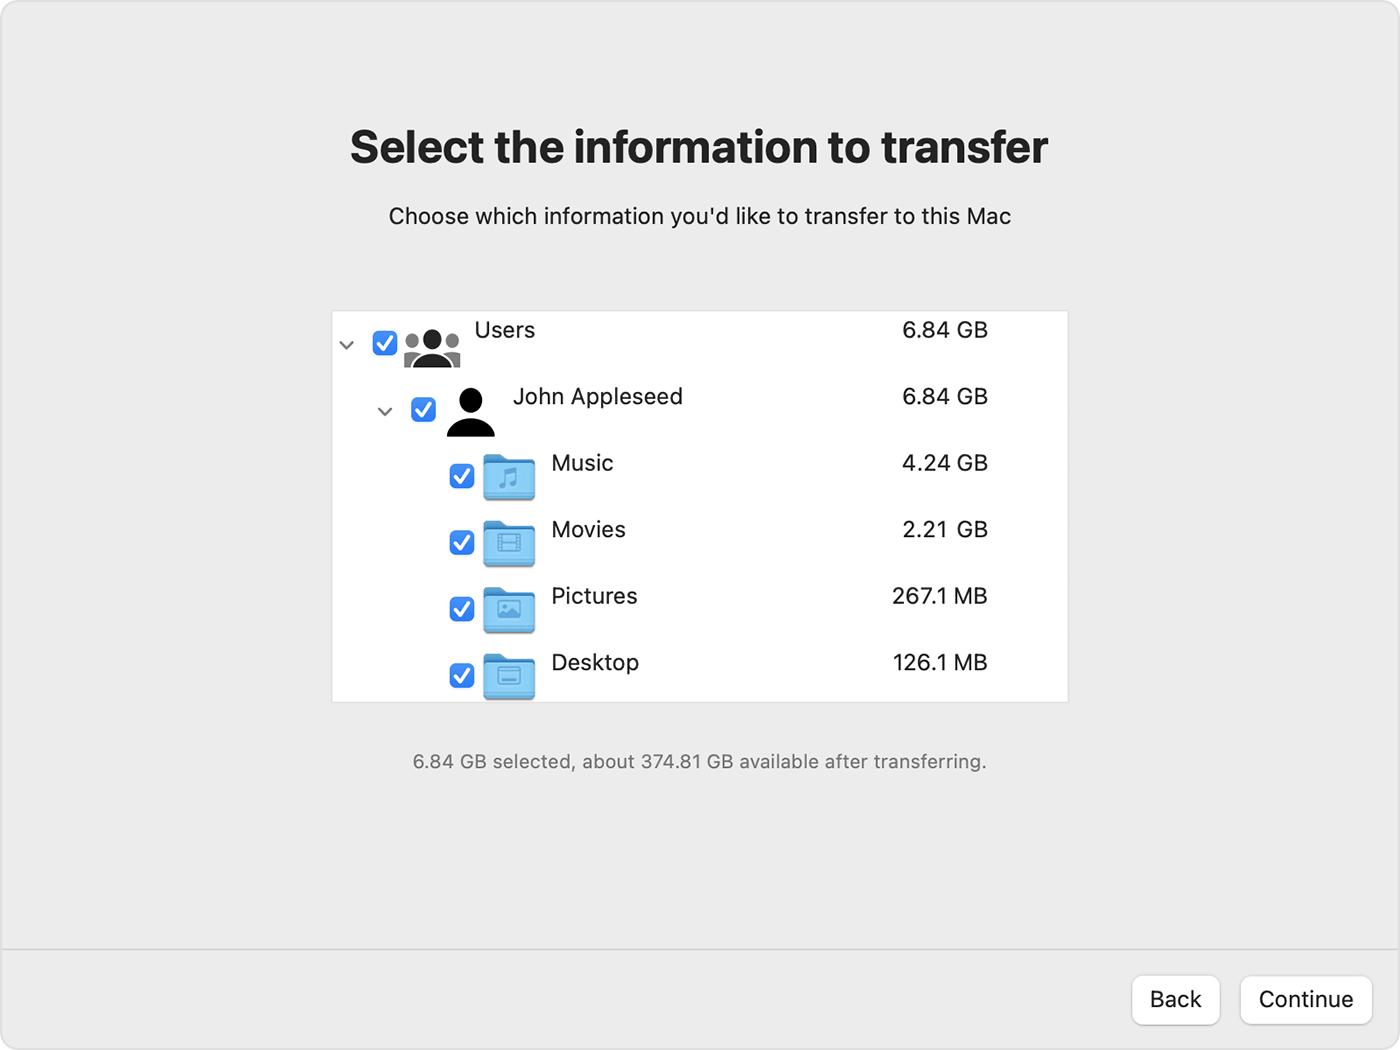
Step 5. Once the connection is established, Migration Assistant will begin scanning your files, which may take a few minutes.

Step 6. Select the Pictures folder for transfer and click Continue. Large transfers might take some time, so it's best to start in the evening.
Step 7. After the transfer finishes, log into your Mac account to view your photos. The account name will match the one on your PC.
Step 8. Before syncing or purchasing content from the Apple Store, be sure to authorize your Mac for Apple purchases.
Advantages:
- Easy setup: Apple's tool automatically detects your PC and helps with data transfer.
- Transfers multiple files: Not just photos, but other data like documents, apps, and settings can be transferred.
- Free and built-in: No need for additional software or services.
Disadvantages:
- Time-consuming: The process can be slow, especially for large file transfers.
- Limited control: You don't have fine-grained control over individual files you want to transfer (it's an all-or-nothing approach).
Method 4. Via direct network connection
Another effective way to transfer photos is by connecting your PC and Mac to the same local network. Once both devices are connected, you can share files over the network. On Windows, enable file sharing for the folders containing your photos. Then, on your Mac, use Finder to access the shared folder from your PC and copy the photos over. This method works best if both devices are on a fast and stable Wi-Fi or Ethernet network.
Here’s a simple guide to transferring photo files from PC to Mac:
Enabling File Sharing on Windows
To access your PC files from your Mac, you first need to enable file sharing on your Windows computer. Here’s how:
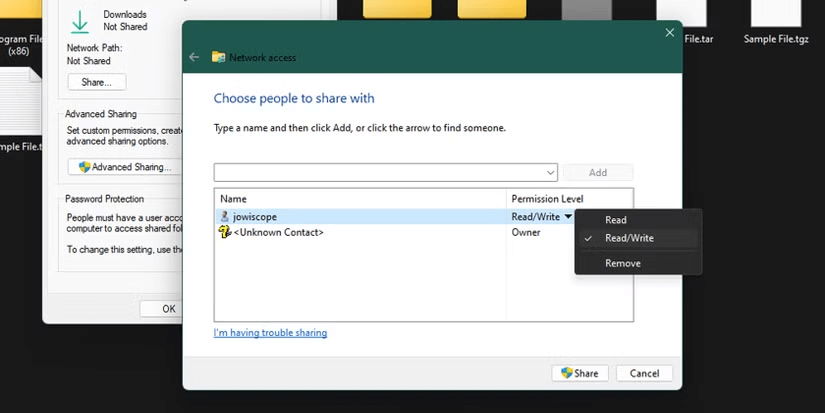
Step 1. Right-click the folder you want to share in File Explorer and select "Properties."
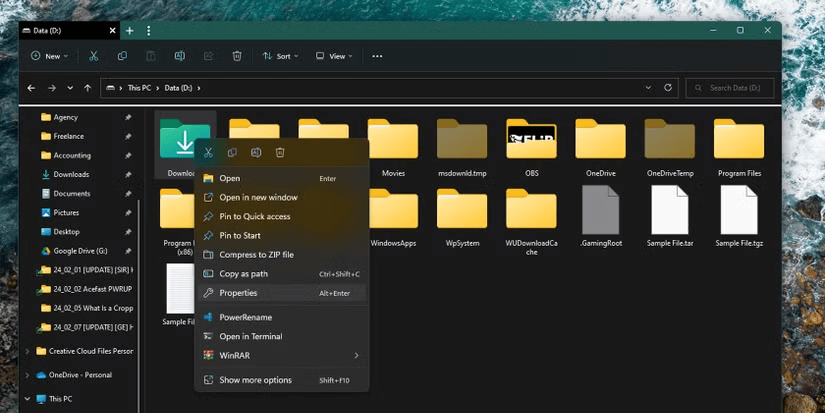
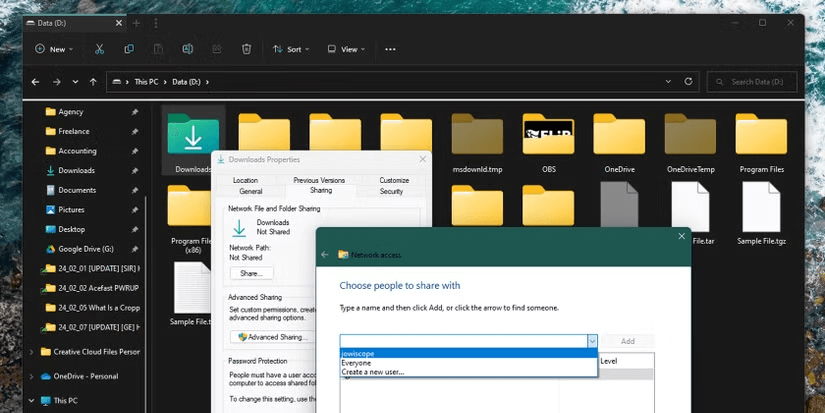
Step 2. Go to the "Sharing" tab and click "Share…"
Step 3. From the dropdown menu, choose the username to share with and click "Add."
Step 4. Select "Read" for view-only access or "Read/Write" for full access with editing, then click "Share."
Step 5. When prompted, enable network discovery and file sharing by selecting "Yes."

Step 6. Open Command Prompt or PowerShell, type ipconfig, and press Enter. Find your PC’s IP address under Ethernet or Wireless LAN as the IPv4 Address.
Accessing Shared Windows Files on Your Mac
Once file sharing is set up on your Windows PC, you can access the files from your Mac as long as both devices are on the same local network. Follow these steps:
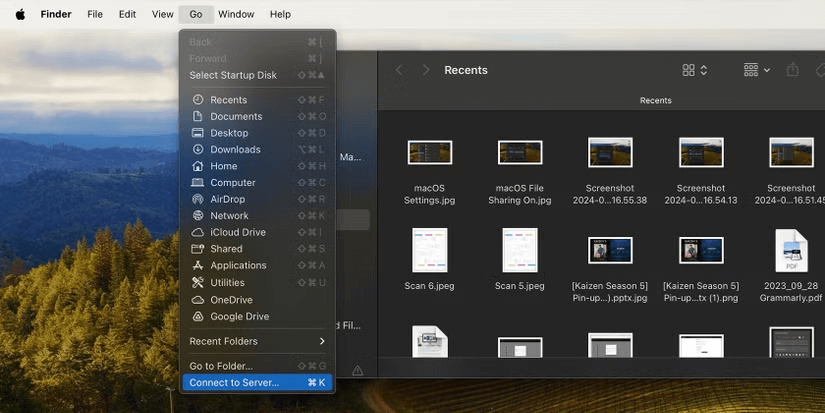
Step 1. Click the Finder icon in your Dock.
Step 2. From the Finder menu, click "Go" and then "Connect to Server."
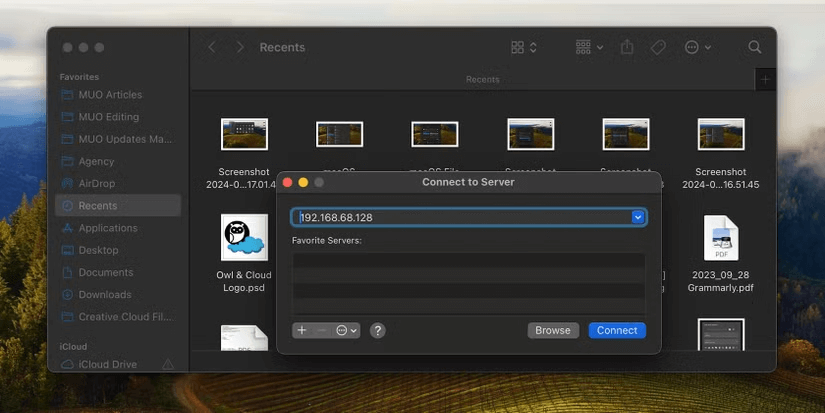
Step 3. Enter your Windows PC's IP address and click "Connect."
Step 4. Enter your Windows username and password, then press "Return."
Step 5. Select the folder you want and click "OK."
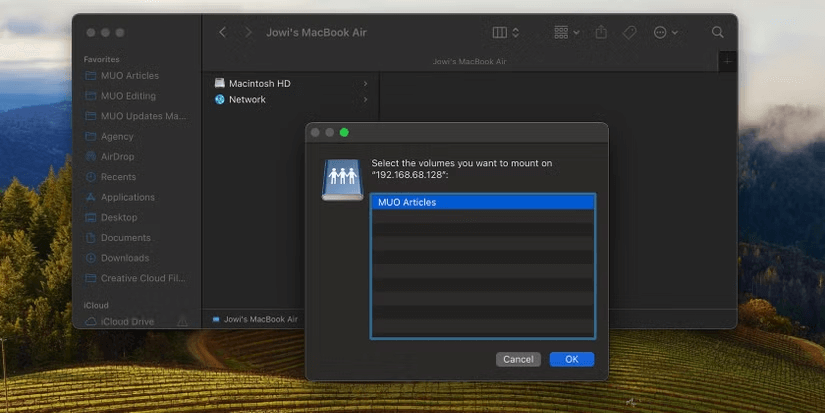
Step 6. Your shared folders will appear in the Finder sidebar.
Advantages:
- No external hardware needed: Transfers happen over your local network, making this method convenient if both devices are connected to the same Wi-Fi or Ethernet network.
- Fast and reliable: This is a fast method, especially if using a wired connection.
Disadvantages:
- Both devices need to be on the same network: This limits the transfer method if you're not on the same Wi-Fi or network.
- Networking setup can be tricky: For users unfamiliar with network sharing, this process can be confusing.
Method 5. With cloud storage
Cloud storage and file sharing services like Google Drive, Dropbox, or iCloud are also convenient for transferring photos between PC and Mac. Upload your photos from the PC to your preferred cloud service, and then access and download them from your Mac. This method allows you to transfer files from anywhere, as long as you have an internet connection. Additionally, it can serve as a backup for your photos in case anything goes wrong during the transfer.
Detailed steps to transfer photo files from PC to Mac:
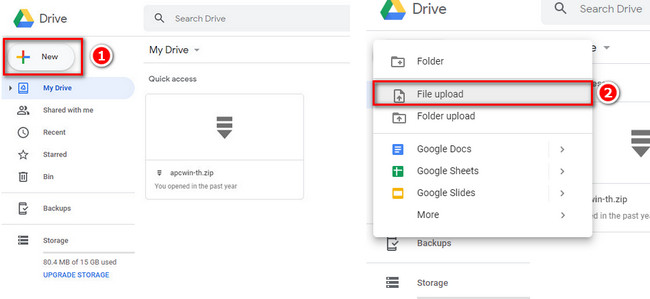
Step 1. Choose a cloud service like Google Drive, Dropbox, or iCloud.
Step 2. Upload your photos to the cloud by dragging and dropping them into the cloud app on your PC.
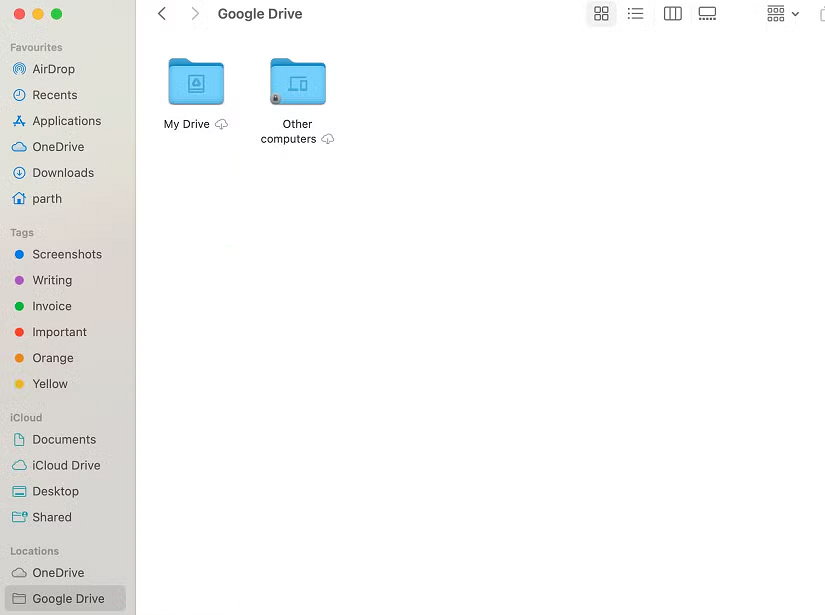
Step 3. On your Mac, download the cloud storage app or visit the web portal.
Step 4. Log in to your cloud service and access your photos.
Step 5. Select the photos you wish to download, then drag them to your Mac's local storage.
Advantages:
- Convenient and accessible: Cloud services allow you to access your photos from anywhere, on any device with an internet connection.
- No physical storage required: Ideal if you don't have an external drive available.
- Automatic backups: Cloud storage provides additional security by backing up your photos online.
Disadvantages:
- Requires internet: You need an internet connection for both uploading and downloading photos, which might not always be fast or stable.
- Storage limits: Free cloud storage plans may come with limited space, requiring you to pay for additional storage.
Conclusion
In conclusion, knowing how to transfer photos from PC to Mac is easy with several options available. If you're looking for the easiest and most efficient way to transfer photos from PC to Mac, AnyViewer is a great choice. With AnyViewer, you can quickly and securely transfer photos without the need for cables or external drives. It offers fast transfer speeds, and high security, and is incredibly user-friendly, making it the perfect solution for those wanting a hassle-free photo transfer experience.
