
6 Easy Ways to Transfer Files from Windows to Mac
This post primarily introduces the top six ways to transfer files from Windows to Mac. Understanding these methods empowers users to choose the most suitable option based on their specific needs, ensuring seamless file transfer and enhancing productivity across platforms.
By Ellie / Updated on April 8, 2026
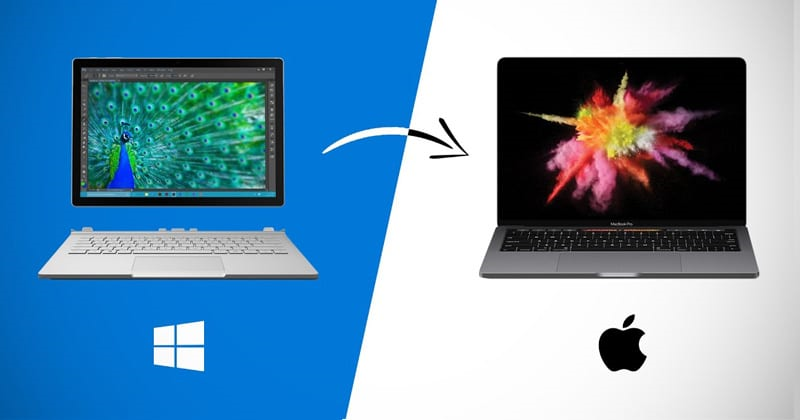
Moving from a PC to a Mac—or simply working between the two—doesn't have to be a technical headache. Whether you are wondering how to transfer data from a Windows laptop to Macbook Air for a fresh start, or you frequently need to share Mac files with Windows users in an office environment, there are several seamless ways to bridge these operating systems.
This guide covers the best 6 methods to share files between Mac and Windows, from native built-in tools to high-speed software solutions.
Quick Comparison: Choosing the Right Method
| Method | Best For | Speed | Remote Support | Internet Required | Difficulty |
| AnyViewer | Fast, secure, and remote transfers | Very Fast (Up to 10MB/s) | Yes (Cross-network) | Yes | ⭐ (Easiest) |
| Migration Assistant | Moving to a new Mac (full data sync) | Moderate | No (Same network) | No (LAN/Cable) | ⭐⭐⭐ (Complex) |
| File Sharing (SMB) | Frequent local transfers without software | Fast | No (Same network) | No (LAN) | ⭐⭐⭐ |
| Cloud Storage | Small files and multi-device syncing | Slow (Double waiting) | Yes | Mandatory | ⭐ |
| USB/External Drive | Large files with no internet access | Very Fast | No (Physical only) | No | ⭐ |
| Occasional small documents | Slow | Yes | Yes | ⭐ |
How to Transfer Files from Windows to Mac [6 Ways]
There are several methods to transfer files from Windows to Mac, each offering its advantages and limitations. Understanding these methods empowers users to choose the most suitable option based on their specific requirements.
Way 1. AnyViewer: The Best Cross-Platform Remote Transfer (Recommended)
AnyViewer is a robust remote desktop tool designed to facilitate secure and efficient file transfers between Windows and MacBook Air, even when you're not on the same network or location. It allows seamless file sharing over the internet, ensuring your files are transferred smoothly and securely.
Here’s why AnyViewer stands out:
- Free Service: AnyViewer offers a cost-free solution for file transfers, making it accessible to all users without extra charges.
- Advanced Security: With features like Elliptic Curve Cryptography (ECC) and two-factor authentication, AnyViewer ensures the safety and integrity of your files during transfer.
- Fast Speed: Experience quick file transfers, allowing you to move batches of files swiftly, saving time and increasing productivity.
- Easy to Set Up: AnyViewer features a user-friendly interface that requires no complex network configurations or port forwarding, allowing you to establish a connection in just a few clicks.
How to Transfer Files from Windows to Mac Using AnyViewer:
Step 1. Download and install AnyViewer on both your Windows PC and MacBook Air.
Step 2. Create an AnyViewer account or sign in if you already have one.

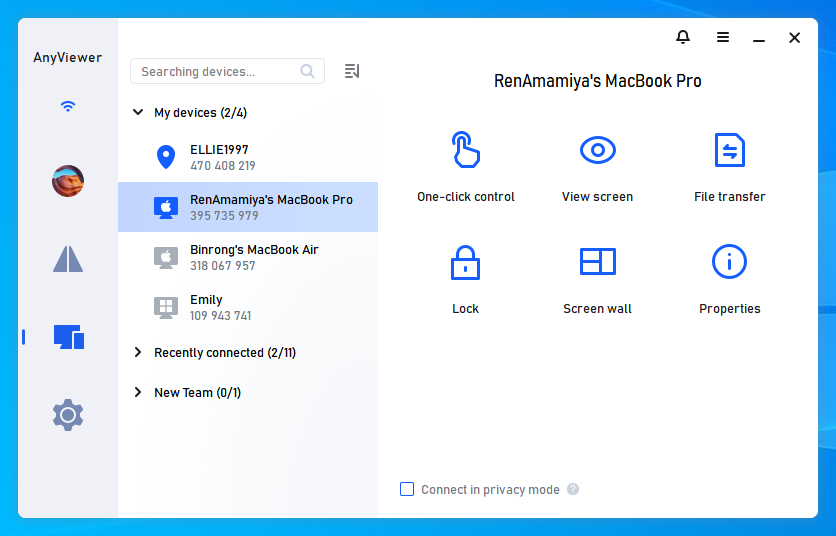
Step 3. Open the AnyViewer app on your Windows device, click "Device" to view connected devices, and select your Mac under "My Devices." Then, click "File Transfer" to open the file transfer manager.
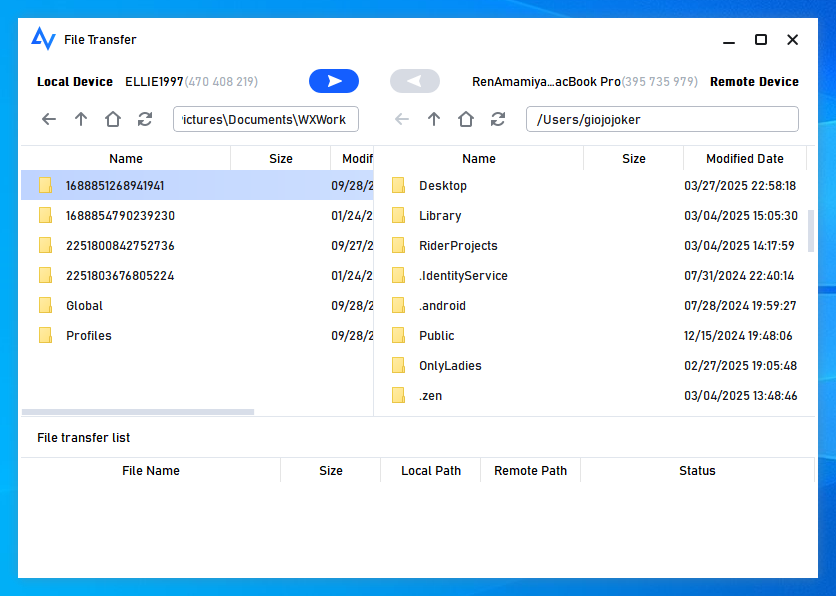
Step 4. Use the file transfer manager to manage your data:
- Transfer files from Windows to Mac: Select files on the local pane and click the arrow toward the remote device.
- Transfer files from Mac to Windows: Select files on the remote pane and click the arrow toward the local device to begin the transfer.
Alternatively, if you want to enable unattended Mac access while transferring files, click "One-click control" to remotely access your Mac. Once connected, you can manage files from the remote session’s toolbar.
- Unleash Maximum Speed: Experience lightning-fast transfers up to 10 MB/s.
- Seamless Multitasking: Process up to 5 concurrent file transfers.
- No Boundaries: Enjoy unlimited file transfers per session.
- Massive Storage Support: Easily move individual files up to 2 TB.
Way 2. Apple Migration Assistant: Best for Initial Setup
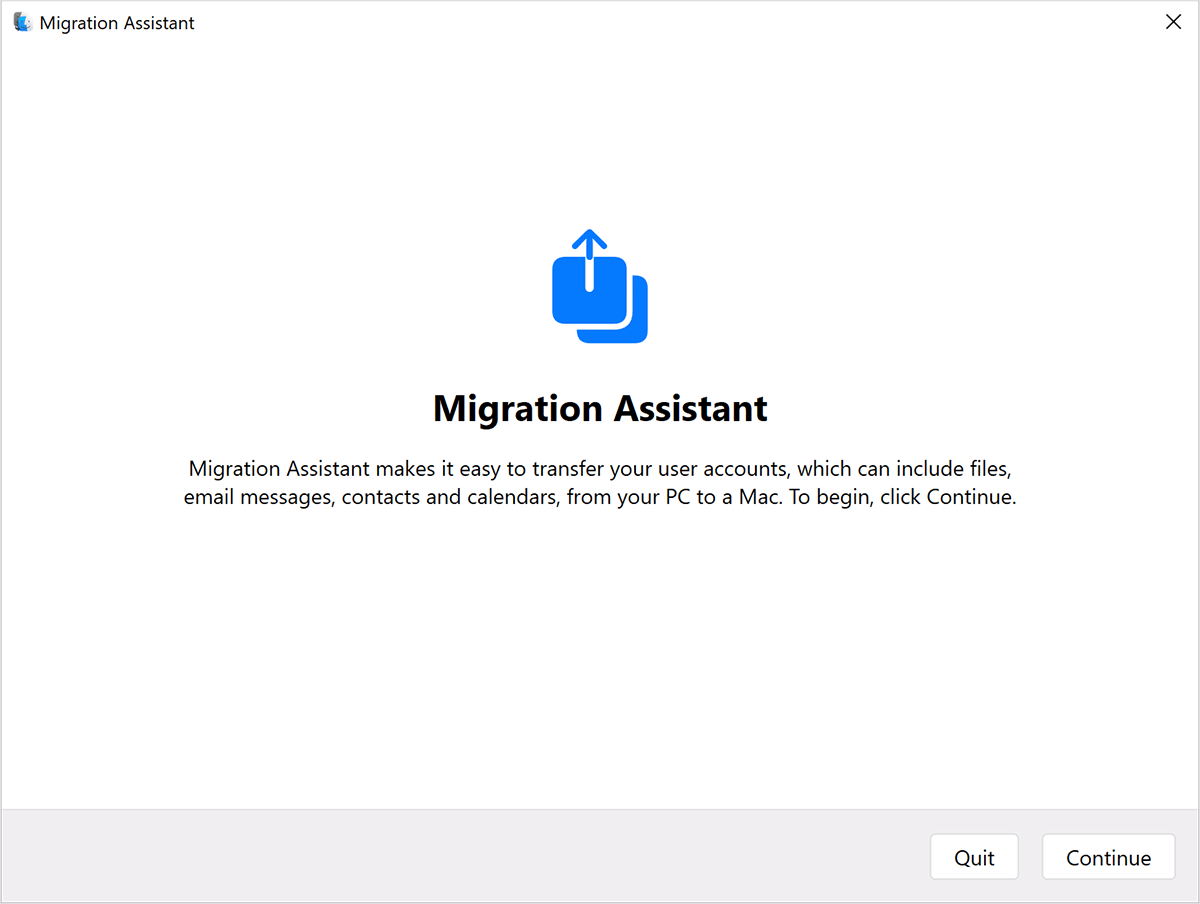
Migration Assistant is a utility software developed by Apple Inc. that facilitates the transfer of files, settings, and applications between computers. You can utilize the Migration Assistant to effortlessly transfer your contacts, calendars, email accounts, and additional data from your Windows PC to their respective destinations on your Mac. Besides, you're also allowed to transfer files between Macs.
Preparation work
Step 1. Make sure that your PC has the latest Windows updates installed.
Step 2. Download and install the relevant Migration Assistant software on your PC, based on the macOS version running on your Mac.
Step 3. If you have antivirus, firewall, or VPN software installed, temporarily disable them until the data transfer is complete.
Step 4. Connect both your Mac and PC to the same network, such as your home Wi-Fi network, or establish a direct Ethernet connection between the two devices.
On your PC
Step 1. Launch Migration Assistant, recently installed on your PC. If any other applications are running, you'll be prompted to close them before proceeding.
Step 2. Migration Assistant will notify you if it detects any of the following conditions:
- Your PC is set to automatically install Windows updates.
- Your PC's network firewall may hinder connection with your Mac.
- Your PC is running on battery power.
Step 3. Upon receiving a prompt to send app usage data to Apple, choose between "Automatically Send" or "Don't Send."
Step 4. As Migration Assistant commences searching for your Mac and awaits its connection, proceed with the subsequent steps on your Mac.
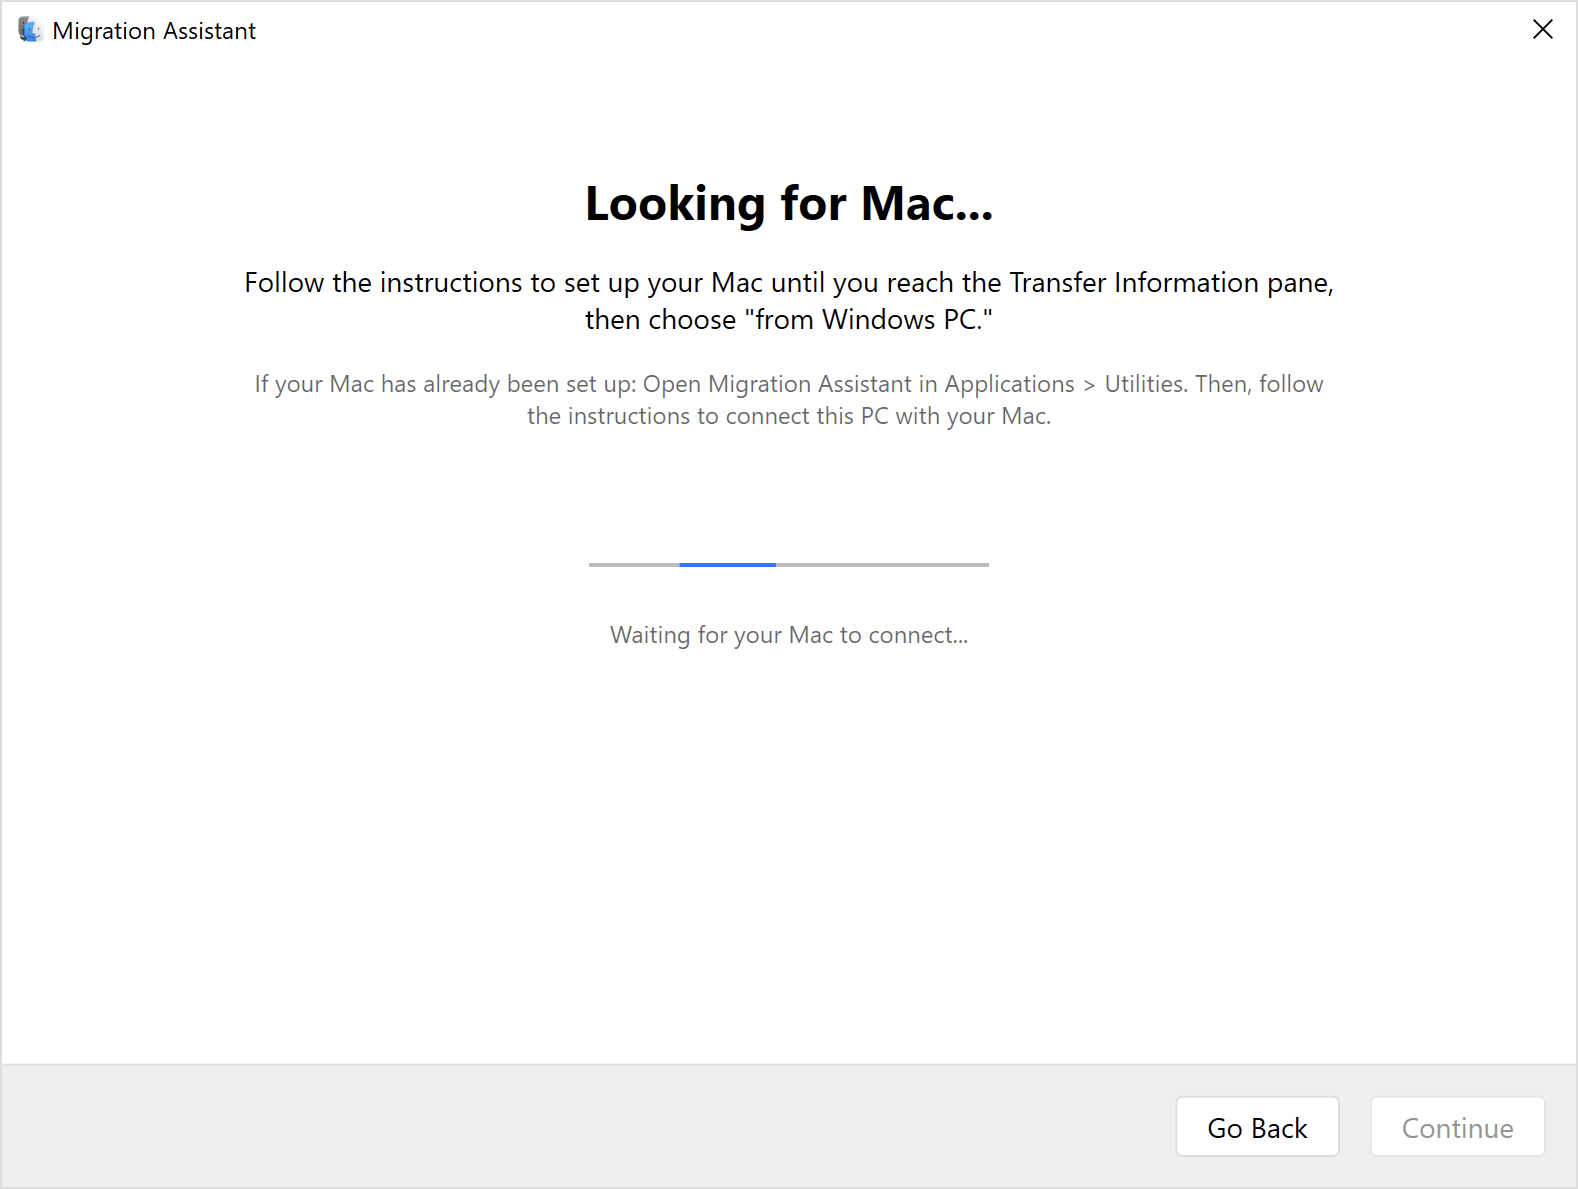
On your Mac
Step 1. Navigate to Migration Assistant, located in the Utilities folder within your Applications folder. You can access the Utilities folder directly by selecting Go > Utilities from the menu bar in Finder. Alternatively, use Spotlight to search for Migration Assistant.
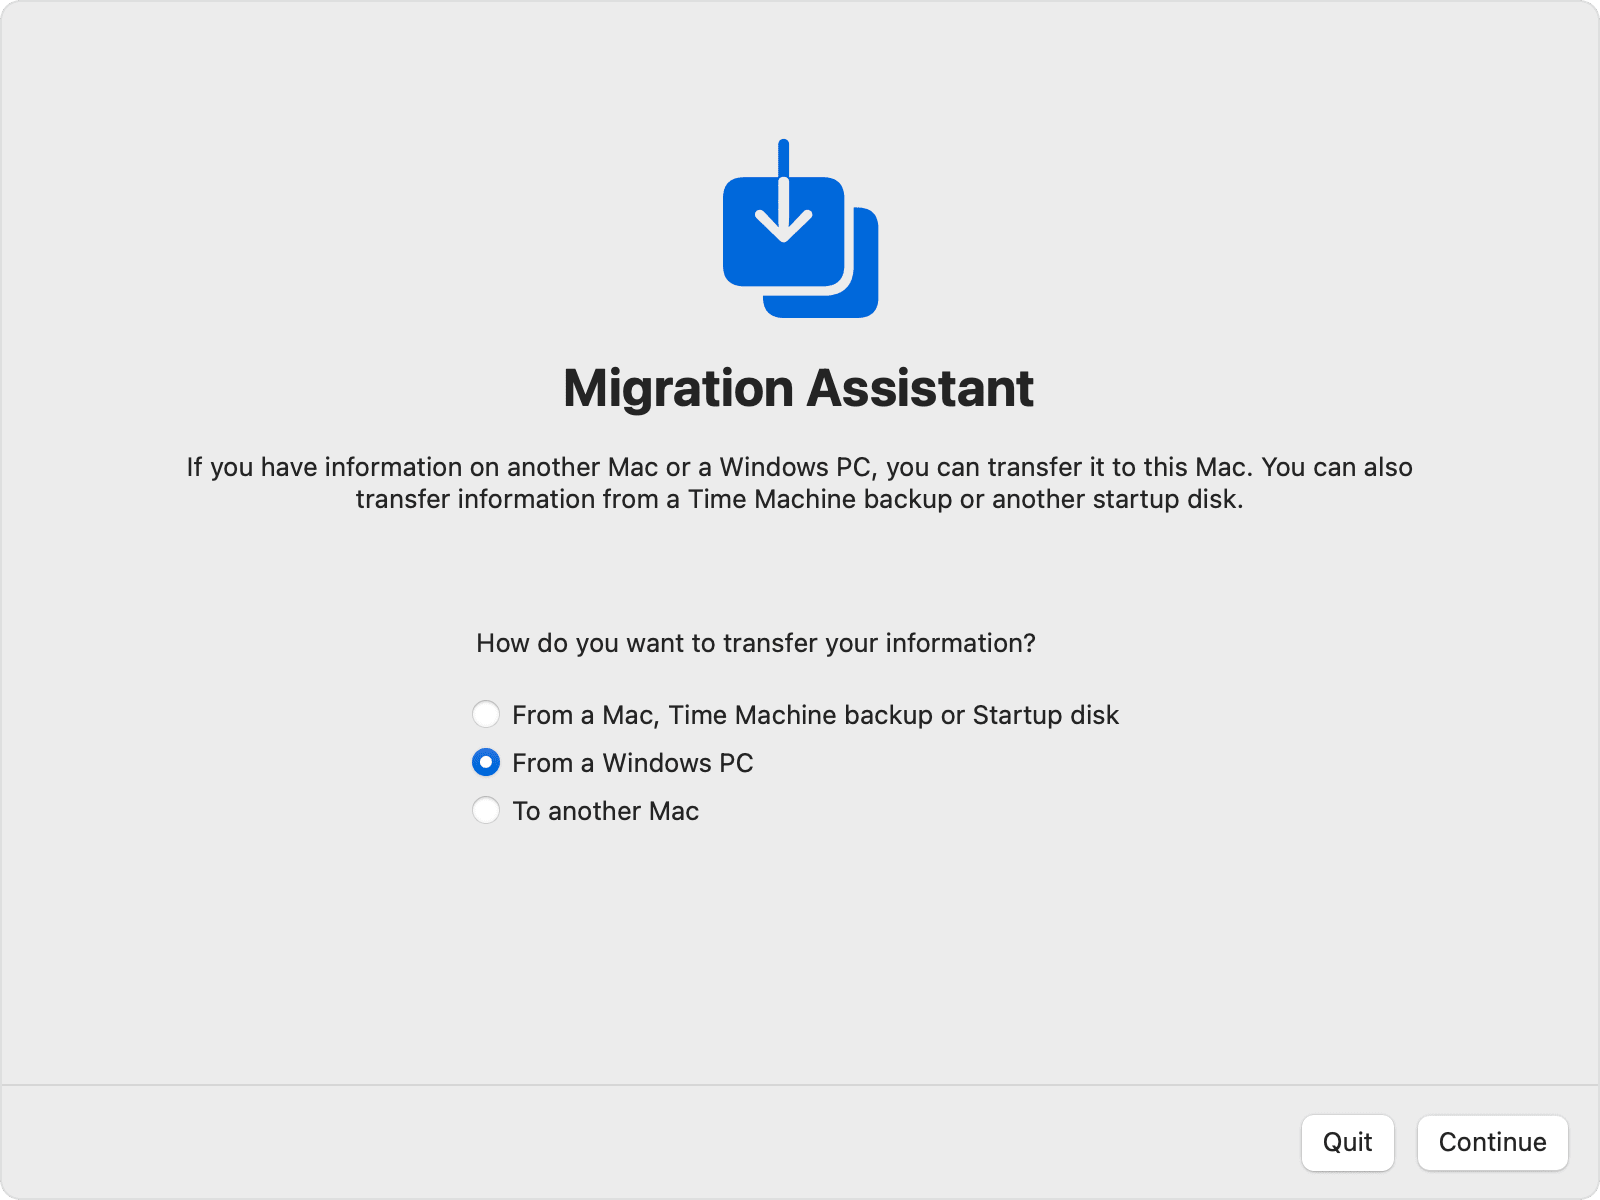
Step 2. Follow the onscreen instructions until prompted to choose how you want to transfer your information. Opt for the option to transfer from a Windows PC, then proceed by clicking Continue.
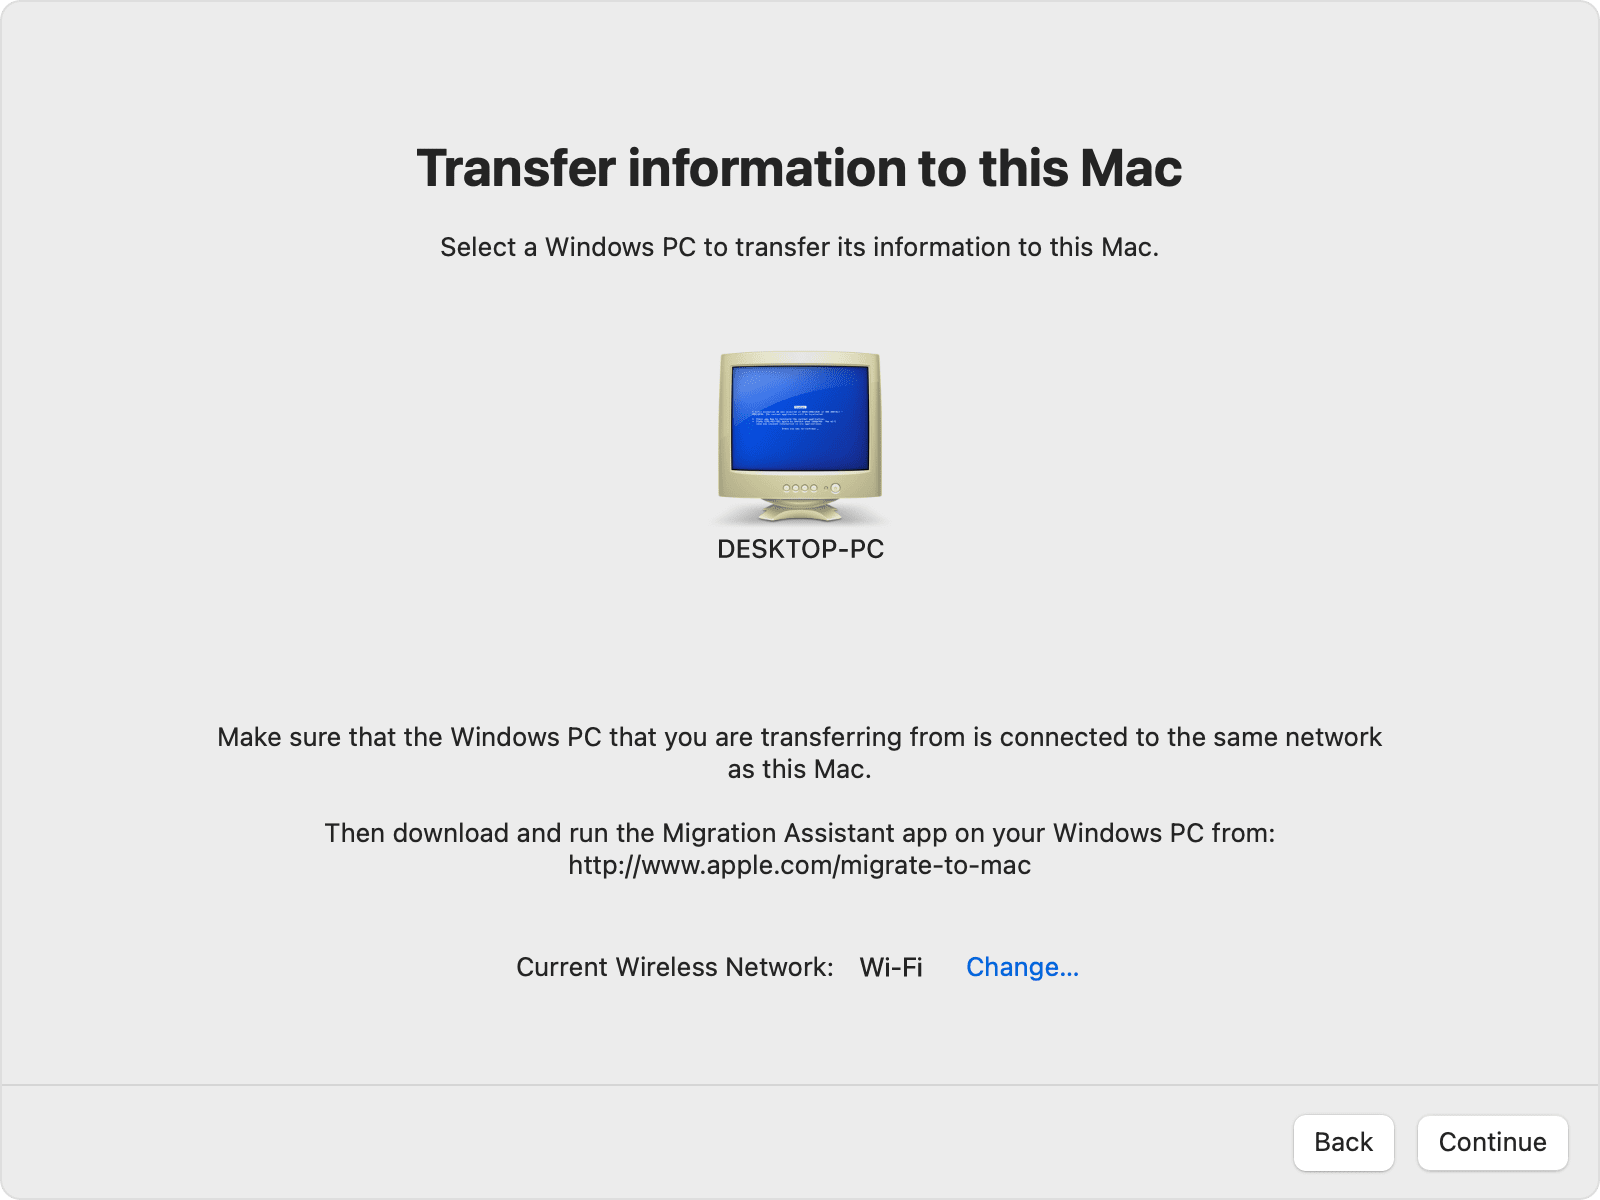
Step 3. Select the icon representing your PC from the list, then click Continue to initiate the transfer process.
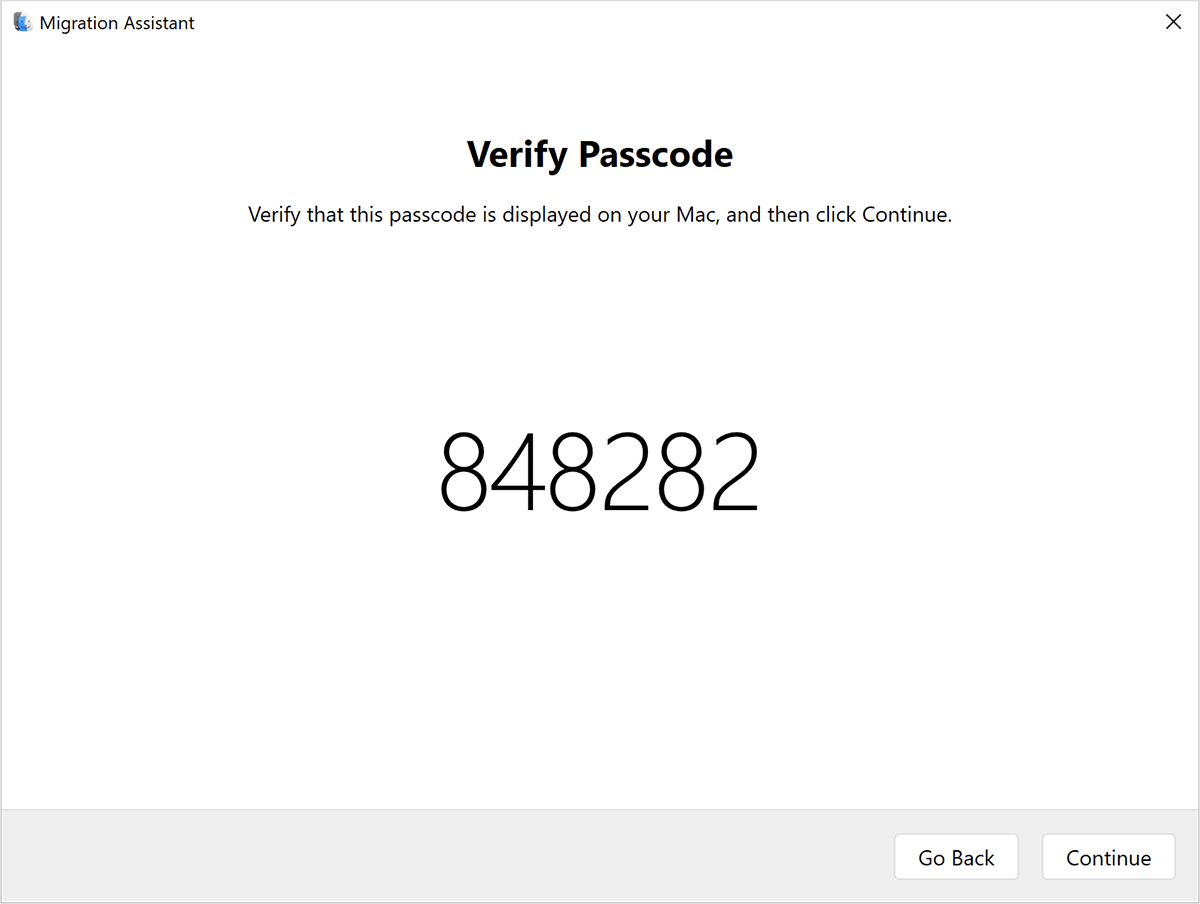
On your PC
Ensure that both your PC and Mac display the same passcode, then proceed by clicking Continue.
On your Mac
Step 1. Migration Assistant will now inventory the content on your PC and calculate the storage space utilized by each file category. This process may take a few minutes. Once completed, select the information you wish to transfer. You might need to scroll down to see the entire list.
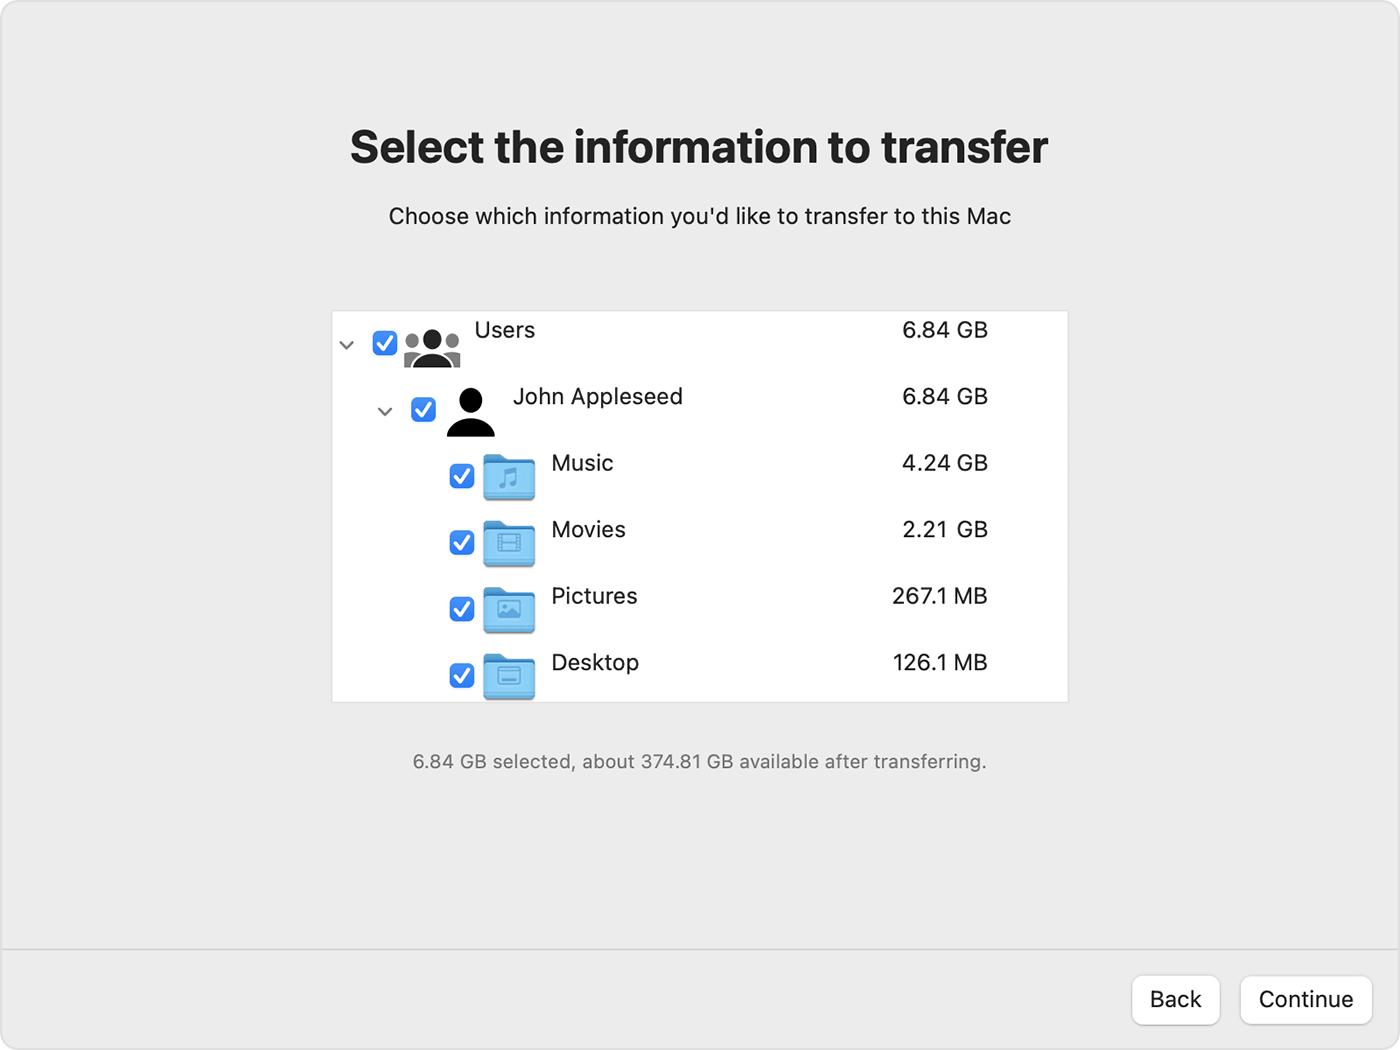
Step 2. Click Continue to initiate the transfer. Larger transfers may require several hours to complete and may appear to pause intermittently. Consider starting the process in the evening and allowing it to continue overnight. Click Continue again to commence the transfer.
Step 3. Once Migration Assistant finishes the transfer, close Migration Assistant on both computers. Next, sign in to the migrated account on your Mac to access its files. The account will utilize the same username and password as the account on your PC.
Way 3. SMB File Sharing: Best for Local Office Use
Setting up and utilizing file sharing on macOS is straightforward when your Windows PC and Mac are connected to the same network. This method is one of the most reliable ways to share folders from Windows to Mac and vice versa. We'll outline the process in two sections, one for each operating system.
On your Mac
Before accessing Mac files from your Windows PC, you'll need to configure file sharing on your Mac. Here's how:
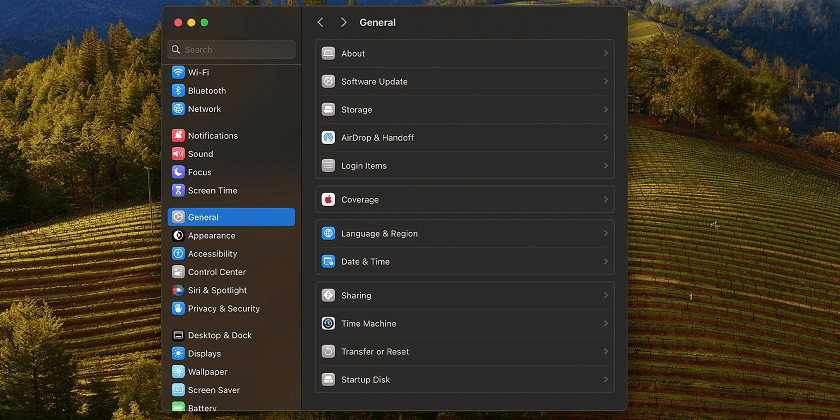
Step 1. Open System Preferences on your Mac and navigate to General > Sharing.
Step 2. Toggle on File Sharing and click the Information (i) icon next to the File Sharing toggle.
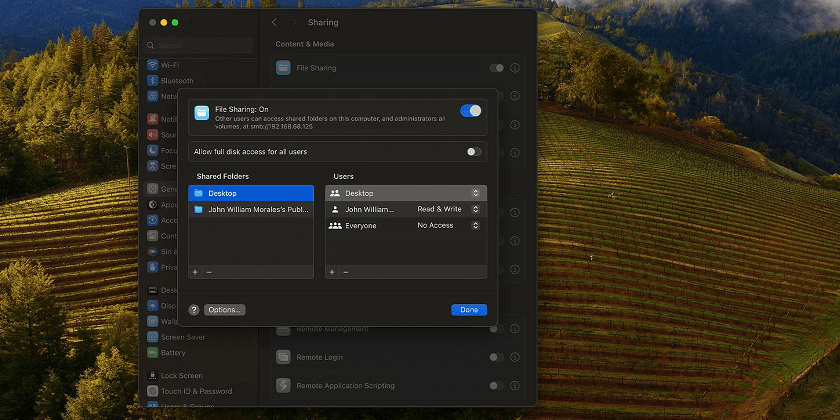
Step 3. Click Options to open the SMB File Sharing window. Enable "Share files and folders using SMB."
Step 4. In the Windows File Sharing section, select the checkbox next to the account name whose files you want to access on Windows. Enter the user's password, then click OK.
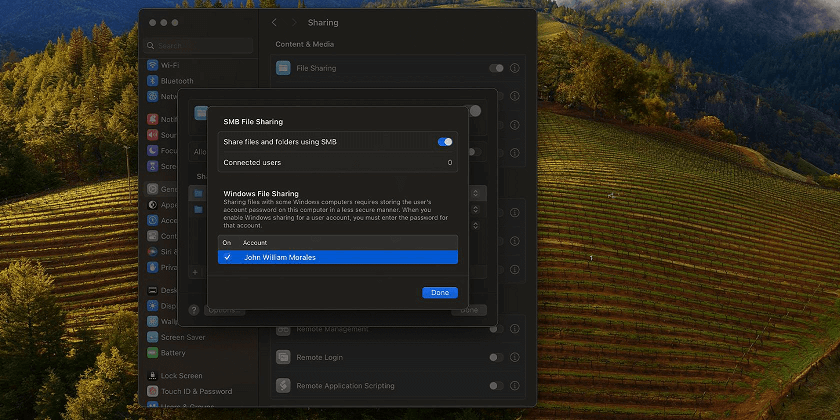
Step 5. Click Done to close the SMB File Sharing window.
Step 6. Make note of the IP Address displayed under the "File Sharing: On" status near the top of the window.
Once you've completed these steps to set up file sharing on your Mac, you're ready to proceed on your Windows PC.
On your PC
To transfer files stored on your Mac to your Windows PC, follow these instructions:
Step 1. Open File Explorer on your Windows PC.
Step 2. Click inside the address bar and type the IP address of your Mac. Disregard the SMB prefix - the IP address should look like \192.168.x.x.
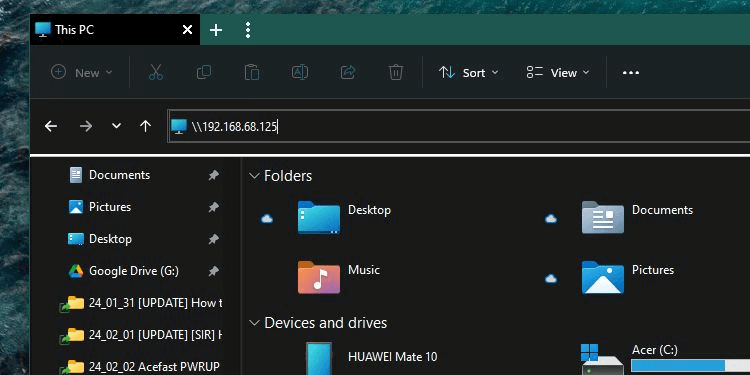
Step 3. Windows will prompt you to enter the username and password for the Mac user's files you're accessing. Ensure you input them exactly as you did on your Mac.
Step 4. You'll now have access to the shared folders on your Windows PC. Simply copy files as you would from any other Windows folder.
Way 4. Cloud Storage: Best for Multi-Device Syncing
Cloud storage services such as Google Drive and Dropbox offer the convenience of storing your files on their servers, allowing you to access them from anywhere. Simply install and configure these services on each of your computers to enable automatic syncing of your files.
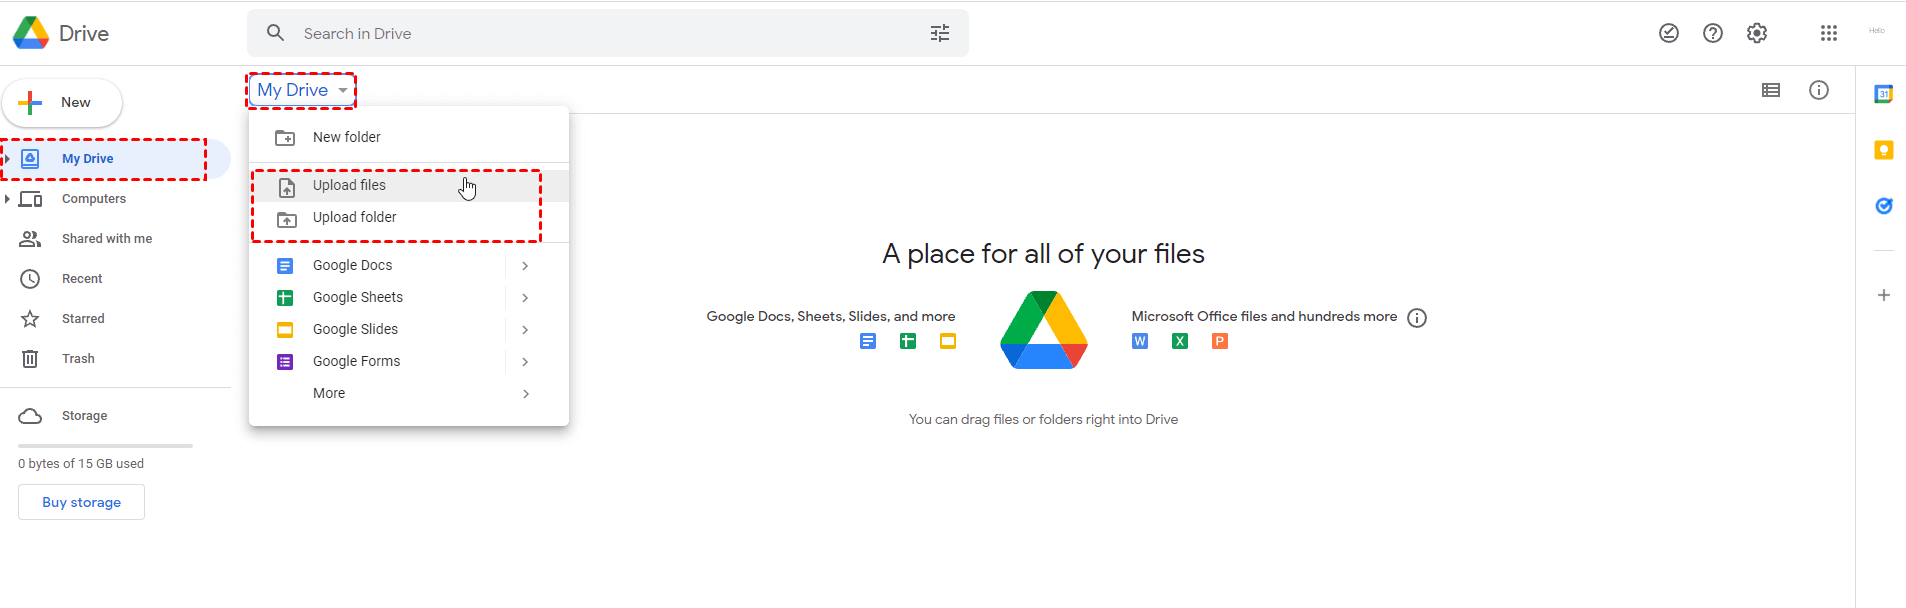
However, it's essential to maintain an active internet connection to ensure that your files are consistently updated. Additionally, if you require more storage space beyond the limits of the free tiers, you'll need to subscribe to a paid plan. Keep in mind that utilizing cloud storage entails waiting twice: once for the files to upload from the source machine and again for them to download on the target PC.
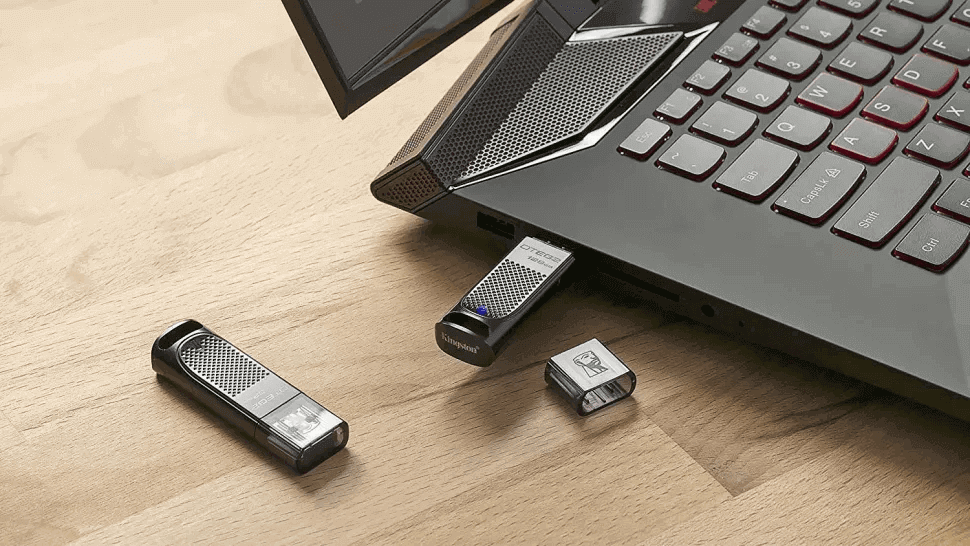
Way 5. External USB/HDD: Best for No-Internet Scenarios
Using an external hard drive or USB stick is often the simplest method for transferring files between a Windows PC and a Mac. All you need to do is copy files to and from your devices.
Ensure to format your drive using the exFAT file system, as it's compatible with both Windows and macOS and can handle large file sizes. Although this method doesn't offer real-time file syncing, it's incredibly user-friendly, particularly as it's plug-and-play.
Moreover, it's a one-time expense, unlike cloud services that necessitate a subscription. If you opt for this approach, consider essential factors when purchasing an external drive for your Mac and PC.
Way 6. E-mail: Best for Individual Documents
Another storage solution with excellent accessibility features is widely embraced by users worldwide: utilizing email. Simply send the necessary files to your email and organize them into respective folders for convenient access. By structuring your email inbox with folders, you can swiftly locate the desired data.
Email platforms offer users the ability to organize their data efficiently and access it through a straightforward login process.
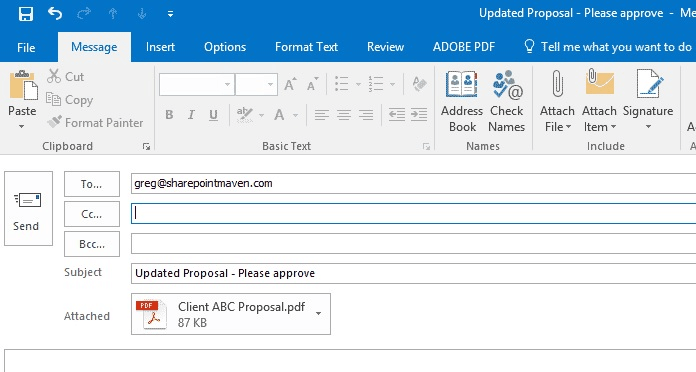
However, this method has a significant drawback: memory space limitations. Email accounts typically have restricted memory space allocations, allowing users to store and access only a limited number of files and data.
The bottom line
In conclusion, transferring files between Windows and Mac systems is essential for a seamless workflow. Whether you are performing a one-time migration to learn to transfer data from Windows to Mac, or you need a long-term solution to share Mac files with Windows users, these six methods provide the flexibility you need. By choosing a tool like AnyViewer for speed or SMB for local convenience, you can bridge the gap between OS platforms effortlessly.
