
How to Transfer Photos from iPhone to Windows
Transferring photos from iPhone to Windows is easy. You can use a USB cable, cloud storage like iCloud, or remote access with AnyViewer. Each method is quick and simple, so you can choose the one that works best for you.
By Ellie / Updated on January 13, 2026
What is the fastest way to transfer files from iPhone to Windows?
Transferring photos from an iPhone to a Windows computer can seem tricky at first, but it doesn’t have to be. Whether you’re looking to back up your precious memories, free up storage space on your phone, or organize your photo library, there are a variety of options available. In this guide, we’ll cover the easiest and most efficient methods for transferring photos from your iPhone to Windows, including using USB cables, cloud storage services, and remote access software like AnyViewer.
How to transfer photos from iPhone to Windows
Now, let's explore three different methods to transfer photos from your iPhone to Windows, each catering to different preferences and needs. This will help you understand how to transfer photos from iPhone to Windows wirelessly and through other methods.
Option 1: Transfer photos via AnyViewer (Remote method)
If you prefer transferring photos remotely and without a physical connection, AnyViewer is a great tool for this. AnyViewer is a remote access application that allows you to connect your iPhone to your Windows PC from anywhere, and it also supports file transfers, including photos. Here's how you can use AnyViewer to transfer photos from your iPhone to Windows:
Step 1. First, download and install the AnyViewer app on both your iPhone and Windows computer.
Step 2. Open the app on both devices and sign in using your AnyViewer account. Ensure both devices are connected to the internet.
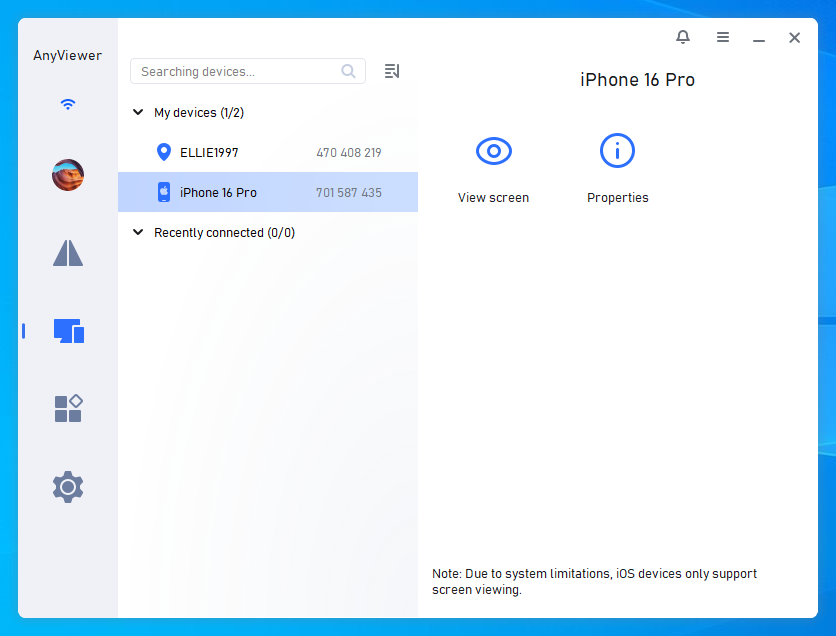
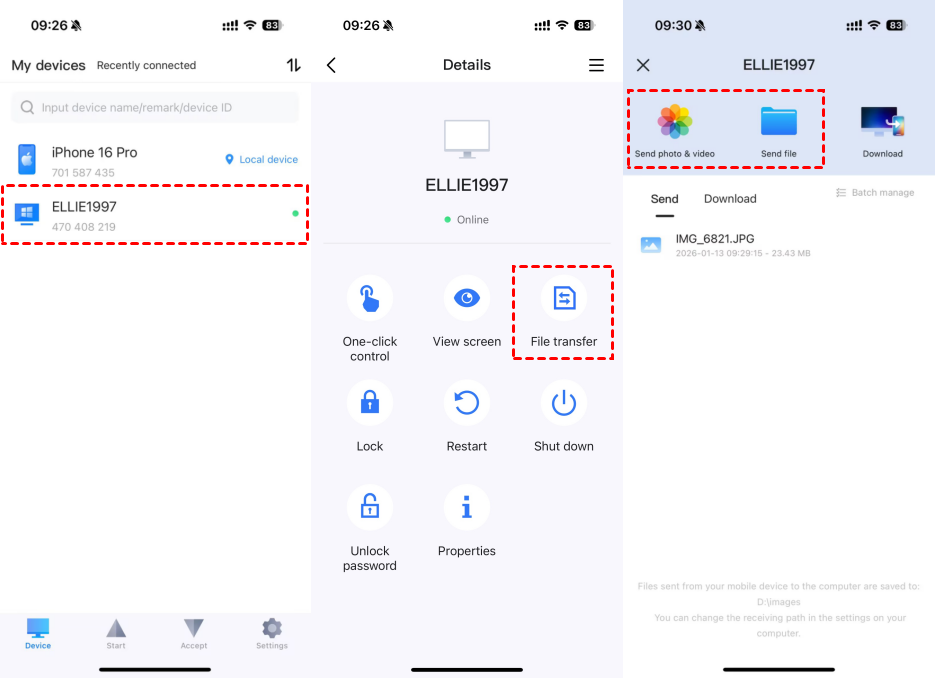
Step 3. Once logged in, you can connect to your PC remotely through the app. Simply select your PC from the device list and click "File transfer." You can also click "One-click control" to remotely control a PC from an iPhone.
Step 4. After establishing the remote connection, open the file management interface on AnyViewer. You can now browse your iPhone’s photo library and transfer images directly to your Windows computer. Simply transfer your selected photos to your PC’s local folders.
This method allows you to transfer files quickly and securely without needing a physical cable. This is an excellent way to understand how to transfer photos from iPhone to Windows wirelessly.
Option 2: Transfer photos using a USB cable
For those who prefer a direct connection, using a USB cable to transfer photos from your iPhone to a Windows PC is a simple and effective option.
Step 1: Connect Your iPhone to Your PC
- Plug your iPhone into your Windows PC using a USB cable.
- If prompted, unlock your iPhone to allow access.
Step 2: Use Windows File Explorer
- Open File Explorer on your PC. Your iPhone will show up as a device under "This PC" in the left-hand panel.
- Click on your iPhone’s icon and navigate to the folder containing your photos (usually labeled as DCIM).
- Select the photos you want to transfer and drag them to a folder on your PC.
- If prompted, choose to Copy the photos to ensure they remain on your iPhone.
- Once the transfer is complete, right-click your iPhone’s icon and select Eject to safely disconnect your device.
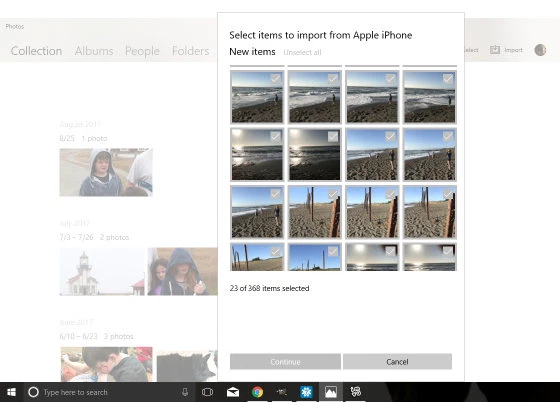
Step 3: Use the Windows Photos App
Alternatively, you can use the Windows Photos App to transfer photos:
- Open the Photos app on your PC.
- Click the Import button in the top right corner of the window and select From a USB device.
- Choose the photos you want to transfer.
- Click Import to save them to your desired location on your PC.
After the transfer is finished, be sure to eject your iPhone safely. This is an ideal method for those wanting to know how to transfer photos from iPhone to Windows using a cable.
Option 3: Transfer photos using cloud services
Cloud storage and file sharing services provide an excellent way to transfer photos from your iPhone to Windows without needing a physical connection. Popular services include iCloud (for iPhone users) and Google Photos (available on both iOS and Android).
Step 1: Set Up Cloud Backup on Your iPhone
Before transferring photos, ensure your photos are backed up to the cloud. For iPhone users, you can use iCloud Photo Library:
- Open Settings on your iPhone.
- Tap on your Apple ID, then select iCloud.
- Ensure iCloud Photos is turned on so that your photos are automatically uploaded.

For Android users, Google Photos offers a similar option.
Step 2: Access Cloud Photos on Your Windows PC
- Open a web browser on your PC and navigate to iCloud.com (for iPhone users) or photos.google.com (for Android or iPhone users).
- Sign in with your Apple ID (for iCloud) or Google account (for Google Photos).
- Browse your photo library and select the photos you want to transfer.
Step 3: Download and Save Photos
- After selecting the photos, click the Download button.
- Open File Explorer on your Windows PC.
- Go to your Downloads folder and move the photos to your desired location.

Always ensure you log out of your cloud account after the transfer to maintain security.
Conclusion
Transferring photos from your iPhone to a Windows PC doesn’t have to be a stressful process. Whether you prefer using a USB cable for a direct connection, leveraging cloud services for wireless transfers, or utilizing remote access software like AnyViewer, there’s a method that fits your needs. For a seamless, remote transfer experience, AnyViewer provides an excellent solution, allowing you to move your photos securely and efficiently from your iPhone to your Windows PC.
FAQs
Why can't I copy photos from iPhone to PC?
- Connection issues: Make sure your USB cable works and your iPhone is unlocked.
- Permissions: Tap "Allow" on your iPhone when asked to allow PC access.
- Outdated software: Check if both your iPhone and PC are updated.
- iCloud issues: If photos are in iCloud, make sure iCloud is set up on both devices.
- Driver problems: Update drivers on your PC if needed.
How to transfer photos from iPhone to Windows wirelessly?
AnyViewer allows you to wirelessly transfer photos from your iPhone to your Windows PC without needing a physical connection. It provides a secure and efficient way to access your iPhone remotely, browse your photo library, and move files directly to your PC. Whether you’re at home or on the go, AnyViewer offers the flexibility to transfer photos effortlessly.
What is the easiest way to transfer pictures from phone to computer?
The easiest and most hassle-free way to transfer pictures from your phone to your computer is by using AnyViewer. It eliminates the need for cables, complicated setups, or third-party apps. With AnyViewer, you can remotely connect your phone to your PC and transfer pictures with just a few clicks, making it a perfect solution for quick and easy file management.
Can I transfer photos from iPhone directly to PC?
Yes, you can transfer photos directly from your iPhone to your PC using AnyViewer. It enables you to connect your devices remotely, allowing you to access and manage your photos from your iPhone and transfer them to your PC without any physical cables. This method is especially convenient for users who prefer a wireless and seamless transfer process.
How to transfer files from your phone to your PC using USB cable?
To transfer files using a USB cable:
Step 1. Connect your phone to the PC using a USB cable.
Step 2. Unlock your phone and grant access.
Step 3. Open File Explorer and select your phone.
Step 4. Drag and drop files to your PC.
