
How to Transfer Files from Mac to Windows: 5 Simple Methods
Need to move files between Mac and Windows? This guide shows how to transfer files from Mac to Windows using 5 simple ways—like AnyViewer, cloud storage, external drives, and more. Perfect for beginners and easy to follow.
By Ellie / Updated on April 17, 2025
How do I transfer files from Mac to Windows?
Switching between platforms or setting up a new computer often requires moving important files from one system to another. Since certain file types or formats may only be compatible with macOS or Windows, transferring data becomes essential to ensure nothing valuable is lost. It also allows you to access your documents, media, and other content from any device, regardless of the operating system.
In this guide, you'll discover five simple and efficient ways to transfer files from a Mac to a Windows PC. These methods are quick to implement and require minimal effort, making cross-platform file sharing a smooth experience.
How to transfer files from Mac to Windows [5 ways]
This section highlights five simple and effective methods to make the file transfer process faster, smoother, and more efficient.
Way 1. Transfer files via AnyViewer [Fast & secure]
One of the most efficient ways to transfer files between a Mac and a Windows PC is by using AnyViewer. Known for its speed, security, and simplicity, AnyViewer is an all-in-one remote access and file transfer tool that's easy to use—even for beginners. With its advanced, patented transfer protocol, it delivers lightning-fast performance while maintaining complete privacy through its built-in privacy mode.
AnyViewer has been proven to be faster than traditional HTTP/FTP methods. Best of all, it imposes no limits on file size or volume, so you can move as much data as you need without restrictions. The platform's integrated file transfer manager allows for seamless file sharing between your Mac and PC with just a few clicks.
Key Features of AnyViewer:
- Supports up to 5 concurrent file transfer threads for faster performance
- Maximum file transfer speed of 10 MB/s
- No limit on the number of files transferred at once
- Supports transferring individual files up to 1 TB in size
Step-by-Step: Transfer Files Between Mac and Windows Using AnyViewer
Ready to get started? Follow these simple steps to move your files safely and efficiently using AnyViewer:
Step 1. Download and install AnyViewer on both your MacBook and Windows PC.
Step 2. Sign in to your account or create a new one if you're a first-time user.

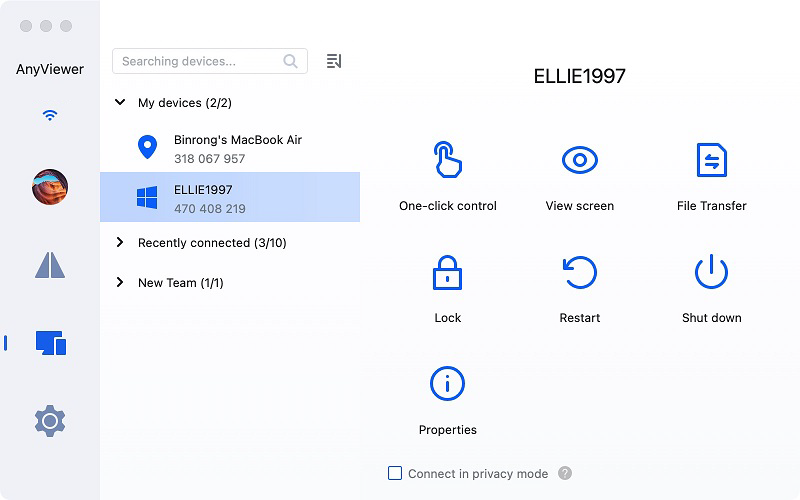
Step 3. On your Windows computer, launch AnyViewer and navigate to the "Device" tab. Locate your Mac under "My Devices" and click "File Transfer" to open the file manager.
- Tip: If you prefer full control from Mac to Windows, select "One-click Control" to access it remotely, then use the file manager from there.
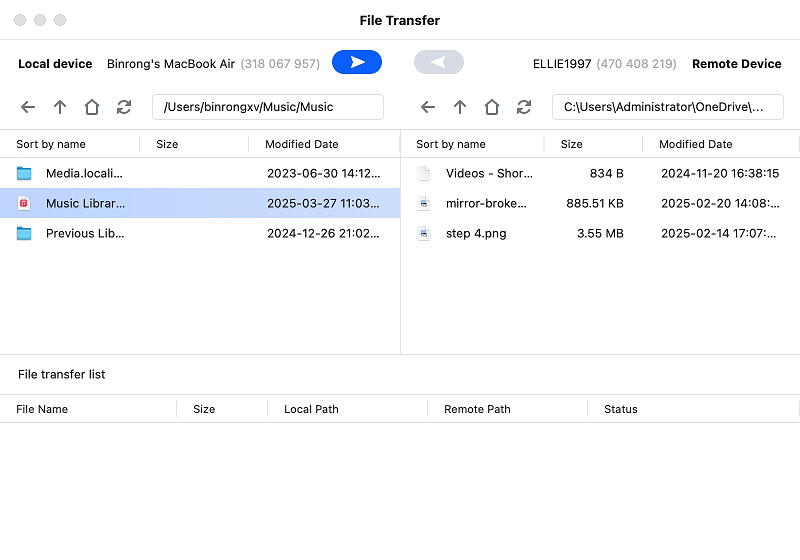
Step 4. Select the files you want to send, and hit the arrow button to start the transfer. You can move files in either direction—from Mac to PC or vice versa.
Additional Advantages of AnyViewer
AnyViewer offers more than just file transfer—it's a powerful remote access solution packed with advanced features designed for both productivity and performance:
- Support for multiple simultaneous connections, even in high resolution with 4:4:4 color accuracy
- Adjustable screen quality during remote control sessions
- Built-in chat function for real-time communication while transferring files
- Up to 60 FPS frame rate for smooth gaming performance during remote sessions
Way 2. Using Mac's built-in File Sharing tool
macOS includes a native file-sharing feature that simplifies the process of moving files to a Windows PC without needing extra software. This built-in tool allows you to share specific folders across devices, saving time and effort when switching between systems.
Before You Begin:
Ensure both your Mac and Windows PC are connected to the same local network (LAN) for the sharing process to work smoothly.
Step-by-Step Guide to Transfer Files from Mac to PC:
Step 1. On your Mac, click the Apple menu in the top-left corner and choose System Settings.
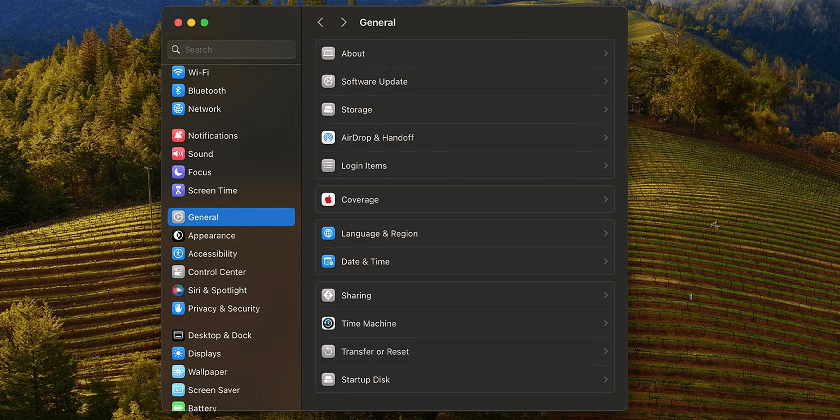
Step 2. Navigate to General > Sharing from the left sidebar to access file-sharing options.
Step 3. Under the Content & Media section, click the info icon (i) next to File Sharing, then toggle the switch to enable it.
Step 4. Click Options to configure more sharing preferences.
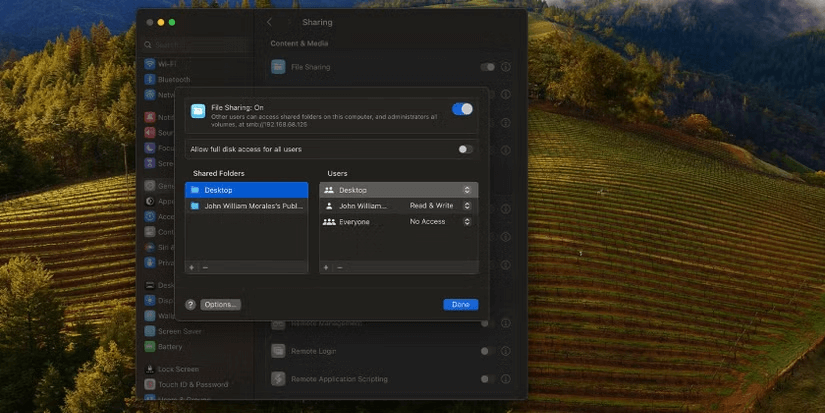
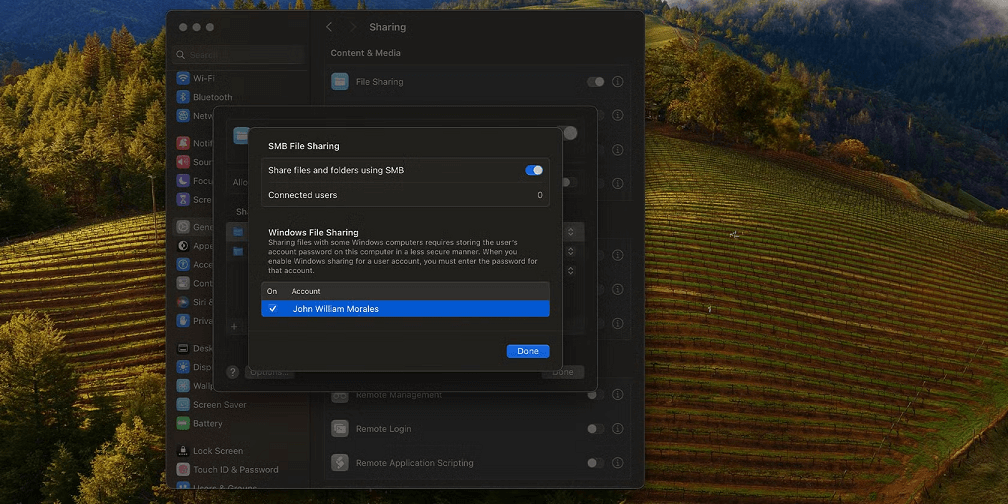
Step 5. Enable "Share files and folders using SMB" under the SMB File Sharing section.
Step 6. Select your user account, verify it by entering your password, then click Done.
Step 7. Under the Shared Folders section, you can choose which folders to share.
Step 8. Use the "+" button to add more folders to the shared list.
Step 9. Now, go to the Users section. Click the "+" to add a user, select from your Contacts, then click Select. A window will prompt you to set a password—enter and confirm it to proceed.
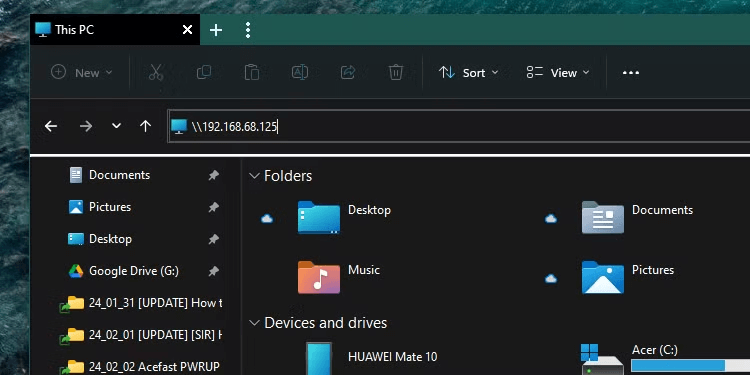
Step 10. On your Windows PC, open File Explorer and type "\\YourMacsIPAddress" in the address bar (replace with your actual IP).
Step 11. Press Enter, enter your Mac username and password when prompted, then click OK.
Step 12. Once connected, your shared Mac folders will be accessible directly from the Windows system, allowing easy drag-and-drop file transfers.
Way 3. Using a cloud storage and file-sharing service
When considering how to share files between Mac and PC, cloud storage and file-sharing services stand out for their convenience and ease of use. These platforms offer users the flexibility to retrieve their data anytime, anywhere, making them ideal for cross-platform file transfers between Mac and Windows.
Well-known cloud service options include OneDrive, Google Drive, iCloud, Dropbox, and Amazon WorkDocs. Each platform provides free storage tiers and simple tools for uploading and downloading files. For this demonstration, we'll use Dropbox to walk through the process:
Step 1. Open Finder on your Mac and visit the official Dropbox website.
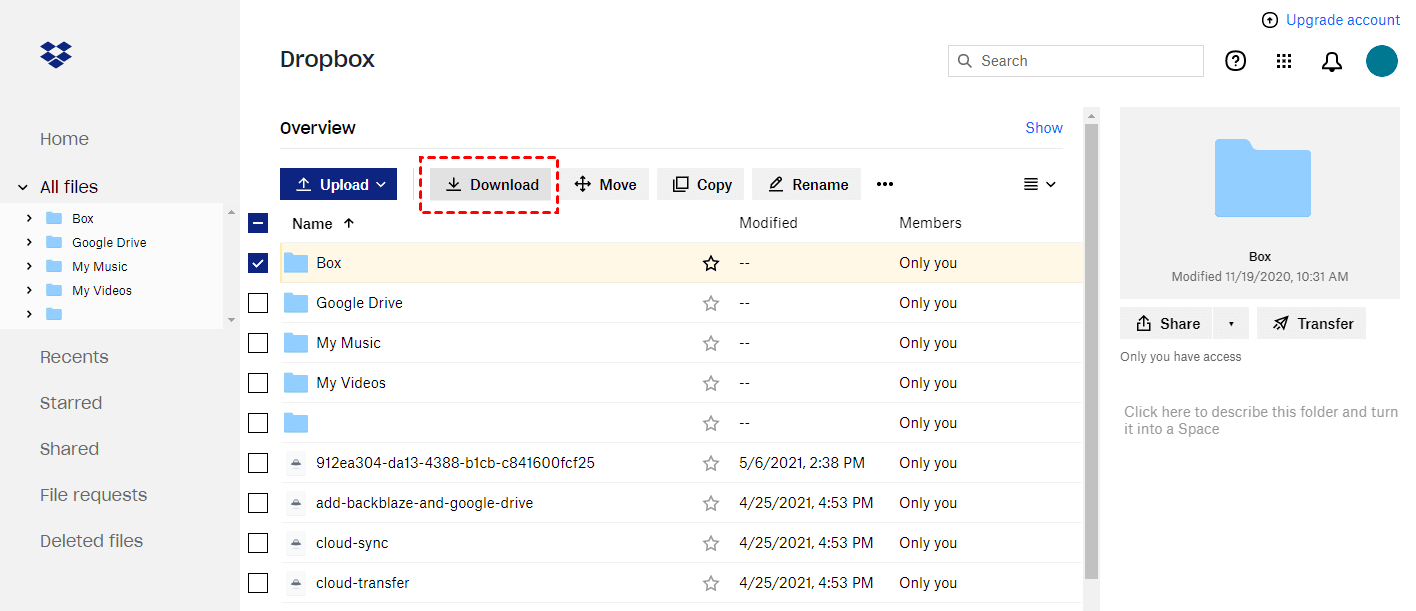
Step 2. On the main interface, select the "All Files" tab located on the left-hand side. From there, click the "Upload" button to add your desired files or folders to your cloud storage.

Step 3. Launch Dropbox on your Windows PC.
Step 4. Log in using the same account credentials you used on your Mac. Once signed in, navigate to the "All Files" section from the sidebar. Locate the uploaded files, select them, and then click the "Download" button to transfer them to your PC.
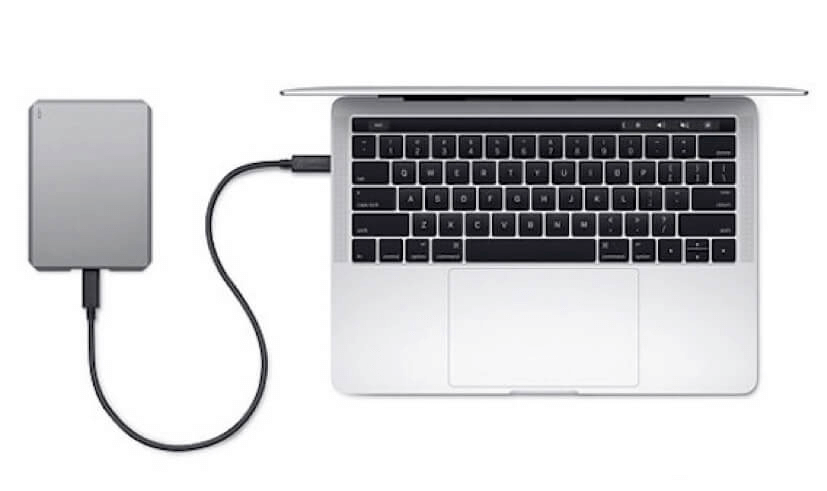
Way 4. Via an external hard drive
Using an external hard drive is one of the most reliable and efficient methods for transferring large volumes of data between a Mac and a PC. These drives connect easily via a USB cable and are ideal for bulk file movements.
Thanks to their generous storage capacities, external hard drives offer more space than standard USB flash drives—making them suitable for heavy-duty transfers. If you're wondering how to move files between Mac and PC using this method, follow the simple steps below:
Step 1. Connect the external hard drive to your Mac using a USB cable.
Step 2. Once connected, the drive's icon will appear on your Mac's desktop. Double-click the icon to open the drive window. Now, copy and paste the files or folders you want to transfer into the external hard drive.
Step 3. Once the file transfer is complete, hold down the "Control" key, click the drive icon, and choose "Eject."
Step 4. After safely removing the drive, plug it into your Windows PC. Open the external hard drive in File Explorer and drag the transferred files into your desired folder on the PC.
Way 5. Via email
Email has become a popular and convenient tool for communication, and many people also use it to transfer important files. Email services like Yahoo Mail, Outlook, AOL Mail, and Gmail make it easy to share files between Mac and PC.
Here's how you can send files from your Mac to a PC using Outlook:
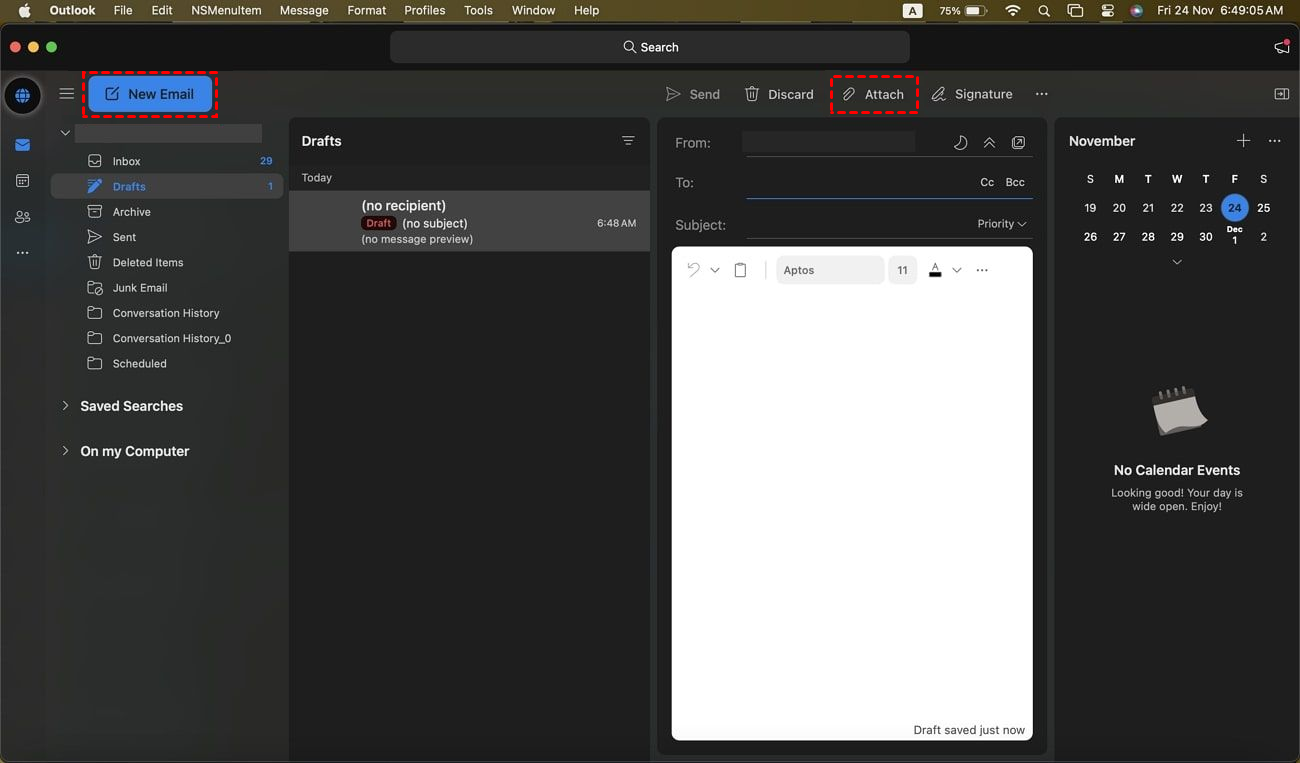
Step 1. Search for Microsoft Outlook using Finder on your Mac.
Step 2. Once opened, click on the "New Email" button in the top-left corner. Then, click into the body text area to enable the attachment icon in the top bar. Select "Attach File" and choose the files you want to upload from your MacBook.
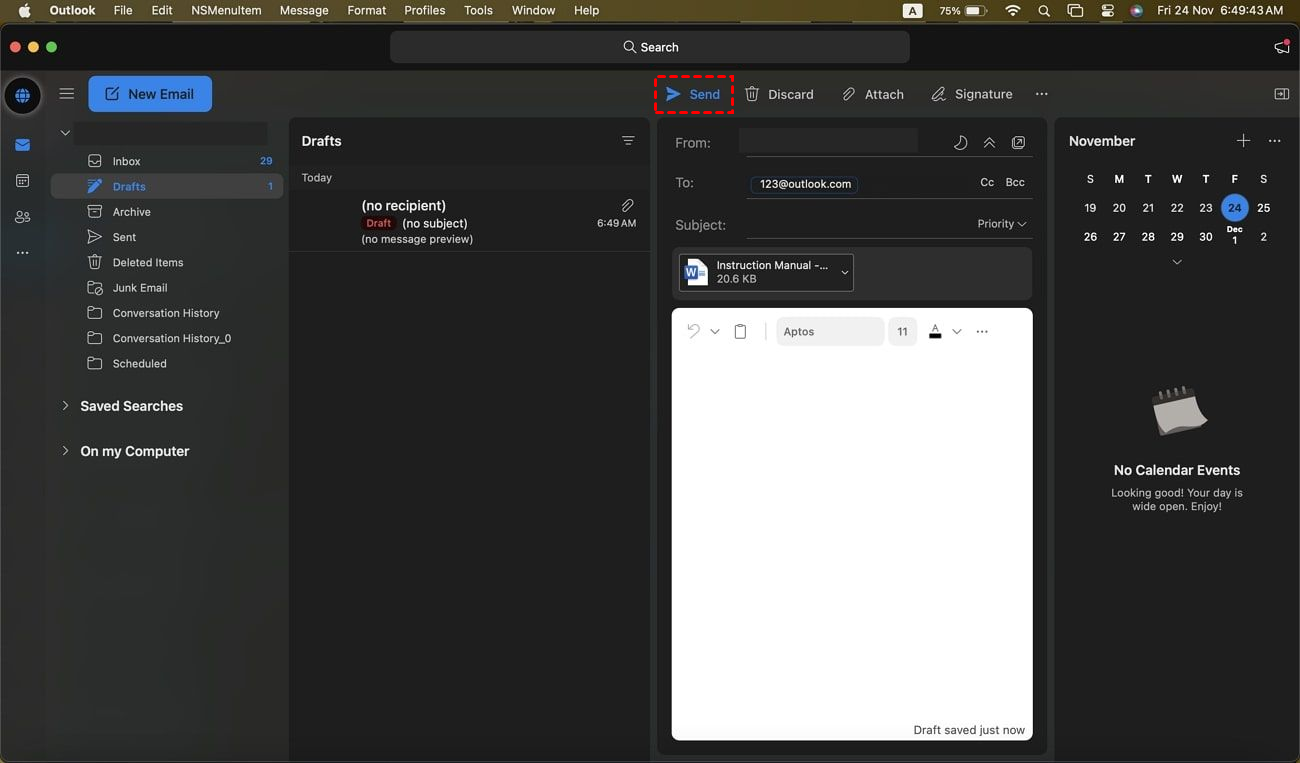
Step 3. Enter the recipient's email address in the "To" field and add any other necessary details.
Step 4. Afterward, click the "Send" button to share the files via email.
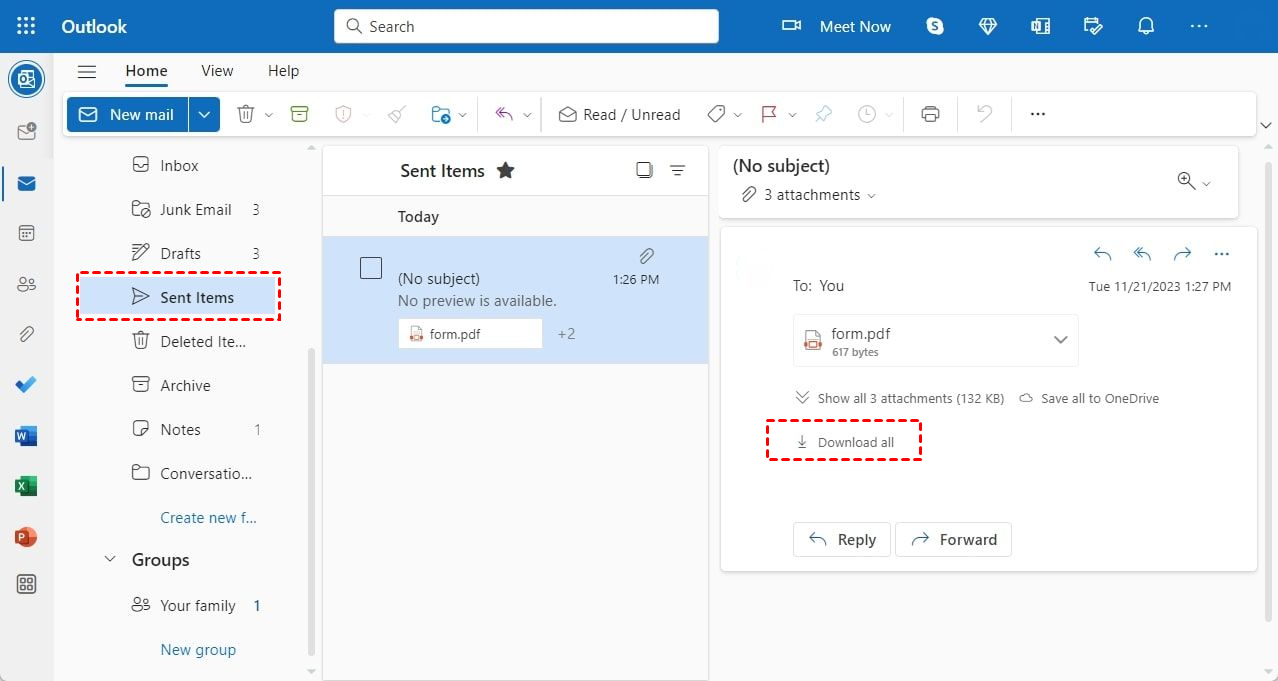
Step 5. On your Windows PC, sign in to the same Outlook account used on your Mac.
Step 6. Go to the "Sent Items" folder on the left panel, locate the email you sent, and open it. To download the files, click on the "Download All" button, and the files will be saved to your PC.
Comparison of file transfer methods between Mac and PC
We have thoroughly covered all five methods for file transfer between Mac and PC. Now, let's compare the features of each approach to understand their capabilities and how they can handle file transfers:
| Features | AnyViewer | Built-in File Sharing tool | Cloud service | External hard drive | |
|---|---|---|---|---|---|
| Speed of Transfer | Patented high-speed transfer protocol | Dependent on network and connection speeds | Dependent on internet speed and server capacity | Dependent on USB speed and drive type | Dependent on internet speed |
| File Size Limitations | An unlimited number and size of files can be transferred | Limited by network configurations and storage capacities | Limited by storage plan or account limitations | Limited by the drive's storage capacity | Limited by email attachment size limits |
| Ease of Use | User-friendly interface for file transfer between Mac and PC | May require technical configuration for proper setup | User-friendly interface for file management and sharing | Simple copy-paste functionality | Simple attachment process, but limited file sizes |
| Installation Requirement | Requires installation of software on both Mac and PC | Built into the operating systems (SMB for Windows, AFP/SMB for Mac) | Requires installation of specific cloud service apps or software | Requires plugging; no additional software required | No additional software required |
| Accessibility | Requires internet connectivity for remote access | Limited by local network or internet connectivity | Requires internet access for uploading and downloading files | Direct access without the internet is required | Requires internet access |
| Security | End-to-end ECC-256 encryption level | Security risks related to network vulnerabilities | Potential security risks associated with cloud service breaches | Risk of physical damage or loss of the drive | Lacks security for sensitive information sent via email |
| Built-in File Transfer | ✓ | X | X | X | X |
| Privacy Mode | ✓ | X | X | X | X |
Conclusion
The method you choose for file transfer depends on your specific needs. Cloud services and other methods are great for general file sharing, but for high-speed transfers without file size limitations, AnyViewer stands out as the best option. Not only does it address security concerns through features like end-to-end ECC-256 encryption and privacy mode, but it also offers a user-friendly experience with unlimited file size and transfer speeds.
If you're looking for a secure and efficient solution with advanced capabilities, AnyViewer is highly recommended. However, for more casual file transfers, options like external hard drives or email may be more convenient.
