
RustDesk Unattended Access: Setup & Security
Learn how to configure RustDesk for unattended access, grant only the permissions you need, secure the host, and compare practical alternatives.

By Ellie / Updated on September 3, 2026


Unattended remote access lets you connect to a computer when nobody is there to approve the session. In RustDesk, that means installing the service, setting a permanent password, and checking the host's permissions before you leave it unattended.
The setup is useful for a home PC, a headless machine, or a support device that must remain reachable after a restart. The steps below cover Windows, macOS, and Linux, followed by the permissions and security checks that are easy to miss.
Step-by-Step Guide: Setting Up RustDesk Unattended Access
The exact labels can vary by RustDesk version, but the setup has three core parts: install the host service, create a permanent password, and confirm that the service starts with the operating system.
Step 1. Installation and Service Setup
Install RustDesk on the computer you want to reach. Running only the portable app may not keep the host available at the sign-in screen or after a restart, and it can limit interaction with elevated prompts.
- Windows: Download the installer, run it, and click "Install" on the left-hand menu. This registers RustDesk as a background service.
- Linux: Use the ".deb" or ".rpm" packages. Ensure the "rustdesk" service is enabled via systemd: "sudo systemctl enable rustdesk"
- macOS: Install the ".dmg". You will grant Screen Recording and Accessibility permissions in Step 4.
Step 2. Setting a Permanent Password
A one-time password is intended for attended sessions. For unattended access, set a permanent password on the host:
- Open the RustDesk client on the Target machine.
- Find the "Password" section near your ID.
- Click the Edit (Pencil) icon next to the password.
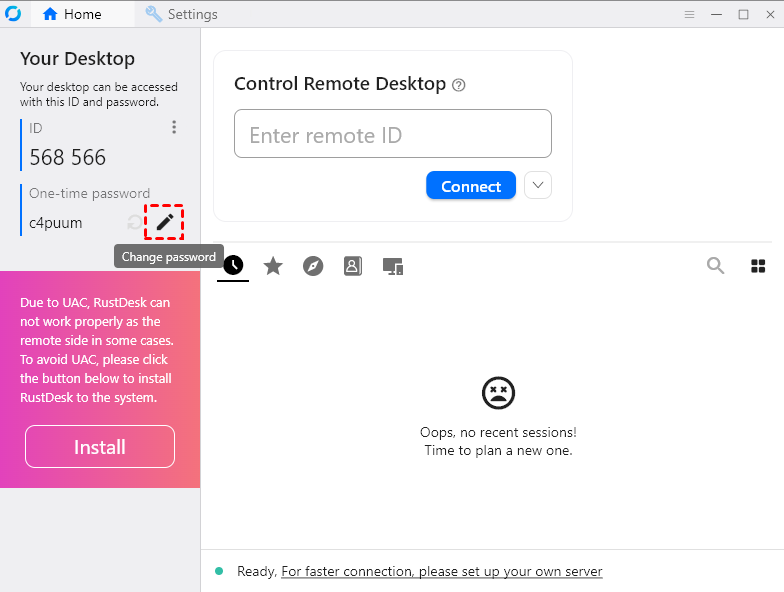
- Select "Set permanent password".
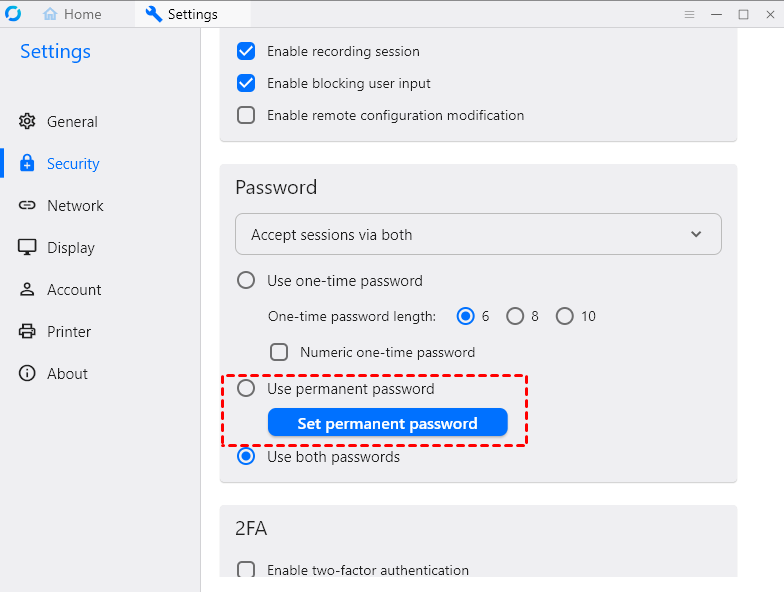
- Enter a strong, unique password.
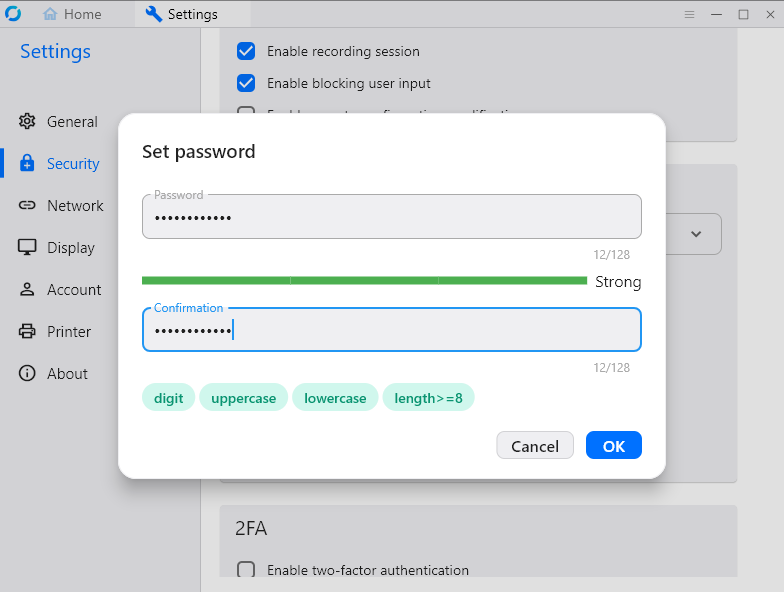
Security note: Use a unique password generated by a password manager. Do not reuse the Windows, macOS, email, or RustDesk account password.
Step 3. Configuring Boot Behavior
For true unattended access, RustDesk must start automatically when the computer turns on, even before a user logs in.
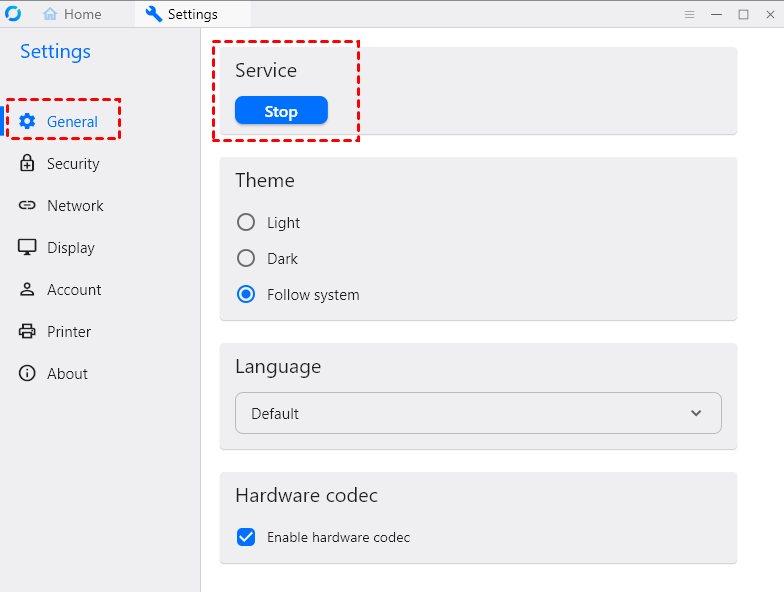
- Go to Settings > General.
- Ensure "Service" is toggled ON.
Step 4. Review operating-system permissions
Grant only what the session requires. A disabled permission can prevent control, but enabling every option gives a remote session more access than necessary.
- Windows: Install the RustDesk service with an administrator account if you need access at the sign-in screen or interaction with UAC prompts. Keep the firewall rule limited to the network profiles you use.
- macOS: In System Settings > Privacy & Security, allow Screen Recording to display the screen and Accessibility to control the keyboard and pointer. Enable Files and Folders, Full Disk Access, microphone, or camera only when the remote workflow needs them.
- Linux: Confirm that the RustDesk service is running and that the display server supports remote control. Wayland sessions can restrict screen capture or input; use the permissions offered by the desktop environment or an X11 session when required.
Step 5. Test before relying on it
Restart the host, leave it at the sign-in screen, and connect from a different network. Verify keyboard and pointer control, display selection, clipboard or file transfer if needed, and reconnection after a remote reboot.
Permissions and Security Checklist
A permanent password makes the computer reachable without a person at the other end, so treat the host like an internet-facing administrative service.
- Use a unique password: Store a long, randomly generated password in a password manager and replace it if it may have been shared or exposed.
- Limit permissions: Disable file transfer, clipboard sync, remote restart, audio, camera, or input control when those capabilities are not required.
- Restrict who can connect: Use allowlists or approved-device controls when your RustDesk version or deployment provides them, and remove devices or accounts that no longer need access.
- Protect the account and host: Enable two-factor authentication if your deployment supports it, keep RustDesk and the operating system updated, and lock the local user account.
- Review exposure: A self-hosted ID/relay server can give an organization more control over routing and logs. It does not replace strong authentication, updates, firewall rules, or monitoring.
- Check activity: Review connection logs and unexpected service changes. Rotate credentials and disable unattended access when the machine no longer needs to be remotely reachable.
For a work-managed device, follow the organization's remote-access policy. Do not enable unattended access on a computer you do not own or administer without authorization.
RustDesk Strengths and Trade-offs
RustDesk suits users who value open-source software and the option to operate their own infrastructure. The trade-off is that self-hosting and troubleshooting require more hands-on administration.
The Advantages
- Open source: The source can be inspected and deployed under RustDesk's applicable license terms.
- Self-Hosting: Users can host their own signal and relay servers, keeping data entirely within private infrastructure.
- Encrypted sessions: Connections are encrypted, while the safety of an unattended host still depends on authentication, updates, and permission settings.
- Deployment flexibility: Community and paid offerings serve different needs; check the current license and plan terms before business deployment.
The Limitations
The following points matter when you compare it with a managed remote-access service:
- Complex Configuration: Achieving low latency often requires manual self-hosting, which can be difficult for non-technical users.
- Variable Performance: The public relay servers can be unstable or slow during peak hours.
- Limited Advanced Features: It lacks some built-in enterprise features like advanced user permission grouping and comprehensive session logging found in paid tools.
RustDesk Alternatives: Which Option Fits?
RustDesk is not the only way to maintain an unattended computer. The right remote desktop software depends on whether you prioritize self-hosting, managed setup, built-in Windows access, or an established support workflow.
| Option | Best fit | Setup and control | Main consideration |
|---|---|---|---|
| RustDesk | Users who want open-source software or self-hosting | Permanent password; optional private ID/relay infrastructure | Self-hosting, updates, and monitoring require administration |
| AnyViewer | Individuals or teams that prefer account-based, managed access | Assign devices to an account and use one-click control | Features, device limits, and business controls depend on the plan |
| Chrome Remote Desktop | Simple personal access through a Google account | Install the host component and create an access PIN | Fewer administration and support features than business-focused tools |
| Windows Remote Desktop | Windows Pro/Enterprise devices on a trusted network or VPN | Uses Windows accounts and built-in RDP | Do not expose RDP directly to the public internet; host-edition support is limited |
| TeamViewer | Organizations with established remote-support workflows | Managed accounts, device assignment, and policy features | Commercial licensing can cost more than personal-use options |
Choose RustDesk when infrastructure control is worth the maintenance. Choose a managed tool when fast rollout and centralized device handling matter more than running the relay yourself. For occasional personal access, Chrome Remote Desktop may be enough; for Windows administration, RDP is best kept behind a VPN or another protected network path.
When AnyViewer Is a Practical Alternative
AnyViewer uses an account-based device list, which removes the need to enter a permanent access password for every connection after the devices are assigned. It may suit users who prefer a managed service and a shorter setup process.
- Account-based access: Assigned devices appear in the account's device list for one-click control.
- Useful session tools: Available features include multi-monitor support, remote file transfer, text chat, and remote restart or shutdown.
- Managed connectivity: The service handles connection infrastructure, so users do not need to deploy RustDesk ID and relay servers.
- Plan-based choice: Compare supported platforms, device limits, session features, permissions, and current pricing before deployment.
This is a convenience trade-off: managed infrastructure reduces setup work, while self-hosting gives you more direct control over the server environment.
How to Set Up AnyViewer Unattended Access
Step 1. Download AnyViewer for both the host and local devices. Install and launch the application.
Step 2. Create an AnyViewer account and sign in. If you already have an account, simply log in.
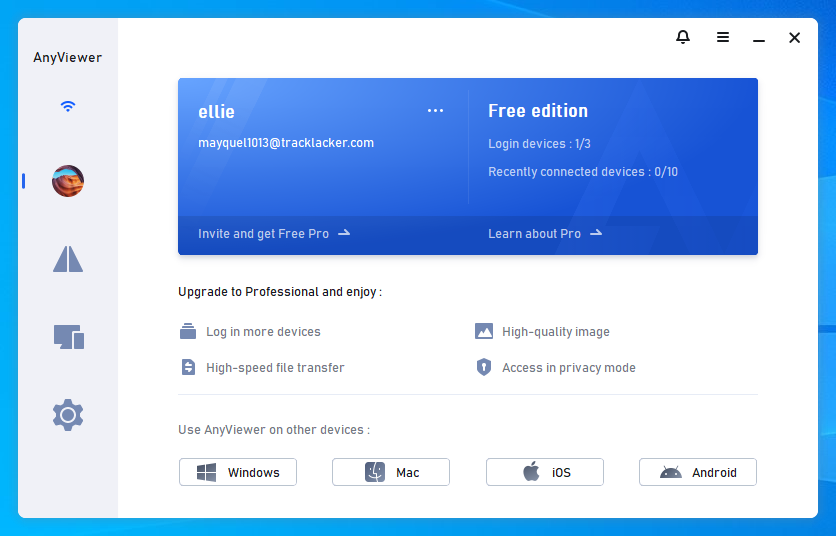
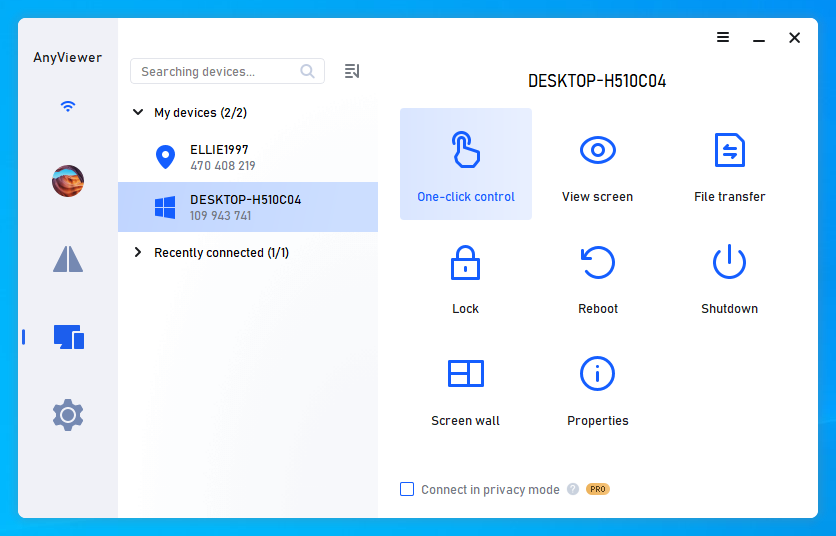
Step 3. On your local device, log in to the same account and navigate to Device.
Step 4. Select the target computer and click One-click control to enable unattended remote access.
Conclusion
RustDesk unattended access depends on four things working together: an installed host service, a permanent password, the correct operating-system permissions, and a successful test after restart. Review those settings whenever RustDesk or the operating system is updated.
RustDesk is a sensible choice when open source or self-hosting is important. AnyViewer and other managed tools reduce server setup, while Chrome Remote Desktop or RDP may cover narrower personal or Windows-only needs. Base the choice on permissions, administration effort, platform support, and cost rather than a single performance claim.


 as a preferred
source on Google
as a preferred
source on Google