
14 Solutions to Fix Remote Desktop: An Internal Error Has Occurred
How to solve Remote Desktop “An internal error has occurred” problem? Read this article to learn about 14 solutions to ensure that Remote Desktop works properly.
By Ellie / Updated on December 26, 2025
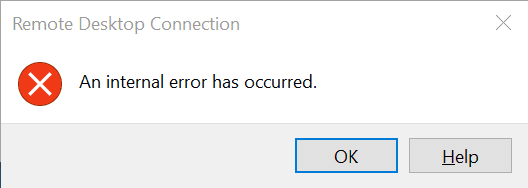
Remote Desktop “An internal error has occurred” problem
“I have a computer running Windows 10 Professional Edition at home. There has been no problem for a long time. But a few months ago, I suddenly received an error message when using Remote Desktop: An internal error occurred. I tried to log in as an administrator, but can’t fix it. Although restarting the computer can temporarily solve the problem, it will still occur randomly. How can I solve Remote Desktop “An internal error has occurred” on Windows 10 problem once and for all?”
Causes of Remote Desktop “An internal error has occurred” problem
According to the feedback from many users, the error often occurs suddenly and cannot be traced back to any specific operation. It occurs in both Windows and Windows servers. It is difficult to determine the specific cause, but it may be caused by the following reasons:
- RDP settings: Incorrect setting of RDP will cause an internal error.
- RDP Security: RDP is secure in most cases, but there will be problems sometimes, resulting in internal errors.
- Computer domain: The domain may also cause internal errors in RDP.
- Network connection settings: Sometimes, incorrect network connection settings will also lead to internal errors.
- VPN connection or setting: If you use VPN, incorrect VPN connections or settings may lead to internal errors.
How to solve Remote Desktop “An internal error has occurred” problem
You can use the following 14 solutions to completely solve Remote Desktop Connection "An internal error has occurred" on Windows 11/10/8.1/8/7 and Windows Server 2022/2019/2016/2012 R2.
Solution 1. Change RDP settings
When you encounter “An internal error has occurred” Remote Desktop on Windows 10, we should first check the RDP settings.
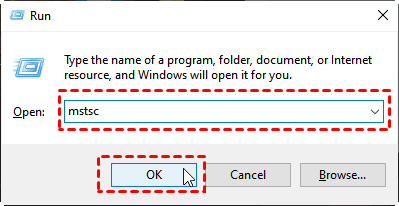
Step 1. Press Win + R to open the run dialog box, and type in “mstsc” to open the Remote Desktop Connection.
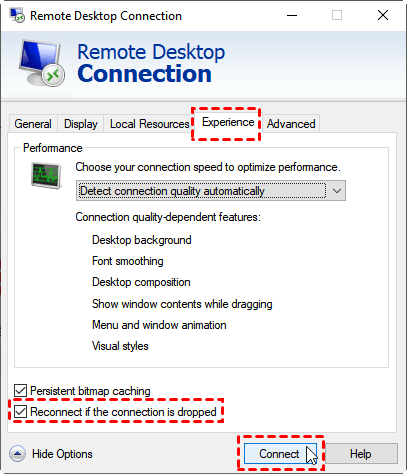
Step 2. Click Show options in the main interface of Remote Desktop Connection, then switch to the Experience tab and tick Persistent bitmap caching and Reconnect if the connection is dropped. Next, click Connect again to see if the internal error has been solved.
Solution 2. Rejoin the domain
The domain to which your system is connected sometimes has an error, which leads to an internal error in RDP. In the feedback of some users, the problem can be solved by deleting the existing domain and rejoining it.
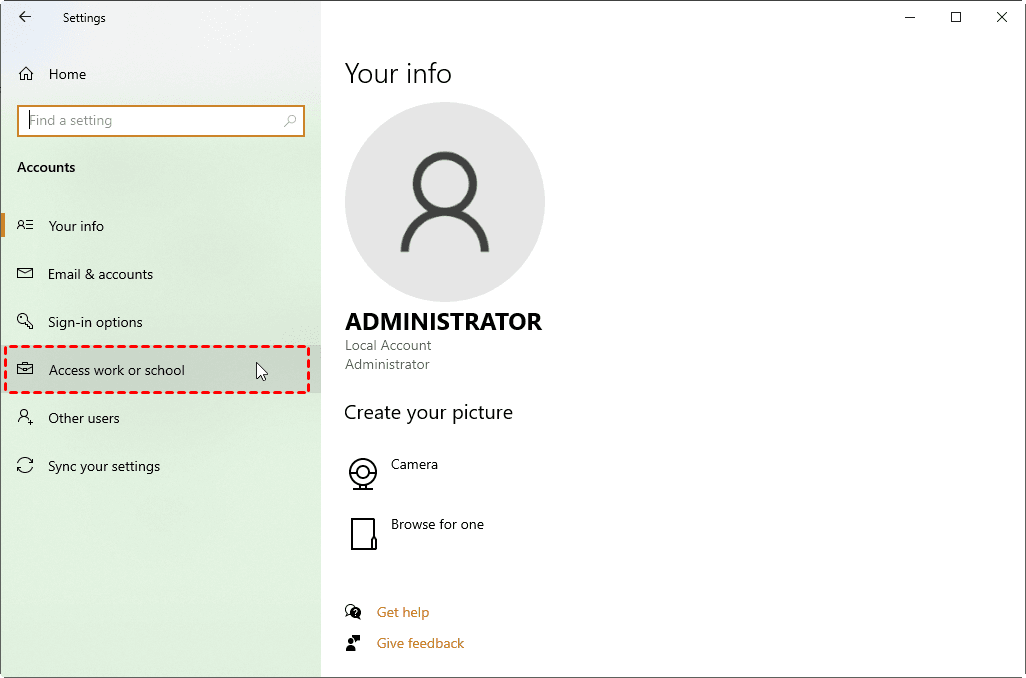
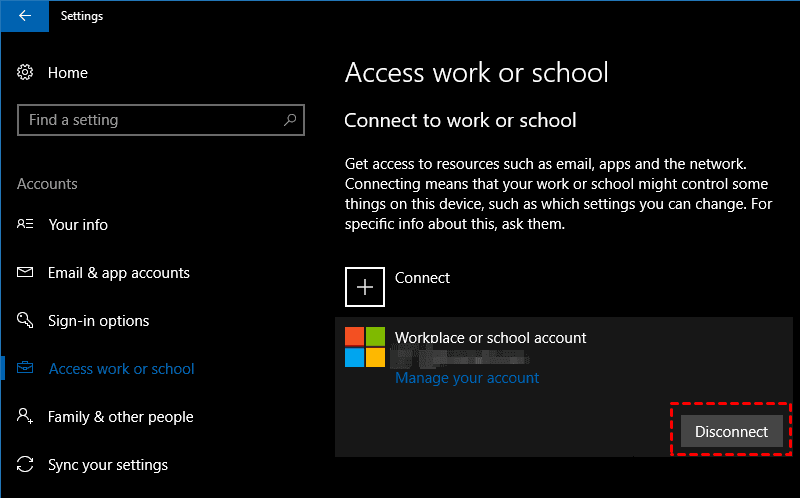
Step 1. Press Win + I to open Windows Settings and find Account. Click Access work or school in the main interface.
Step 2. Select the domain to which the system is connected, click Disconnect, click Yes in the pop-up window. Restart the computer, and then rejoin the domain.
Solution 3. Change MTU value
MTU is the abbreviation of Maximum Transmission Unit, which can be simply understood as the size of the Ethernet data frame. This value is 1500 by default but can be changed as required. In the feedback of some users, changing the MTU value can solve the problem of an internal error on Remote Desktop.
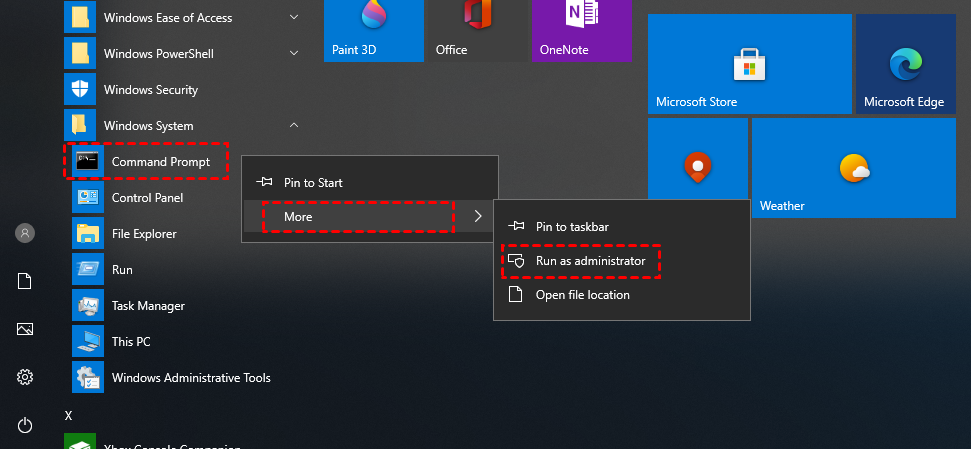
Step 1. Click Start, find Windows System, and expand it. Right-click Command Prompt, select More and click Run as administrator.
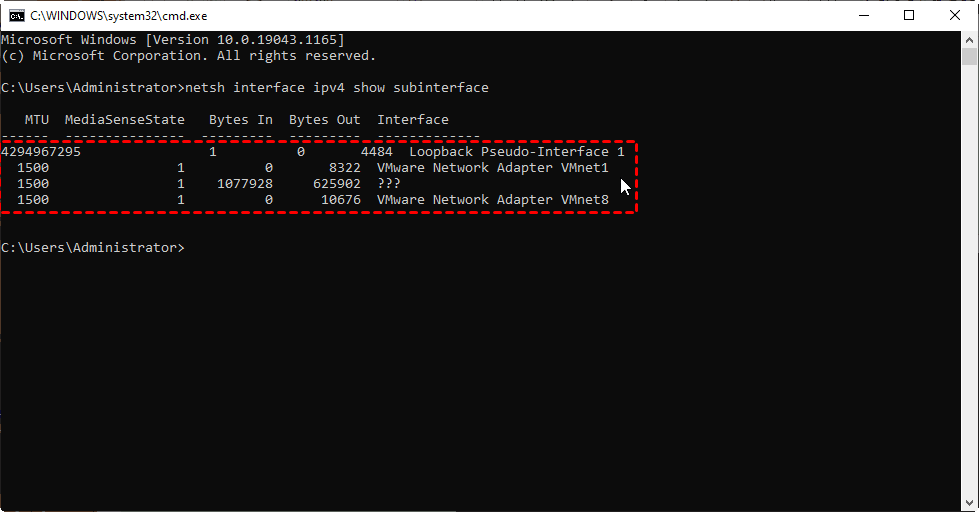
Step 2. Input “netsh interface ipv4 show subinterface” to view the MTU size.
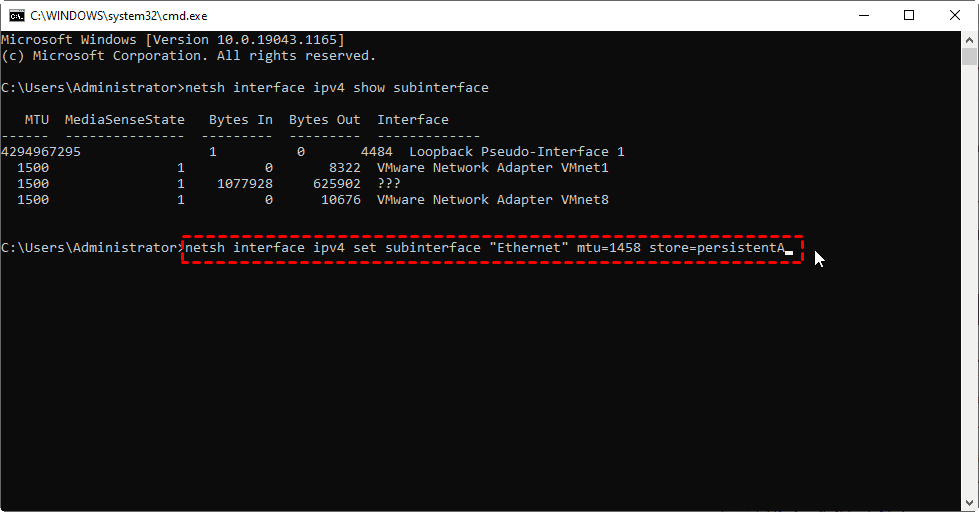
Step 3. Input “netsh interface ipv4 show subinterface “Ethernet” mtu=1458 store=persistentA”, and modify the MTU of Ethernet to 1458.
Solution 4. Change RDP security
Sometimes, the security layer of RDP may also affect the connection. Therefore, you may also configure the RDP security layer to fix this problem.
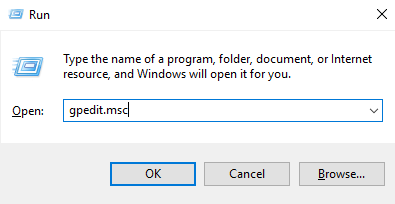
Step 1. Press Win + R to open the run dialog box, and type in “gpedit.msc” to open the Local Group Policy Editor.
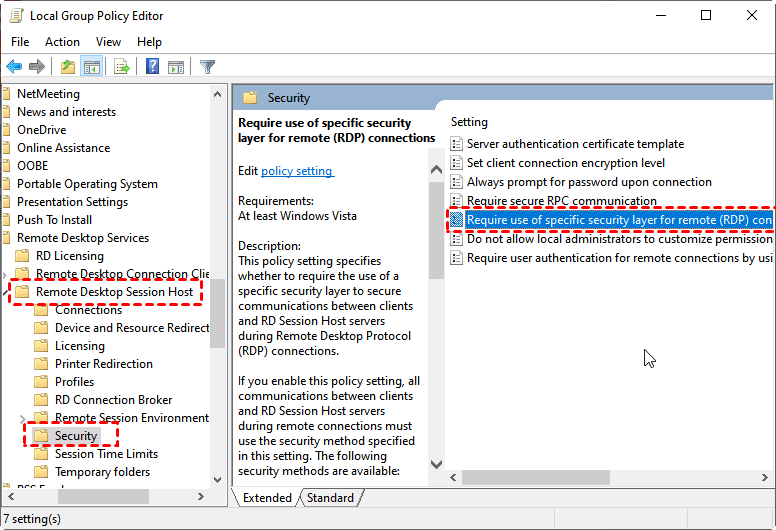
Step 2. Find Computer Configuration on the left, click and expand Administrative Templates, click and expand Windows Components, click and expand Remote Desktop Services.
Step 3. Click Remote Desktop Session Host, click Security, find “Require use of specific security layer for remote (RDP) connection” on the right, and double-click to open it.
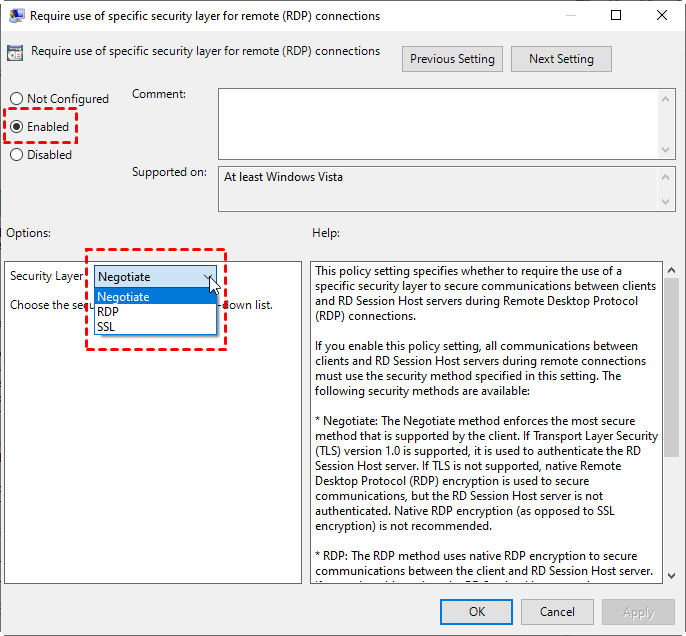
Step 4. Tick Enabled in the main interface, select RDP in the Security Layer, and click OK.
Solution 5. Disable network-level authentication
Disable network-level authentication may also help solve the "An internal error has occurred" on Remote Desktop.
Step 1. Open the Control Panel, find and click System, and click Allow Remote Access.
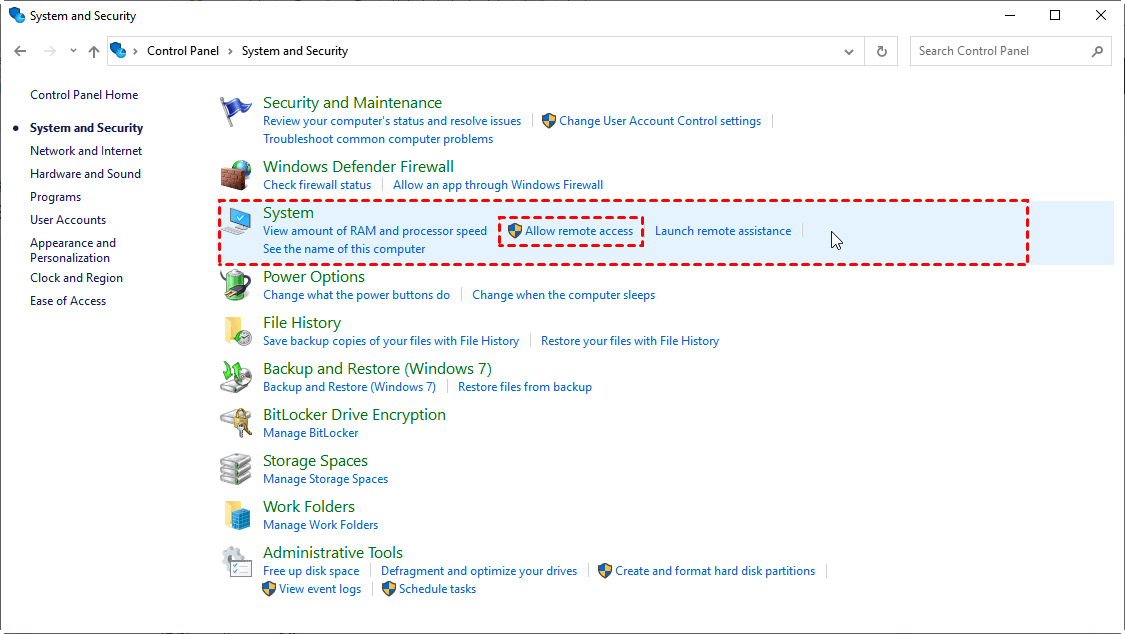
Step 2. In the Remote tab, tick Allow remote connection to this computer, un-tick Allow connections only from computers connection running Remote Desktop with Network Level Authentication (recommended) and click OK.

Solution 6. Disable VPN connection
If you are connecting over a VPN, it means that the Internet connection of your computer will pass through another server, which may affect the normal operation of RDP. In the feedback of some users, disabling VPN helps to solve the internal error on Remote Desktop.
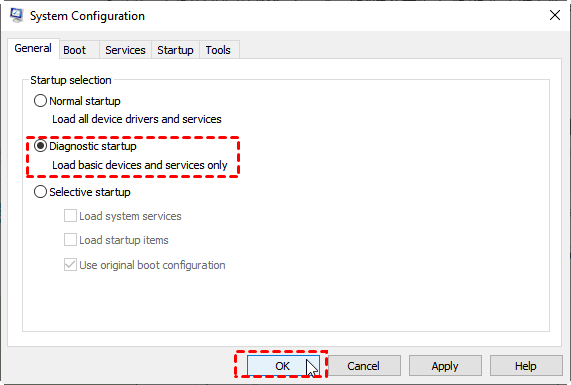
Step 1. Press Win + R to open the run dialog box, and type in “msconfig” to open System Configuration.

Step 2. Find and click Diagnostic startup in the Startup selection on the General tab, and click OK.
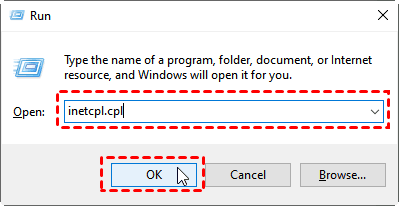
Step 3. After restart, click Win + R to open the Run dialog box and enter “inetcpl.cpl”.
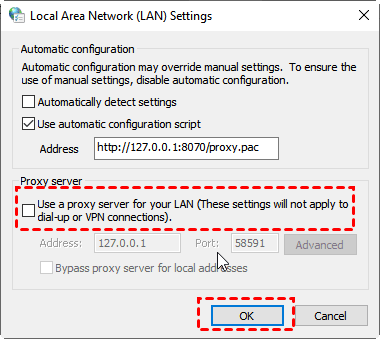
Step 4. Switch to the Connection tab and open LAN settings. In the main interface, un-tick Use a proxy server for your LAN and click OK.
Step 5. Press Win + R to open the run dialog box, and type in “msconfig” to open System Configuration again. Then un-tick Diagnostic startup.
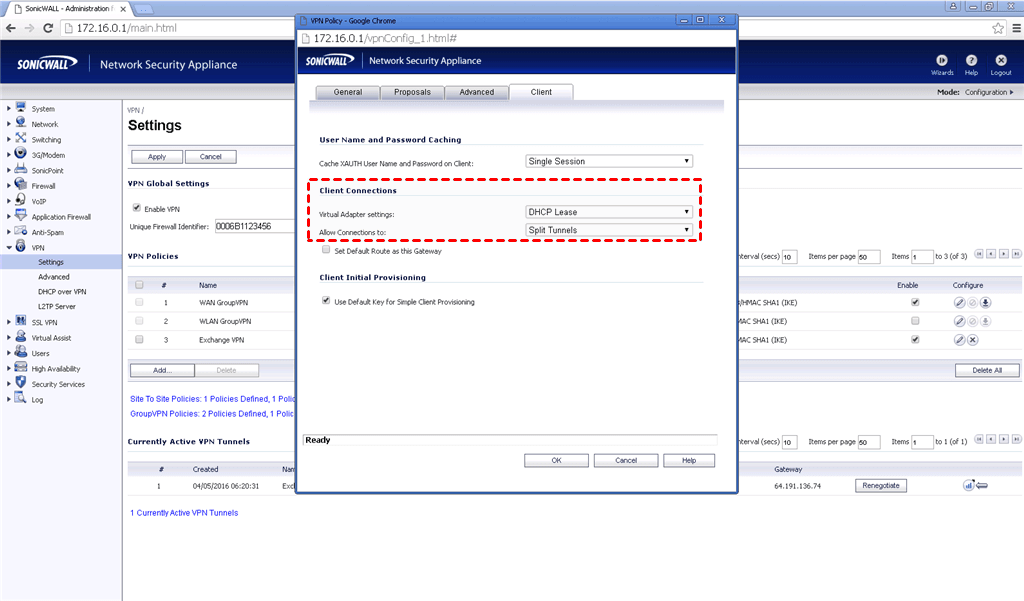
Solution 7. Reconfigure VPN
If you are connecting over VPN and do not want to disable VPN, you can try to change the internal settings to solve the internal errors on Remote Desktop. Here, we take the Sonic Wall VPN client as an example.
Open VPN settings, find the WAN under the VPN Policies, click the configuration option on the right. click the Client tab, and change the Virtual Adapter settings from none to DHCP Lease.
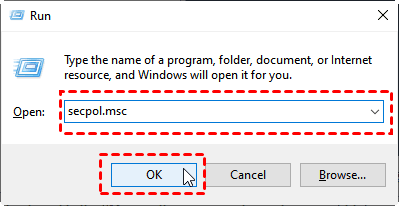
Solution 8. Reconfigure the Local Security Policy
The improper configuration of the Local Security Policy may also cause this problem, you can reconfigure it to troubleshoot.
Step 1. Press Win + R to open the run dialog box, and type in “secpol.msc” to open System Configuration.
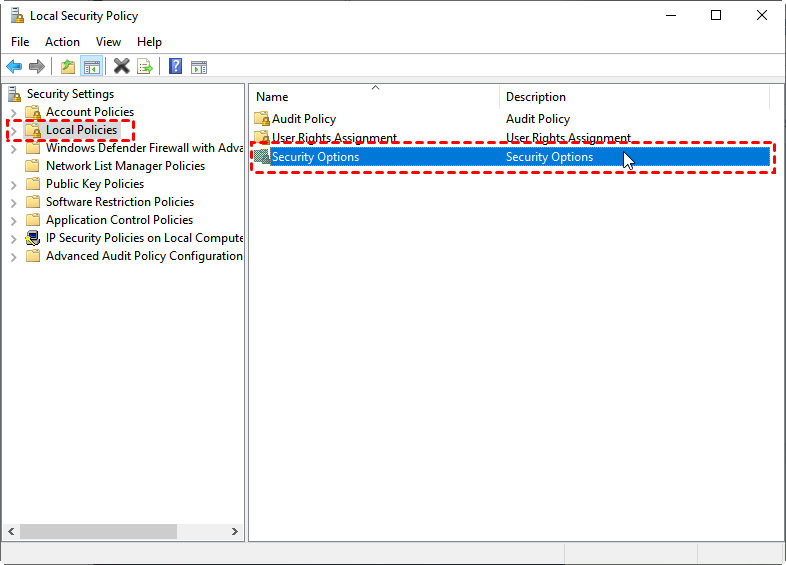
Step 2. Find and click Local Policies option, and double-click Security Options on the right.
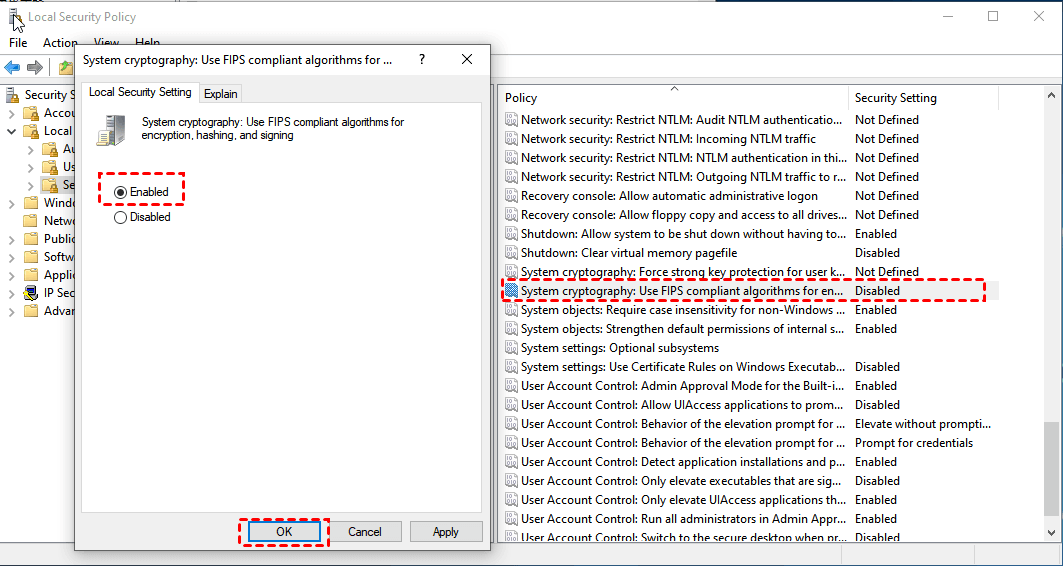
Step 3. Find and double-click System cryptography: Use FIPS compliant algorithms for encryption, hashing and signing, choose Enabled on the Local Security Setting tab and click OK.
Solution 9. Update or recover system version
Updating or recovering the Windows system version is another way to fix RDP errors.
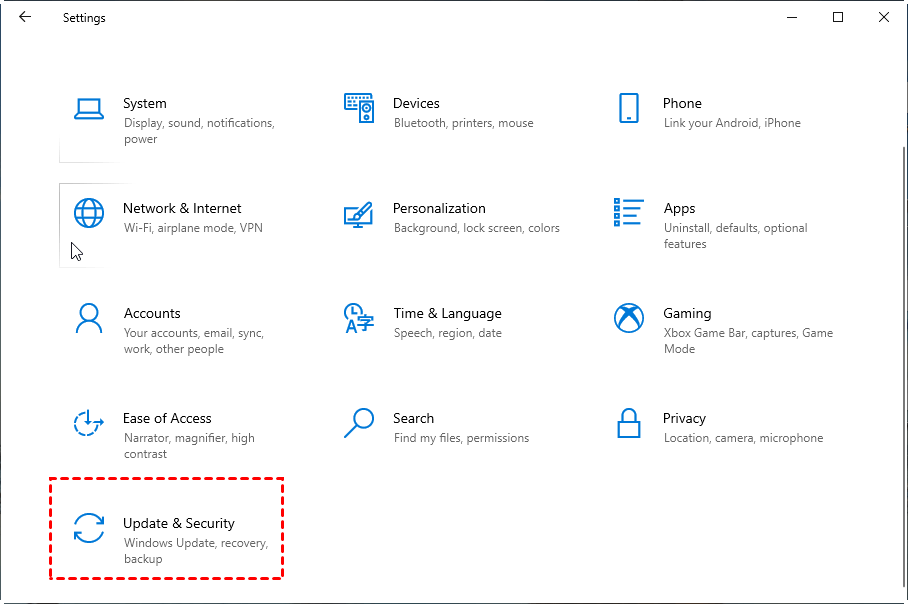
Step 1. Open the Control Panel, locate and click Update & Security.
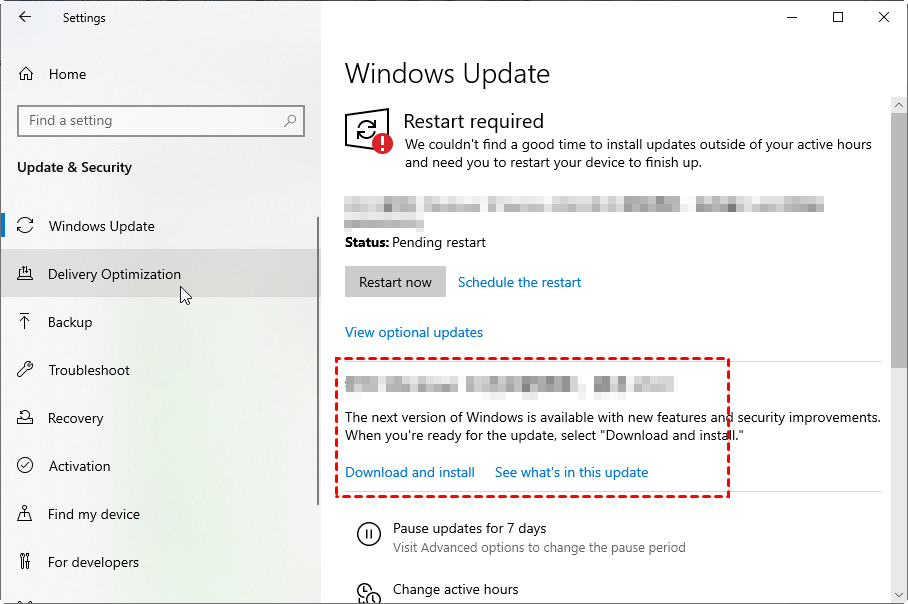
Step 2. In the Update & Security interface, check whether a new version is available. If yes, download and install it (remember to back up your data first).
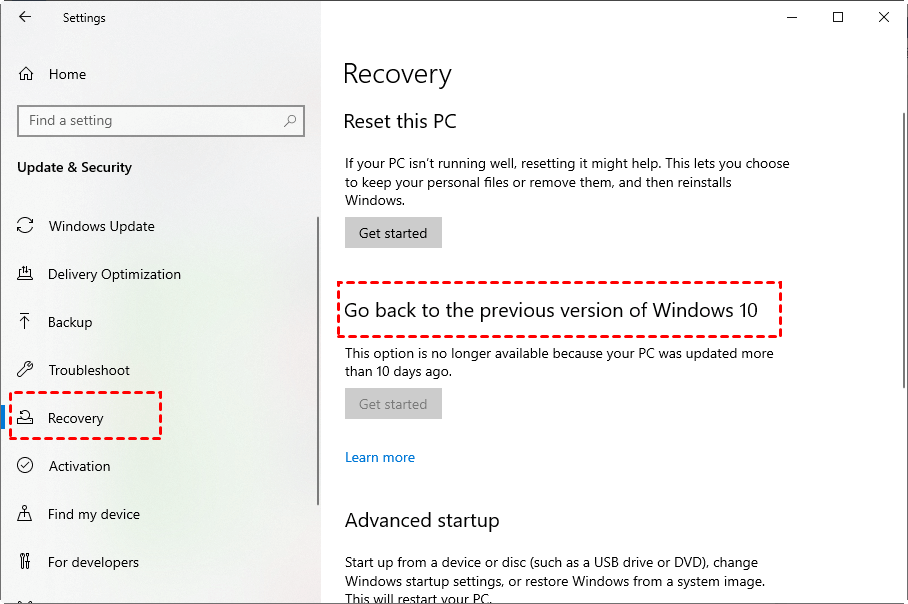
Step 3. If your computer system is already the latest version, you can consider to Go back to the previous version of windows 10 in Recovery (choose carefully).
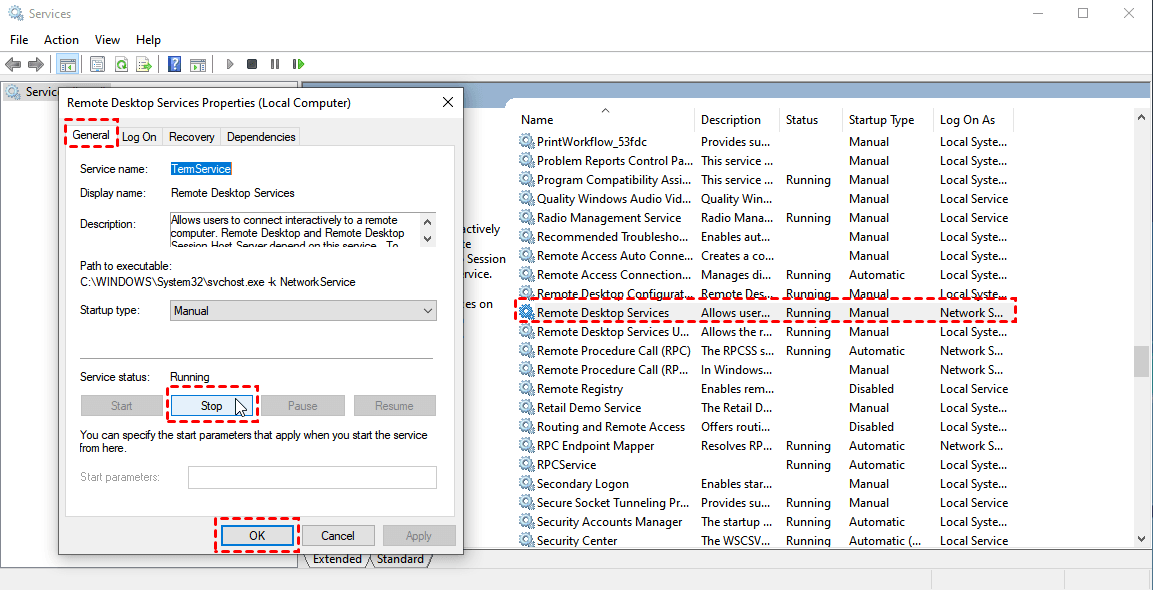
Solution 10. Restart Remote Desktop Services
If none of the above solutions helped, you can also try to restart Remote Desktop Services to see if it helps.
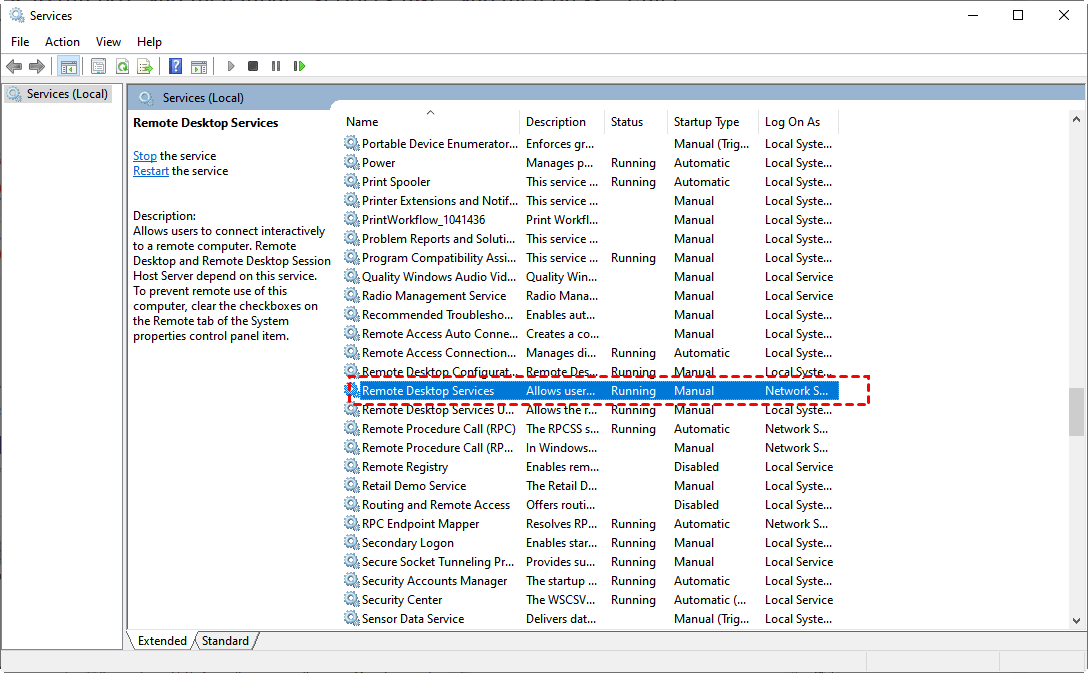
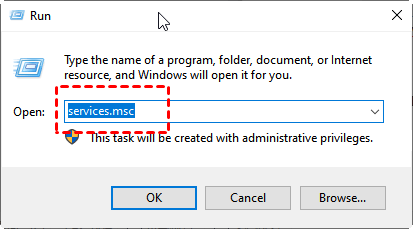
Step 1. Press Win + R to open the run dialog box, and type in “services.msc” to open the Services.
Step 2. Find and double-click “Remote Desktop Services”, click Stop in the General tab, and then click OK.
Solution 11. Allow Remote Desktop Services to start automatically
If you don’t allow Remote Desktop Services to start automatically, an internal error may occur on Remote Desktop.
Step 1. Press Win + R to open the run dialog box, and type in “services.msc” to open the Services. Then find Remote Desktop Services.
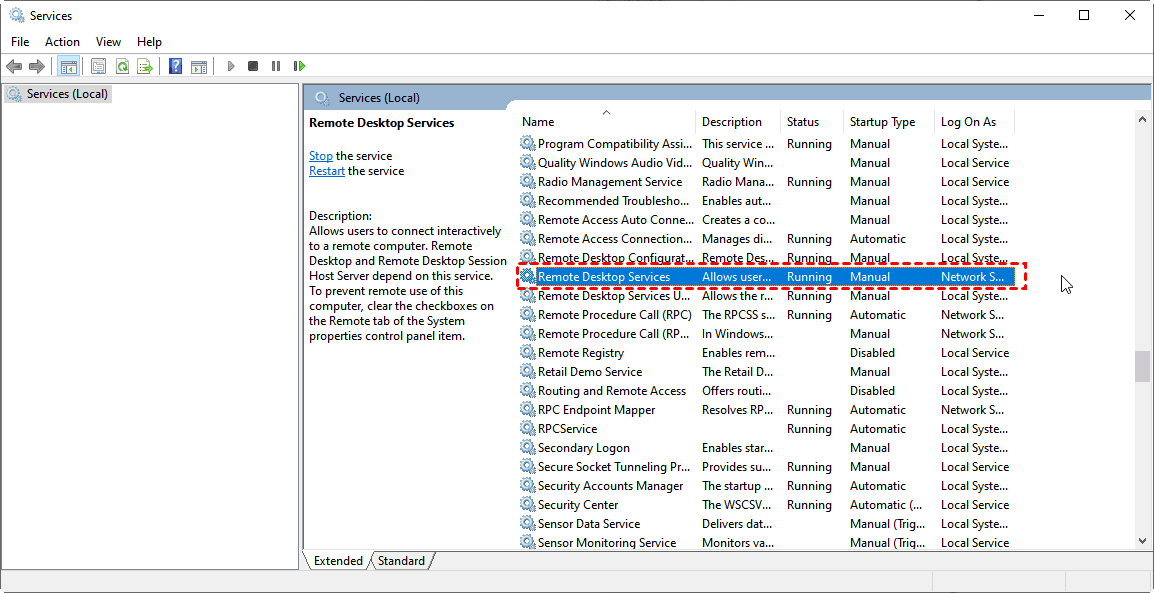
Step 2. Double click to open Remote Desktop Services, click Stop in the General tab, select Automatic in the Startup type, and click OK.

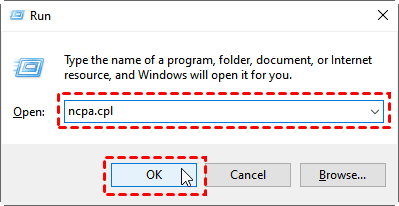
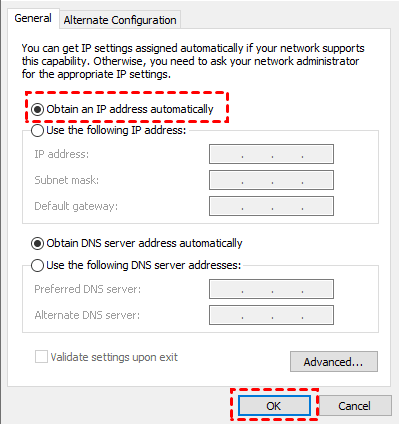
Solution 12. Disable the static IP of the computer
Disable the static IP of the computer and re-connect to see if this helps.
Step 1. Press Win + R to open the run dialog box, and type in “ncpa.cpl” to open the Network Configuration Panel.
Step 2. Find your network adapter, right-click Properties, select and double-click the Internet Protocol version 4 (TCP / IPv4) option.
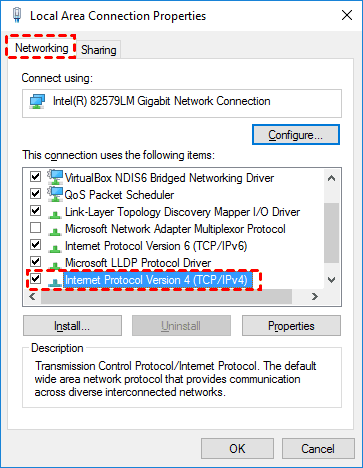
Step 3. Select the Obtain an IP address automatically and click OK.
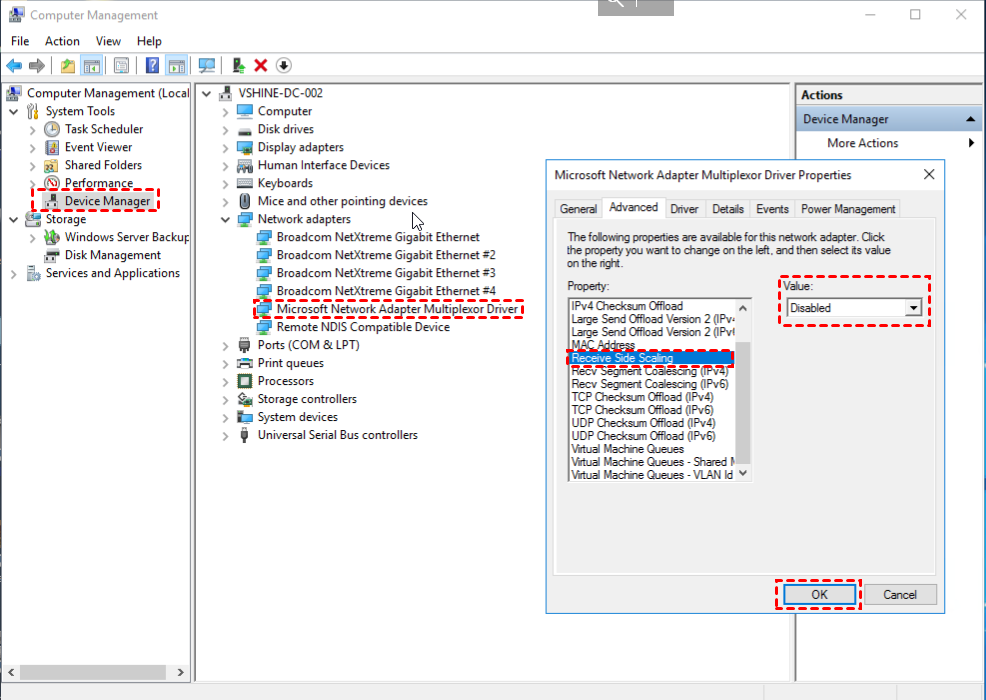
Solution 13. Turn off receiver scaling
You may also turn off the Receiver Side Scaling to fix this problem.
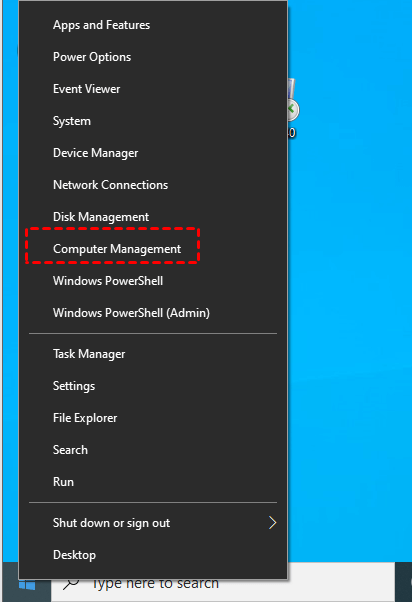
Step 1. Right-click Start and then choose Computer Management.
Step 2. Click Device Manager and then Network adapters, find and double-click Microsoft Network Adapter Multiplexor Driver. In the pop-up window, find Receiver Side Scaling in the Advanced tab, disable it, and then click OK.
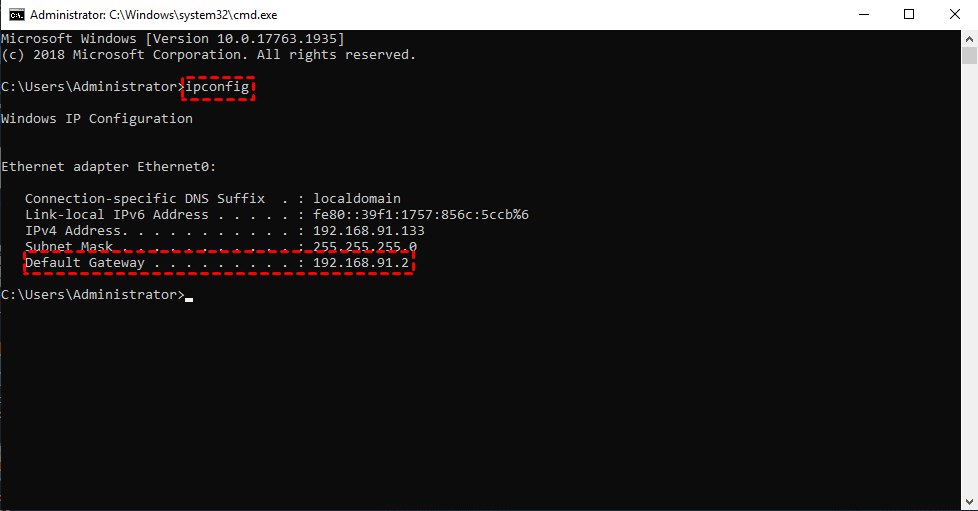
Solution 14. Check the network connection
When we encounter an internal error on Remote Desktop, we can try to ping the Default Gateway IP address of the computer using the command prompt. If it is not successful, it means that there is a problem with the computer network connection.
Step 1. Press Win + R to open the run dialog box, and type in “cmd” to open the command prompt, and then enter “ipconfig” command to view the IP address of the Default Gateway (remember it).
Step 2. Open the command prompt on another computer, enter the Default Gateway IP address of the former computer, wait for the operation result and record it. If the TTL value appears, it means the pinging is successful, which also means that the IP address of the default gateway can be accessed. If not, it means that the Default Gateway IP address is not accessible.

Step 3. Then we need to test the “telnet” feature of the computer. Open the command prompt again and enter “telnet 3389” to check whether telnet is available on the port required to be opened by Remote Desktop Client.
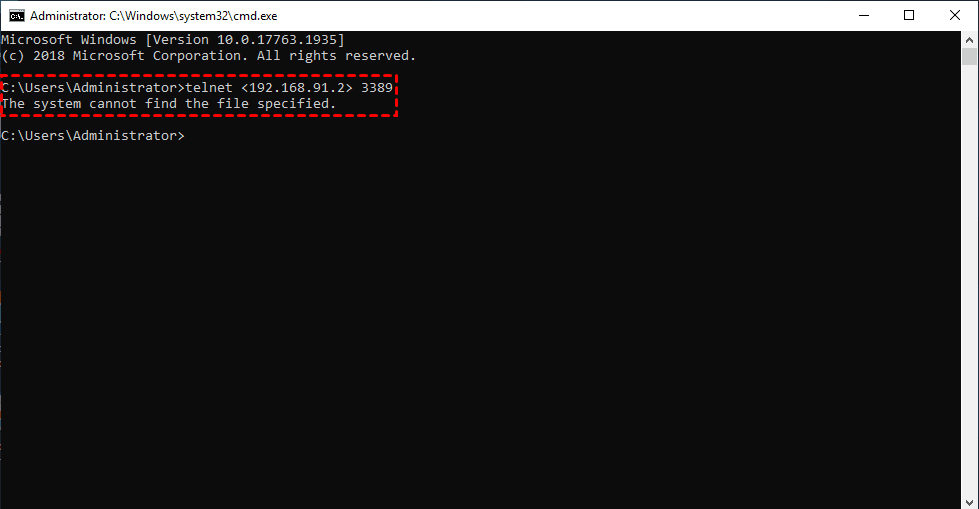
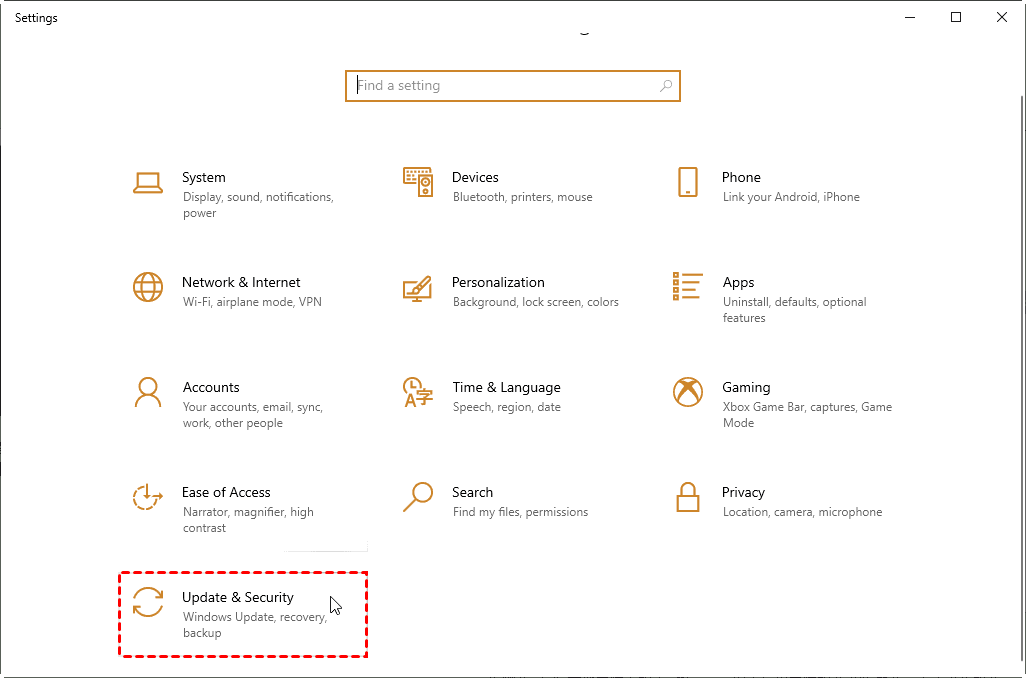
Step 4. If a black screen appears, it means that telnet is successful. If not, it means that the port is blocked or not opened. Therefore, we need to reconfigure the Windows firewall to open the specific port (3389). Press Win + I to open the Windows settings and find Update & Security.
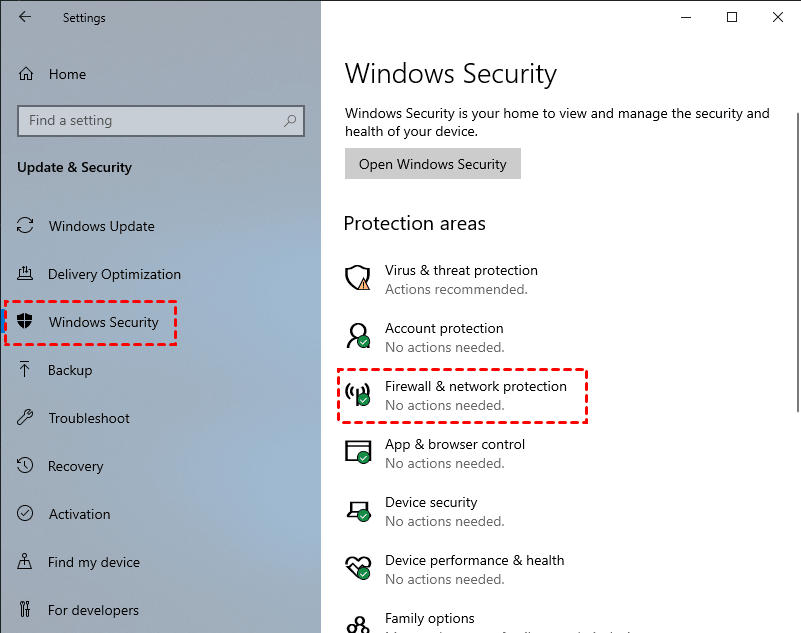
Step 5. Click Windows Security on the left pane and click Firewall & network protection.
Step 6. Click Advanced Settings in the pop-up window, find and click Inbound Rules, and select New Rule on the right.

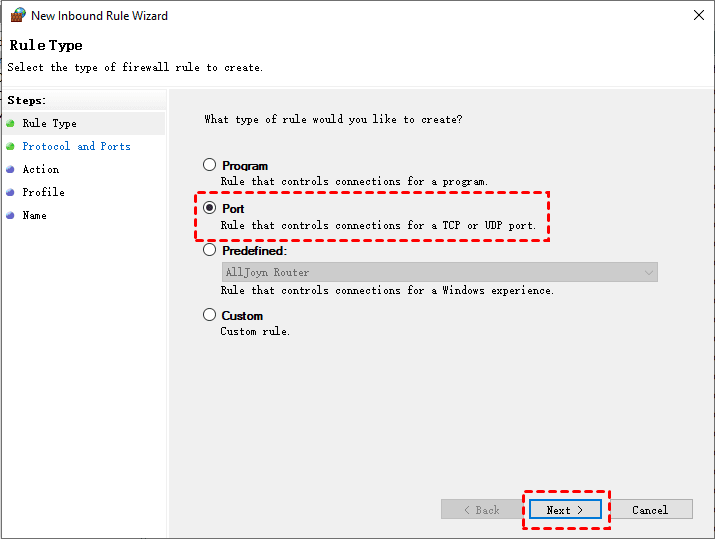
Step 7. Select Port and click Next.
Step 8. Tick TCP and Specified local port. Enter the port number 3389, and click Next.
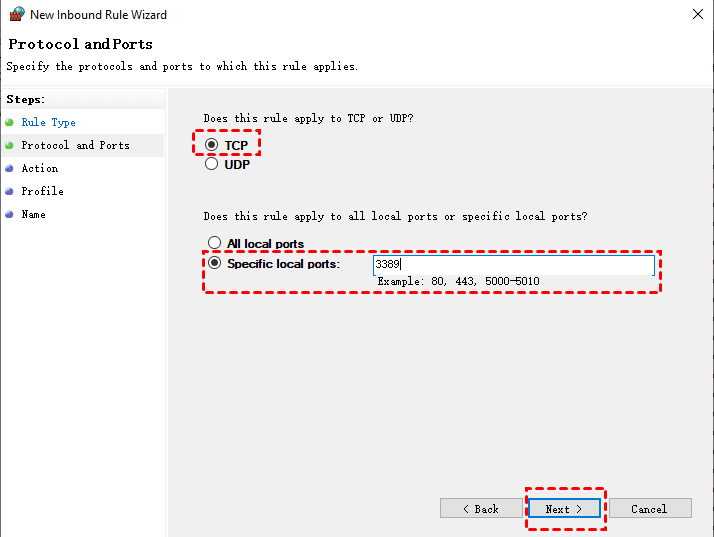
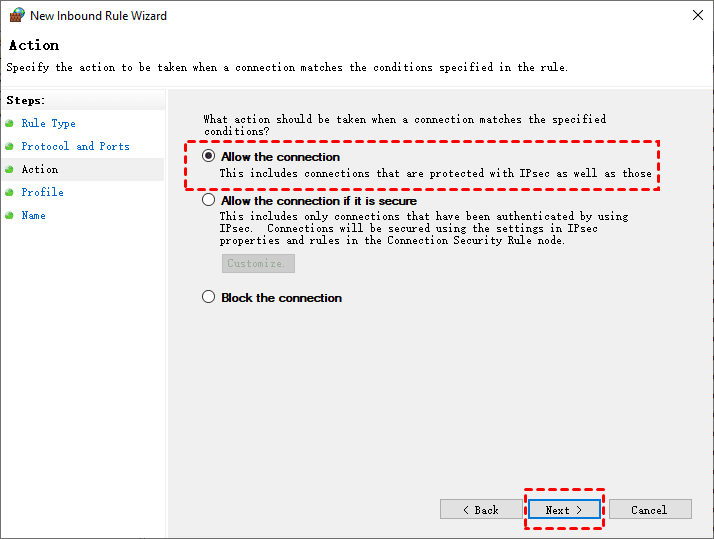
Step 9. Click Allow the connection and click Next.
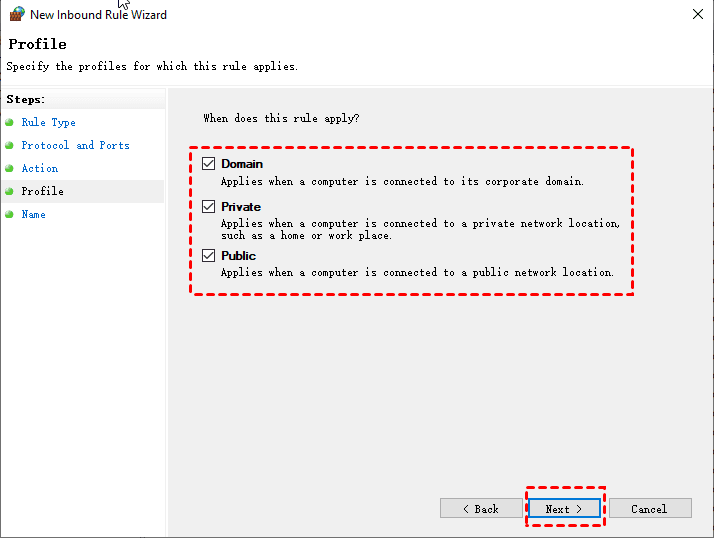
Step 10. Confirm that all three options in the main interface are checked, and click Next.
Step 11. Enter the name of the newly created rule, click Next, and then click Finish. Then restart RDP to see if the problem is fixed.

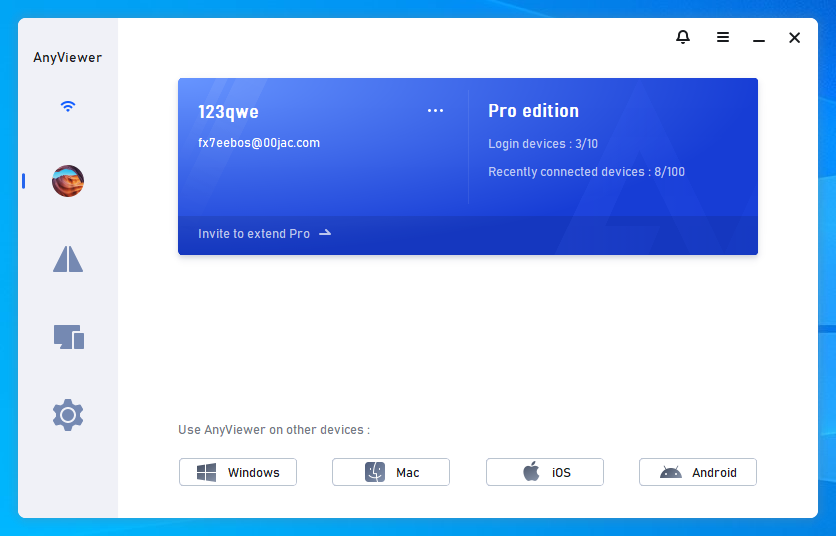
Free remote desktop software with no internal error: AnyViewer
If you think the above-mentioned solutions are too complicated, you can try free remote control software for Windows, AnyViewer, which does not have any internal error at all. It is the comprehensive remote access, remote control, and remote support solution that allows you to remotely access and control computers from anywhere. It supports multiple Windows versions, including Windows 11/10/8.1/8/7 and Windows Server 2022/2019/2016/2012 R2.
How to use AnyViewer
AnyViewer provides you with different connection methods in different circumstances. If you need to control your own remote computers, see Part 1 to achieve unattended remote access. If you need to provide remote support for others, please see Part 2.
Preparation work:
- Connect the client computer (the controller computer) and the host computer (the controlled computer) to the Internet.
- Download and install AnyViewer on the client computer and the host computer respectively.
Part 1. For unattended remote access with one-click
Step 1. Download, install and launch AnyViewer on both computers. Go to Log in, and then click Sign up. (If you already have signed up on its official website, you can log in directly.)

Note: AnyViewer also has an iOS version, you are also able to remotely control your PC from your iPhone or iPad.
Step 2. Fill in the signup information.

Step 3. Then you can see you successfully logged in to AnyViewer. Your device will automatically be assigned to the account you've logged in to.

Step 4. Log in to the same AnyViewer account on the two devices, then click One-click control to achieve unattended remote access.

Note: If you want to assign more devices to achieve unattended remote access, then you can upgrade your account to a Professional or Enterprise plan. Also, you can connect to another computer in privacy mode, which means you can black the screen and block the mouse and keyboard of the remote computer.
Part 2. Two more connection methods of AnyViewer
If you do not want to log in to the same account on the two devices for any reason, we also provide you with other two connection methods. But you should note that you're unable to transfer files between computers using these two connection methods, as this is a function for logged-in users.
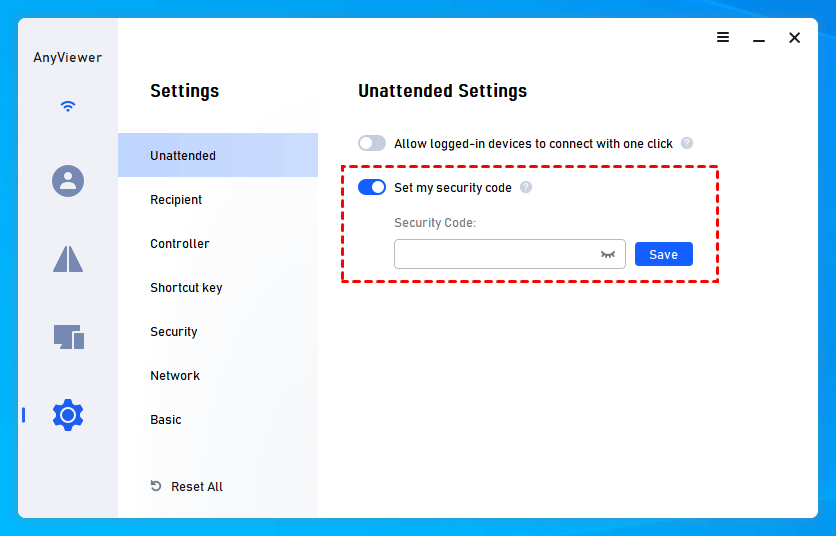
Step 1. On the host computer, click on Setting and then Recipient. Tick the third option. Then set the security code you want in the box. Then click OK to finish the set-up process.
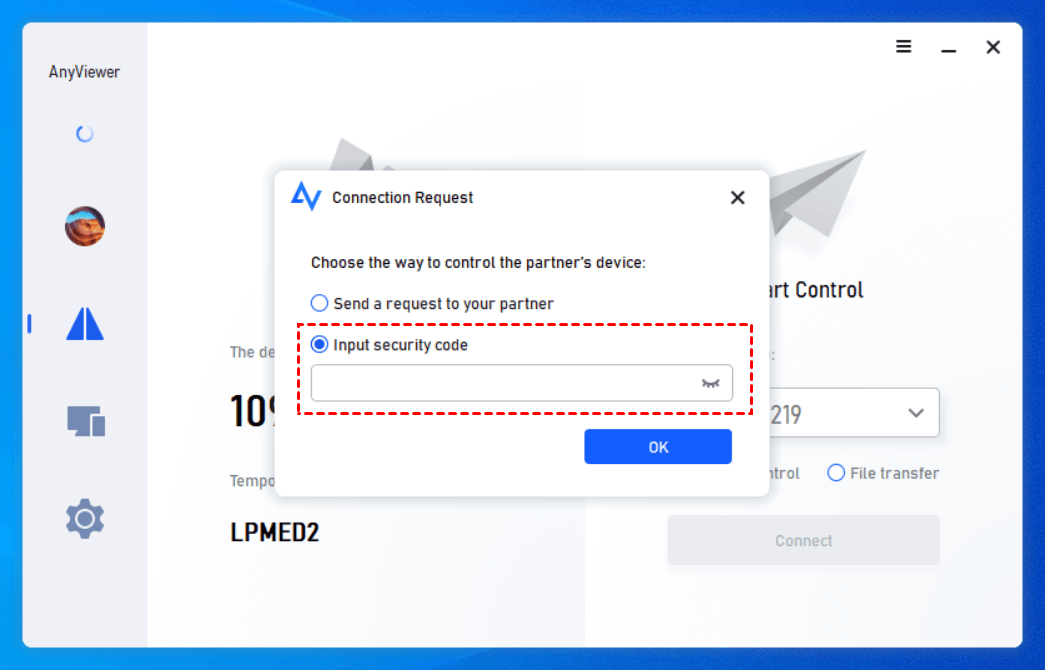
Step 2. On the client computer, enter the device ID of the host computer. After entering the device ID, you’ll be given two options.
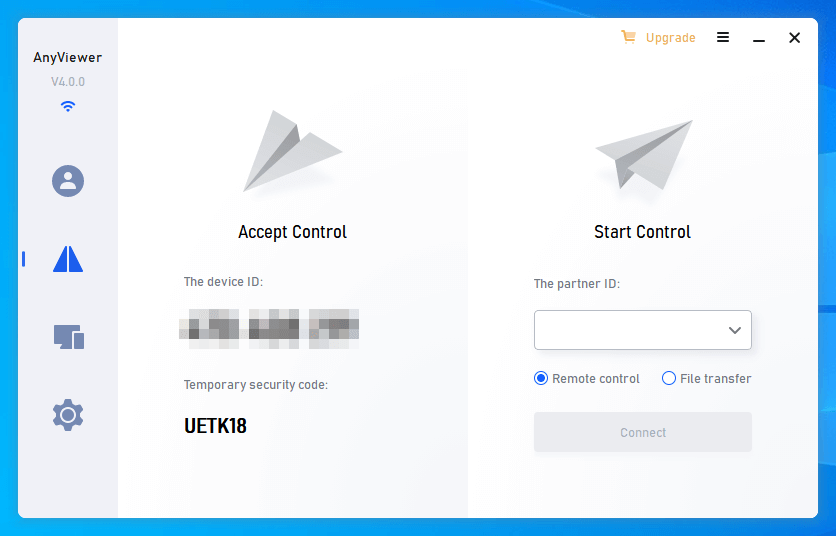
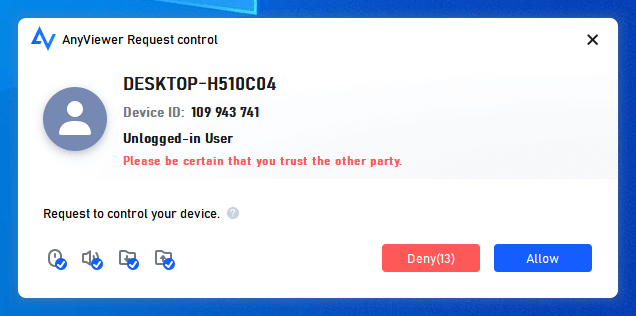
Option 1: You can send a control request; then the host computer will receive a pop-up request. People sitting in front of the host computer could either allow it or deny it.
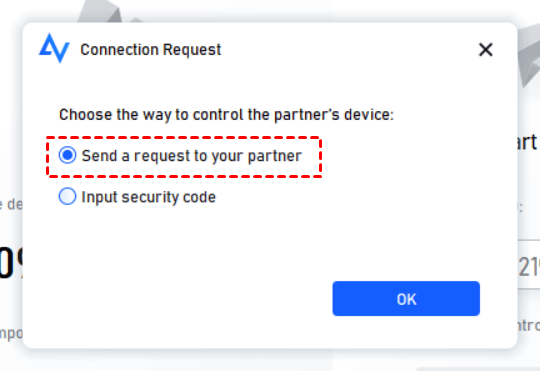
Option 2: You could also input a security code of your home PC to achieve remote assistance directly. You can either input a permanent security code or a temporary security code.
Conclusion
If you happen to encounter a Remote Desktop “An internal error has occurred” problem, please don’t worry. You can try the 14 solutions mentioned in this article, in turn, to see if they can solve the problem. If none of the above 14 methods can help you solve the problem, or you think the above solutions are too troublesome, you might as well try AnyViewer, a free third-party remote control software.
Compared with RDP, AnyViewer is more stable. It can connect remotely without an IP address. It can be applied to multiple Windows system versions. If you're tired of RDP problems like the RDP user account did not work, try it.
