
Top 4 Best Quick Assist Alternatives [Pros & Cons]
Quick Assist is a free remote support tool developed by Microsoft. Although it is beneficial, it has many limitations. This post lists the top 4 best Quick Assist alternatives. Keep reading if you need.
By Ellie / Updated on December 13, 2024
What can I use instead of Quick Assist?
Quick Assist is a Windows built-in feature by which people can share their screen with another person to get help or give assistance. Is Quick Assist free? Yes. Quick Assist is 100% free. But why do many people still look for Quick Assist alternatives? That's because Quick Assist has many inevitable limitations.
- As a remote support tool, Quick Assist only offers attended access. An end-user must be present to accept a remote connection. Unattended remote access is not available.
- Quick Assist only supports remote connections from a Windows 10/11 computer to another Windows 10/11 computer. Computers running other OS and mobile devices like Android can’t use Quick Assist.
- Quick Assistlacks many practical features, for example, file transfer, remote restart, and clipboard sharing.
What can you use instead of Quick Assist? A great Quick Assist should complement the above-mentioned Quick Assist limitations. Here we pick out four remote support software for you.
The best Quick Assist alternative [4 options]
Let's check out the top 4 best Quick Assist alternatives. All free, free & paid, and paid-only options are included.
Option 1. AnyViewer [free & paid]
The first option is the highly recommended professional remote support software AnyViewer. It is the best Quick Assist alternative free. AnyViewer has both free and paid versions. But usually, the features provided by the free version are adequate for most users. The followings are the pros and cons of the AnyViewer free version.
Pros:
- Cross-platform compatibility. AnyViewer works flawlessly on Windows, iOS, and Android.
- Cross-network connection. AnyViewer provides free services, whether you use it over WiFi or a network.
- Unattended remote access. AnyViewer supports attended remote access and allow users to access an unattended computer without permission.
- File transfer. AnyViewer provides various ways of remote file transfer between computers.
- Multi-session. AnyViewer allows users to have two concurrent remote sessions.
- Clipboard sync. AnyViewer allows users to copy and paste text with the shared clipboard between devices.
- Remote management. AnyViewer allows users to control an unattended computer remotely, such as locking, restarting, or shutting it down.
Cons:
- Mac & Linux are not supported at present.
Step 1. Download, install, and run AnyViewer on your devices.
Step 2. Create an AnyViewer account and sign into it on both devices.

Step 3. On your local device, go to Device and click the remote computer and choose One-cilck control to provide remote support.

- Notes:✎...
- It is recommended to upgrade your account to a Professional or Enterprise plan. What can a professional or enterprise plan brings to you:
- More devices will be allowed to assign to the same account for unattended access.
- More connection channels for more devices to be able to start remote connection at the same time.
- One device can connect to more devices simultaneously.
- Black the remote PC screen and disable the remote keyboard & mouse click to protect privacy.
- Transfer 1TB files at 10 MB/s.
Option 2. Chrome Remote Desktop [free]
Chrome Remote Desktop is a free remote support program developed by Google. It is an entirely free tool, just like Quick Assist. You can add it to your Google Chrome as an extension and log in to your Google account to use it.
Pros:
- It is fully compatible with Windows, macOS, Chrome OS, Linux, iOS, OS X, and Android.
- It supports unattended remote access. You can use the PIN feature to access a remote computer permanently.
- It allows you to transfer files by uploading and downloading files.
Cons:
- No chat function in session.
- No multi-session support.
- Unable to reboot the remote computer and then reconnect to it.
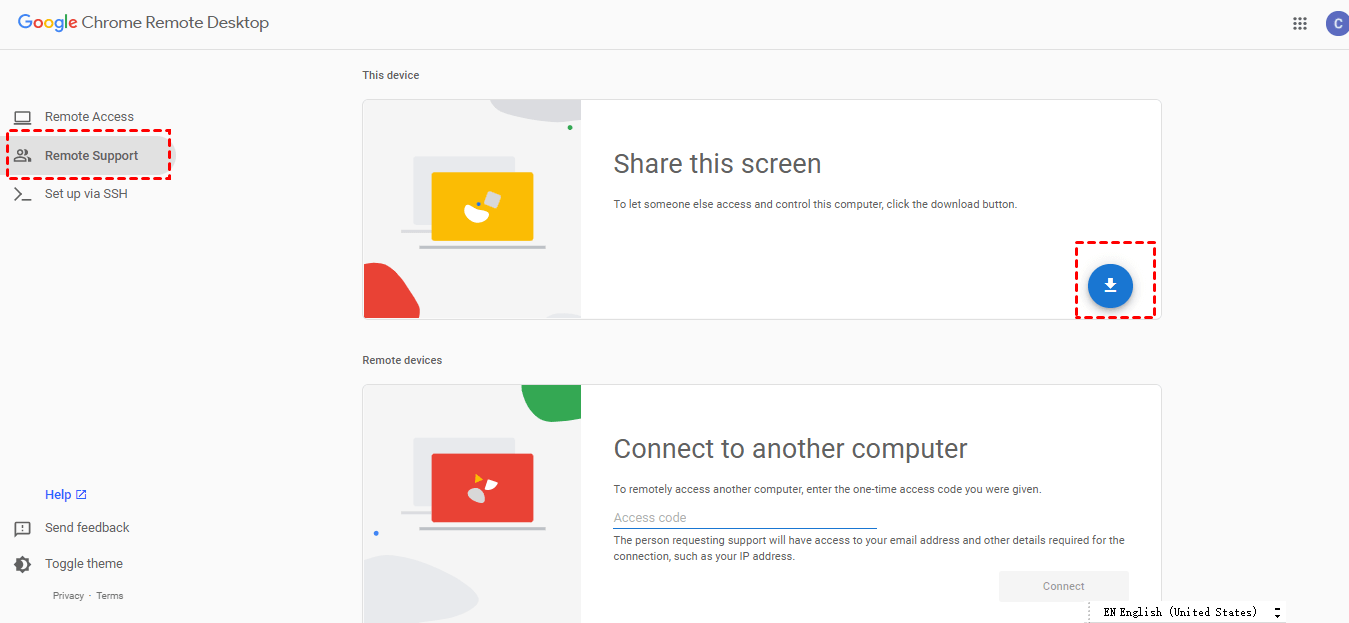
Step 1. Sign in to the same Google Account and open the Chrome Remote Desktop web page. On the remote computer, click Remote Support first and then click the blue download button.
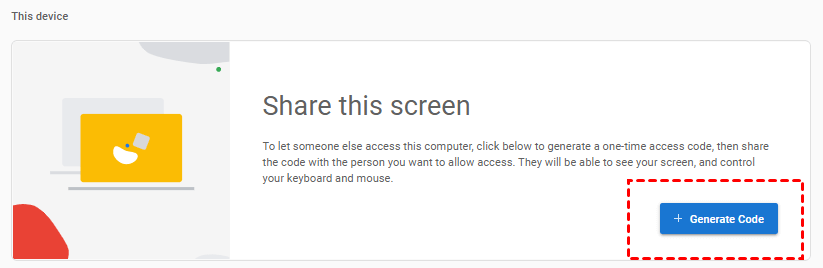
Step 2. After adding the Chrome Remote Desktop extension, click Generate Code.
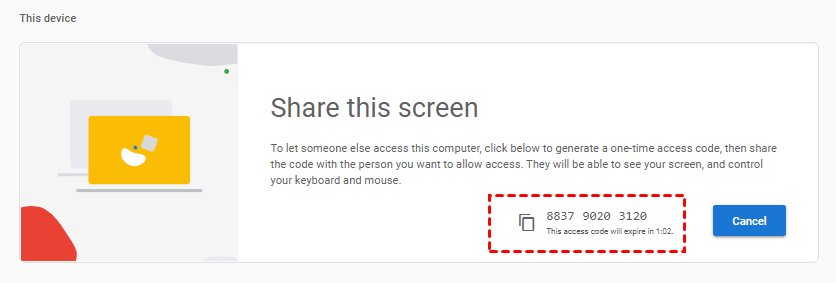
Step 3. Send the automatically-generated code to the local computer. Note: the code is only valid for 5 minutes.
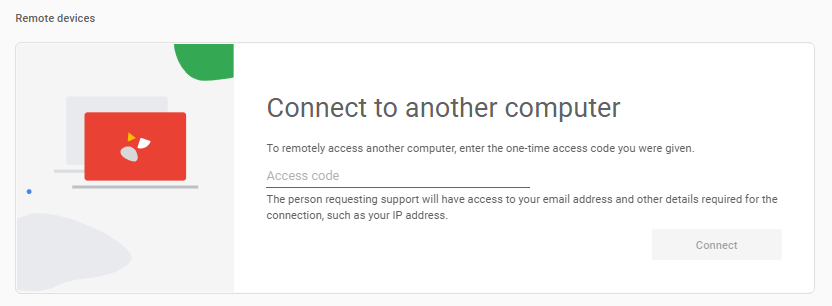
Step 4. On the client computer, input the code of the host computer in the box, then click Connect.
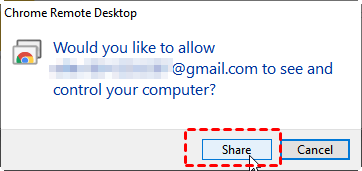
Step 5. On the remote computer, there will be a pop-up confirmation window. Click Share to establish an instant connection.
Option 3. TeamViewer [free & paid]
TeamViewer is another third-party remote support tool that has been used by many people worldwide. TeamViewer has a free version for personal use and paid versions for business use. But you need to be careful when using TeamViewer free version. Because some users have reflected that they have been detected as using TeamViewer for commercial purposes and been blocked from connection even though they are not. Let's see the pros and cons of TeamViewer Free.
Pros:
- It is available for iOS, Android, and Microsoft smartphone and tablet operating systems and works on Macs, PCs, and Linux.
- It supports unattended remote access.
- It supports text chat and video chat during a remote session.
Cons:
- Only one concurrent session is allowed.
- It doesn't provide users with operation shortcuts, for example, open Task Manager.
- It is easily suspected of commercial use and blocked from connections.
And another significant disadvantage of TeamViewer is its high prices. All TeamViewer pricing plans are more expensive than other remote support software and can only be paid annually.
Step 1. Select the purpose (commercial or personal) for downloading this software during installation. Here, take the free version of individual users as an example.

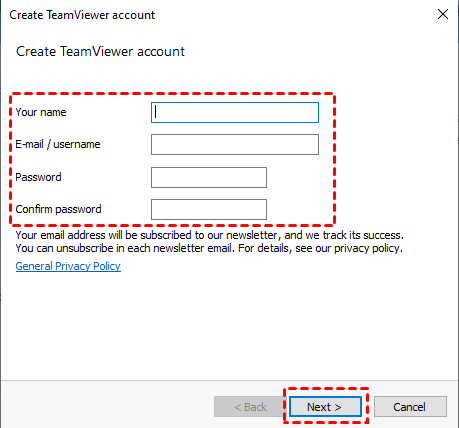
Step 2. Run TeamViewer on both computers. Select Login in the main interface. You need to create your own TeamViewer account for the first time. Click Next to complete account registration (you also need to verify the account before use).
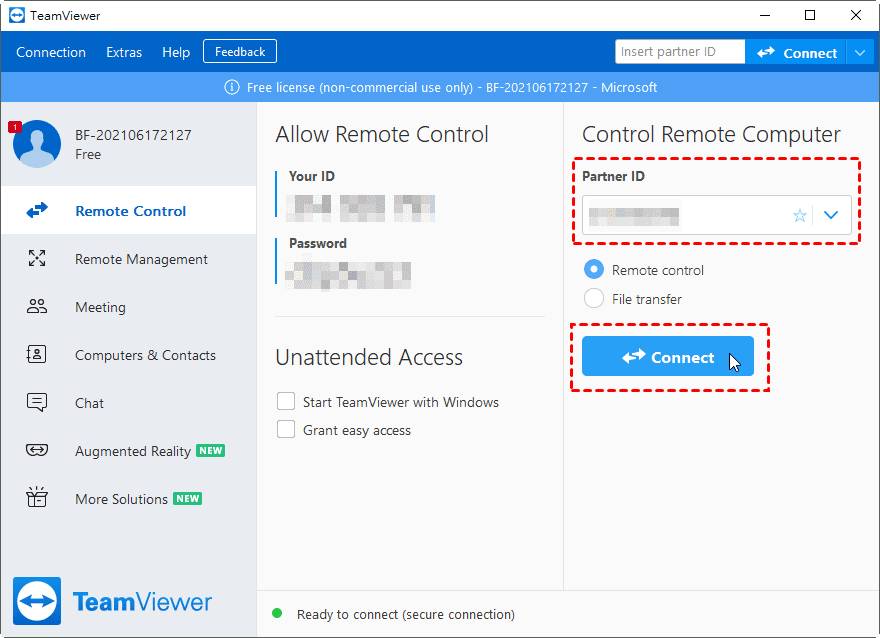
Step 3. Click Remote Control on the left side of the TeamViewer main interface on the client computer, enter the ID of the host computer under Partner ID, and click Connect.
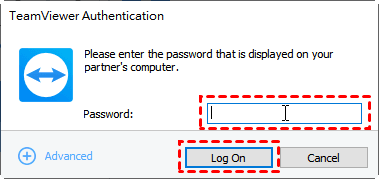
Step 4. Enter the password of the host computer in the TeamViewer Authentication window to realize the remote control.
Option 4. Splashtop [free & paid]
Splashtop is the remote solution for IT and helpdesks. With it, you'll enjoy fast, reliable, secure remote access to support your users' devices. Its free version is called Splashtop Personal. Let's check the pros and cons of Splashtop Personal.
Pros:
- The initial setup is simple.
- Click-and-drag file transfer, even across platforms.
Cons:
- It is only available for free in your local home network. To connect from an outside network, a subscription is required.
- The whiteboard only works on mobile.
- You can only access a maximum of 5 computers with Splashtop Personal.
- Problems while connecting to the 2nd computer.
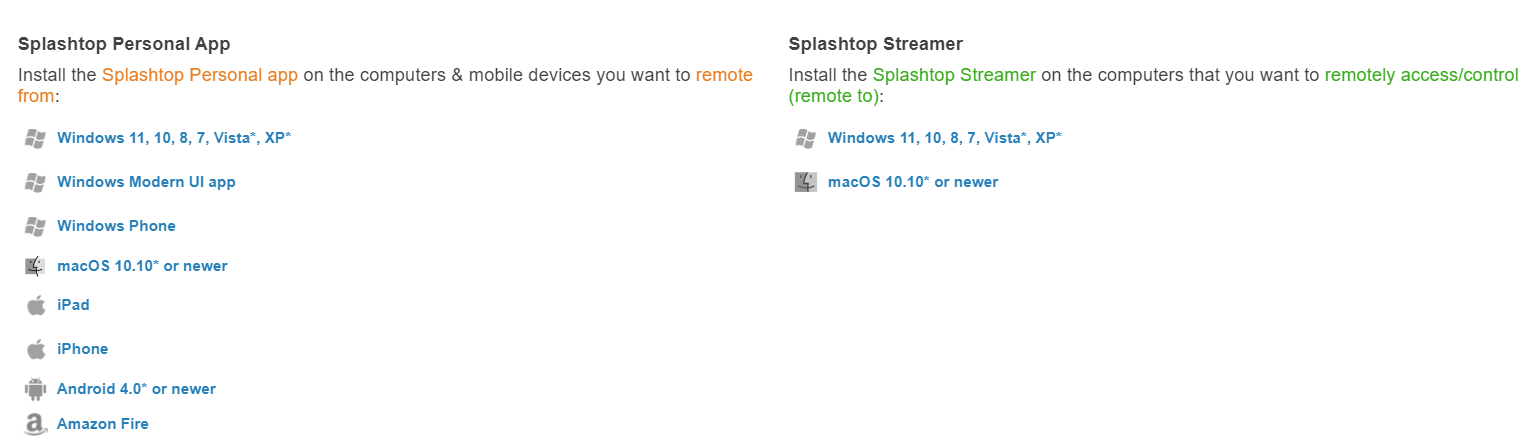
Step 1. Download Splashtop Personal App on the local computer and download Splashtop Streamer on the remote computer from its official site. Choose the correct version according to your computer OS.
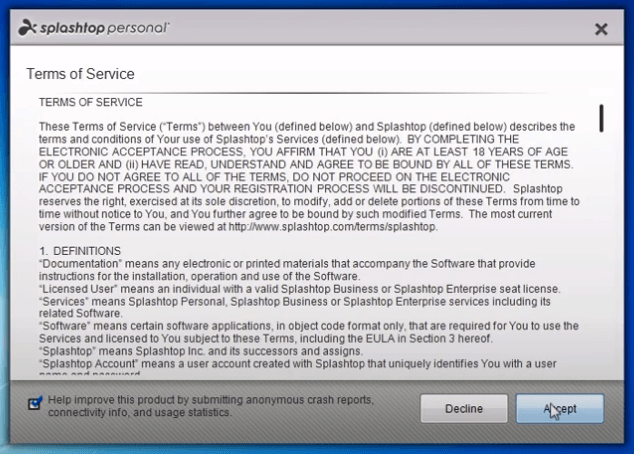
Step 2. Follow the guidance to install Splashtop Personal on both computers.
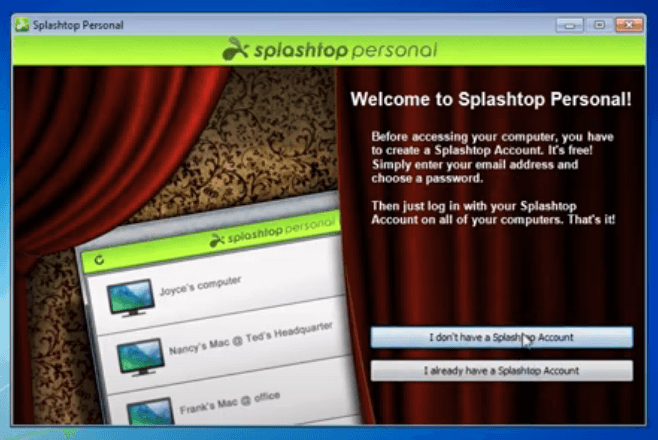
Step 3. Splashtop will ask you to log in to your account. If you already have an account, choose I ready have a Splashtop account. If not, choose I don't have a Splashtop account.
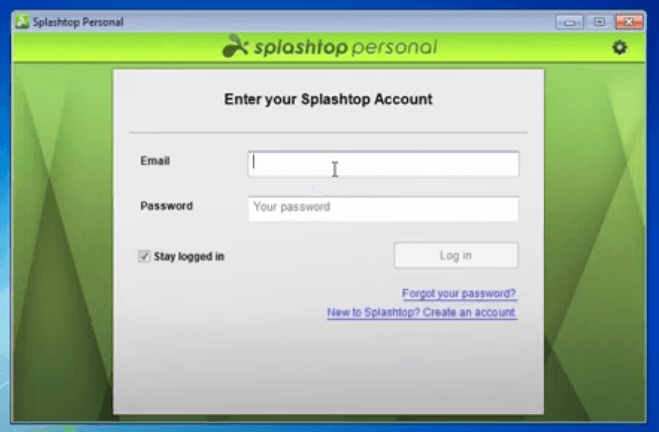
Step 4. Log in to your Splashtop account.
Note: If you can’t log in successfully, it may be because your device needs to be authenticated. Check your email box, and you may receive an authentication email. Follow the link in the email to authenticate the device.
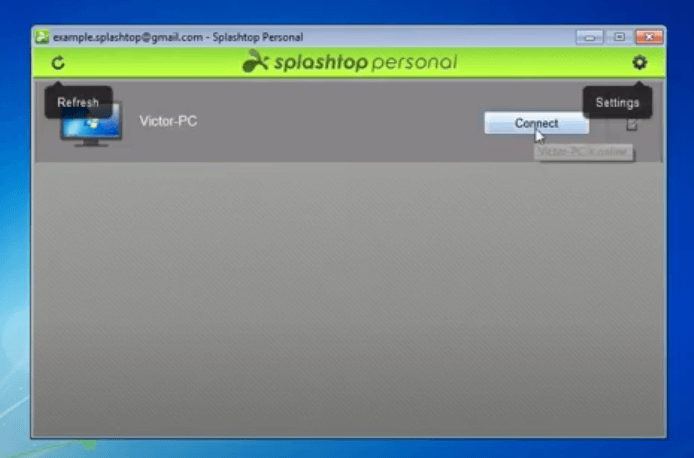
Step 5. After logging in successfully, you'll see the device that has installed Splashtop Streamer. Click Connect; you can successfully connect to the remote device on your home network.
The bottom line
This post primarily introduces the top 4 best Quick Assist alternatives and their pros and cons. It is easy to see that AnyViewer provides most features for free. If you are a Windows, iOS, or Android user, it is highly recommended to choose AnyViewer.
