
[Fixed] Allow Remote Assistance Connections to This Computer Grayed Out
The tutorial is devoted to analyzing the causes for “Allow Remote Assistance Connections to this computer” greyed out and offers 4 solutions to address the problem.
By Ellie / Updated on December 13, 2024
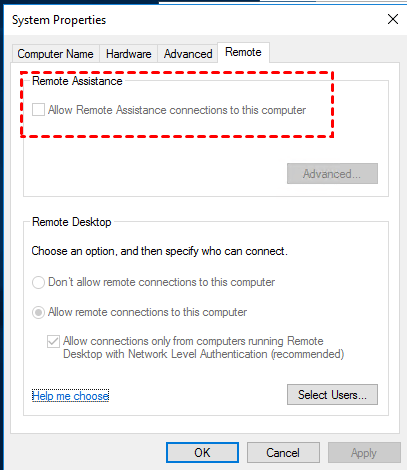
Allow Remote Assistance connections to this computer greyed out on Windows 11, 10, 8, 7
What should I do? The "Allow Remote Assistance connections to this computer" option under the "Remote" tab greyed out on my Windows. I need the help of my friends now. But I can't click on it to enable Remote Assistance. Any solutions?
4 solutions for “Allow Remote Assistance connections to this computer greyed out”
When we run into issues like “Allow Remote Assistance connections to this computer greyed out”, then it seems unable to receive help by using Remote Assistance. It is said that the issue is related to the wrong Group Policy settings, corrupted file systems, etc. Now, we provide 4 solutions on how to fix “Allow Remote Assistance Connections to this computer greyed out” in Windows 11/10/8.1/8/7.
Method 1. Enable the Policy "Allow users to connect"
Step 1. Press Win + R to run box, enter “gpedit.msc” and then click "OK".

Step 2. Navigation: Computer Configuration > Administrative Template Windows Components > Remote Desktop Services > Connections
Step 3. Double click on “Allow users to connect remotely by using Remote Desktop Services”.
Step 4. Click on "Enabled" and then choose "OK".
Method 2. Configure Offer Remote Assistance
Step 1. Press Win + R to run box, enter “gpedit.msc” and then click "OK".
Step 2. Navigation:
Computer Configuration > Administrative Templates > System > Configure Offer Remote Assistance
Step 3. Double-click on the option, and then click on "Enabled". Finally, choose "OK".
Method 3. Change some registry settings
Step 1. Press Win +R to run box, enter “regedit” and then click on "OK".
Step 2. Navigation: Computer\HKEY_LOCAL_MACHINE\SOFTWARE\Policies\Microsoft\Windows NT\Current Version\Terminal Services
Step 3. Copy “fDenyTSConnections”, and then go to the right pane, right-click and choose “New”, then click on the third one “DWORD (32-bit) Value”.
Step 4. Paste “fDenyTSConnections” as the name, double-click on it, and change its value to 0 in the data field, then select OK.
Note: “0” means “Allow users to connect by Terminal Services/Remote Desktop remotely
“1” means “Disallow uses to connect by Terminal Services/Remote Desktop remotely
Method 4. Run sfc/scannow and dism.exe
Step 1. Search cmd in the search box, right-click the option, and choose “Run as administrator”.
Step 2. In Command Prompt window, input sfc /scannow and hit Enter key (this process will take some time so don’t interrupt it).
If sfc/scannow doesn’t work for you, you can run dism.exe:
Step 3. Enter “DISM /Online /Cleanup-Image /RestoreHealth” and hit Enter key.
Note: The scanning can check the safe areas of the registry for broken, empty, and invalid keys and clean them out.
A free remote assistance software: AnyViewer
Now, I guess you have known how to fix the “Allow Remote Assistance connection to this computer greyed out" on Windows 11, 10, 8, and 7... However, if the ways above are not working for you, how about trying a free and secure remote assistance software - AnyViewer, which is applicable for many editions of computers, like Windows 11/10/8.1/8/7 and Windows Server 2022/2019/2016/2012 R2 (64bit and 32bit).
With the tool, you can get assistance via receiving remote control requests when you are in front of your computer; and you can also get technical support when you are far away from your computer as long as you have sent a security code to your helper.
Preparation work:
- Ensure both computers are turned on and connected to the Internet.
- Download and install AnyViewer on the two devices.
Step 1. Install AnyViewer on 2 PCs. Sign up and fill in the information to create an AnyViewer account. Once logged in, the PC will be assigned to the account automatically. (If you sign up on the official website, you can log in directly.)

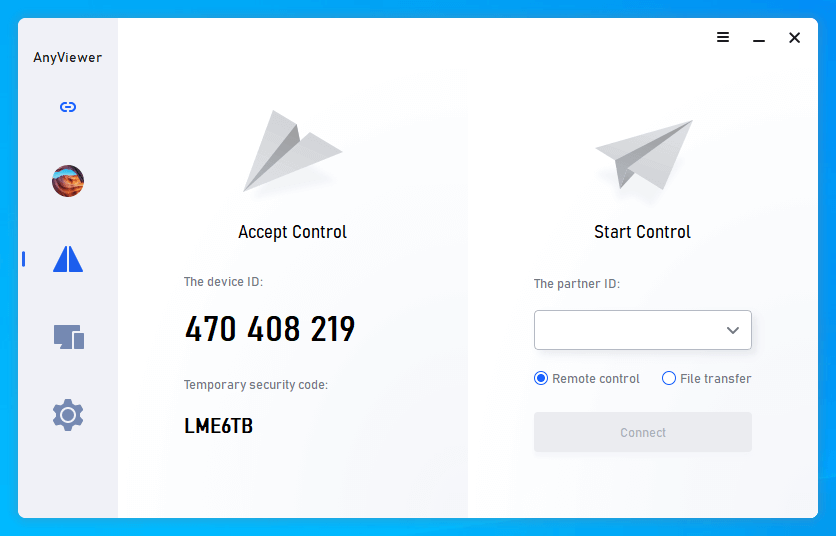
Step 2. After logging in, you can see your interface as the following picture.

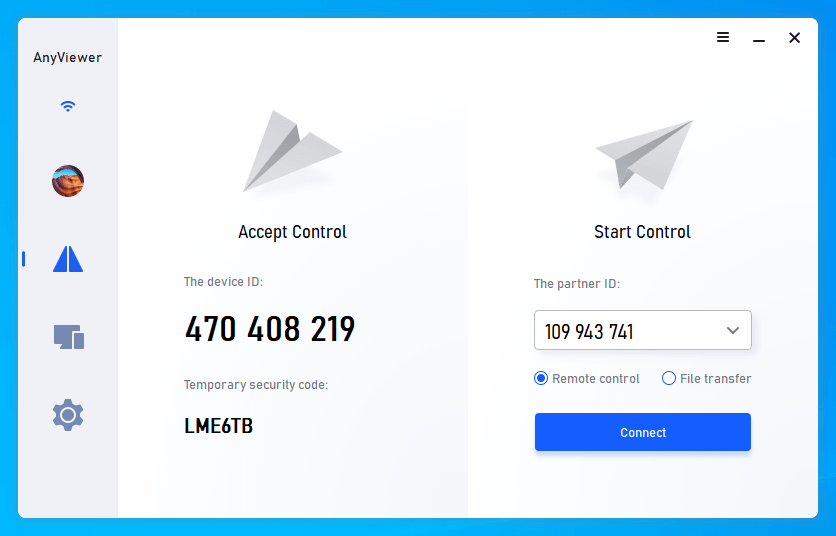
Step 3. Go to the “Connect” tab, and then you can see the device ID. Ask your friends or family member to tell you the device ID of the host PC.
Step 4. Enter the device ID of the remote PC and then click on “Connect”.
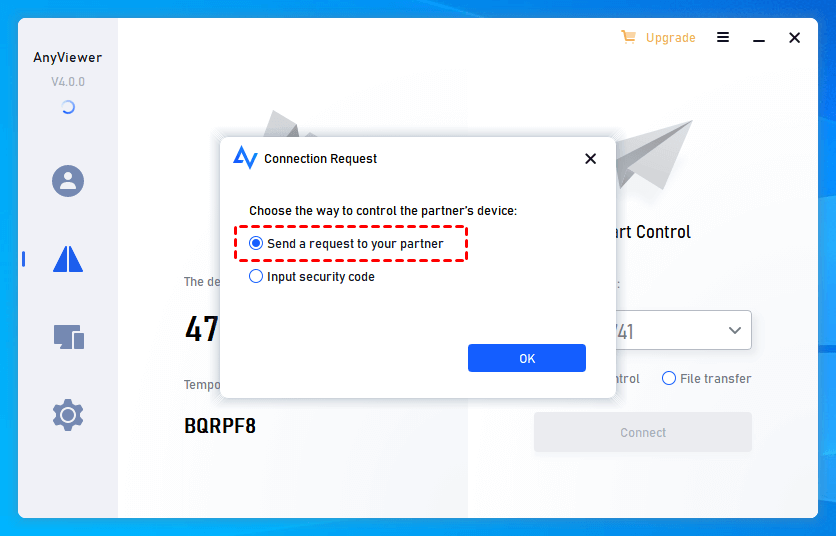
Step 5. For the 2 options, choose the first one “Send a control request to your partner”, and then click on “OK”.
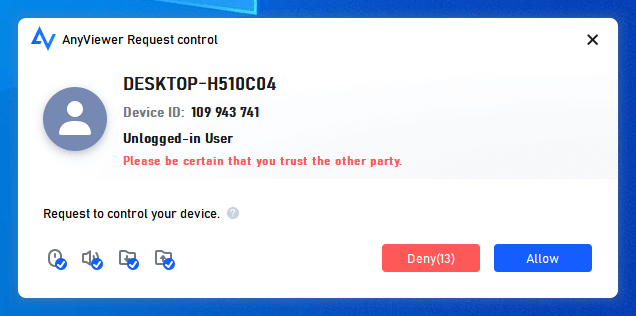
Step 6. There will be a pop-up window on the host PC. Click on “Allow” to receive the remote support. And then the connection will be realized.
Note: Are you looking for how to offer Remote Assistance without permission? Actually, it’s kind of easy. Log into the AnyViewer account on the host PC, and then go to "Device" on the local PC, locate and click the PC that you need to control. And then click "One-click control" to achieve remote connection with one click.

Conclusion
3 solutions for “Allow Remote Assistance connection to this computer greyed out” are demonstrated in this post. Of course, if you are not familiar with those ways or they are too troublesome for you, it’s better for you to resort to the Remote Assistance alternative, AnyViewer, which is a completely stable and easy-to-use remote support software.
