
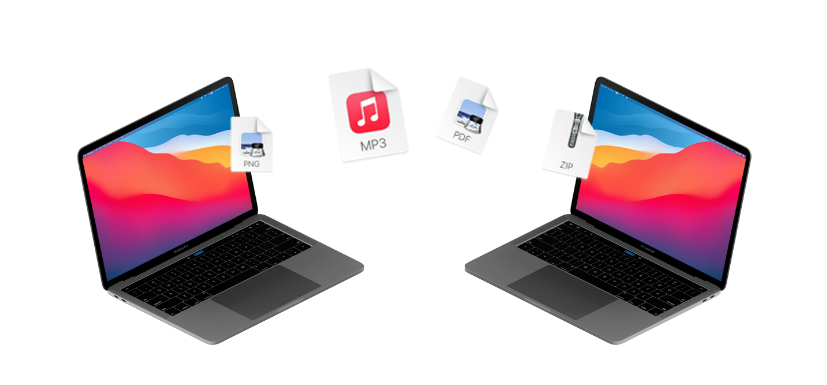
How to Transfer a Folder from One Mac to Another: 7 Simple Ways
Transferring folders between Macs is simple with several methods to choose from. This article explains seven easy ways, including using Migration Assistant, AirDrop, iCloud, and AnyViewer for remote transfers.
By Ellie / Updated on March 28, 2025
How do I send a folder from one Mac to another?
Transferring folders between Macs is a straightforward process, thanks to Apple's integrated operating system, which streamlines file sharing across devices. Whether you're looking to share files with another Mac user or transfer data from an old laptop to a newly purchased Mac, the process is simple and efficient.
There are various methods available to move or exchange files between Macs. In this article, we'll explore the most effective options for transferring your data, ensuring you have the best solutions at your fingertips.
How to transfer a folder from one Mac to another [7 ways]
This article covers seven different methods to transfer files and folders from one Mac to another. Step-by-step instructions are provided to help get started with the suggested solutions right away.
Way 1. Transfer all folders between Macs via Migration Assistant
Apple's Migration Assistant is a convenient tool that automatically transfers all files and folders from your source Mac to your destination Mac, eliminating the need for manual file copying. If your files are on a PC, follow the appropriate PC migration steps instead.
Step 1. Open Migration Assistant on both your source and destination Macs. You can find it in the Utilities folder within Applications.
Step 2. On your source Mac, enter your administrator password when prompted and click "OK" to allow changes.
Step 3. When asked how you'd like to transfer your data, select the option to transfer from a Mac, Time Machine backup, or startup disk, then click "Continue."

Step 4. If a security code appears on your source Mac, make sure it matches the one displayed on your new Mac, then click "Continue."
Step 5. On your new Mac, choose the data you want to transfer.
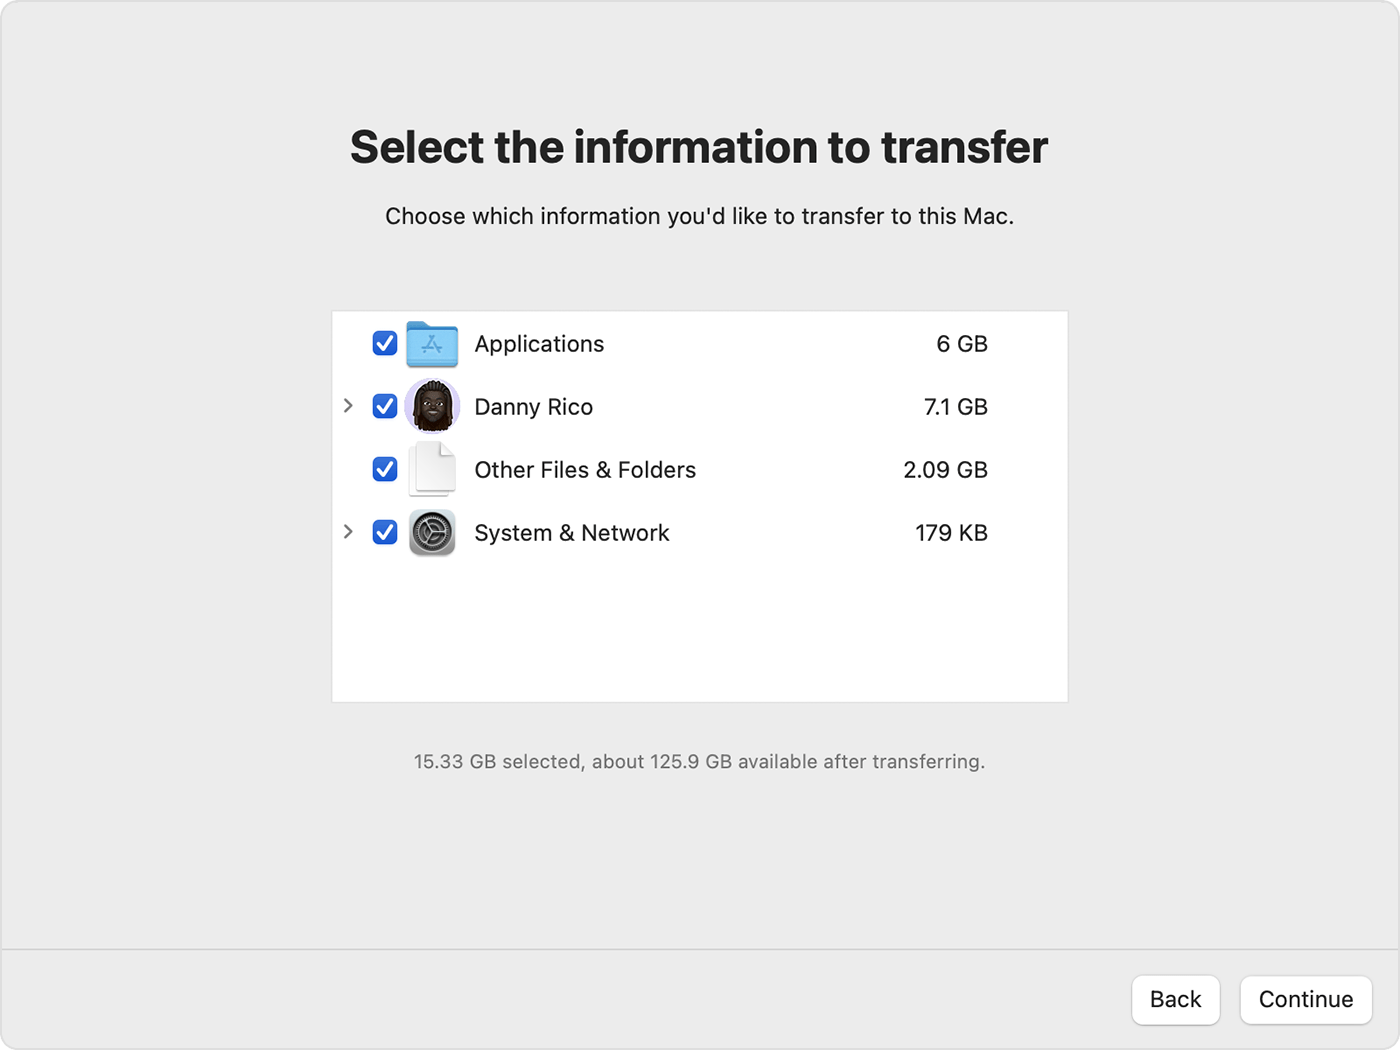
Step 6. Click "Continue" to start the transfer. Larger transfers can take several hours, so it might be best to begin the process in the evening and let it run overnight.
Step 7. Once the transfer is finished, close Migration Assistant on both Macs and log into the migrated account on your new Mac to access the files.
Way 2. Transfer folders remotely between Macs using AnyViewer
While Apple's Migration Assistant is great for local transfers, it's not ideal when the two Macs are far apart. How can you transfer files remotely between Macs? AnyViewer is the best remote desktop solution for transferring folders between Macs over the internet, no matter where they are located. Unlike Migration Assistant, which requires both Macs to be on the same network, AnyViewer allows fast, secure, and stable transfers across different networks.
Why choose AnyViewer for Mac file transfers?
- Cross-Network Flexibility – Transfer files remotely between Macs, even if they are on different networks, unlike Migration Assistant.
- Dual Functionality – In addition to file transfers, AnyViewer offers remote desktop control, enabling you to manage settings, troubleshoot issues, and access applications from anywhere.
- Enhanced Security – AnyViewer uses strong encryption protocols, ensuring your data is protected during the transfer process.
- Cross-Platform Support – Not only can you transfer files between Macs, but AnyViewer also supports transfers between Mac and PC, making it a versatile remote access tool.
How to transfer a folder from one Mac to another using AnyViewer
Step 1. Install AnyViewer on both Macs.
Step 2. Log in on both devices using the same AnyViewer account.

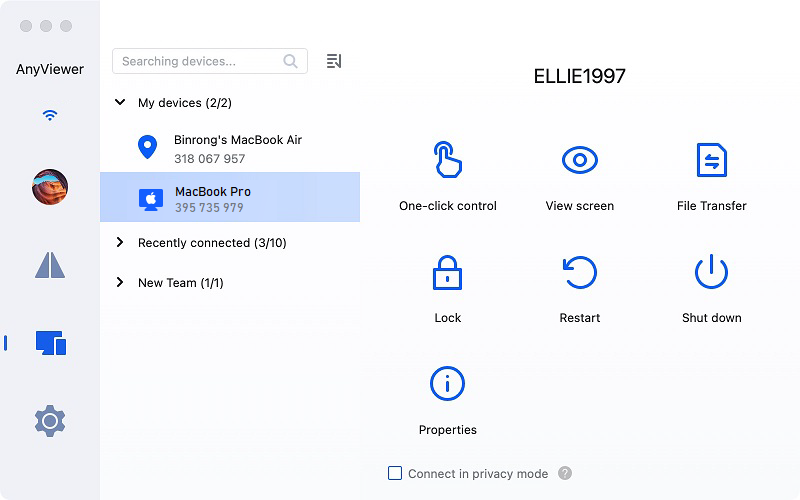
Step 3. On your local Mac, find the remote Mac in the device list and select "File Transfer." Optionally, select "One-Click Control" to remotely access the Mac and initiate the transfer directly from the toolbar.
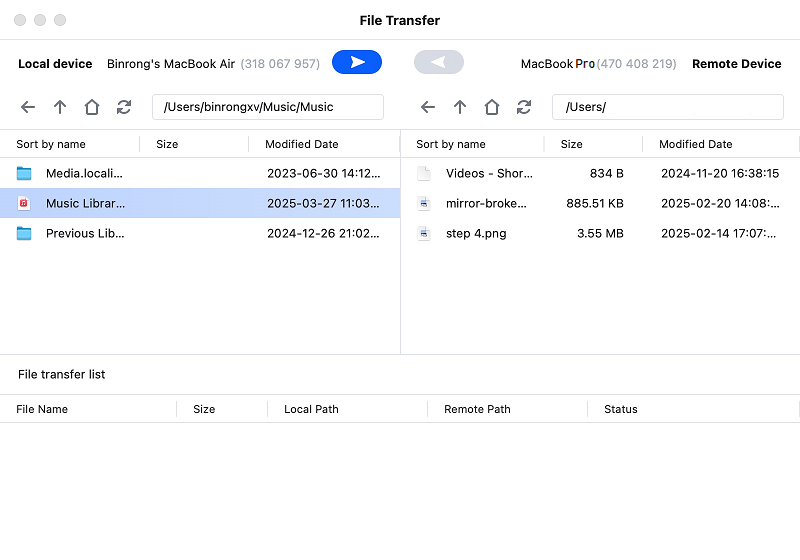
Step 4. In the File Transfer Manager, choose the files you want to transfer and click the arrow to start the process.
With AnyViewer, file transfers between Macs are fast, secure, and hassle-free—regardless of your location.
Tips for faster transfers with AnyViewer
To boost file transfer speed and efficiency, consider upgrading to an AnyViewer Professional or Enterprise plan. These premium plans offer several enhancements:
- Maximum transfer speed: 10 MB/s
- Simultaneous transfers: Transfer up to 5 files at once
- Unlimited files per transfer: Move as many files as needed in a single session
- Large file support: Transfer individual files up to 1 TB in size
Way 3. Transfer files and folders between Macs with AirDrop
For Macs running macOS X Lion or later, AirDrop is one of the quickest and easiest ways to transfer files and folders between them. As long as both Macs are updated, AirDrop works seamlessly without the need for Wi-Fi. An ad-hoc network is automatically created between the devices as long as they are within close range of each other.
How to use AirDrop to transfer files and folders:
Step 1. Open Finder on your Mac.
Step 2. To launch AirDrop, press Command + Shift + R on your keyboard.
Step 3. Wait for the receiving Mac to appear in the AirDrop window.

Step 4. Drag and drop the files and folders you wish to transfer onto the visible Mac.
Step 5. On the receiving Mac, accept the file transfer to complete the process.
With AirDrop, transferring files and folders between Macs is fast and simple, as long as they are close to one another.
Way 4. Transfer data between Macs with iMessage
iMessage is more than just a messaging app—it's also a handy tool for transferring files between Macs. You can send files to another Mac remotely through iMessage, making it a convenient option for quick transfers.
How to transfer files and folders using iMessage:
Step 1. Open the Messages app on your Mac, located in the Applications folder.
Step 2. Start a new iMessage conversation and address it to the recipient.
Step 3. Drag and drop your file or folder into the message box, or simply copy and paste it into the conversation window.
Step 4. Hit the Return key to send the file or folder.
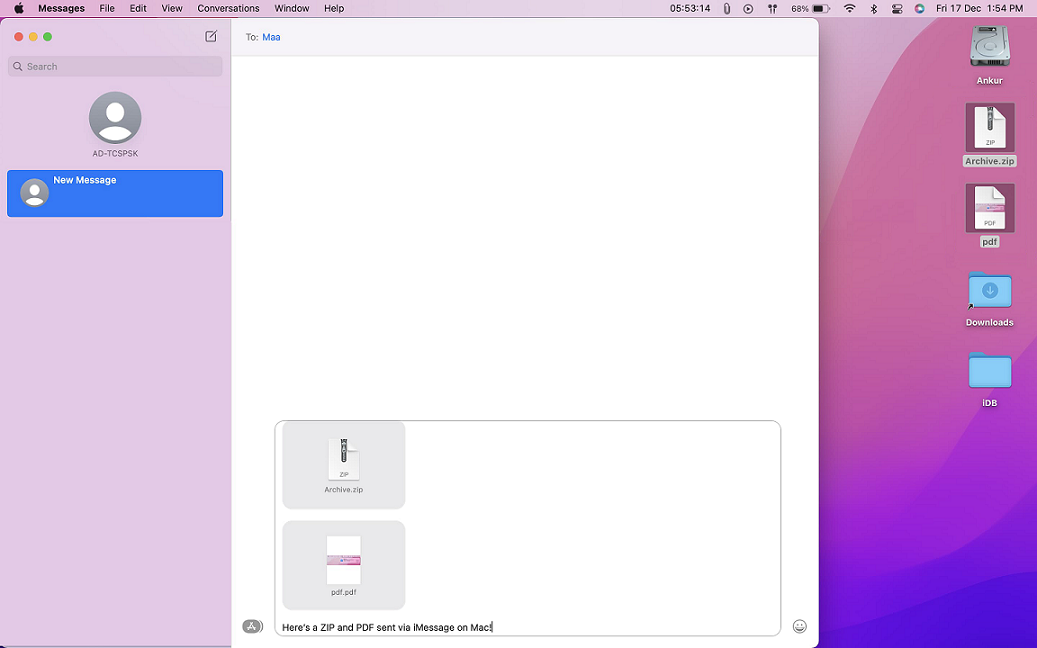
Step 5. On the receiving Mac, the file will appear in the iMessage conversation.
Step 6. To save the file, right-click on the attachment and select "Save As".
Step 7. Choose the Downloads folder (or another location) to store the file.
Using iMessage is an easy way to transfer files, especially for smaller transfers that don't require specialized software.
Way 5. Share files and folders between Macs using Bluetooth Sharing
Bluetooth sharing is another viable method for transferring data between Macs, especially when the devices aren't connected to the same network. It's a practical solution for small file transfers when no Wi-Fi connection is available.
How to transfer files using Bluetooth Sharing:
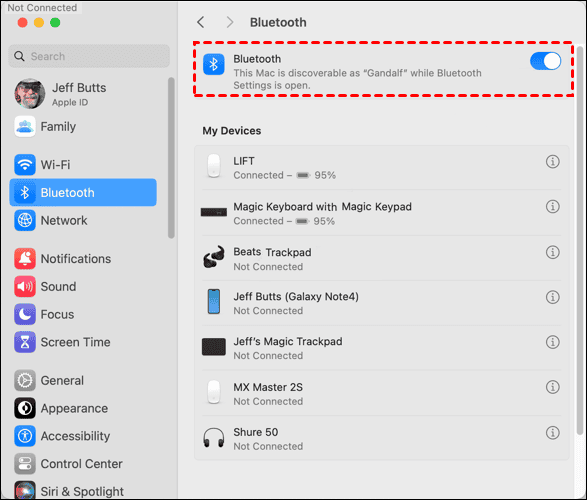
Step 1. Ensure Bluetooth is enabled on your sending Mac.
Step 2. On the receiving Mac, click the Bluetooth icon in the menu bar or go to System Preferences, select Bluetooth, and ensure Bluetooth is turned on and the system is in Discoverable mode.
Step 3. On the source Mac, go to Finder > Applications > Utilities > Bluetooth File Exchange, and confirm Bluetooth Sharing is enabled.
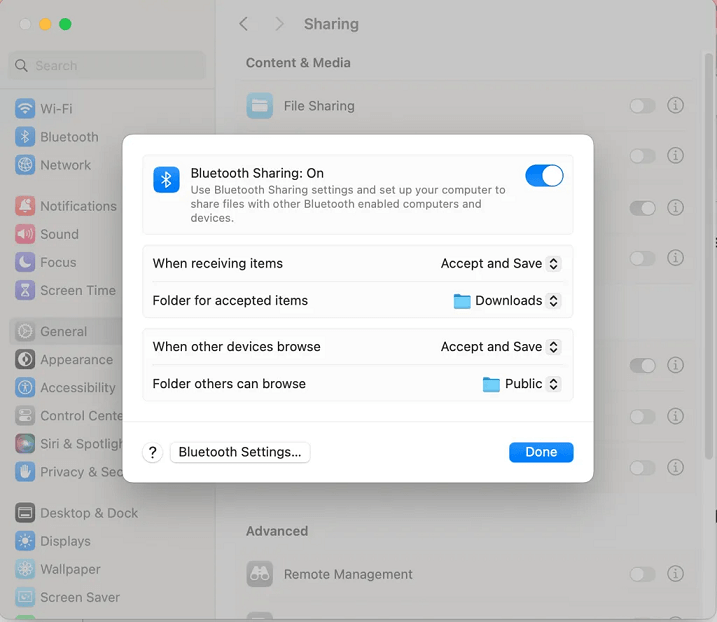
Step 4. In the Bluetooth File Exchange window, choose the file you want to transfer, click the Share button, and select the destination Mac.

Step 5. On the destination Mac, a Connection Request window will appear. Click Connect to accept the connection.
Step 6. On the receiving Mac, a window will pop up asking whether to accept the incoming files. Click Accept to complete the transfer.
Bluetooth sharing is simple and works well for small file transfers, but keep in mind that it's slower than other methods and best suited for lighter tasks.
Way 6. Transfer files between Macs using iCloud Storage
iCloud Storage acts as a seamless link between Apple devices, allowing you to store and access files from anywhere, at any time. It's especially useful when you need to recover a file you accidentally deleted or don't have your Mac with you. With iCloud, syncing files across all your Apple devices becomes incredibly easy.
How to move a folder from one Mac to another using iCloud:
Step 1. Go to System Preferences, click Apple ID, then select iCloud. Choose the files you want to sync to iCloud Drive.
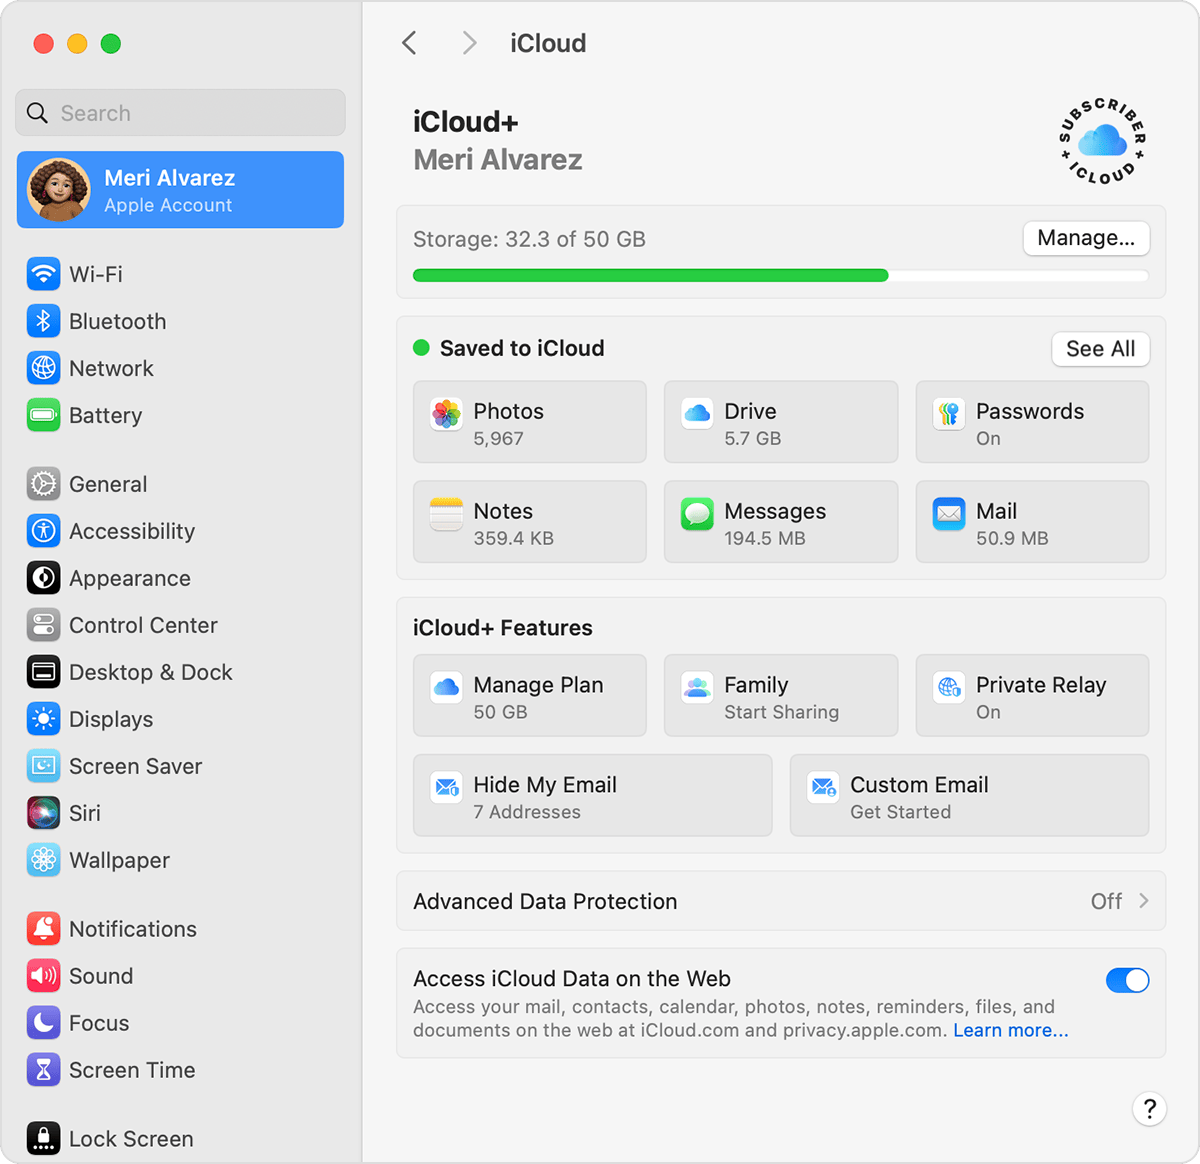
Step 2. On the destination Mac, navigate to System Preferences, click Apple ID, and sign in using the same Apple ID and password.
Step 3. If prompted, enter the verification code sent to one of your other Apple devices.
Step 4. After logging in, enable iCloud and any other file storage services by going to System Preferences > Apple ID > iCloud.
Once iCloud sync is enabled, your files will be available on the new Mac, ready for easy access and download.
Way 7. Transfer files between Macs using File Sharing
macOS offers an easy and secure way to transfer files between Macs via the built-in File Sharing feature. This functionality allows you to share files and folders with authorized users or groups on your local network.
Step 1. Open the System Preferences by selecting it from the Apple menu.
Step 2. In the preferences window, choose the "Sharing" section. On the left, you'll find a list of available services. Check the "File Sharing" option to turn it on.
Step 3. Once activated, a green dot will appear next to "File Sharing On," and your Mac’s IP address will show underneath. Make sure to note the IP address for later use.
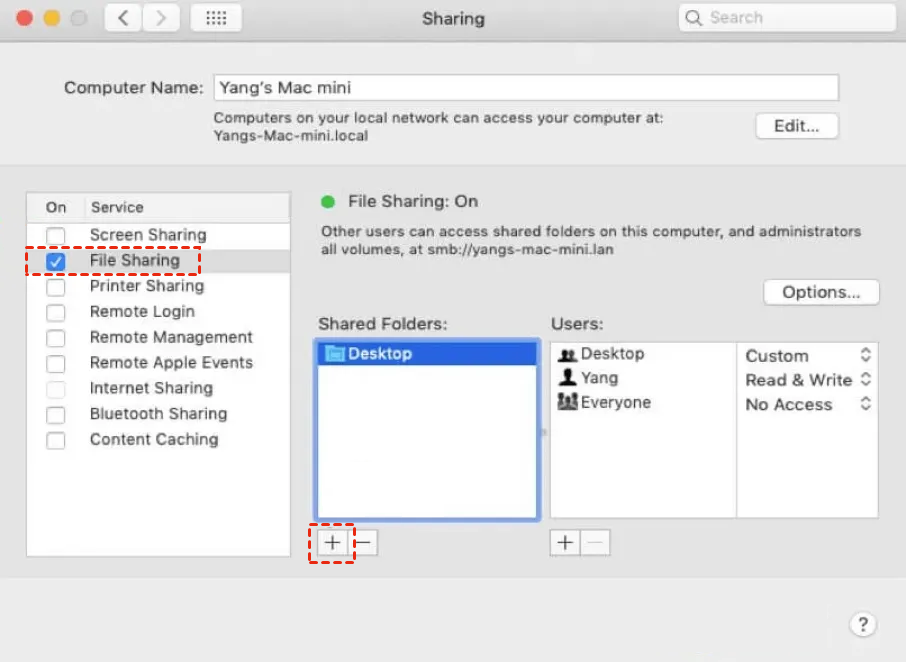
Step 4. Click on the "Options" button next to the settings. Make sure both "Share files and folders using SMB" and "Share files and folders using AFP" are selected. These options will enable your Mac to share files with both newer and older Macs.
Step 5. Your Mac is now set up to share files using SMB for newer Macs and AFP for legacy Macs.
Step 6. To transfer files, return to the Sharing preferences and ensure "File Sharing" is checked. The IP address will appear below it. Make a note of this information for the next steps.
Step 7. To allow access to your Mac, share the displayed name with any other Mac on your local wireless network.
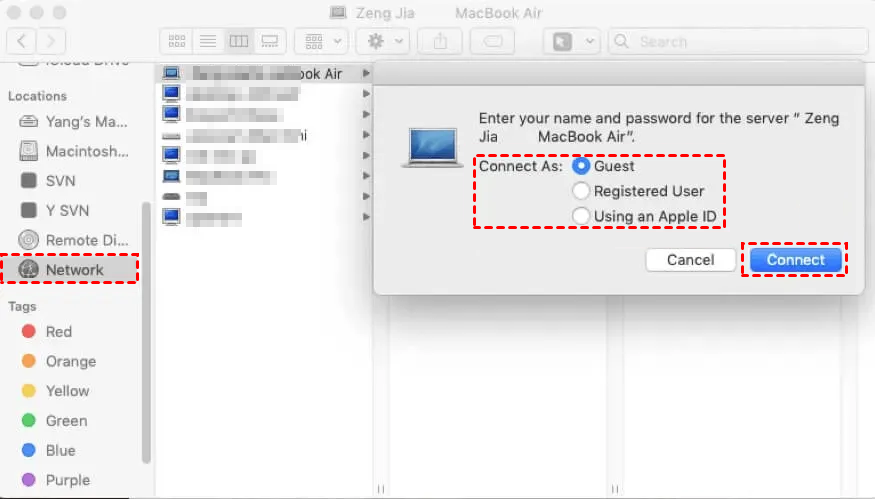
Step 8. Move the files or folders you want to share into the "Public" folder you set up in System Preferences. The other Mac will now be able to access the shared files.
Conclusion
In conclusion, knowing how to transfer a folder from one Mac to another is essential for efficiently managing your files. Whether you're using Apple's built-in tools like Migration Assistant and AirDrop or opting for remote solutions like AnyViewer, there are multiple ways to make the process seamless. By selecting the best method for your needs, you can easily and securely transfer your folders between Macs, ensuring smooth data management across devices.
