
Top 5 App to Control Mac Laptop from Phone [iPhone & Android]
This article provides a comprehensive overview of app to control Mac laptop from phone remotely. It covers the best apps and procedures. It also provides you with the best way to control a Windows laptop from your phone remotely.
By Ellie / Updated on November 27, 2025
Can I control my MacBook from my phone?
Hi all. I'm searching for a simple, ideally free tool that will allow me to do simple chores on my MacBook remotely from my phone. I have an M1 MacBook if this makes any difference. Thank you in advance!”
- Question from Reddit

Yes. The ability to control your Mac laptop from Windows or your phone is becoming increasingly important these days. Whether you're a professional who needs to access work files on the go, a student managing multiple devices, or just someone who values the convenience of remote control, finding the correct app can make all the difference.
In this article, we'll explore some of the best app to control Mac laptop from phone remotely, highlighting their features, benefits, and ease of use.
Top 5 apps to control Mac laptop from phone remotely [iPhone & Android]
Controlling your Mac remotely is a very useful feature, although it can be a bit complicated. But don't worry, we found different apps to control Mac laptop from phone remotely for you, including iPhone and Android phones. Now let's get started!
1. AnyViewer (Best Recommended)
AnyViewer is an excellent remote desktop solution choice for remotely controlling your Mac laptop from your phone, delivering outstanding compatibility, strong performance, and top-tier security. It supports multiple platforms—including Windows, macOS, iOS, and Android—allowing you to access and manage your laptop from virtually any smartphone.
With smooth remote sessions, advanced security features like end-to-end encryption and two-factor authentication, and an intuitive interface, AnyViewer ensures a dependable and efficient remote control experience.
Key capabilities include:
- Unattended remote access: Connect to your Mac even when no one is physically present.
- Screen mirroring: View your Mac’s screen in real time from your phone.
- Multi-display support: Switch between multiple monitors on your Mac during remote sessions.
- Remote sound synchronization: Hear your Mac’s system audio directly through your phone.
The setup process is identical on both iPhone and Android. The following instructions use an iPhone as the example.
On your Mac:
Step 1. Download and launch AnyViewer on both your iPhone and Mac laptop. Then, proceed to "Log in" or "Sign up" to create an account.

Step 2. Once you successfully log in, your device will automatically connect to the account.

On your phone:
Step 1. Open AnyViewer on your phone and log in using the same account. Navigate to "My devices" and select your Mac laptop. Select "One-click control" to enable unattended remote access from iPhone to Mac.
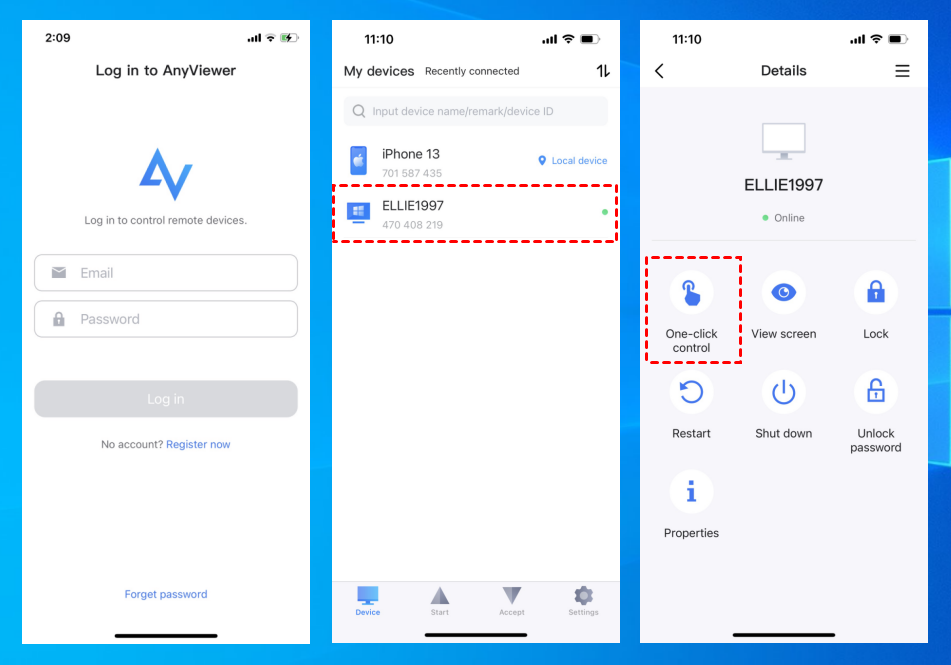
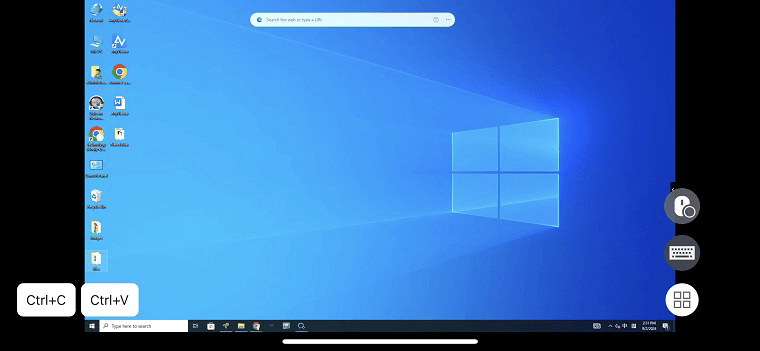
Step 2. You now have full control over your remote Mac laptop using your phone. The interface smoothly adapts to both portrait and landscape orientations, making it easy to switch between them by tapping the menu button and rotating the screen.
- ★Tips: Upgrade to an advanced plan to access a range of benefits:
- Seamless Connections: Access and control more devices with effortless one-click remote sessions.
- Unlimited Control: Lift restrictions on how many devices a single computer can manage at the same time.
- Efficient Management: Organize and oversee large device inventories with customized groups designed for business environments.
- Enhanced Viewing: Benefit from higher image quality, Ultra HD mode, and other visual upgrades for a clearer, smoother remote experience.
2. Chrome Remote Desktop
Chrome Remote Desktop is a free, easy-to-use option that works seamlessly with your Google account. It's a great choice if you're looking for a straightforward solution to control your Mac from your phone. It not only supports you to control Mac remotely with iPhone but also supports you to control Mac remotely with an Android.
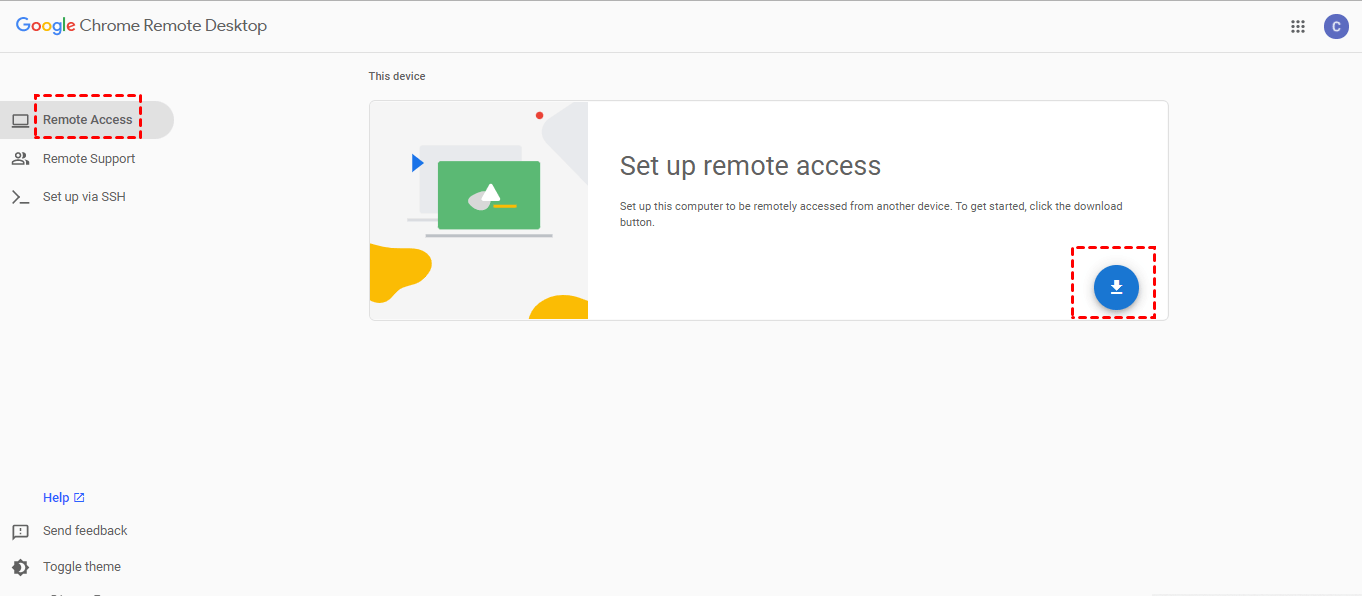
Step 1. Install on Mac: Open the Chrome Remote Desktop webpage on your Mac. Installing the software is as simple as following the instructions. You might need to enter your computer password for access.
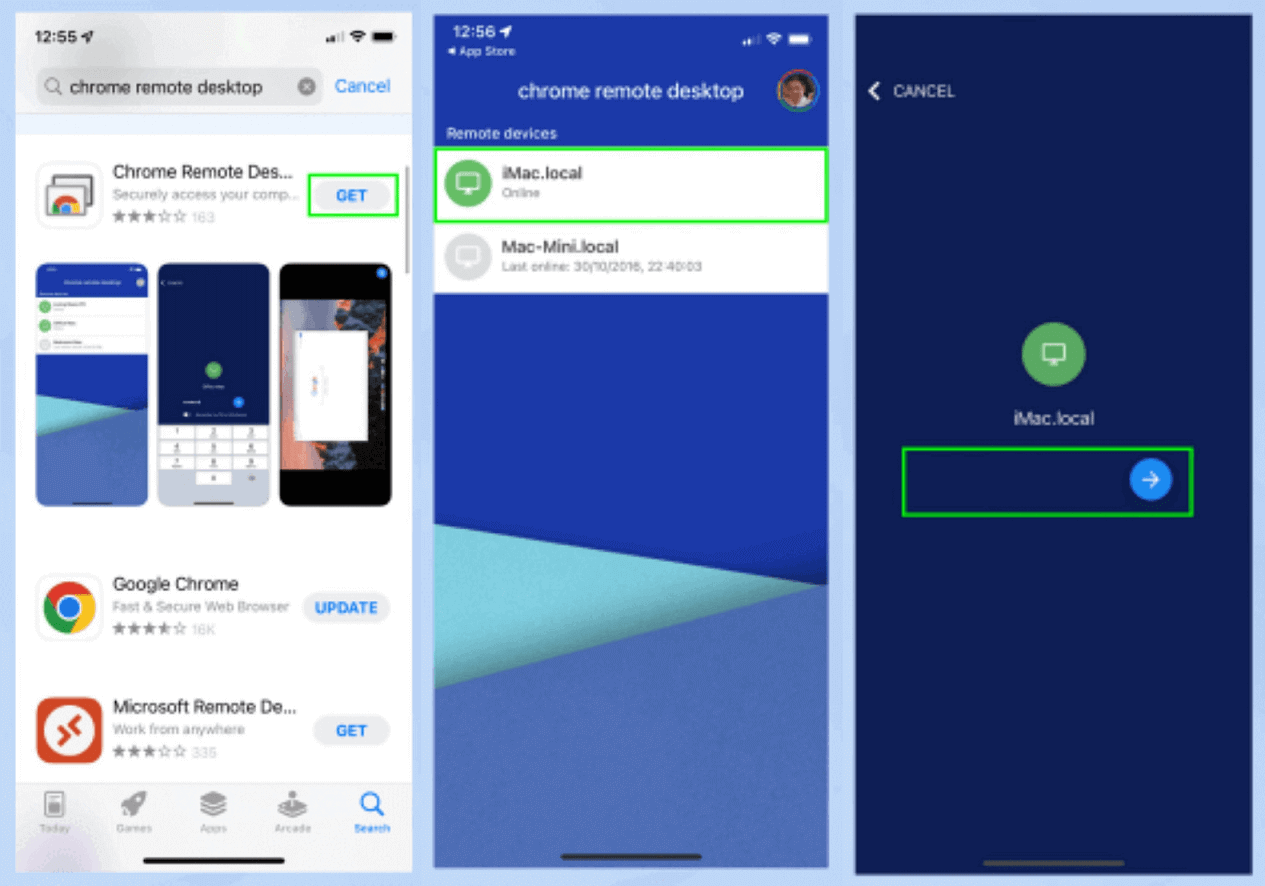
Step 2. Install on Phone: Download and install the Chrome Remote Desktop app on your phone. Open the app and sign in with the same Google account you used on your Mac. Your remote devices will appear on the screen. Select your Mac, enter your PIN, and tap the arrow to proceed.
Step 3. Allow Network Access: When asked if you want to let Remote Desktop find and connect to devices on your local network, click "OK."
Step 4. Control Your Mac: You're now connected to your Mac from your phone, allowing you to control it remotely.
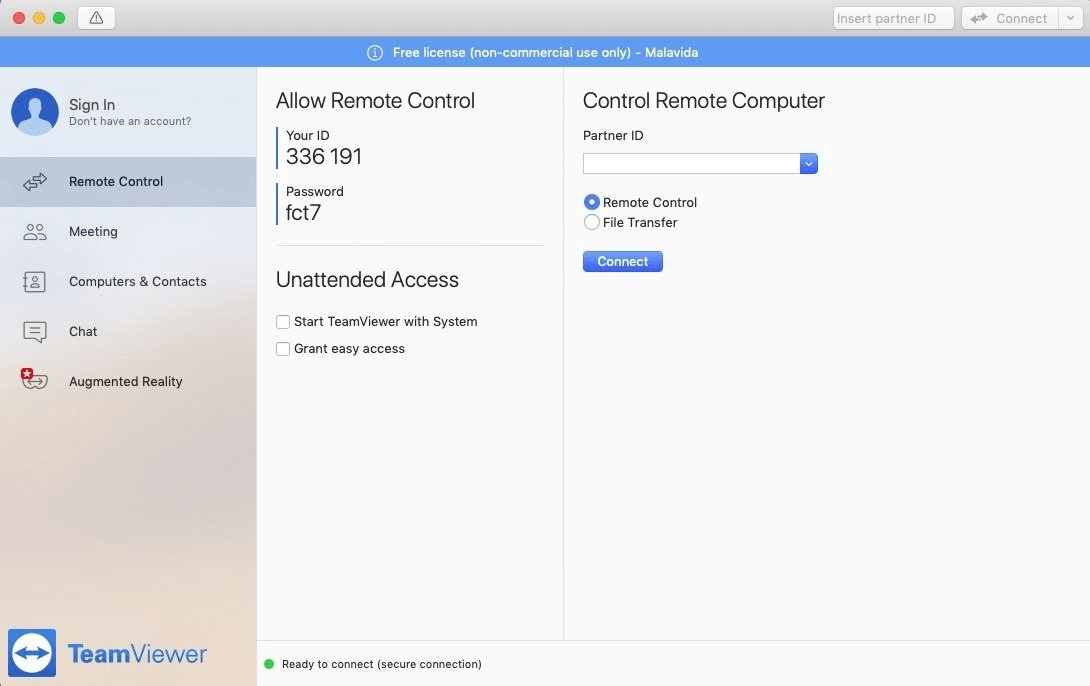
3. TeamViewer
TeamViewer is a well-known remote control app that offers a wide range of features. It's easy to set up and provides reliable performance, making it a top choice for many users. Whether you're using it for business or personal purposes, TeamViewer stands out due to its comprehensive feature set and robust security measures. It's particularly renowned for its ability to provide seamless remote access and support across different devices and operating systems. It is compatible with Android and iPhone.
Step 1. Install TeamViewer on Mac: Begin by downloading and installing TeamViewer on your Mac.
Step 2. Sign In or Create Account: Create a new TeamViewer account or log in to your existing one. Note that having an account is now mandatory.
Step 3. Grant Access: To enable remote control, click the exclamation mark in TeamViewer and select "Request Access" for Screen Recording and Accessibility permissions.
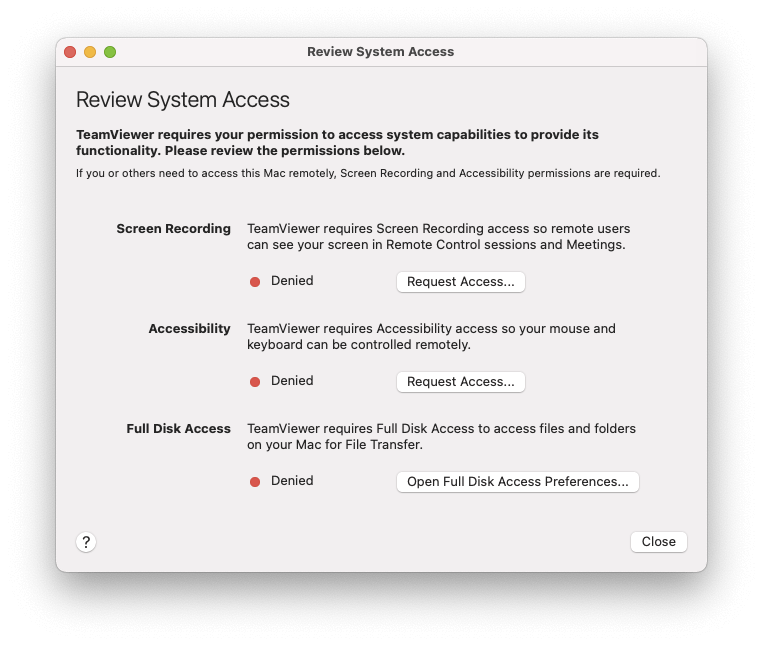
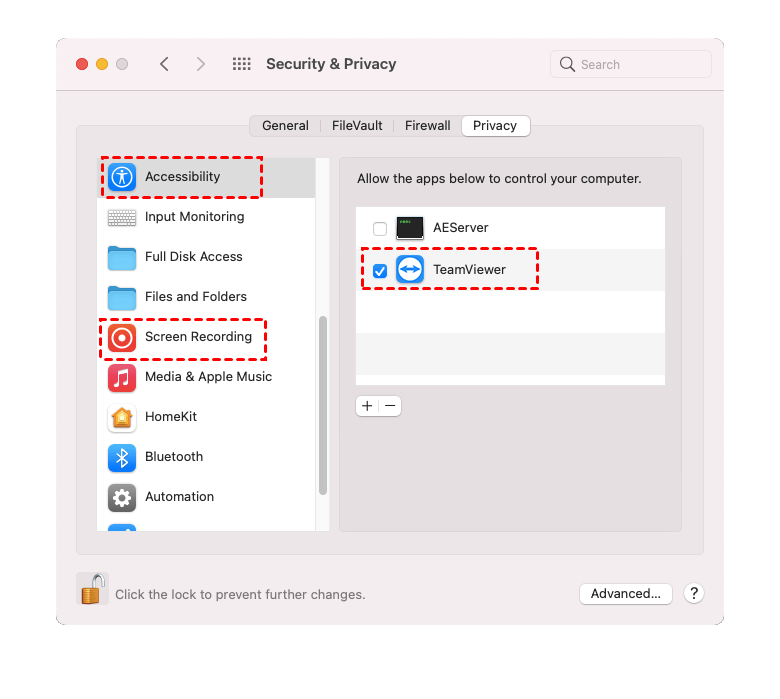
Step 4. Accessibility Permission: Unlock the padlock icon, then check the box next to “TeamViewer” to grant “Accessibility” permission.
Step 5. Screen Recording Permission: Similarly, grant “Screen Recording” permission to TeamViewer in the appropriate section.
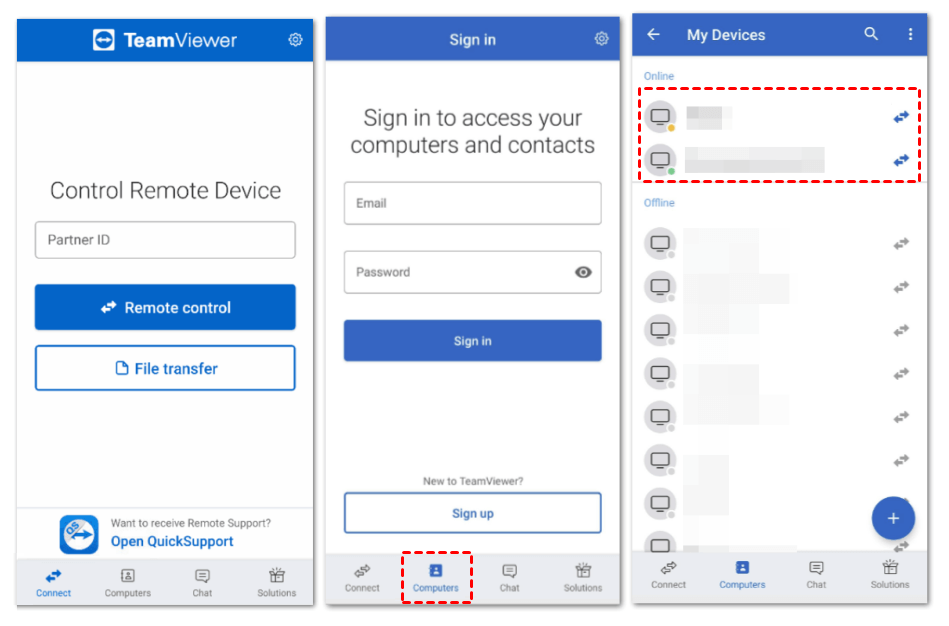
Step 6. Install TeamViewer on Phone: Download and install the “TeamViewer Remote Control” app on your phone.
Step 7. Sign In on Phone: Open the app, go to the Computers menu, and sign in with your TeamViewer account.
Step 8. Connect to Mac: Choose your Mac from the list and initiate the connection to control it remotely.
4. Switch Control
For iPhone users, the "Use Other Devices for Switch Control" feature enables you to remotely control your other Apple devices on the same Wi-Fi network without adjusting any switch connections. This feature lets you navigate your Mac or Apple TV using the same switch settings that you use to control your iPhone.
Step 1. Connect to Wi-Fi: Make sure all your devices are on the same Wi-Fi network.
Step 2. Sign In to iCloud: Use the same Apple ID to sign in to iCloud on both devices.
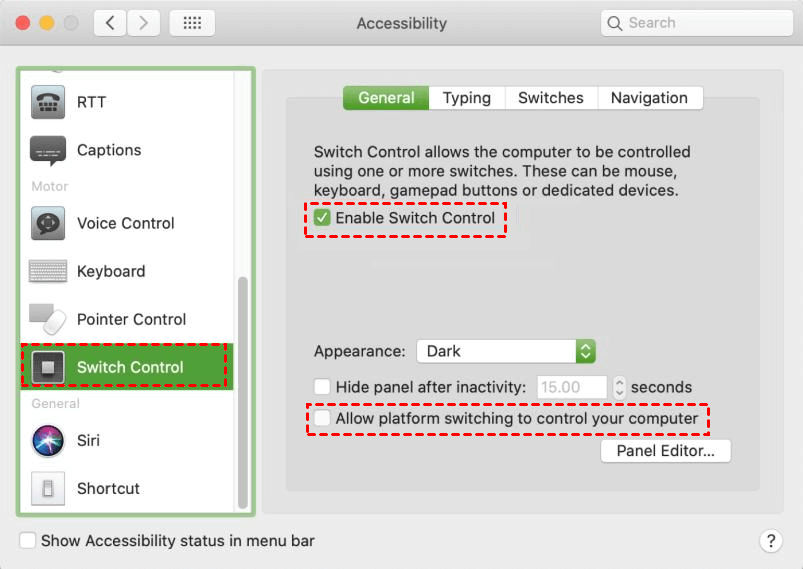
Step 3. Open System Preferences on Mac: If controlling a Mac laptop, go to the "Apple menu," and then "System Preferences."

Step 4. Enable Switch Control: Select "Accessibility," then "Switch Control" from the sidebar. Check the box labeled "Allow platform switching to control your computer."
Step 5. Navigate Switch Control Menu: Use your switch to navigate the Switch Control menu and select "Device."
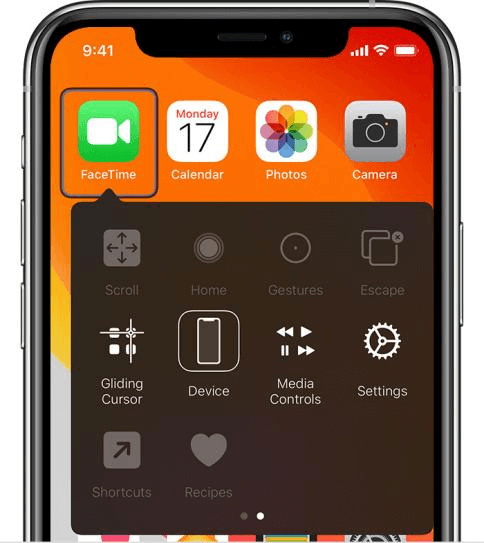
Step 6. Select Device: Choose "Use Other Device."
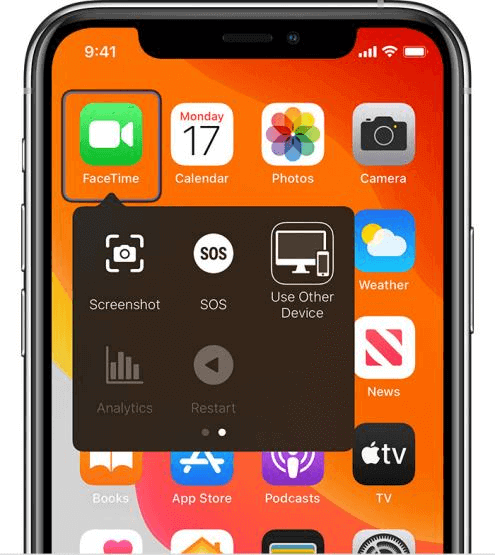
Step 7. Connect: Choose the device you want to control and click "Connect." You can now use the switch linked to your iPhone to control the Mac laptop.
5. Built-in feature
Another method to control nearby Apple devices using your iPhone is by leveraging a built-in feature, which is simpler than the first method. Before this, make sure the devices you want to control are signed in with the same Apple ID and connected to the same Wi-Fi network as your iPhone.
Step 1. Open Control Nearby Devices: Go to "Settings" > "Accessibility" > "Control Nearby Devices," then tap on "Control Nearby Devices."
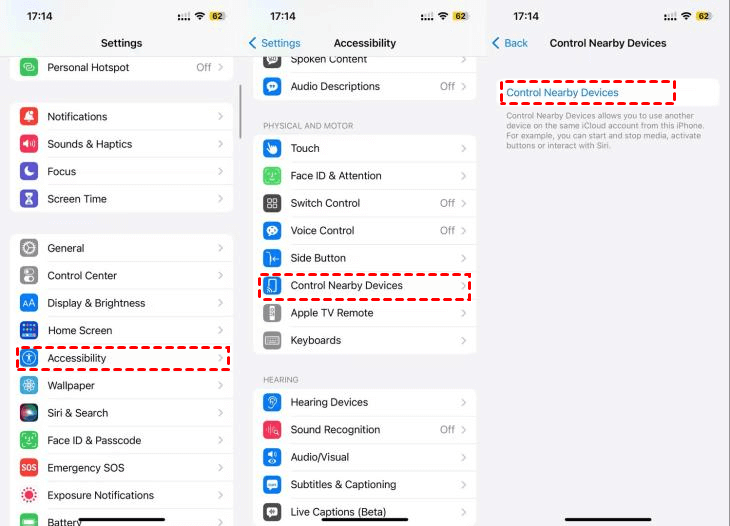
Step 2. Select Device: Once the search completes, choose the device you want to control, then tap on the corresponding button. The button names will match the controls on your selected device.

Conclusion
Choosing the right app to control your Mac laptop from your phone can revolutionize the way you work and manage your devices. Whether you're using Chrome Remote Desktop for its simplicity, TeamViewer for its robust features, or exploring other built-in options, each app offers unique benefits. These tools enhance your productivity and convenience, ensuring you can access your Mac from anywhere.
What's more, AnyViewer offers a comprehensive solution with advanced features to enhance your workflow. Embrace the power of remote access with AnyViewer to stay productive and connected wherever you go. By following the setup steps and tips outlined in this article, you'll be well-equipped to make the most of remote access technology. Embrace the flexibility and control these apps offer, and transform your digital experience.
