
How to Enable and Activate Remote Desktop on Windows 10?
This article outlines how to enable remote desktop on Windows 10. It describes the settings menu options used to allow remote desktop access for various user needs.
By Irene / Updated on February 4, 2026
🌟Key takeaways
This article explains what Remote Desktop is, what you need before using it, and the main ways to enable it on Windows 10 and 11. Below is a quick summary to help you understand the core points at a glance.
| Key Point | Summary |
|---|---|
| AnyViewer | AnyViewer is the easiest option for remote access, offering secure connections, support for all Windows editions, no port forwarding, and advanced features like multiple sessions and file transfer. |
| Remote Desktop basics | Remote Desktop allows you to access and control another computer remotely, but it depends on correct system, network, and permission settings. |
| System requirements | Admin rights, enabled Remote Desktop, firewall access, network connectivity, and proper user permissions are required for successful connections. |
| Built-in methods | Windows provides several ways to enable Remote Desktop, including Settings, Registry Editor, PowerShell, and System Properties. |
With these key points in mind, you can now start from the beginning of this article and follow the method that best matches your setup and experience level.
What is Remote Desktop?
Remote Desktop is a technology that allows you to access and control a computer from another location through the internet. It is especially useful when you need to work away from the office but still depend on files, software, or systems stored on your main computer. When connected, the remote computer’s screen appears on your device, letting you use programs and manage data just as if you were physically there.
This process works through a client and server setup, where the remote computer provides access and your current device receives it. IT professionals often rely on this method to solve technical issues without visiting the site in person. It is also practical for running powerful software on an office computer while using a lightweight device elsewhere.
One important point to note is that not all Windows editions offer this function, as some standard or home versions do not support remote desktop. When configured securely, Remote Desktop becomes a reliable way to stay productive from any location.
The prerequisites for enabling Remote Desktop on Windows 10
It’s not something you can use the Remote Desktop instantly without preparation. The computer you want to access has to meet a few basic requirements so the connection is secure and reliable.
-
Administrative privileges: You must be signed in as an administrator. Standard user accounts cannot change Remote Desktop settings.
-
Power and network connection: The host computer needs to be turned on and connected to a network. Remote Desktop cannot connect to a fully shut down PC unless Wake on LAN is configured.
-
Remote Desktop enabled: The feature is disabled by default in Windows and must be manually turned on in system settings.
-
User permission: Your account must be added to the Remote Desktop Users list even after Remote Desktop is enabled.
-
Network access: A clear network path is required. For internet connections, port forwarding may be necessary.
-
Firewall allowance: Windows Firewall or third party security software must allow Remote Desktop traffic or connections will be blocked.
Once all of these conditions are met, you can move on to enabling and using Remote Desktop in Windows 10 without issues.
How to enable and activate Remote Desktop on Windows 10
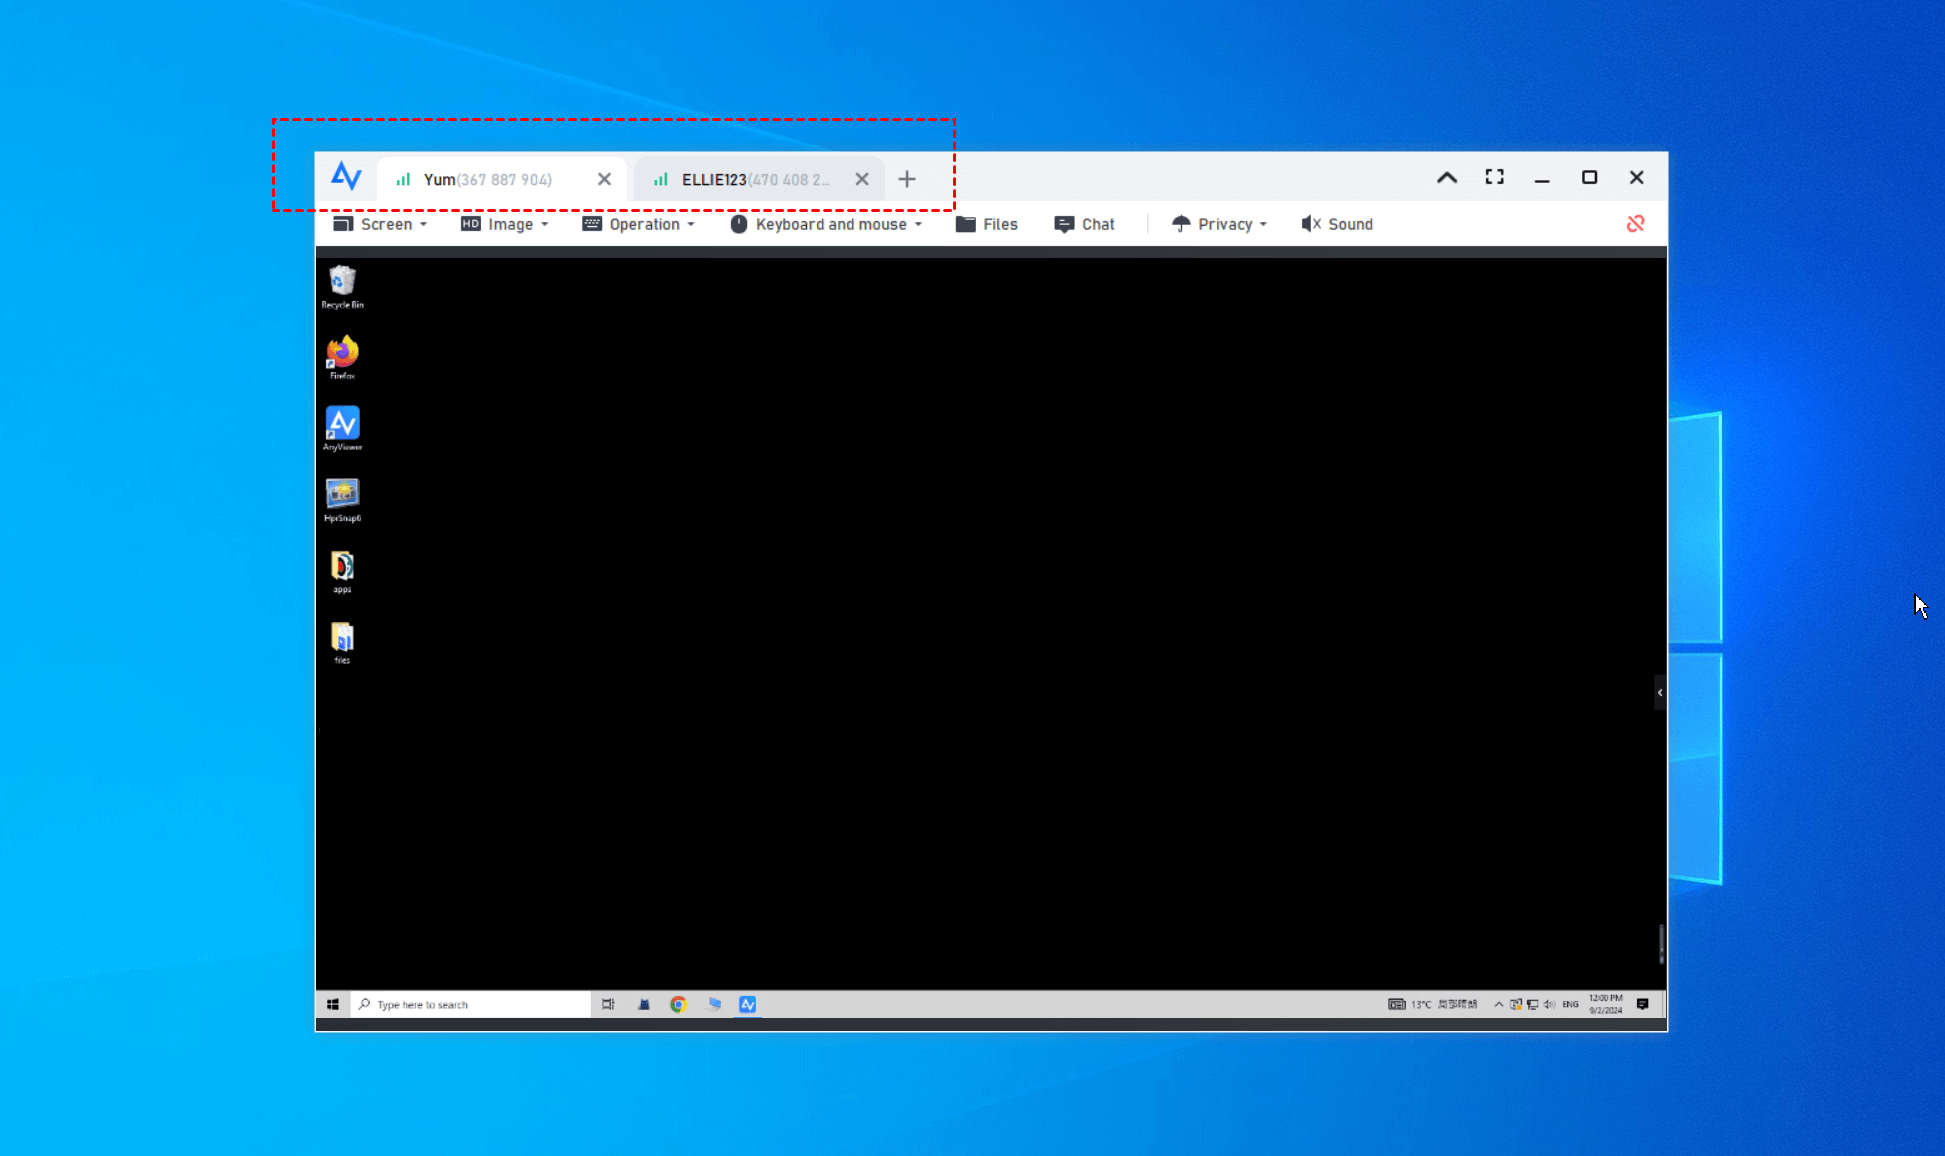
🔥 Way 1. Run AnyViewer (The easiest way)
When Remote Desktop fails to connect, the problem is often related to disabled settings, network issues, firewall restrictions, or missing user permissions. Before troubleshooting further, confirm that Remote Desktop is turned on and allowed through the firewall. After that, checking network stability, account access rights, system updates, security software, and port settings may help restore the connection.
If you prefer a faster and simpler solution, AnyViewer is a practical alternative for free to Windows built-in features. It lets you remotely access Windows 10 and other Windows versions over the internet or LAN with minimal setup. AnyViewer supports both attended and unattended access, making it easy to connect in different situations without complicated configuration. It is easy to use, requires no port forwarding or IP setup, uses ECC encryption for security, supports all Windows editions, and offers advanced features like multiple sessions, file transfer, and privacy mode.
Step 1. Download AnyViewer on your devices. Open it on the remote computer and create a new account to log in.

Step 2. Open AnyViewer on the local computer and sign in to the same account. Then the computer will be automatically assigned to the account.

Step 3. Go to the Device section. Select the computer you wish to connect to and select the One-click control option to establish a connection.

Step 4. Repeat the same step to control other remote computers by clicking One-click control. You can switch between the computers easily from the session tabs when performing multiple sessions.
✔️ If you have more than two remote PCs or need to control from more than two computers, we recommend upgrading your account to enjoy unlimited simultaneous sessions, unlimited channels, and the ability to assign up to 300 devices for one-click control.
✔️ If you use multiple monitors, AnyViewer makes remote control simple. Its multi-screen display feature lets you smoothly manage multi-monitor devices from another multi-monitor setup, helping you work efficiently without switching screens or losing focus.
Way 2. Enable Remote Desktop on Windows 10 with Registry
Follow the steps below to enable Remote Desktop on Windows 10 and 11 by adjusting relevant registry settings that control remote access permissions. Because improper edits may affect system stability, backing up the registry or your system beforehand is highly recommended.
Step 1. Press Windows + R, input "regedit” and hit Enter to open Registry Editor.
Step 2. Navigate to the following Registry key:
HKEY_LOCAL_MACHINE\CurrentControlSet\Control\Terminal Server

Step 3. In the right pane, double-click on "fDenyTSConnections" entry and change the value data from "1" to "0". Then, click "OK".
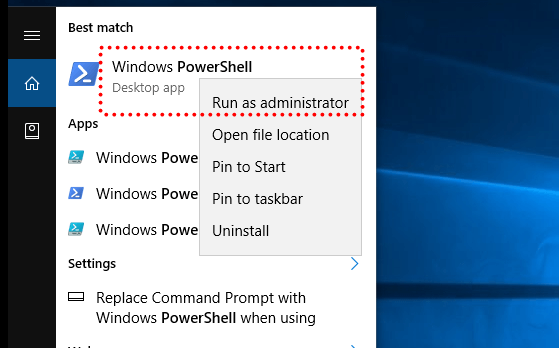
Way 3. Enable Remote Desktop Windows 10 with PowerShell
Another option is to use PowerShell to modify system settings that permit Remote Desktop access by following these steps.
Step 1. In the search box, input "Powershell", right-click "Windows Powershell" and choose "Run as administrator".
Step 2. In the Windows PowerShell window, input the following command and hit Enter.
Set-ItemProperty -Path 'HKLM:\System\CurrentControlSet\Control\Terminal Server' -name "fDenyTSConnections" -value 0

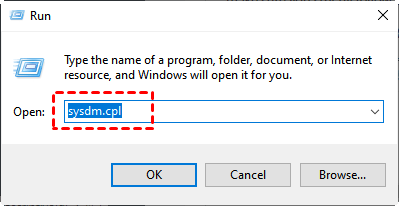
Way 4. Allow Remote Desktop from System Properties
You can also enable remote connections to this computer through the System Properties interface, which provides a built-in graphical option for managing Remote Desktop settings. This method is suitable for users who prefer adjusting system features without using command-line tools.
Step 1. Press Windows + R to open the Run box. Type “sysdm.cpl” in the entry bar and press Enter to open System Properties.
Step 2. In the System Properties window, go to the "Remote" tab, and check ”Allow remote connection to this computer”.

All five ways can help you turn on the Remote Desktop feature on Windows 10 and Windows 11, and you can choose the one that you like. You may also need to configure the firewall settings to allow Remote Desktop through Windows Firewall for a successful remote connection. Here is the instruction.
Step 1. Search for "Windows Security" and open the corresponding app.
Step 2. Click Allow apps to communicate through Windows Defender Firewall, and click "Change Settings".
Step 3. Scroll down, locate Remote Desktop, and make sure that the checkboxes are checked to allow RDP through the firewall.
Way 5. Enable Remote Desktop Windows 10/11 from Settings
If you are not comfortable using command-line tools or making registry changes, you can configure the computer to allow remote access directly through the Windows Settings interface, which offers a safer, more user-friendly way to manage Remote Desktop options.
Step 1. Press Windows + S to open the Search box.
Step 2. Search “remote desktop settings” in the search box, and double-click it to open Remote Desktop Settings.
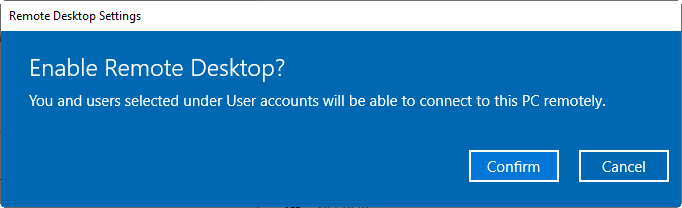
Step 3. Toggle the button to the On position to enable Remote Desktop on Windows 10 and Windows 11.
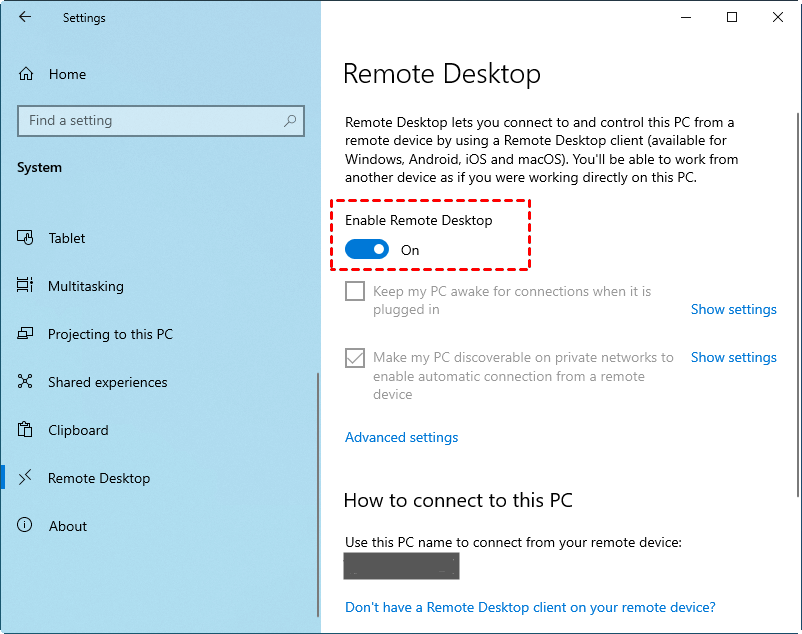
Note: Here you can see the PC name of this PC under "Use this PC name to connect from your remote device". Keep it in mind as you'll need it when you use Remote Desktop Connection from another computer to connect to this computer.
Step 4. You'll be asked to confirm whether to open the app; click "Confirm" to continue.
Extra tip: Necessary settings for a successful Remote Desktop connection
If you choose to manually activate Remote Desktop on Windows 10, to ensure Remote Desktop works properly on Windows 10, the following settings should be configured in advance. These adjustments help maintain system availability, assign proper access permissions, and prevent connection blocks during remote sessions. For conveniences, it is recommended use AnyViewer to avoid these settings.
1. Disable Sleep Mode to Keep the Computer Accessible
A computer in sleep mode cannot receive Remote Desktop connections, so keeping it awake is essential for uninterrupted access.
Step 1. Open Settings and go to System.
Step 2. Select Power & sleep from the left panel.
Step 3. Set the Sleep option to Never for both battery and plugged-in modes.
Once sleep mode is disabled, the computer will remain available for remote connections whenever needed.
2. Add Authorized Users and Grant Remote Access Permissions
Only users with proper permissions can connect remotely, so the correct user accounts must be added to the Remote Desktop access list.
Step 1. Open Settings and navigate to System > Remote Desktop.
Step 2. Scroll down and click Select users that can remotely access this PC.
Step 3. Click Add, then choose the user account you want to grant access to.
After adding authorized users, the selected accounts will be allowed to establish Remote Desktop connections.
3. Permit Remote Desktop Through Windows Firewall
Windows Firewall may block Remote Desktop connections by default, so allowing the feature through firewall settings is necessary.
Step 1. Open Control Panel and go to System and Security > Windows Defender Firewall.
Step 2. Click Allow an app or feature through Windows Defender Firewall on the left.
Step 3. Select Change settings, find Remote Desktop, and check both Private and Public boxes.
With firewall access enabled, Remote Desktop traffic can pass through securely without being blocked. Then you can connect to Windows 10 with the Remote Desktop client app.
4. Connect to Windows 10/11 with the Remote Desktop client app
Once Remote Desktop is enabled and allowed through the firewall on Windows 10 or 11, the system is ready to accept incoming connections. You can then access the remote computer using a Remote Desktop client such as Remote Desktop Connection by following the steps below.
Step 1. Press Windows + R at the same time and type "mstsc" to launch Remote Desktop Connection on your local computer.
Step 2. Type in the IP address or the computer name of the remote computer that you want to connect and then click "Connect".
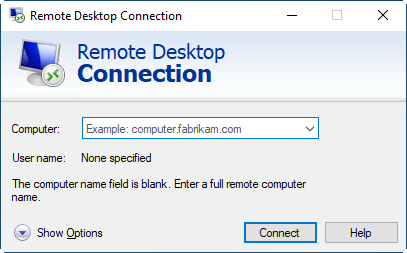
Step 3. In the pop-up window, you need to input the user name and the password of the remote computer account that you want to log in to and click "OK".
-
The steps are for accessing a Windows computer from another Windows computer.To access a Windows computer from an iOS deviceor an Android device, you need to download the RD client from the AppStore or Google Play.
-
The steps are suitable for accessing a PC over LAN; to access a computer over the internet via RDP, you need to perform port forwarding or set up a VPN, which can be complicated and time-consuming.
-
If you have no idea about how to find out the IP address, computer name, or user name, pressWindows+R, inputcmdto open Command Prompt, run"whoami" and"ipconfig" commands, and you can find out what you need.
Conclusion
In conclusion, enabling Remote Desktop on Windows 10 and 11 is possible through several methods, depending on your technical comfort and connection needs. While built-in tools work well with proper configuration, they often require extra settings and troubleshooting. For users who want a faster, safer, and more flexible experience, AnyViewer offers a simple alternative that reduces setup complexity and ensures reliable remote access.
FAQs
🗨️ Why can’t I turn on Remote Desktop?
Remote Desktop may be unavailable due to using Windows Home, lacking admin rights, disabled system settings, or firewall and network restrictions.
🗨️ How to enable Remote Desktop on desktop?
Go to Settings > System > Remote Desktop, toggle it on, confirm the prompt, and make sure your account is allowed and the firewall permits RDP.
🗨️ Which version of Windows allows Remote Desktop?
Remote Desktop host is supported on Windows Pro, Education, and Enterprise editions. Windows Home can only connect as a client, not host.
🗨️ How to make Remote Desktop Connection active?
Ensure Remote Desktop is enabled, the PC stays awake, your user account has permission, and the firewall allows Remote Desktop traffic.
🗨️ Can I still use Remote Desktop on Windows 10 after October 2025?
Windows 10 reaches end of support in October 2025, so RDP may still function but without security updates. For a safer option, tools like AnyViewer provide secure remote access without OS edition limits, and it will continue to receive updates.
