
How to Access Another Computer Through IP Address [Easiest]
Here in this post, we list 1 easy solution on how to connect to another computer using IP address on the same or different network. Also, you will get a brand-new remote desktop experience with the help of AnyViewer. Keep reading to find out your way to remote work.
By Ellie / Updated on January 16, 2026
How do I access another device using IP address?
I know the IP address of a computer. But I have no idea how to connect remote desktop using IP address when the computer is connected to the Internet. Can anyone please tell me?"
-Question from Tom’s Hardware
Remote Desktop is a powerful technology that lets you access or control a computer over the internet from anywhere. To establish a connection, you usually need the host PC’s IP address, computer name, and login credentials.
In this article, you’ll learn how to connect to another PC using an IP address, whether both devices are on the same network or not, using Windows Remote Desktop. We’ll also introduce the best Remote Desktop alternative, AnyViewer. Read on to learn more.
Quick comparison: Windows RDP vs. AnyViewer
Before diving into the technical steps, see which method fits your needs:
| Feature | Windows Remote Desktop (RDP) | AnyViewer (Recommended) |
| Complexity | High (Requires 10+ steps) | Low (3 simple steps) |
| Static IP Needed? | Yes (Manual configuration) | No (Dynamic IP is fine) |
| Port Forwarding? | Required (Risky & Hard) | Not Required |
| Windows Home Edition | Not Supported (Host side) | Fully Supported |
| Security | Requires opening Firewall ports | ECC Encrypted (No ports opened) |
| Success Rate | Often fails due to NAT/Firewall | High (Connects via Cloud) |
Method 1. The traditional way (Using Windows Remote Desktop)
To connect via IP address using Windows' built-in tool, you must complete four critical configuration phases.
Part 1. Check the permission of remote connections
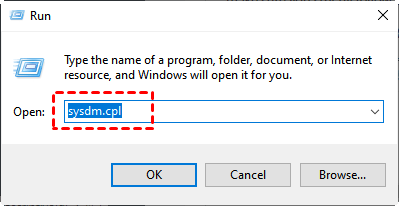
Step 1. On the host computer, press Win + R, input “sysdm.cpl” and press Enter.
Step 2. Go to the Remote tab, and ensure that "Allow remote connections to this computer" is checked. And then click OK.

Part 2. Change the Windows Firewall settings
Step 1. On the host computer, select Control Panel > System and Security > Windows Defender Firewall.
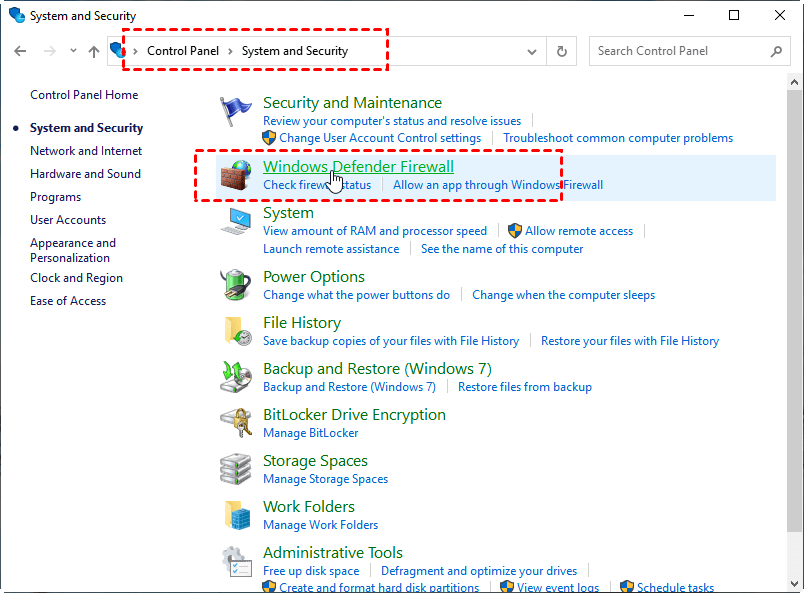
Step 2. Click Allow an app or feature through Windows Defender Firewall on the left navigation. Check Remote Desktop and hit OK.

Part 3. Assign a static IP address
The IP address in the local network is another thing we require. Later, we can configure the client computer using the IPv4 address. However, the router has set this IP, not the public IP address. In most local networks, it varies each time a PC connects to the network. Therefore, Remote Desktop Connection will only sometimes work. Consequently, we're going to give this PC a Static IP Address.
Tips: Setting up a static IP can be risky and complex for beginners. If you want to skip these 10+ steps, try AnyViewer now.
Step 1. To launch Command Prompt, press Win + R again, type "cmd," and press Enter. To get the IP for Remote Desktop, type "ipconfig" and hit Enter. You can now see a collection of IP addresses.

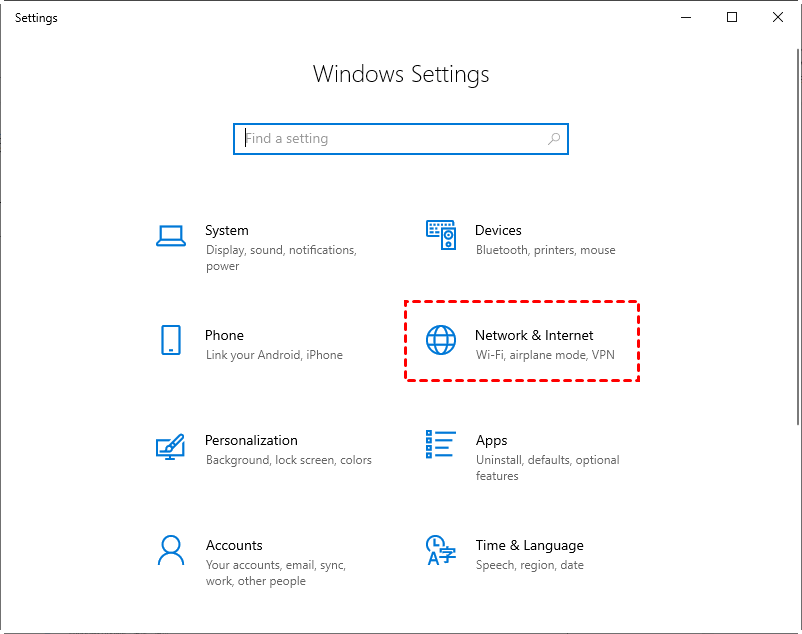
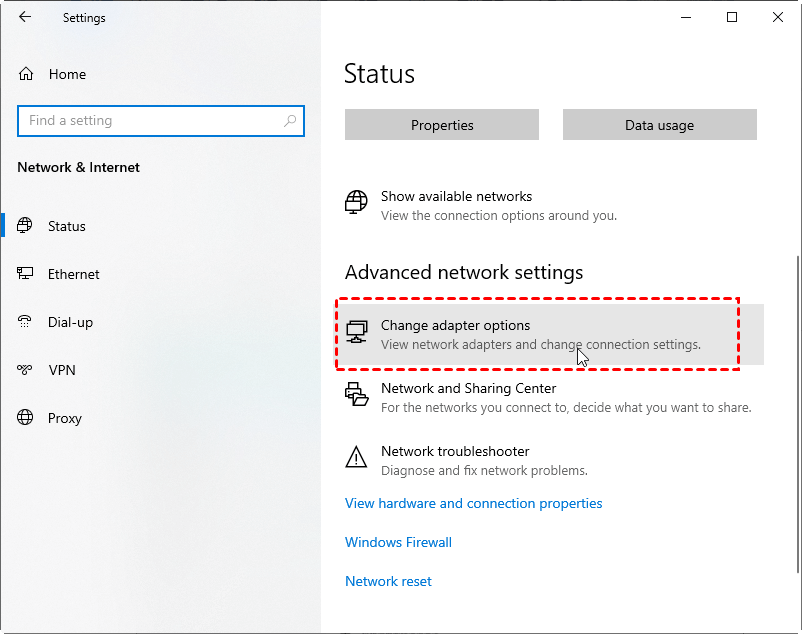
Step 2. Open the Start menu and click Settings. Then choose Network & Internet.
Step 3. Find Advanced network settings, and click Change adapter options below.
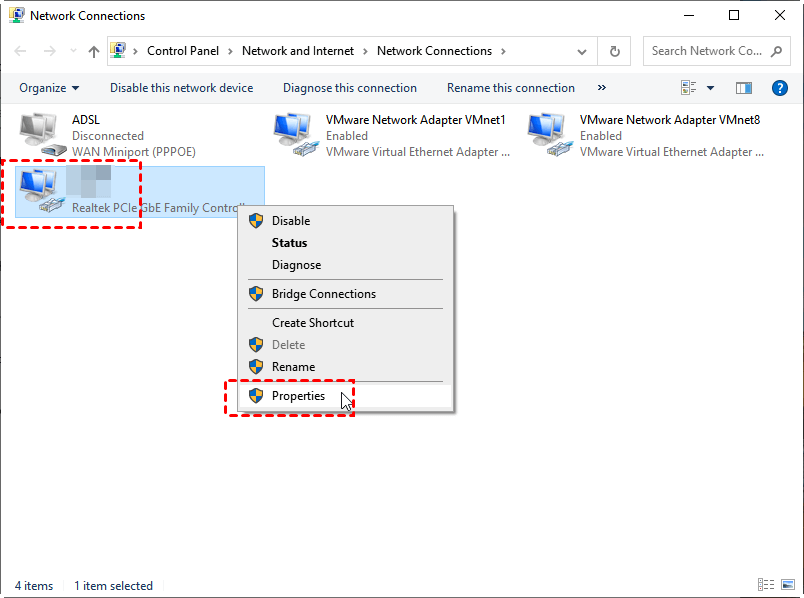
Step 4. Right-click your network and then click Properties.
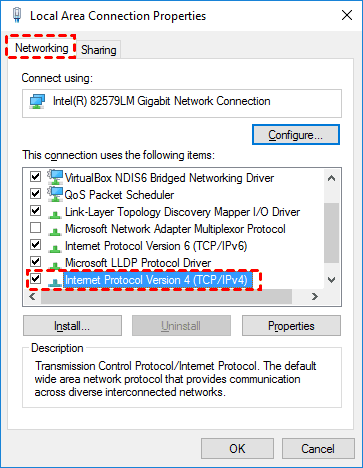
Step 5. Tick Internet Protocol Version 4 (TCP/IPv4), and click Properties.
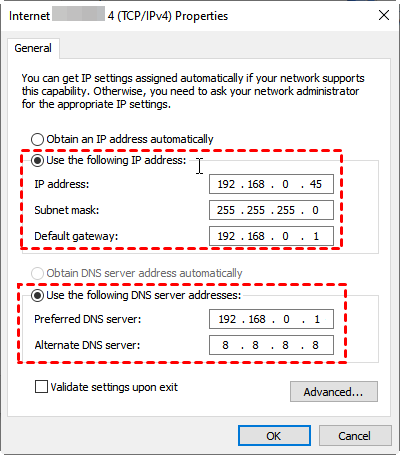
Step 6. Set up the properties through the following actions.
1. Turn on Use the following IP address in the General tab, and change the IP address to a Static IP address. For example, if your router IP is 192.168.0.1, your usable IP is from 192.168.0.2 to 192.168.0.254. You can use 192.168.0.45 as your Static IP.
2. Set the Subnet mask to the default values, 225.225.225.0.
3. Set the Default gateway to the Default Gateway address noted down above.
4. Then turn on Use the following DNS server addresses, set the Preferred DNS server to the same Default Gateway address, and set the Alternate DNS server to Google DNS, 8.8.8.8.
5. Click OK to apply changes.
Part 4. Get the remote PC name
Open the Command Prompt again, and type in “query user” to get the PC name.

Part 5. Access another computer through IP address
Now everything is ready. You can start to access the remote computer using an IP address. Let’s see how to access computer with IP address on the local network and over the Internet.
Remote computer connection over local network (LAN):
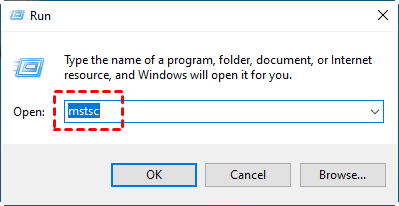
Step 1. On the client computer, press Win + R, and type “mstsc” in the Run Dialog box to open the Remote Desktop Connection.
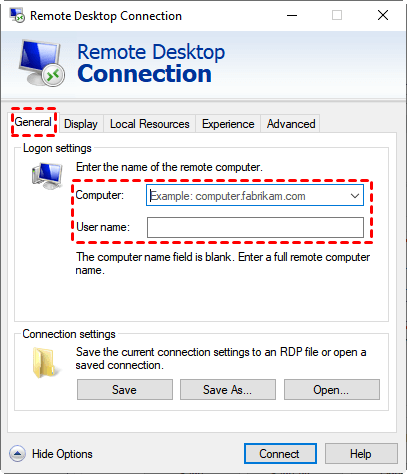
Step 2. Click Show Options, type in the IP address and name of the host computer, and then click Connect.
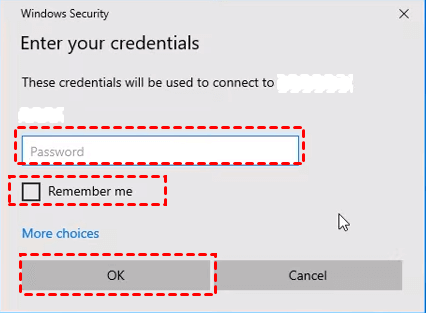
Step 3. Input the password of the client computer in the pop-up window, and press OK.
Part 6. Remote computer connection over the Internet (Optional)
Connecting Remote Desktop over the Internet requires an additional step, port forwarding. You’ll have to switch port 3389 to the IP address of your computer in your router, and then connect to the public address of your router specifying this port.
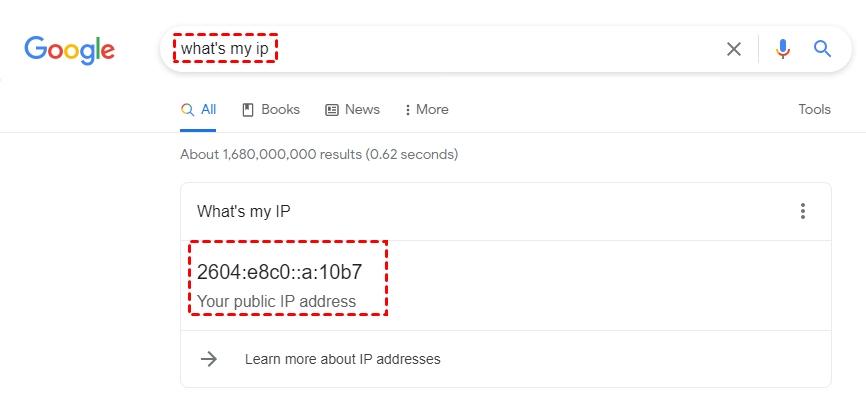
Step 1. Enter "what is my IP" into the search bar of the browser, then write down your public IP address (not to share it with anyone else in case of security issues).
Step 2. Enter the IP address of your router in a web browser once it is open. Then a privacy warning will appear. To proceed, select Advanced > Continue.

Step 3. Enter the username and password for your router in the box, then click Login.

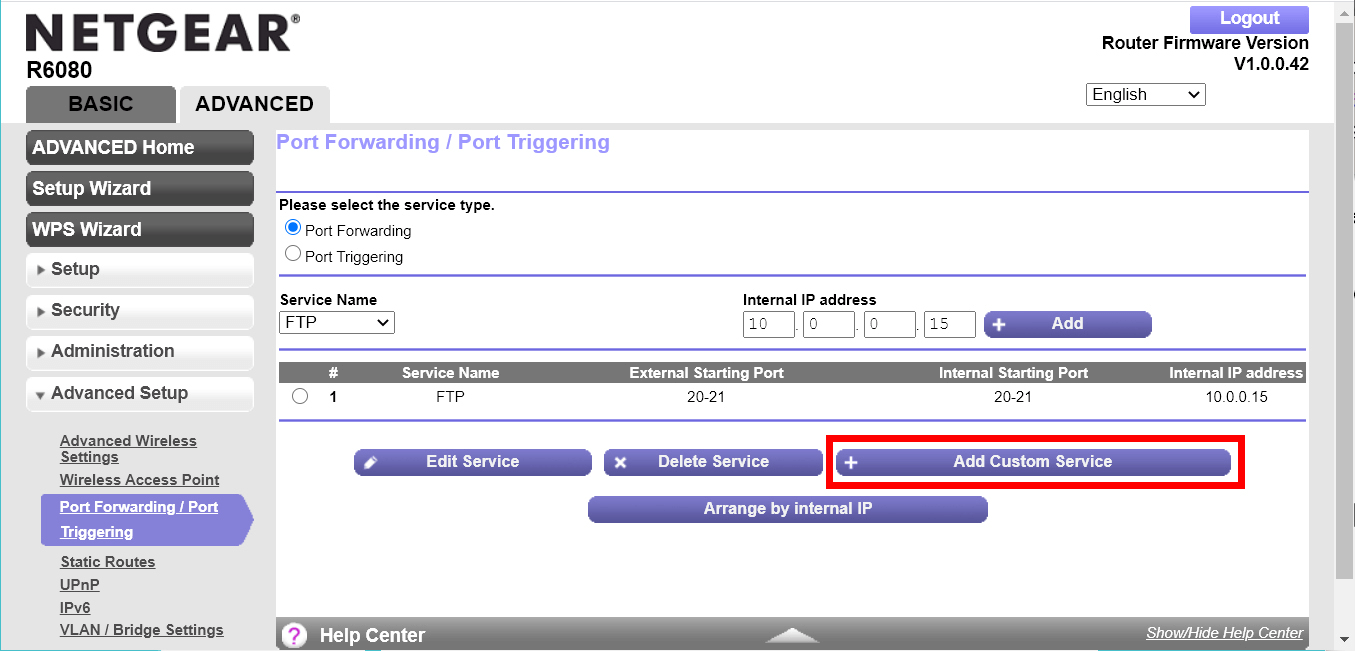
Step 4. From the left pane, select Port Forwarding/Port Triggering. To add a new port forwarding rule, click Add and select Add Custom Service.
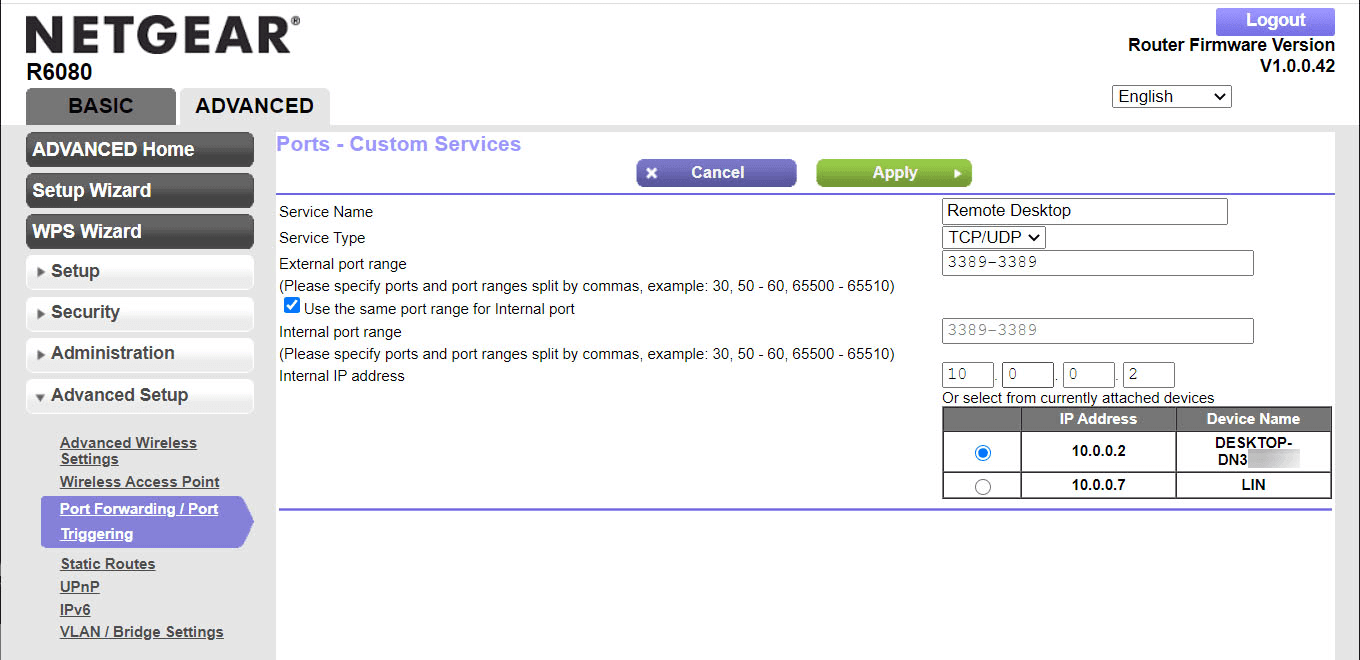
Step 5. In the Port Forwarding interface, choose the port you want to forward (if you are unsure of the protocol being used, choose TCP/UDP or Both under Service Type). Click apply after selecting the IP address of the device you want to port forward.
Step 6. Follow the same steps on how to use Remote Desktop Connection over LAN, you can connect to a remote desktop over the internet now.
Method 2: The smarter & more reliable alternative — AnyViewer
While using an IP address for RDP is a traditional method, it often leads to frustration due to technical barriers and security risks. AnyViewer is designed to eliminate these hurdles, providing a professional-grade remote desktop experience that just works.
Why AnyViewer is AnyViewer better than traditional RDP?
1. Break Windows Home Edition Restrictions
Did you know? Windows 10/11 Home Edition cannot be controlled via RDP. Many users spend hours configuring settings only to realize their system isn't supported.
AnyViewer Advantage: Unlike RDP, AnyViewer fully supports all Windows editions, including Home and Standard versions. No need to upgrade your Windows license just for remote access.
2. Superior Security (No Port Forwarding Required)
Using RDP over the internet requires opening Port 3389, which acts like an open window for hackers and brute-force attacks.
AnyViewer Advantage: AnyViewer uses End-to-End ECC (Elliptic Curve Cryptography) Encryption and connects through a secure cloud tunnel. It bypasses firewalls automatically without opening any ports, keeping your PC invisible to online threats.
3. Zero-Config Network Traversal (No Public IP Needed)
Connecting via IP address usually requires a Static Public IP or complex Port Forwarding on your router. For most home and office networks (NAT), this is a technical nightmare.
AnyViewer Advantage: AnyViewer handles the "handshake" for you. It works flawlessly across different networks, even if you are behind a CGNAT or a strict corporate firewall. No IP configuration, no router tweaks—just one-click connection.
Experience remote desktop with 3 simple steps
Step 1. Install and launch AnyViewer on both computers. Then click Sign up to create an AnyViewer account.

Step 2. Then you can see you successfully logged in to AnyViewer. Your device will automatically be assigned to the account you've logged in to.
Step 3. Log in to the same AnyViewer account on other devices, then you can achieve a direct connection by clicking One-click control.
More than just a connection: Productivity features
Unlike the bare-bones RDP experience, AnyViewer includes built-in tools to help you get more done:
- High-Speed File Transfer: Move large files between PCs instantly.
- Mobile Access: Control your PC from an iPhone, iPad, or Android device with ease.
- Privacy Mode: Black out the remote screen and disable the keyboard to protect your privacy while you work.
- Multi-Monitor Support: Seamlessly switch between or view multiple screens at once.
Stop struggling with IP addresses and Port Forwarding. Join millions of users who trust AnyViewer for a faster, safer, and simpler remote desktop experience. Download AnyViewer for free now.
Conclusion
While you can access another computer through IP address using Windows RDP, the process is often hampered by Remote Desktop port forwarding issues and Windows Home Edition restrictions.
Don't let complex network settings slow you down. AnyViewer provides a secure, one-click alternative to access another computer through IP address logic without the technical headaches. It’s faster, safer, and completely free for personal use.
