
6 Tested Ways to Fix WOL Not Working
This post primarily introduces 6 tested ways to fix WOL not working on Windows 10. If you’re facing the problem right now, find the solutions here.
By Ellie / Updated on December 13, 2024
WOL not working after shutdown
Recently I upgraded my desktop PC from Win 7 to Win 10. Now WOL not working after shutdown and LAN LED is completely off.”
- Question from Microsoft Community
WOL is short for Wake-on-LAN, representing an industry-standard protocol for remotely awakening computers from a low-power state including sleep, hibernate and shut off. This is pretty useful if you plan to remotely access your computer located at another place.
However, some Windows users are complaining that the WOL not working properly on their Windows computers. This needs to be fixed right away.
How to fix WOL not working [6 ways]
Here we listed 6 ways to help you fix WOL not working on Windows 10.
Way 1. Confirm the AC power is plugged in
The WOL doesn’t work properly if the remote computer is running on battery power. AC power is a must requirement for the WOL to work properly. Therefore, you need to confirm that the AC power is plugged in.
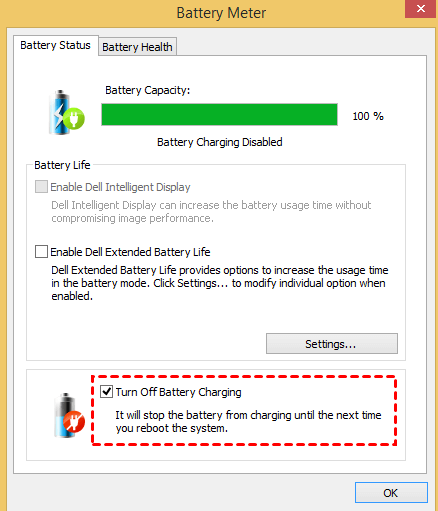
Different manufacturers have different software to help you limit your charging and run your laptop on AC power. Take Dell as an example. Dell has Dell Battery Meter for Dell laptops. It has the “Turn Off Battery Charging” feature that stops your battery from charging further and directs all the AC adapter power directly to your laptop. Hence, making it run on AC power without the battery interfering in between.
You can download Dell Battery Meter from the following website and tick Turn Off Battery Charging.
www.dell.com/support/home/en-in/drivers/driversdetails?driverid=0kw7p
Way 2. Disable the fast startup
You can also disable the fast startup so the network devices receive power even when the computer is switched off.
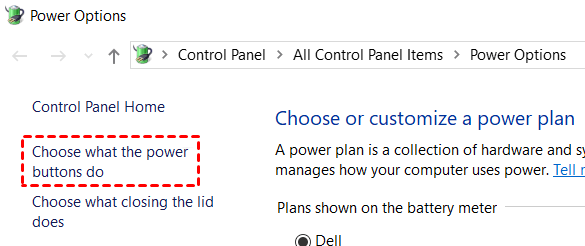
Step 1. Open Control Panel, click Large icons and select Power Options from the menu.

Step 2. On the left-hand side, click Choose what power buttons do option.
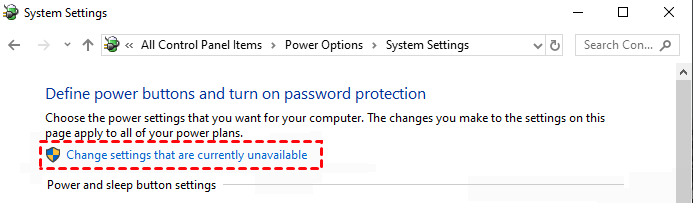
Step 3. Click Change settings that are currently unavailable.
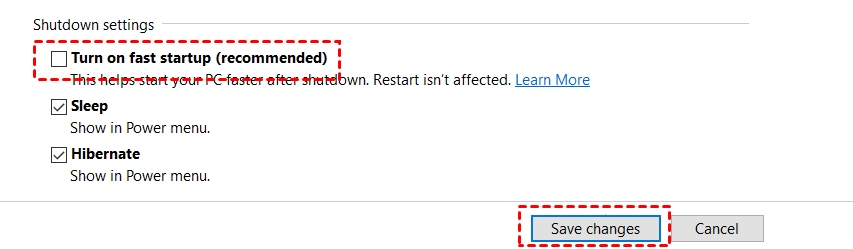
Step 4. Uncheck Turn on fast startup option and click on Save changes.
Way 3. Configure the Power Management settings
Make sure the Power Management settings are configured correctly in the Ethernet driver properties.
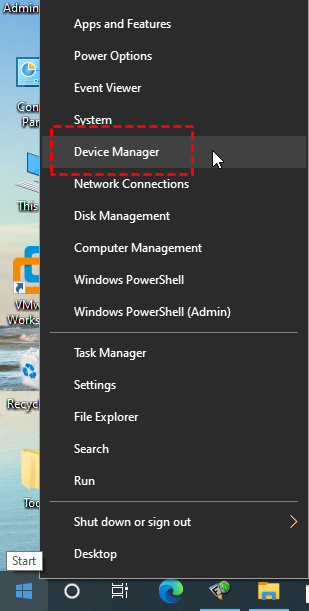
Step 1. Right-click the Start menu and click Device Manager.
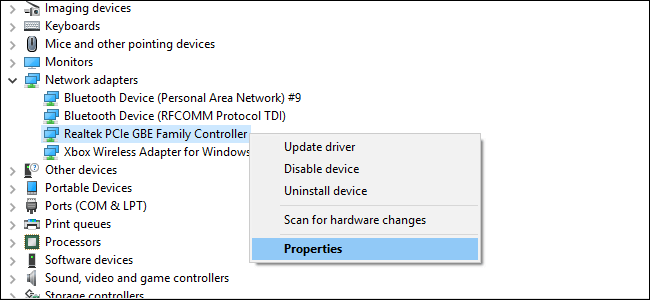
Step 2. Locate and open the Network adapters category. Right-click the network adapter that you are currently using and click Properties.
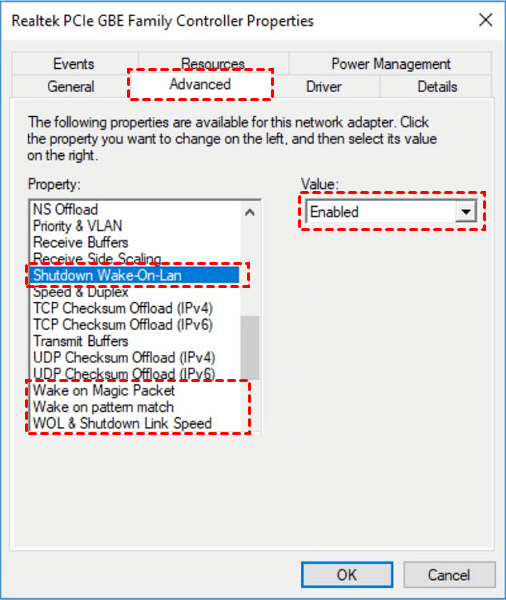
Step 3. Go to the Advanced tab, and configure the Advanced driver properties for the following settings:
- Shutdown Wake-On-Lan: Enabled
- Wake on Magic Packet: Enabled
- Wake on pattern match: Enabled
- WOL & Shutdown Link Speed: 10 Mbps
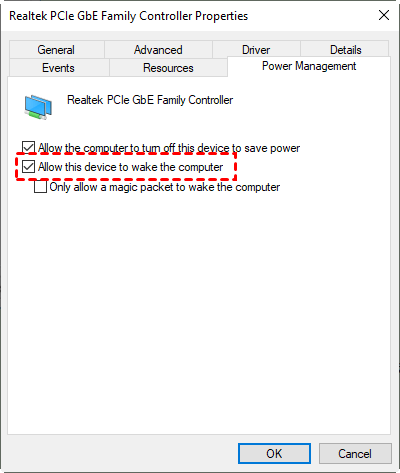
Step 4. Next, click the Power Management tab and check the Allow this device to wake the computer.
Way 4. Check BIOS settings
If WOL is not working, the problem might be your BIOS settings. To fix the problem, you need to boot into BIOS and adjust some settings.
Step 1. Restart your computer and, depending on your preferences, enter BIOS by pressing the F, Del, or Enter keys. This varies by manufacturer, so consult your PC manual or the indicators on your screen.
Step 2. Locate the Power management section and turn on the Wake-on-LAN feature. This may be referred to differently depending on the BIOS and motherboard versions. In our case, it is PME Event Wake Up.
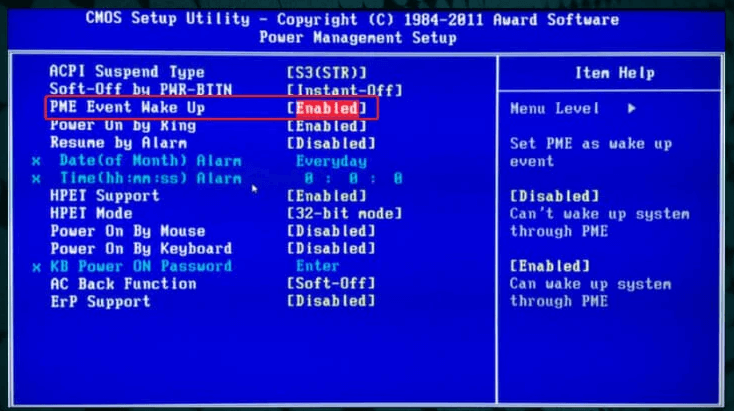
Step 3. Check that Deep Sleep is turned off in the BIOS (not applicable to all systems). This power-saving option disables the NIC.
Step 4. Enable the Allow PCI to wake up the system setting in BIOS if it is available.
Step 5. When finished, press the F10 key to save and exit.
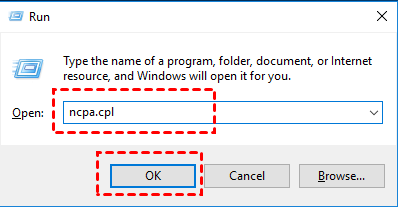
Way 5. Enable the NetBIOS over TCP/IP Feature
NetBIOS enables computers on a local area network to communicate with network hardware and send data across the network. In the meantime, the NetBIOS over TCP/IP networking protocol enables legacy computer applications that rely on the NetBIOS API to be used on modern TCP/IP networks. If your PC uses the NetBIOS API, it may be worthwhile to enable the NetBIOS over TCP/IP feature to avoid network issues while using WOL.
Step 1. Press Win + R to launch the Run command dialog box. Type "ncpa.cpl" and press OK to open the Network Connections window.
Step 2. Right-click on your Network adapter and then click Properties.

Step 3. Double-click the Internet Protocol Version 4 (TCP/IPv4) option.
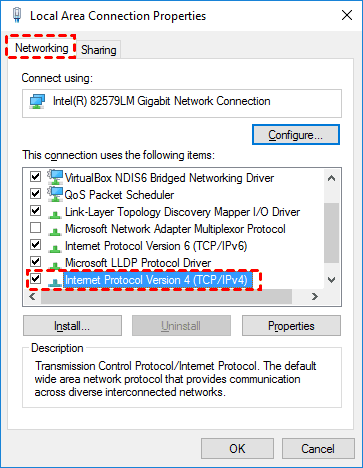
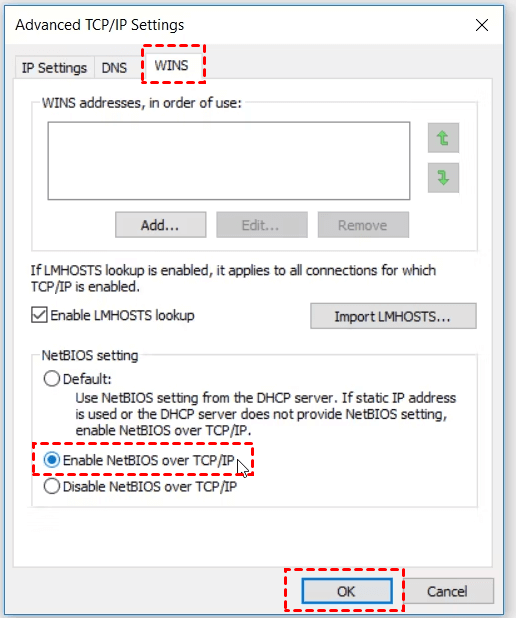
Step 4. In the next window, near the bottom-right corner, click the Advanced button. Navigate to the WINS tab in the Advanced TCP/IP Settings window, then check the Enable NetBIOS over TCP/IP box. Finally, click OK to save these modifications.
Way 6. Modify the Registry key
Please note that this solution will only work if you have a Realtek adapter.
Step 1. Press Win key + R and enter "regedit". Press Enter or click on OK.

Step 2. Go to: Computer > HKEY_LOCAL_MACHINE > SYSTEM > CurrentControlSet > Control > Class > 4de3e972-e325-11ce-bfc1-08002be10318.
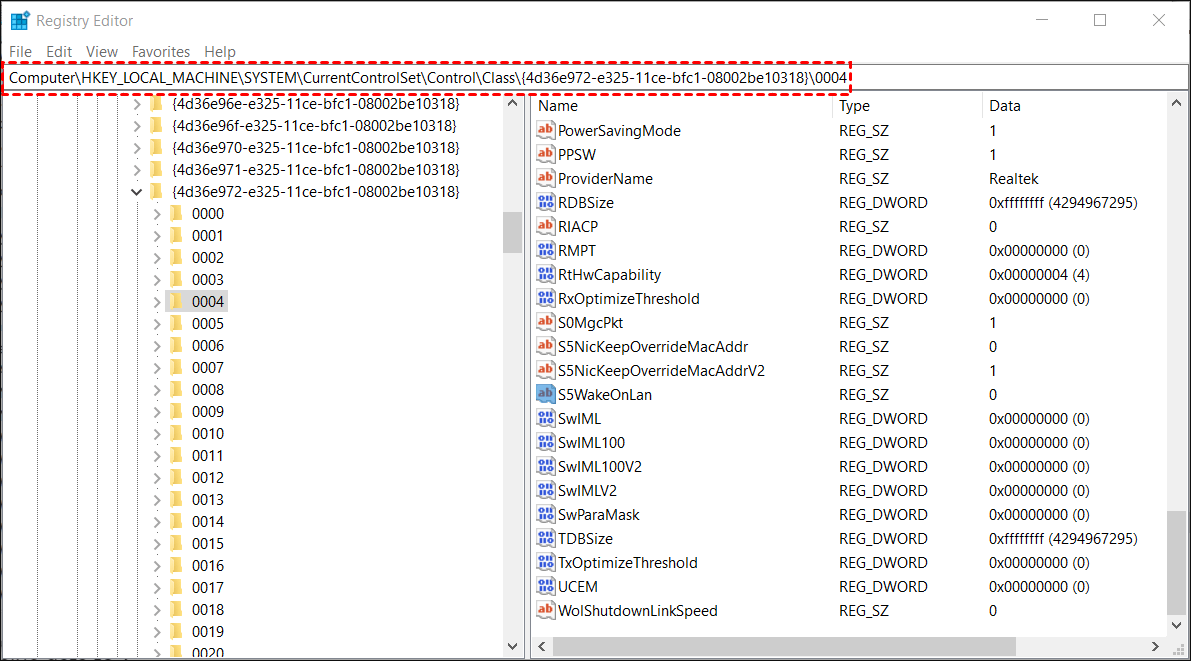
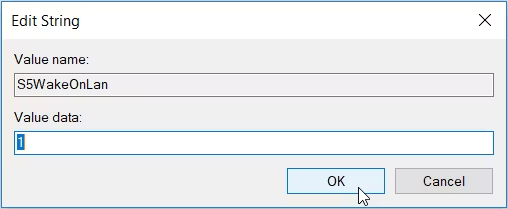
Step 3. Once you find your Realtek adapter, in the right pane you should see S5WakeOnLAN DWORD. Double-click it and change its Value data to 1.
Step 4. Now, double-click PowerDownPll DWORD and set its Value data to 0.
How to remotely control a waking computer
Once you have fixed the WOL not working problem and completed the remote startup, you are recommended to remotely control the waking computer with the free remote desktop software AnyViewer.
✍ Advantages
▪ Quick installation.
▪ Fast connection speed.
▪ One-click for unattended remote access.
▪ Chat available in the remote session.
▪ File transfer support.
▪ Shortcuts of essential apps like Task Manager.
▪ Support controlling multiple computers at the same time.
▪ Mobile support is for both iOS and Android devices.
Now, download the free remote access software - AnyViewr, and walk through how it works.
Step 1. Install and launch AnyViewer on both computers. Go to Log in, and then click Sign up. (If you already have signed up on its official website, you can log in directly.)

Step 2. Fill in the signup information and click Sign up to create an AnyViewer account.

Step 3. Then you can see you successfully logged in to AnyViewer. Your device will automatically be assigned to the account you've logged in to.

Step 4. Log in to the same AnyViewer account on the two computers. Then you can achieve a one-click connection by clicking One-click control after going to Device and clicking the computer you want to access.

- Notes:✎...
- Additionally, it is recommended to change your account's plan to a Professional or Enterprise one. What a business or professional plan can provide for you is:
- More devices will be allowed to assign to the same account for unattended remote access.
- More connection channels for more devices to be able to start remote connection at the same time.
- One device can connect to more devices simultaneously.
- Black the remote PC screen and disable the remote keyboard & mouse click to protect privacy.
- Transfer 1TB files at 10 MB/s.
Closing words
This post primarily introduces 6 tested ways to fix WOL not working on Windows 10. If you’re facing this problem right now, find the solutions listed in this post to fix it. Besides, after the remote startup, you can use AnyViewer to access the remote computer.
