
How to: Transfer Files Using Remote Desktop on Windows 10
Here in this post, we list the ways to transfer files using Remote Desktop on Windows 10, 11. If you want to operate but don’t know how, you can get answer from this guide.
By Ellie / Updated on December 13, 2024
Need to transfer files using Remote Desktop on Windows 10
“Hi friends. I need help. I want to transfer files using Remote Desktop on Windows 10 to my colleagues’ PC. But I have no idea how to operate and what can I do in advance. Can you guys give me some advice? Thanks in advance!”

With the advent of remote access tools such as Remote Desktop, remotely accessing a PC from another PC is available for all of us, which makes our life be more convenient and interesting. There’s no doubt some features in it also attractive to us, such as file transfer. However, some users claim that it’s a little bit difficult for them. If this describes you, keep reading to learn how to transfer files using Remote Desktop on Windows 10.
How to transfer files using Remote Desktop on Windows 10
To transfer files using Remote Desktop on Windows 10, we need some preparation work in advance. Now follow me to operate.
Step 1. On the host PC, search remote desktop connection settings and open it.
Step 2. Drag the slider to the right to enable Remote Desktop.
Step 3. After the setup, let’s get started now. On the client computer, input Remote Desktop Connection and then open it.
Step 4. On the main interface of Remote Desktop Connection, click on Show Options and then switch from the General tab to the Local Resources tab. Go to the Local Devices and Resources column and click More.
Step 5. On the Local Devices and Resources interface, check the Drives and click OK.
Step 6. Go to the General tab and then enter the IP address and the user name of the remote PC.
Step 7. After the connection is successfully established, click This Computer on the host computer desktop, and find the previously checked disk.
Step 8. Find the disk that stores the files you need and selects the file you want to transfer, click the Home tab above, and then click Move to. Click Choose Location in the drop-down menu to realize remote desktop file transfer.
For how to transfer files from RDP to PC fast, you can also use the Copy and Paste function to achieve the goal.
Step 1. Enter the IP address and the username of the remote computer. Click on Connect and input the password to establish remote connection.
Step 2. Then copy the files on your desktop by pressing Ctrl + C and then paste the files to the remote computer by pressing Ctrl + V. Finally, the file transfer with Remote Desktop is successful.
AnyViewer: Fast & secure files sharing on Windows 10
You should now understand how to transfer files using Remote Desktop on Windows 10. However, if you encounter issues such as copy and paste not working on Windows 10 or file transfer with Remote Desktop is too slow, why not use professional software to help you achieve your goal easier?
AnyViewer can satisfy your needs on file-sharing very well. It allows you to transfer files quickly. And the ways to transfer files is flexible. Unlike RDP, the file-sharing of AnyViewer won’t be limited to the same LAN, which means you could reach the goal anywhere and anytime. And it is workable for Windows 11, 10, 8, 7, including Windows Home edition.
Click on the blue button and let’s have a try.
Step 1. To transfer files remotely, there will be 2 ways illustrated to you. Choosing the first option, you can get file transfer without the need to remotely access a PC. With option 2, you could transfer files in the course of remote access.
Option 1. Select the "File transfer" option after entering the Recipient ID and then click on Connect:
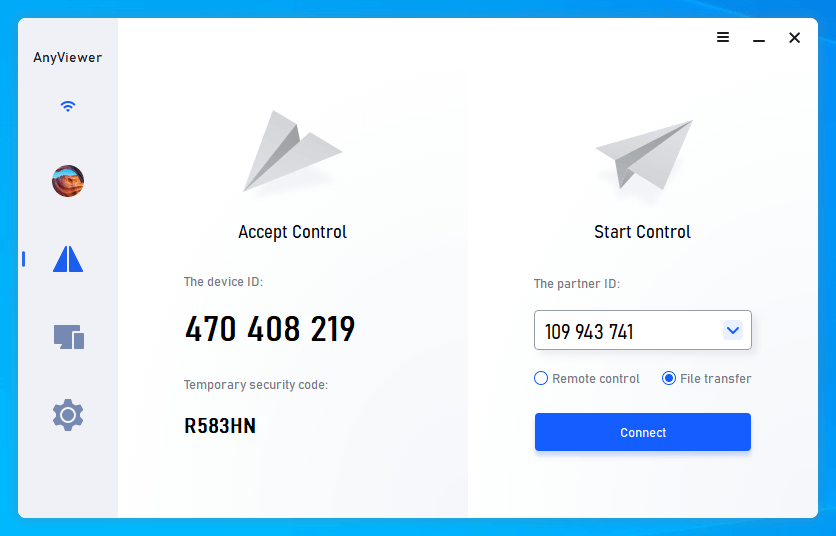
Option 2. Select the "Remote control" option. After the connection is successful, click the "Files" button in the menu bar:
![]()
Step 2. In the "File Transfer" dialog box, the path of the client computer is displayed on the left, and the path of the host computer is displayed on the right.
If you want to transfer a file from the Controller to the Recipient, please select the file to send on the left by clicking the blue triangle button, and specify the location to save the file on the right. If transferring from Recipient to Controller, please click the left triangle button.
Step 3. You can see the transfer status at the bottom of the "File Transfer" dialog box. Right-click to pause or remove the transfer task. The dialog can be closed when the transfer is completed.
Conclusion
Here in this post, we list 2 ways to transfer files using Remote Desktop on Windows 10, such as using the “Move to” or “Copy and Paste function”. However, if you meet with some problems in the course of RDPing to a server, then you could use AnyViewer to help you transfer files quickly and safely.
