
4 Ways to Easily Transfer Data from Mac to PC
Transferring data from Mac to PC is easy with methods like AnyViewer for remote transfers, cloud storage for syncing, and USB drives for quick file sharing. These options make moving your files smooth and hassle-free.
By Ellie / Updated on April 1, 2025
How do I transfer files from Mac to Windows?
Transferring data from Mac to PC doesn't have to be a complicated process. Whether you're switching to a new computer or just need to access files from a different system, there are several methods available to make the transition seamless. Let's dive into the best ways to transfer data from Mac to PC.
How to transfer data from Mac to PC [4 methods]
Whether you're transitioning from a Mac to a PC or simply need to transfer your files, we've got you covered. Our detailed guide will walk you through the entire process, ensuring a smooth file transfer.
Method 1. Transfer data from Mac to PC remotely via AnyViewer
AnyViewer offers a reliable remote desktop solution for transferring files securely and efficiently over the Internet. Unlike many file transfer tools that require both devices to be on the same network, AnyViewer enables remote transfers, making it the perfect choice for moving files across different networks or locations.
Key Advantages of AnyViewer:
- Effortless Remote Transfers: Transfer files between devices over the internet, even if they’re on separate networks.
- Intuitive Interface: Easily move files between Windows and macOS without needing an admin account or password.
- Fast and Secure: Experience rapid file transfers with robust encryption for enhanced security.
- Versatile Capabilities: Beyond file transfers, you can access applications, manage settings, and troubleshoot devices remotely.
Here's how to transfer data from Mac to PC using AnyViewer:
Step 1. Download and install AnyViewer on both your Windows PC and Mac.
Step 2. Log in to your AnyViewer account, or create one if you don’t have an account yet.

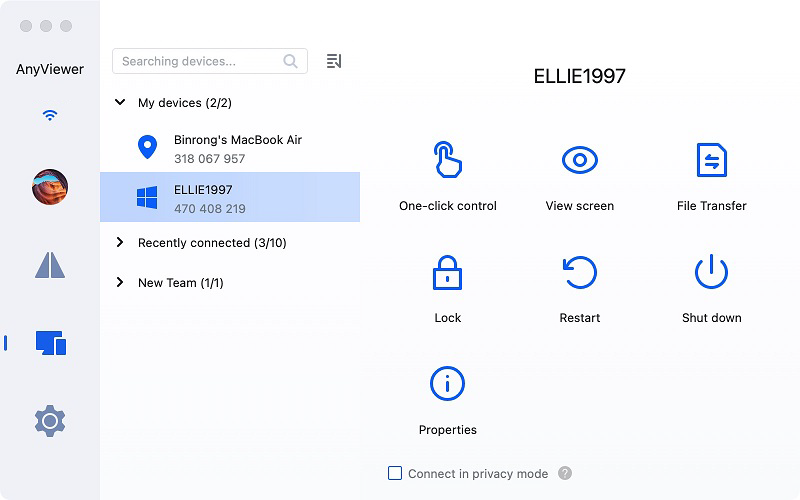
Step 3. Launch AnyViewer on your Windows PC and click on “Device” to see a list of connected devices. Find your Mac under “My Devices,” select it, and click “File Transfer” to open the transfer manager.
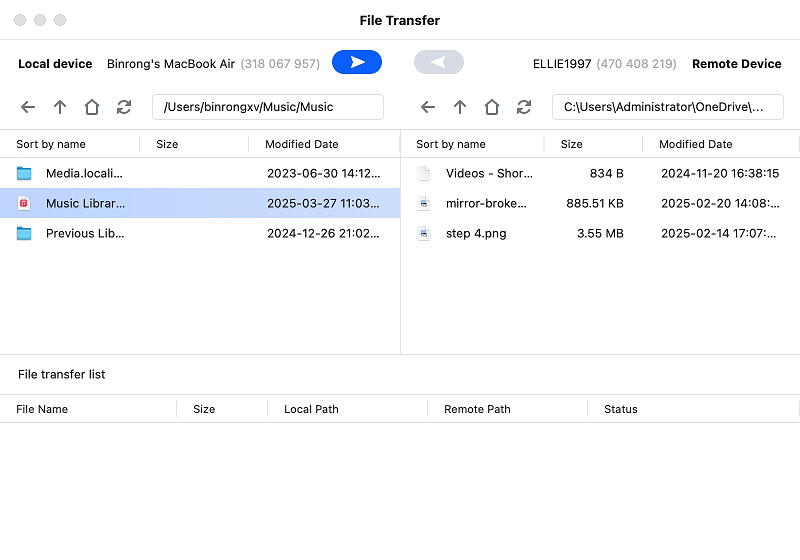
Step 4. In the file transfer manager, choose the file you want to transfer and click the arrow to begin the process.
Alternative Method: For unattended remote access during the transfer, select “One-click control” to remotely access your Mac. Once connected, use the file transfer manager from the toolbar to seamlessly move your files.
Method 2. Share Mac files with Windows via File Sharing
To transfer files between your Mac and a Windows PC, you’ll need to enable file sharing and configure SMB sharing. Here’s a step-by-step guide to transfer files from Mac to PC.
Enable File Sharing on Your Mac
Step 1. Open the Apple menu and go to System Settings.
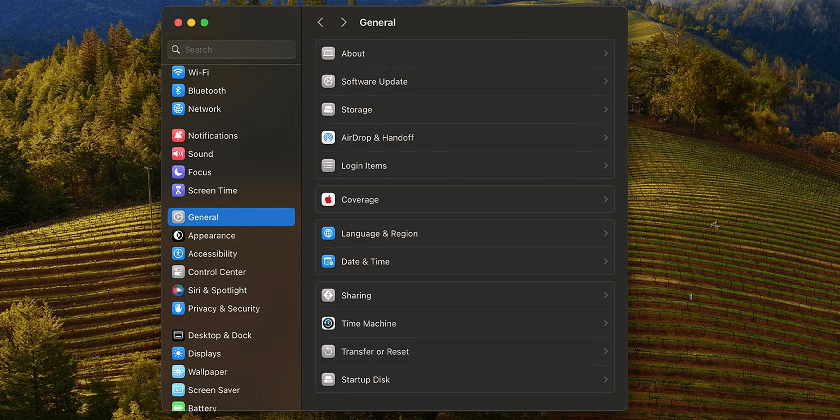
Step 2. Select General from the sidebar, then scroll down and click on Sharing.
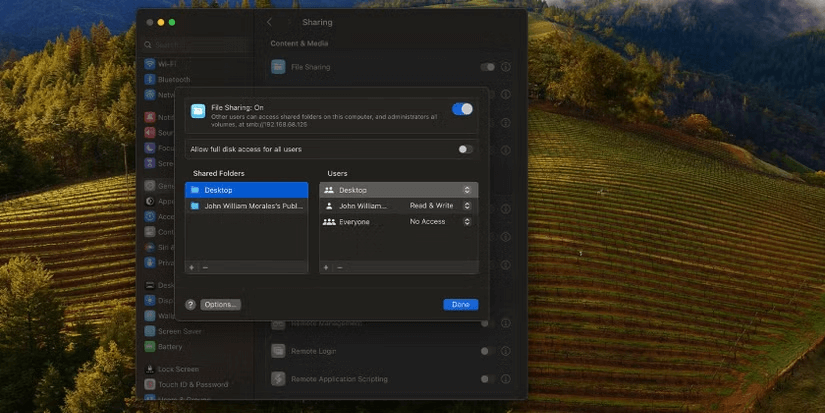
Step 3. Click the Info button next to File Sharing and toggle it to On.
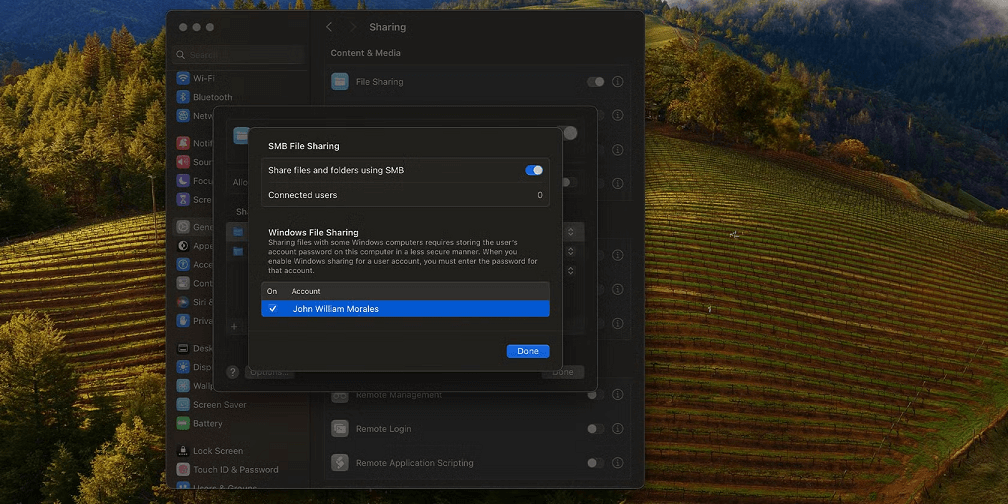
Step 4. Click Options and enable Share files and folders using SMB.
Step 5. Under Windows File Sharing, check the box next to the user accounts you want to share files with.
Step 6. Enter the password for each selected account and click OK.
Step 7. Click Done twice to save your changes.
Step 8. Take note of the IP Address under the File Sharing: On status near the top of the window.
Access Mac Files from Your Windows PC
To transfer files from your Mac to your Windows PC, follow these steps:
Step 1. Open File Explorer on your Windows PC.
Step 2. Click in the address bar and type your Mac's IP address (e.g., \192.168.x.x), ignoring the SMB prefix.
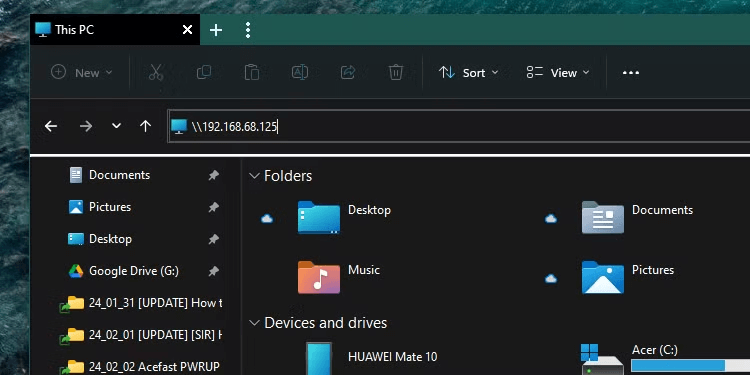
Step 3. When prompted, enter the username and password for the Mac user whose files you're accessing, ensuring they match exactly as on your Mac.
Step 4. You will now have access to the shared folders on your Windows PC. From here, you can copy files just as you would from any other folder on your PC.
Important Security Note
Windows file sharing stores passwords less securely, so it’s advisable to disable user accounts when they’re no longer needed. Before turning off Windows sharing, ensure all enabled accounts are deactivated to avoid password vulnerabilities.
Method 3. Snyc data on Mac and PC using cloud storage services
Cloud storage and file sharing platforms like iCloud, Google Drive, and Dropbox offer an efficient way to store and access your files from anywhere. To transfer data, you need to install and set up these services on both your Mac and PC so that they can automatically sync.
How to transfer data from Mac to Windows using iCloud:
Enable iCloud Sync on Your Mac
Step 1. From your Mac, click the Apple menu and select System Settings.
Step 2. Click on Apple Account (or Apple ID in macOS Sonoma or earlier).
Step 3. Choose iCloud from the options.
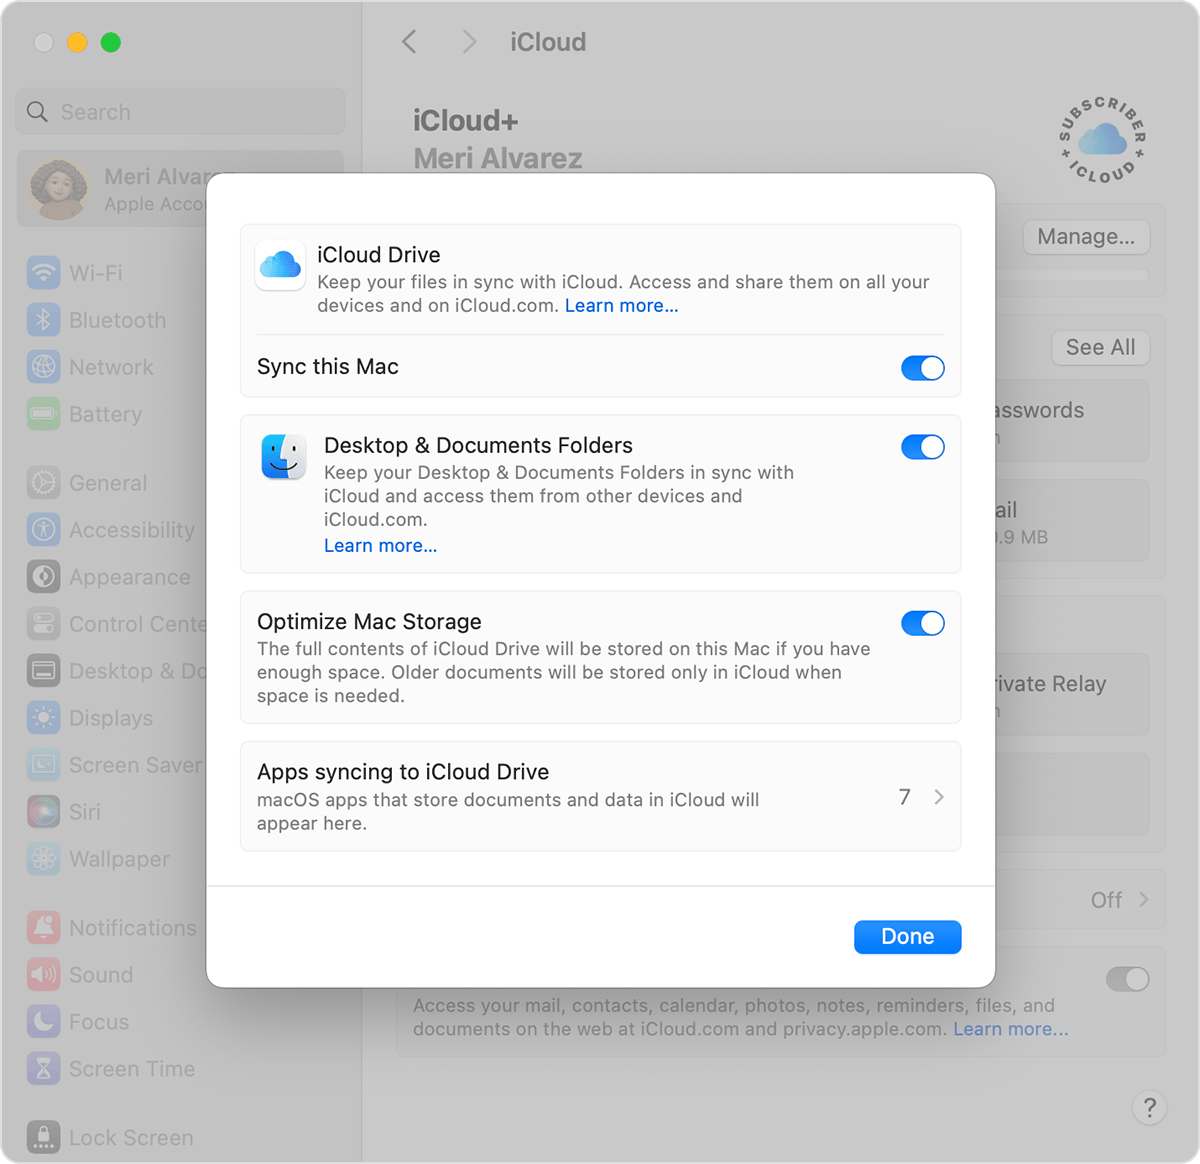
Step 4. Under Saved to iCloud, click on Drive (or iCloud Drive in macOS Sonoma or earlier).
Step 5. Ensure that Sync this Mac is turned on.
Step 6. Turn on the Desktop & Documents Folders toggle to sync these files as well.
Step 7. Click Done to confirm your settings.
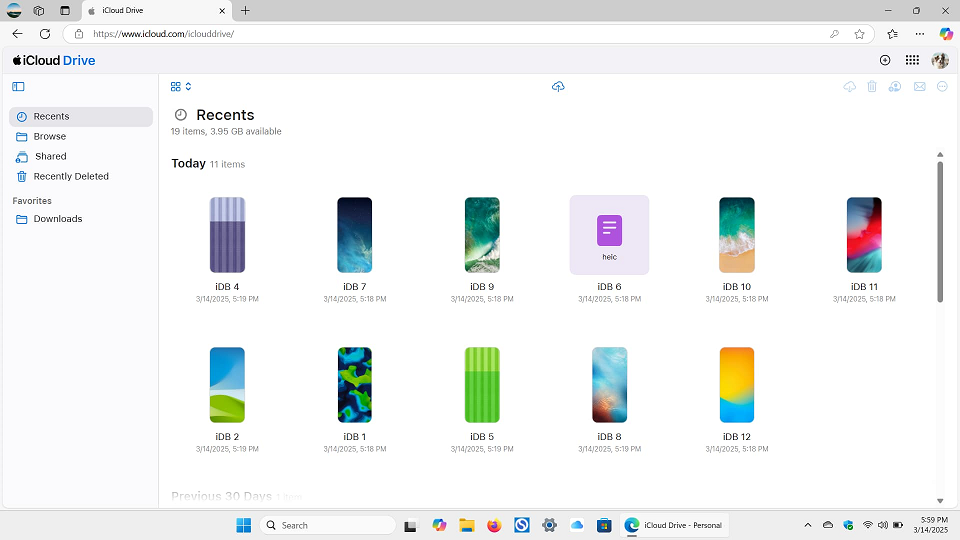
Access Files on Your PC
Step 1. On your PC, sign in to your Apple Account via iCloud.com.
Step 2. Navigate to iCloud Drive.
Step 3. Double-click on the Desktop or Documents folder to view and download your files.
Important Considerations
- You need a stable internet connection to keep your files synced across devices.
- The free storage tier may not be enough for large files, and additional storage will require a paid iCloud subscription.
- Be mindful of the wait time: files must first be uploaded from your Mac before they can be downloaded to your PC, which could take some time depending on the size of your files.
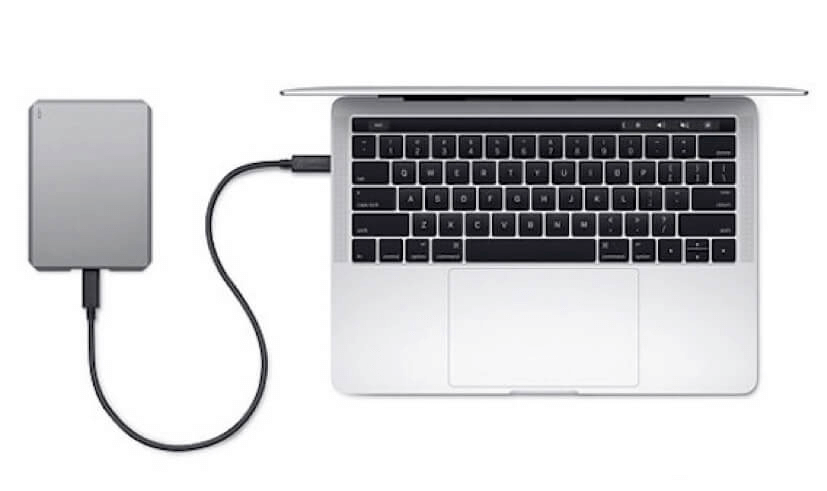
Method 4. Use a removable USB storage device
Using a removable USB storage device, such as an external hard drive or USB stick, is one of the easiest methods to transfer files between a Windows PC and a Mac. This method requires no complicated setup—simply copy files to the device and transfer them between the two computers.
Important Considerations
- Format the Drive: Ensure your drive is formatted using the exFAT file system. This format is compatible with both Windows and macOS and supports large file sizes.
- Plug-and-Play: Unlike cloud services, which require a subscription, this method is straightforward and does not require an internet connection. Just plug the drive into your Mac or PC, and you're good to go.
- One-Time Cost: Unlike cloud storage, which often involves ongoing fees, purchasing a USB storage device is a one-time expense.
- Choosing the Right Drive: When selecting an external drive, consider factors such as storage capacity, speed, and reliability to ensure it meets your needs for transferring files between devices.
Conclusion
In conclusion, transferring data from Mac to PC is simple and can be done through various methods depending on your needs. Whether you choose remote transfer via AnyViewer, cloud syncing, or using a USB drive, each method offers its unique advantages. For those looking for secure and seamless transfers, AnyViewer is an excellent choice, while cloud services provide the convenience of syncing files across devices. No matter which method you select, you'll be able to transfer your files quickly and efficiently, ensuring smooth data migration between Mac and Windows systems.
