
Remote Desktop Connection vs TeamViewer: Choose Your Solution!
How do TeamViewer and Remote Desktop differ? This post makes a detailed comparison of LogMeIn and Remote Desktop, helping you choose the right remote desktop solution.
By Ellie / Updated on December 13, 2024
How do TeamViewer and Remote Desktop differ?
“Remote DesktopConnection vs TeamViewer, what are the differences? Which is better? Can anyone tell me to help me make the right remote desktop solution?”
-Question from Quora
Remote Desktop Connection vs TeamViewer
Remote Desktop Connection vs TeamViewer, what are the differences? Which should you choose? Let’s keep reading.
Remote Desktop Connection
Windows computers come with a remote access tool called Remote Desktop Connection. It is well suited for people looking to connect to Local computers/servers after connecting to VPN or LAN.
![]()
How to use Remote Desktop Connection
Let’s get started using Remote Desktop. You must set up Remote Desktop in advance for it to function. You must first obtain the remote computer's IP address and PC name. If your devices are connected to the network, you need one more step to configure port forwarding.
Step 1. On the client computer, search for Remote Desktop Connectionin the Search box. And then open it.

Step 2. Enter theIP addressand User name in the Remote Desktop Connection interface to achieve connection.
Step 3. In the pop-up Windows Security window, find the user name you just entered and enter the power-on password. If there is no power-on password, click OK.
Step 4. In the authentication pop-up window, click Yesdirectly to realize remote access.
What are the pros and cons of Remote Desktop Connection?
Let’s see the pros and cons of Microsoft Remote Desktop Connection.
✔ Pros:
- ✍No need to download. There’s no need to download Remote Desktop Connection as it is a Windows built-in software.
- ✍No need to sign up. You don’t need to create an account to use Remote Desktop Connection.
- ✍Free. Remote Desktop Connection is tally free.
✘ Cons:
- ✍Complex setup process. Working with Remote Desktop Connection requires a lot of preparation and configuration for the support and the remote side.
- ✍Limitations on the host computer. The host computer must be running Windows Pro, Enterprise, or Ultimate versions. It does not have support for connecting to non-Windows-based devices and Windows devices running Standard/Home versions.
- ✍Inconvenient to adjust the screen size. After a connection has been made, scaling the screen size up or down is not supported. Right now, you can only change the screen size before a connection is made.
- ✍Not support multiple monitors on one screen. It does not support multiple screens in one view. Currently, you can toggle between multiple screens.
TeamViewer
TeamViewer is a third-party application that can be used for remote control in the background of any firewall and NAT agent. But unlike Remote Desktop Connection, you’ll need to download it from its official site or app store as it is not built-in software on your devices.

How to use TeamViewer
Download and install TeamViewer on the client and host computers respectively. Launch it and then follow the step below.
Step 1. Select the purpose (commercial or personal) for downloading this software during installation. Here, take the free version of individual users as an example.

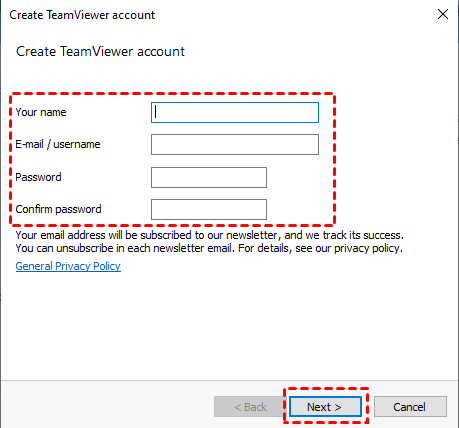
Step 2. Run TeamViewer on both computers. Select Login in the main interface. You need to create your own TeamViewer account for the first time. Click Next to complete account registration (you also need to verify the account before use).
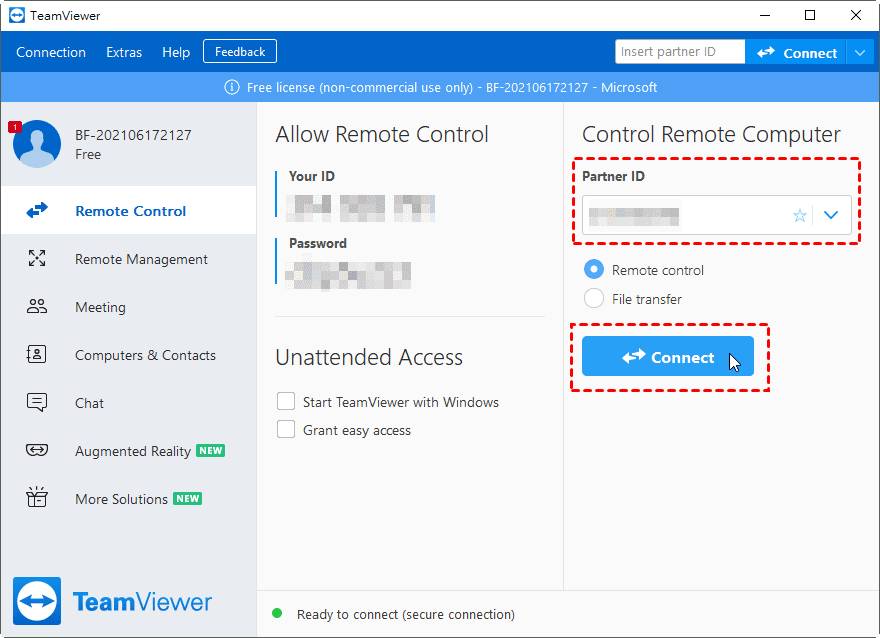
Step 3. Click Remote Control on the left side of the TeamViewer main interface on the client computer, enter the ID of the host computer under Partner ID, and click Connect.
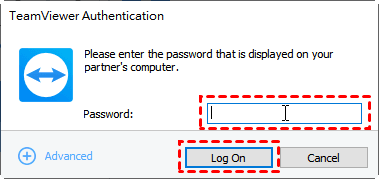
Step 4. Enter the password of the host computer in the TeamViewer Authenticationwindow to realize the remote control.
What are the pros and cons of TeamViewer?
Let’s see the pros and cons of TeamViewer.
✔ Pros:
- ✍Wide compatibility. It can be applied to multiple operating systems such as Windows, Mac OS, Linux, Chrome OS, Android, and iOS.
- ✍Unattended remote access. It allows users to remote into an unattended device as long as it has the same account logged into.
- ✍Easy setup. It works without port forwarding or other firewall configurations and works directly after the installation.
✘ Cons:
- ✍Need to pay for more features. It provides a free version, but you need to pay if you need more features. For example, it is priced starting at $83.40 per year for one user to access three designated computers.
- ✍Large file sharing isn’t allowed. The program cannot share a single file larger than 4GB.
- ✍Same version on both sides needed. It needs the same version of TeamViewer installed on both ends of the connection.
Windows Remote Desktop Connection vs TeamViewer: who is better?
Is TeamViewer better than Remote Desktop? Or is Remote Desktop Connection better than TeamViewer. I don’t think it is a YES-or-No question.
For example, if you use a Mac, TeamViewer is a better remote desktop solution than Remote Desktop Connection, which only supports Windows. However, if you need to transfer large files between devices, Remote Desktop Connection is a better remote desktop solution because TeamViewer only allows you to share a single file that is less than 4GB in size.
The point is that you need to choose a remote desktop solution based on your needs.
Bonus tip: Best remote desktop software for Windows
Before the end, we would like to recommend you a free remote access software for Windows AnyViewer.
- It is easy to set up.
- It supports multiple Windows versions, including Windows Home and Standard versions.
- It allows users to adjust screen size during the remote session.
- It supports multiple monitors on one screen.
- It provides users with free service. Every free account can assign 3 devices.
- It supports large file transfers of up to 1 TB.
Step 1. Download, install, and launch AnyViewer on both your work and home computer. On the Controller computer, go to Log in, and then click Sign up. (If you already have signed up on its official website, you can log in directly.)

Step 2. Fill in the signup information.

Step 3. Then you can see you successfully logged in to AnyViewer. Your device will automatically be assigned to the account you’ve logged in to.

Step 4. Log in to the same AnyViewer account on the two devices, then you can achieve a direct connection by clicking One-click control to achieve unattended remote support.

Step 5. After connecting successfully, you’ll see the remote desktop. Then you can completely control it and provide remote support just like you’re sitting in front of it.
- Notes:✎...
- You can also upgrade your account to a Professional or Enterprise plan. What can a professional or enterprise plan brings to you:
- More devices can be assigned to the same account for unattended remote support.
- Connect in privacy mode to protect privacy, which means the Controller can black the remote PC screen and disable the remote keyboard & mouse click.
- Faster file transfer speed. Transfer speed for a free account is 500 KB/s, and for a paid account is up to 10 MB/s.
Closing words
Remote Desktop Connection vs TeamViewer, which should you choose? After learning their pros and cons, I believe you’ve already had the answer. Besides, if you’re a Windows user, you are advised to choose the professional Windows remote desktop software AnyViewer.
