
2026 Full Tutorial: How to Use Remote Desktop Connection over LAN
This post primarily introduces how to use Remote Desktop Connection over LAN. Besides, it also gives tutorial on how to use Remote Desktop Connection over internet. Keep reading if you’re interested!
By Ellie / Updated on December 26, 2025
How do I connect to Remote Desktop via LAN?
How do I use the Windows built-in feature Remote Desktop Connection over LAN? I need a full tutorial. Could anybody help me out? Thanks in advance!”
- Question from Reddit
Remote Desktop Connection is a technology and feature that allows you to connect to and control a computer or server from another device, typically over a network or the internet. It's a convenient way to access and work on a remote computer as if you were physically present at its location.
Remote Desktop Connection functions on both local area networks (LAN) and the internet, with a key distinction: when used within a LAN, there's no need to configure port forwarding.
How to use Remote Desktop Connection over LAN [5 parts]
Let's now delve into the process. Setting up a Remote Desktop Connection can be somewhat intricate, so the following breakdown into five distinct parts will provide a clearer understanding.
Part 1. Allow remote connections to this computer
Step 1. On the host computer, press Win + R, input “sysdm.cpl” and press Enter.
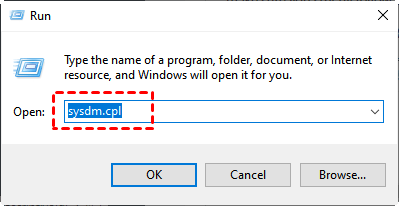
Step 2. Go to the Remote tab, and ensure that "Allow remote connections to this computer" is checked. And then click OK.

Note: The host computer needs to run Windows Professional or higher edition because Windows 11/10 Home doesn't support Remote Desktop and you can access it via Remote Desktop Connection.
Part 2. Changing the Windows Firewall settings
Step 1. On the host computer, select Control Panel > System and Security > Windows Defender Firewall.
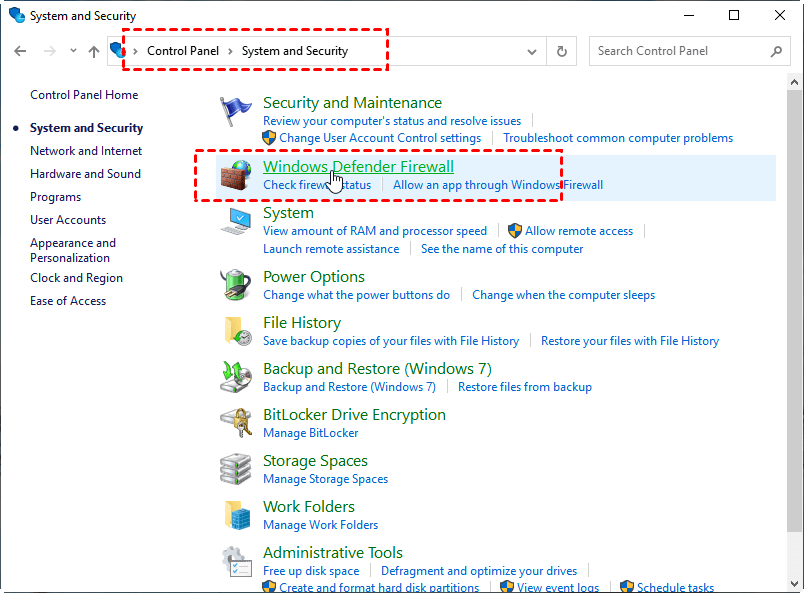
Step 2. Click Allow an app or feature through Windows Defender Firewall on the left navigation.
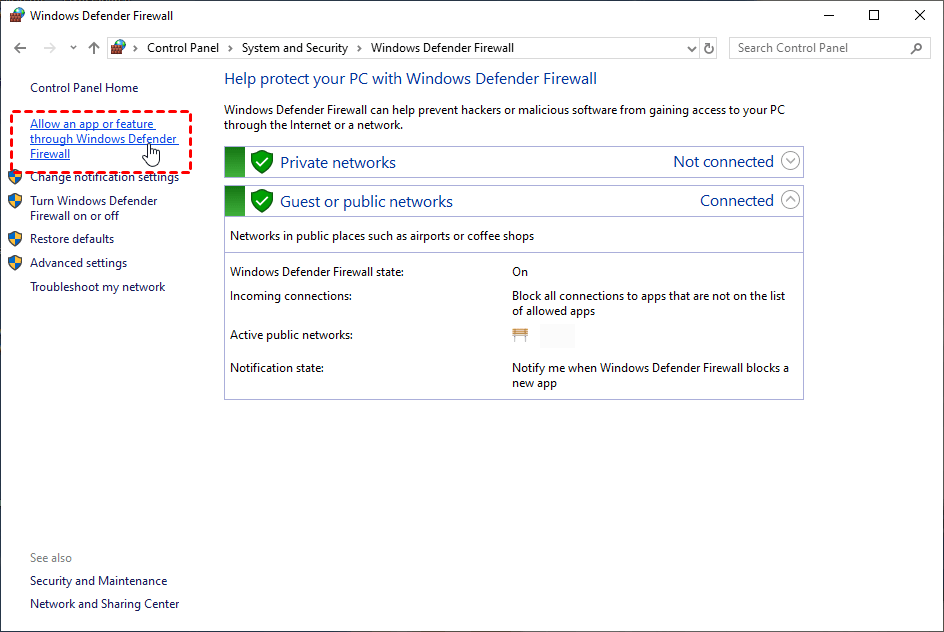
Step 3. Check Remote Desktop and hit OK.

Part 3. Assigning a static IP address
The IP address in the local network is another thing we require. Later, we can configure the client computer using the IPv4 address. However, the router has set this IP, and it is not the public IP address. In the majority of local networks, it varies each time a PC connects to the network. Therefore, Remote Desktop Connection won't always work. Therefore, we're going to give this PC a Static IP Address.
Step 1. To launch Command Prompt, press Win + R again, type "cmd," and press Enter. To get the IP for Remote Desktop, type "ipconfig" and hit Enter. You can now see a collection of IP addresses.

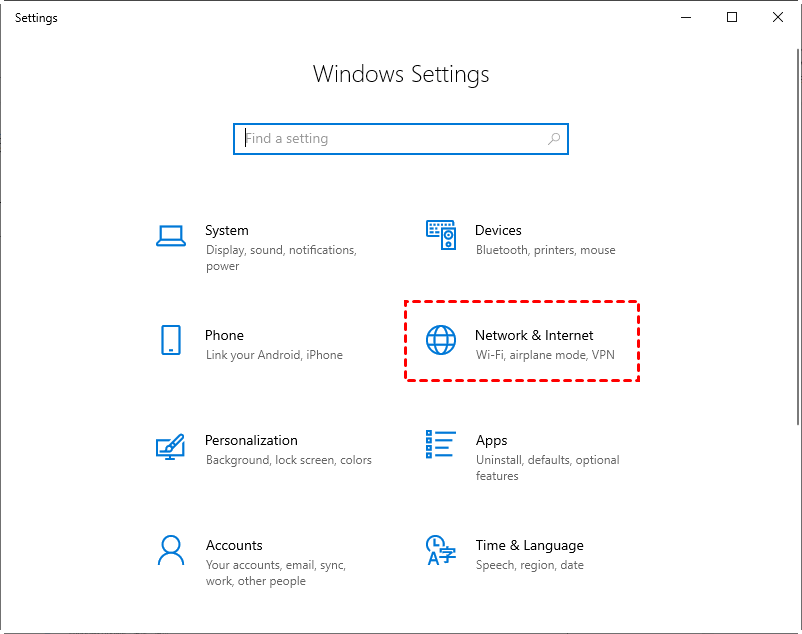
Step 2. Click Start and then click Settings. Find Network & Internet and then click it.
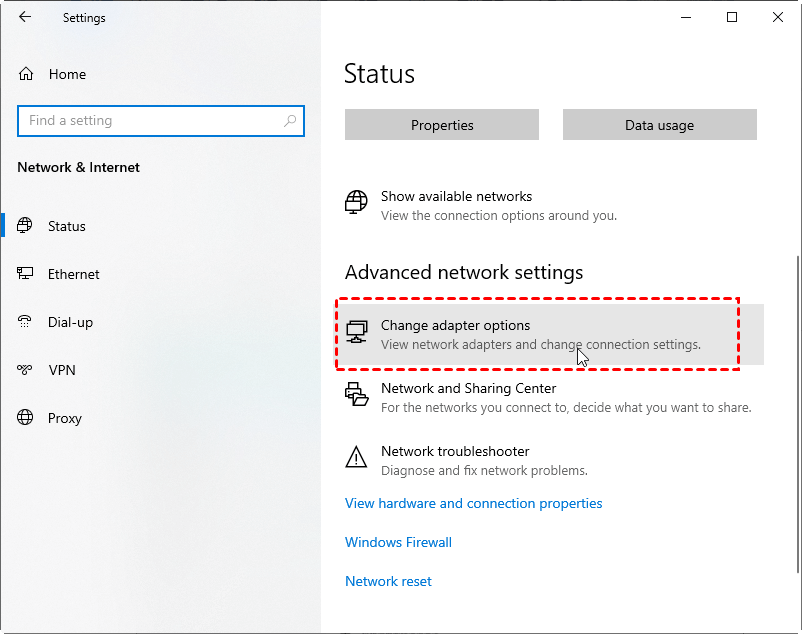
Step 3. On the Network & Internet interface, find Advanced network settings, and click Change adapter options below.
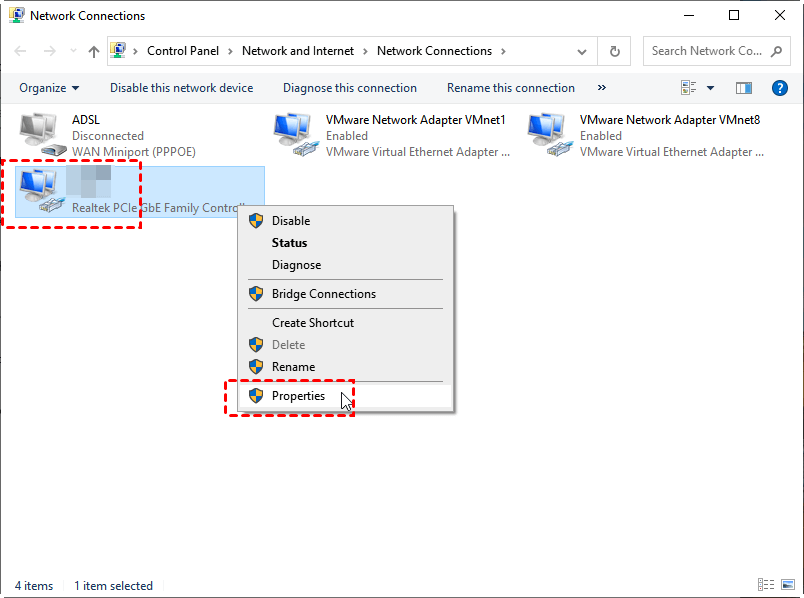
Step 4. Right-click your network and then click Properties.
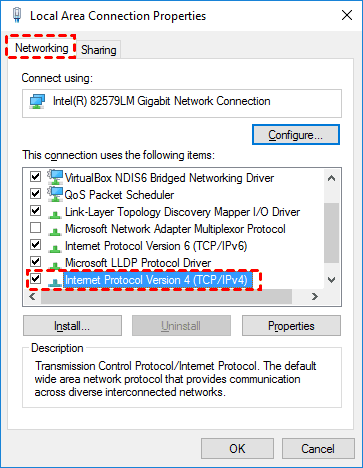
Step 5. Tick Internet Protocol Version 4 (TCP/IPv4), and click Properties.
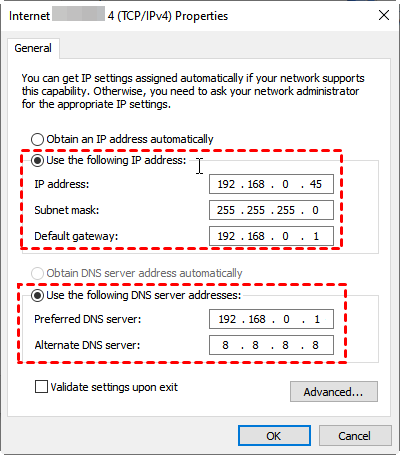
Step 6. Turn on Use the following IP address in the General tab, and change the IP address to a Static IP address. For example, if your router IP is 192.168.0.1, your usable IP is from 192.168.0.2 to 192.168.0.254. You can use 192.168.0.45 as your Static IP.
Set the Subnet mask to the default values, 225.225.225.0.
Set the Default gateway to the Default Gateway address noted down above.
Then turn on Use the following DNS server addresses, set the Preferred DNS server to the same Default Gateway address, and set the Alternate DNS server to Google DNS, 8.8.8.8.
Click OK to apply changes.
Part 4. Getting the remote PC name
Open the Command Prompt again, and type in “query user” to get the PC name.

Part 5. Gaining access to the remote desktop
Now everything is ready. You can start to access the remote computer. Let’s see how to use Remote Desktop on local network Windows 10, 11.
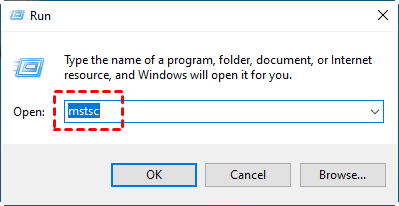
Step 1. On the client computer, press Win + R, type in “mstsc” in the Run Dialog box, and click "OK" to open the Remote Desktop Connection.
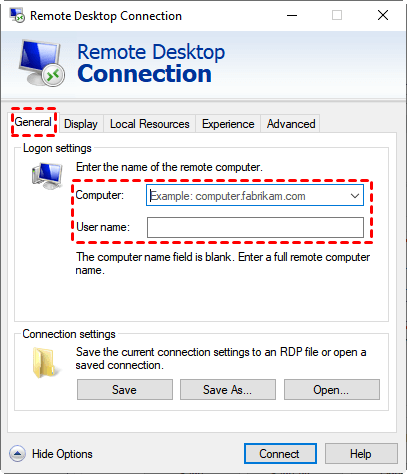
Step 2. Click Show Options, type in the IP address and name of the host computer, and then click Connect.
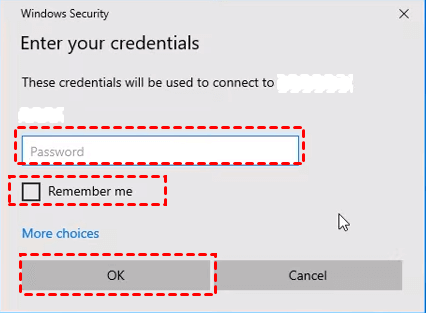
Step 3. Input the password of the client computer in the pop-up window, and press ”OK“.
Bonus tip: Connecting Remote Desktop over the internet
Connecting Remote Desktop over Internet requires an additional step, port forwarding. You’ll have to switch port 3389 to the IP address of your computer in your router and then connect to the public address of your router specifying this port.
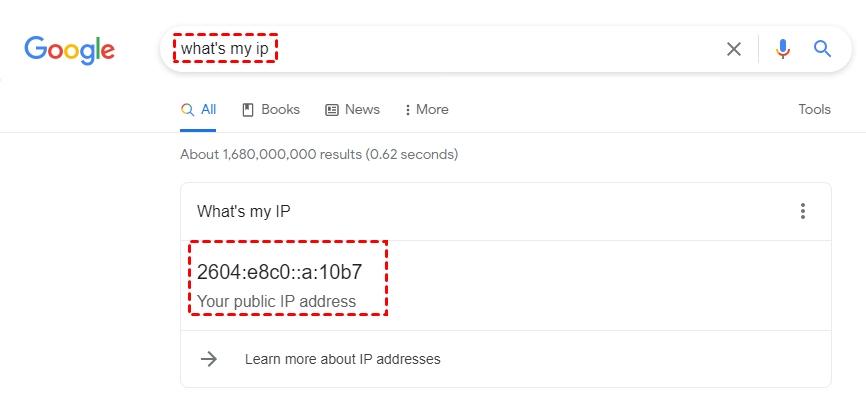
Step 1. Enter "what is my ip" into the search bar of the browser, then write down your public IP address (not to share it with anyone else in case of security issues).
Step 2. Enter the IP address of your router in a web browser once it is open. Then a privacy warning will appear. To proceed, select Advanced > Continue.

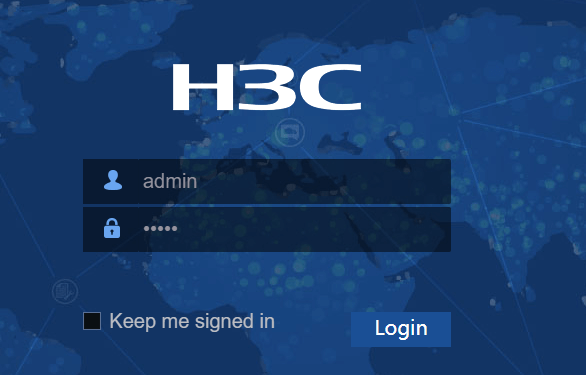
Step 3. Enter the username and password for your router in the box, then click Login.
Step 4. From the left pane, select Port Forwarding/Port Triggering. To add a new port forwarding rule, click Add and select Add Custom Service.
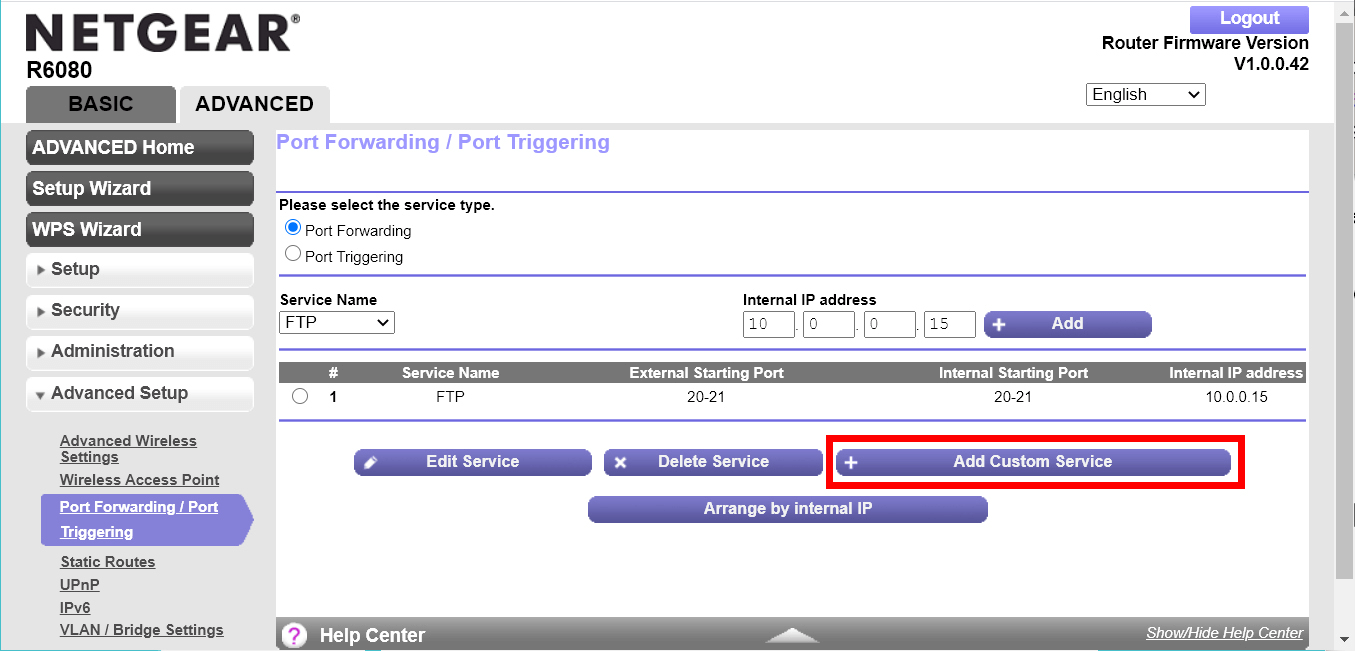
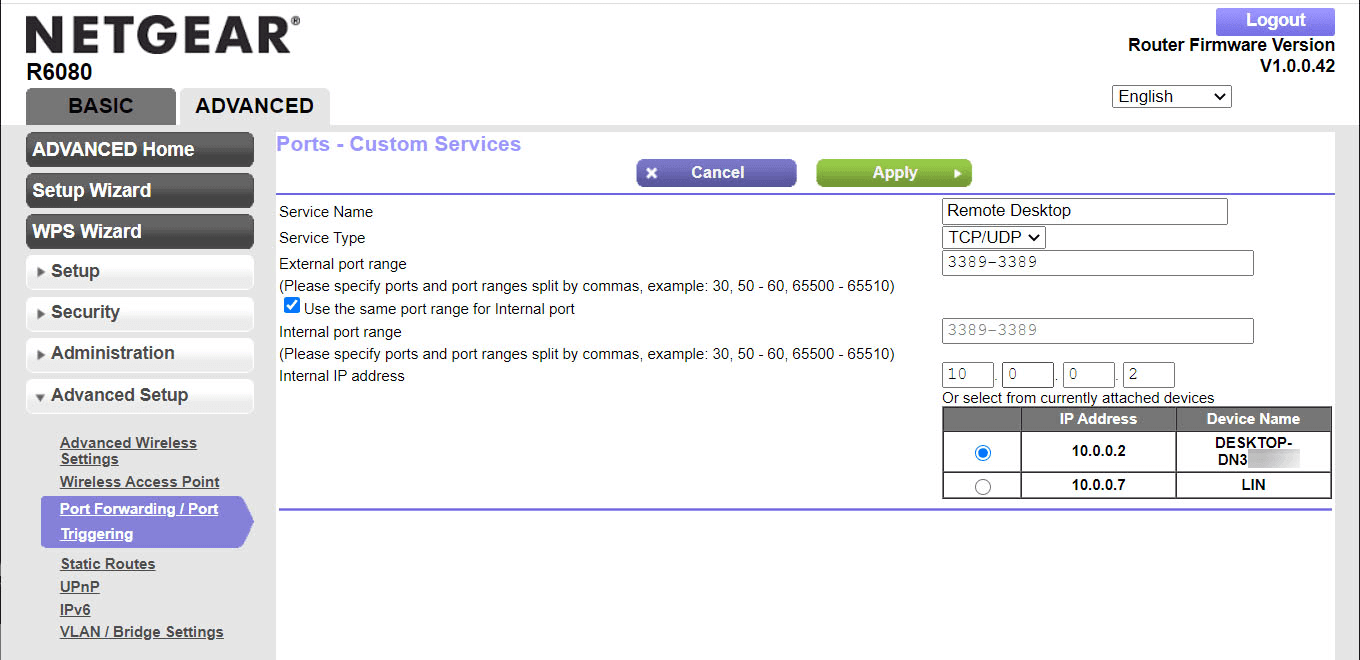
Step 5. In the Port Forwarding interface, choose the port you want to forward (if you are unsure of the protocol being used, choose TCP/UDP or Both under Service Type). Click apply after selecting the IP address of the device you want to port forward.
Step 6. Follow the same steps on how to use Remote Desktop Connection over LAN; you can connect to a remote desktop over the internet now.
An easier way to access remote desktops over LAN & internet
Opting for the free remote access software AnyViewer comes highly recommended for remote desktop access over both LAN and the Internet. What sets AnyViewer apart as the superior Remote Desktop alternative? Here are the key reasons:
- Simplified setup: AnyViewer offers an uncomplicated setup process. You can effortlessly access a remote computer, even if it's not within your local network, without the need for intricate port forwarding configurations.
- Enhanced compatibility: AnyViewer boasts seamless compatibility with Windows Home and Windows Standard editions, which traditionally lack support for Remote Desktop functionality.
- Multiple concurrent sessions: AnyViewer surpasses the capabilities of Remote Desktop Connection by facilitating multiple concurrent remote sessions, a feature not provided by the latter.
✔ Note: AnyViewer also releases mobile apps for you to access a computer from an Android device, iPhone, or iPad.
Step 1. Navigate to Log in and then Sign up on the Controller computer to create an AnyViewer account. (if you have already registered on the official website, you can log in directly).

Step 2. Your device will be automatically assigned to the account to which you have logged in and is listed on My devices.

Step 3. Log in to the same AnyViewer account on the two devices, then you can click One-click control to achieve a direct connection, click View the screen to see another’s screen or click File transfer to share files between computers.

- ✍ Upgrade your account's plan to a Professional or Enterprise and you can:
- Connect in privacy mode: Access the remote computer by blacking out the remote PC screen and disabling the remote keyboard & mouse to protect privacy.
- Asisgn more devices: More devices will be allowed to assign to the same account for one-click unattended remote access and power management.
- More channels offered: Among assigned devices, more devices that can start remote connections at the same time.
- Control more computers: One computer can control more computers at the same time.
- Group computers for efficient management: Create groups to conveniently handle a large number of enterprise devices.
The bottom line
This post primarily introduces how to use Remote Desktop Connection over LAN and over the internet. Besides, it also provides you with an easier way to access remote computers from anywhere. Try AnyViewer right away.
