
Easily Fixed: Quick Assist "A Referral Was Returned from The Server"
This post primarily outlines the causes of the Quick Assist "A referral was returned from the server" issue, along with three tested solutions to resolve the problem. Keep reading if you have the same problem.
By Ellie / Updated on December 13, 2024
How do you fix "A referral was returned from the server"?
I'm currently dealing with an issue regarding Quick Assist where a referral was returned from the server. I've tried troubleshooting on my end, but I'm still facing some challenges in resolving it completely. Any tools or techniques you found particularly helpful?"
-Question from Reddit

Encountering the Quick Assist "A referral was returned from the server" error can be quite perplexing, particularly when relying on its services. Understanding the complexities of this issue and implementing effective troubleshooting strategies can greatly enhance user satisfaction and service quality.
In this article, we explore the intricacies of referral returns from the server, providing solutions to guarantee a smooth experience for both service providers and users.
Common reasons for Quick Assist "A referral was returned from the server" error
What triggers the Quick Assist "A referral was returned from the server" error? Here are some common causes behind this issue:
- Network Issues: Connectivity problems, such as intermittent internet connection or network congestion, can prevent the referral from reaching the server successfully.
- Server Configuration Problems: Misconfigured server settings, including firewall rules, port configurations, or authentication issues, may cause the server to reject the referral request.
- DNS Errors: Issues with Domain Name System (DNS) resolution, such as incorrect DNS settings, outdated cache, or DNS server unavailability, can lead to referral returns.
- Firewall Restrictions: Stringent firewall settings on either the client or server side can block the referral request, resulting in the error.
Before delving into more intricate troubleshooting steps on your Windows computer, you can swiftly check for these issues. If the problem persists, continue reading the following solutions.
How to fix Quick Assist “A referral was returned from the server” [3 solutions]
The provided reasons offer comprehensive guidance for addressing the issue. Now, let's proceed together to resolve the Quick Assist "A referral was returned from the server" on Windows 11 and Windows 10.
Solution 1. Disable Public Key Infrastructure (PKI) Signature Check by using the Group Policy Editor
For Windows 11 Pro, Education, or Enterprise Edition users, resolving the error involves disabling the public key infrastructure (PKI) signature check policy setting. This setting enforces PKI signature checks on apps necessitating administrative privileges. Typically, this policy is deactivated by default on most Windows systems. However, if not, you can manually disable it via the Group Policy Editor.
Step 1. Press Win + R and then type in “gpedit.msc” to open Group Policy Editor.
Step 2. Navigation: Computer Configuration > Windows Settings > Security Settings > Security Options. Then scroll down to find “User Account Control: Only elevate executables that are signed and validated”.
Step 3. Under the "Local Security Setting", tick "Disabled" and click on “OK”.
Method 2. Disable cryptographic signature enforcement using Registry Editor
If you encounter the error across all applications on your computer, disabling cryptographic signature enforcement for interactive applications might offer a solution. This policy pertains to applications that require administrative privileges to execute.
You can disable cryptographic signature enforcement through the Registry Editor. However, before proceeding with this fix, it's advisable to back up your registry to prevent any potential issues in case of errors.
Step 1. Press Win + R and then type in “regedit” and then press the "Enter" key to open Registry Editor.
Step 2. Navigation: HKEY_LOCAL_MACHINE\SOFTWARE\Microsoft\Windows\CurrentVersion\Policies\System\
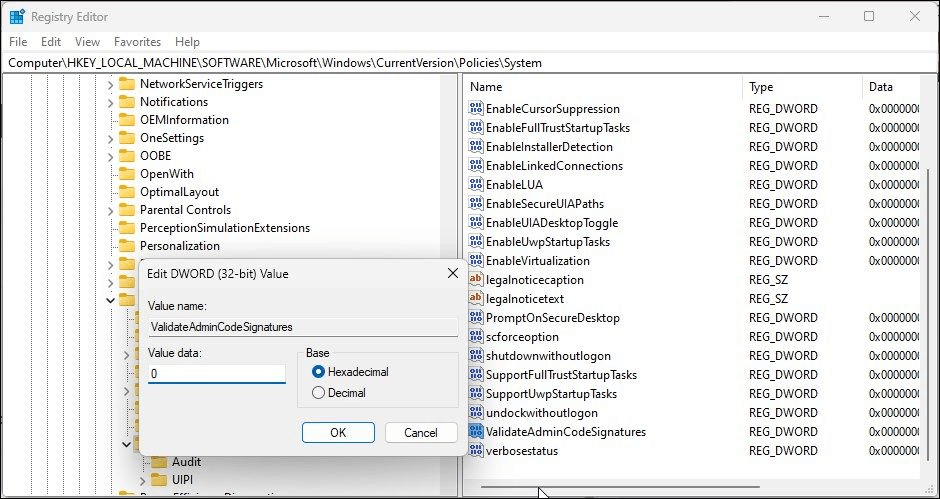
Step 3. In the right pane, find “ValidateAdminCodeSignatures” and double-click it.
Step 4. Change the value to 0 and click on OK.
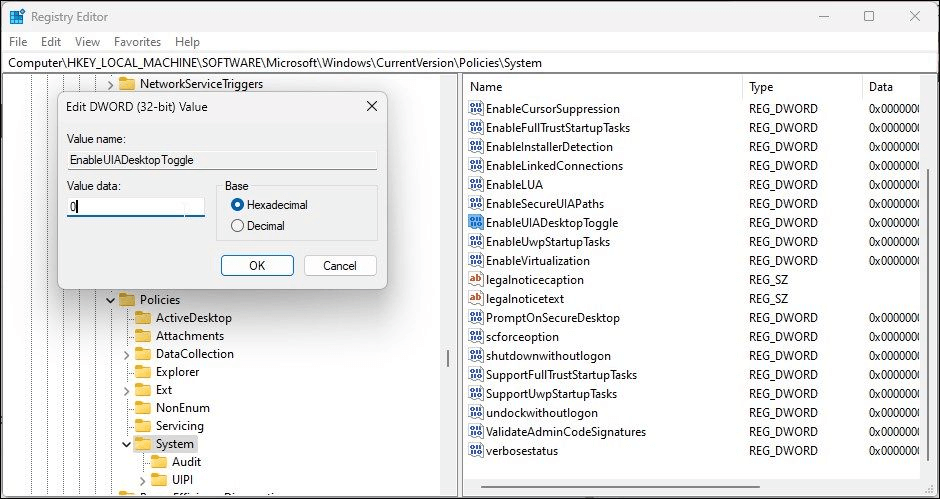
Step 5. Go to “EnableUIADesktopToggle” in the same pane and then double-click.
Step 6. Change to value data to 0 and click on “OK”.
Step 7. Reboot your system and check whether the problem has been addressed.
Method 3. Change UAC by using the control panel
If you encounter this error with a particular program and have obtained it from a trusted source, disabling User Account Control (UAC) settings can assist in installing the app without encountering the error.
Step 1. Press Win + R and input “control panel” and then click on “OK”.
Step 2. Choose "User Accounts".
Step 3. Click on “Change User Account Control settings”.
Step 4. Choose "Never notify" and click on “OK”.
Final solution: Free & Secure remote assistance software - AnyViewer
Have you successfully resolved the "A referral was returned from the Server" Quick Assist issue? If so, your confirmation on whether the provided solutions worked would be appreciated. However, if the problem persists, there's no need to worry. Consider using AnyViewer, a free third-party remote support software, as an alternative solution.
AnyViewer is recommended as the top alternative to Quick Assist for remote support due to the following reasons:
- Strong Security: AnyViewer ensures data security through end-to-end encryption and offers two-factor authentication for account protection.
- Improved Performance: AnyViewer provides fast and seamless remote access, featuring low latency and a high frame rate of up to 60 FPS.
- Impressive Features: AnyViewer comes equipped with various built-in features, including chat functionality, file transfer capabilities, and copy/paste functionality.
- Compatibility: AnyViewer supports multiple Windows versions (not restricted to Windows 10 and 11 like Quick Assist), as well as Android and iOS devices.
Download and install AnyViewer, then follow the steps below to provide remote support to unattended computers:
Step 1. Sign up for an AnyViewer account. Once logged in, the PC will be assigned to the account automatically.

Step 2. On the client computer, log in to the same account. Then go to "Device", click the PC that you need to control, and click "One-click control" to achieve unattended access with one click.

If you need to help a client with computer issues and don't want to log in to your AnyViewer account on his computer, the following steps are also workable for you:
Step 1. On your computer, input the device ID of his computer and then click on “Connect”.
Step 2. Choose the first option “Send a control request to your partner”.
Step 3. On his PC, there will be a pop-up window just like the following picture, tick "Allow".
Step 4. Then the connection is successful and you can assist him with AnyViewer.
✍ Note: Consider upgrading to a Professional or Enterprise plan if you wish to access additional advanced features such as privacy mode, high-quality image transmission, accelerated file transfer, unattended remote access to a broader range of devices, and more.
Conclusion
In conclusion, troubleshooting the Quick Assist "A referral was returned from the server" error requires a systematic approach and an understanding of its underlying causes. By addressing network issues, server configurations, DNS errors, and firewall restrictions, users can often resolve the issue efficiently. The provided solutions, including adjusting Group Policy settings, modifying Registry Editor values, and changing User Account Control settings, offer practical steps to tackle the problem on Windows 10 and Windows 11 systems.
Additionally, considering alternative remote support software like AnyViewer can provide a reliable solution for assisting clients seamlessly while ensuring data security and compatibility across various devices.
