
Stepwise Tutorial: Allow Multiple Remote Desktop Connections to One PC
Do you want to initiate multiple remote connections simultaneously? This post mainly introduces how to enable multiple remote desktop connections to one PC on Windows and Windows Server. Read it carefully.
By Ellie / Updated on April 16, 2025
Can you have multiple Remote Desktop Connections?
Windows 10 and 11 Pro and Enterprise editions come with built-in support for Remote Desktop Protocol (RDP), enabling users to access their systems remotely. However, there's a key limitation: only one user can be connected via RDP at any given time. Multiple users trying to connect simultaneously aren't supported.
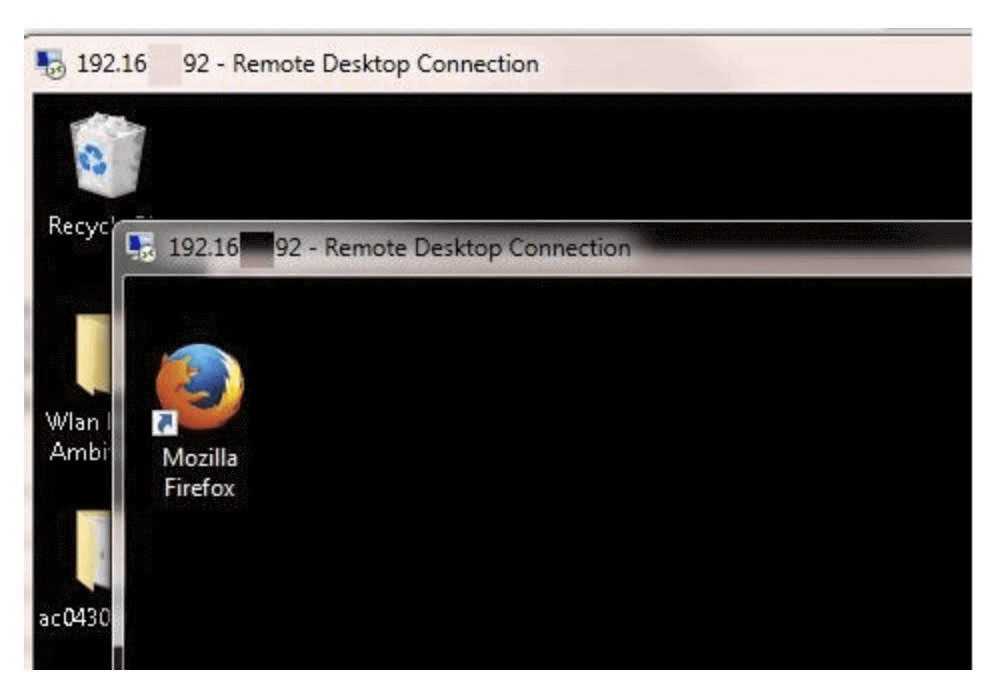
If a second user attempts to start a remote session, a warning appears indicating that proceeding will log out the active user: “Another user is signed in. If you continue, they’ll be disconnected. Do you want to sign in anyway?”

Looking for a way around this limitation? Fortunately, there are a couple of effective methods to enable multiple remote desktop sessions on Windows 10 or 11. This guide will walk you through two practical solutions: utilizing the open-source RDP Wrapper tool or manually modifying the "termsrv.dll" system file.
2 ways to enable multiple Remote Desktop Connections to one PC on Windows 10, 11
Does this mean it is not possible to allow Windows 10 multiple users simultaneously on RDP? Not exactly. Here in this part, we’ll introduce two options on how to enable multiple Remote Desktop Connections to one PC on Windows 11/10/8.1/8/7.
Warning: Before reading the two methods, please bear in mind the following points:
- Each user and device that connects to a Remote Desktop Session host need a client access license (CAL). If you want to enable multiple remote desktop connections to one PC, please buy more CALs.
- These two methods break the End User License Agreement (EULA). You are advised to only use these methods in a test or educational environment. Perform all the operations described below at your own risk.
Way 1. Enable multiple RDP sessions by using the RDP Wrapper Library
The first option to enable multiple RDP sessions on Windows 11/10/8.1/8/7 is to use the RDP Wrapper Library, which works as a layer between Service Control Manager and Terminal Services and allows users to establish more than one simultaneous RDP session without modifying the original termsrv.dll file.
Step 1. Download the latest available version of the RDP Wrapper Library.
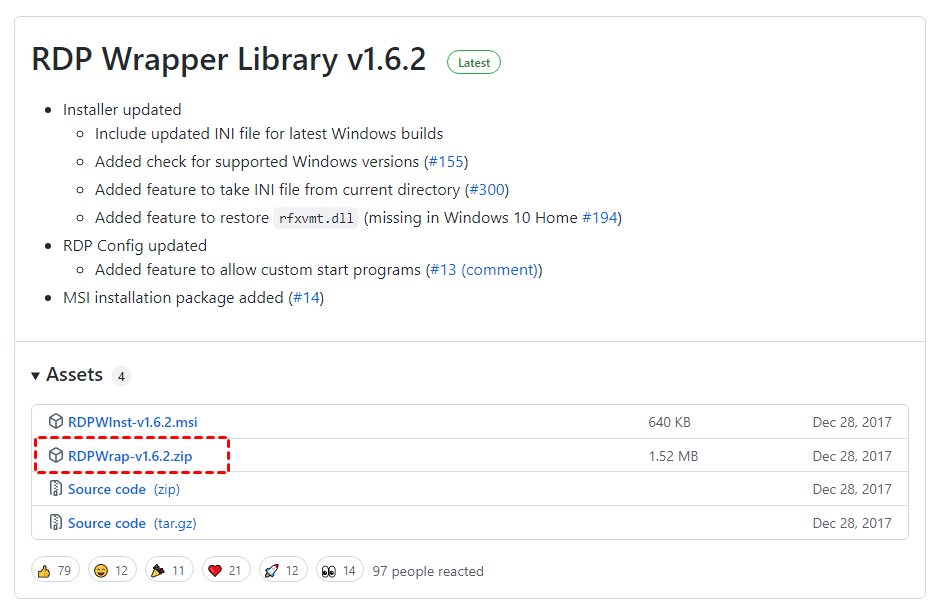
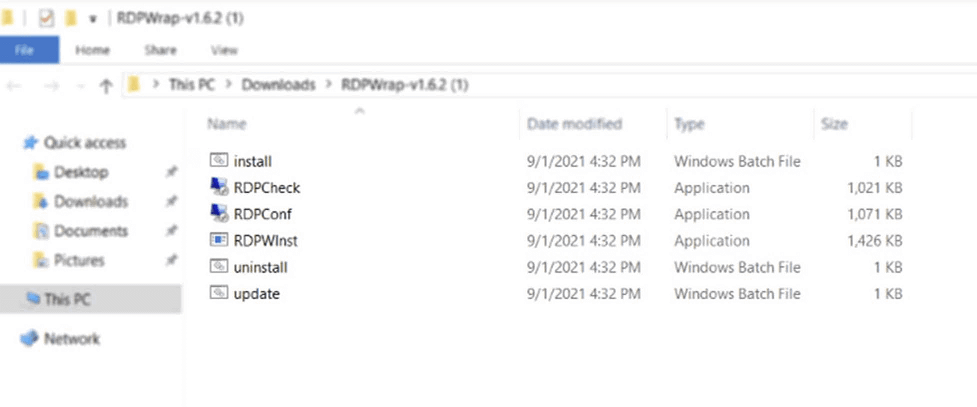
Step 2. Extract the RDPWrap-v1.6.2.zip, below are the extracted content of RDPWrap-v1.6.2.zip archive:
- RDPWinst.exe: RDP Wrapper Library install/uninstall the program
- RDPConf.exe: RDP Wrapper configuration tool
- RDPCheck.exe: RDP check utility and Local RDP Checker
- install.bat, uninstall.bat, update.bat: batch files to install, uninstall, and update RDP Wrapper.
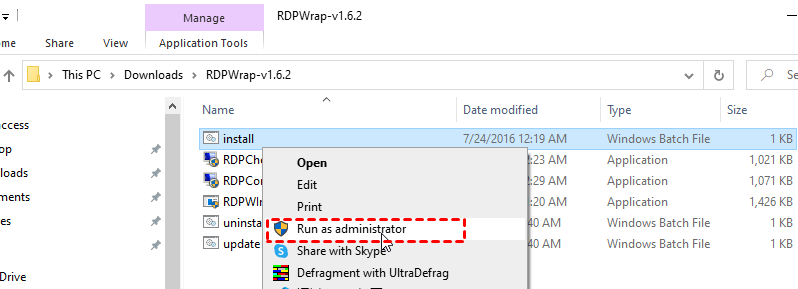
Step 3. Right-click on the install.bat and choose Run as administrator option from the context menu to install RDPWrap.
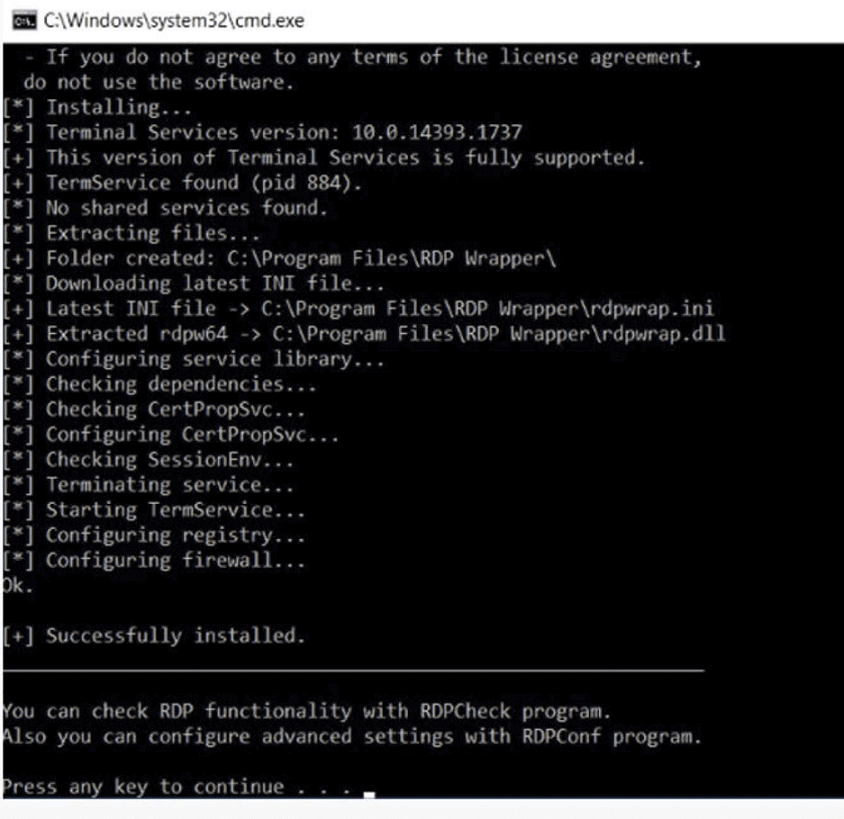
Step 4. The program will access the GitHub site for the most recent versions of the ini file during the installation, then install it to the C:\Program Files\RDP Wrapper directory. After installation is completed, you can see the successfully installed message below:
Step 5. Double-click RDPConfig.exe to open RDP Wrapper Configuration to ensure the installation was successful and RDPWrapper is functioning properly. In the Diagnostics section, make sure that all elements are green.
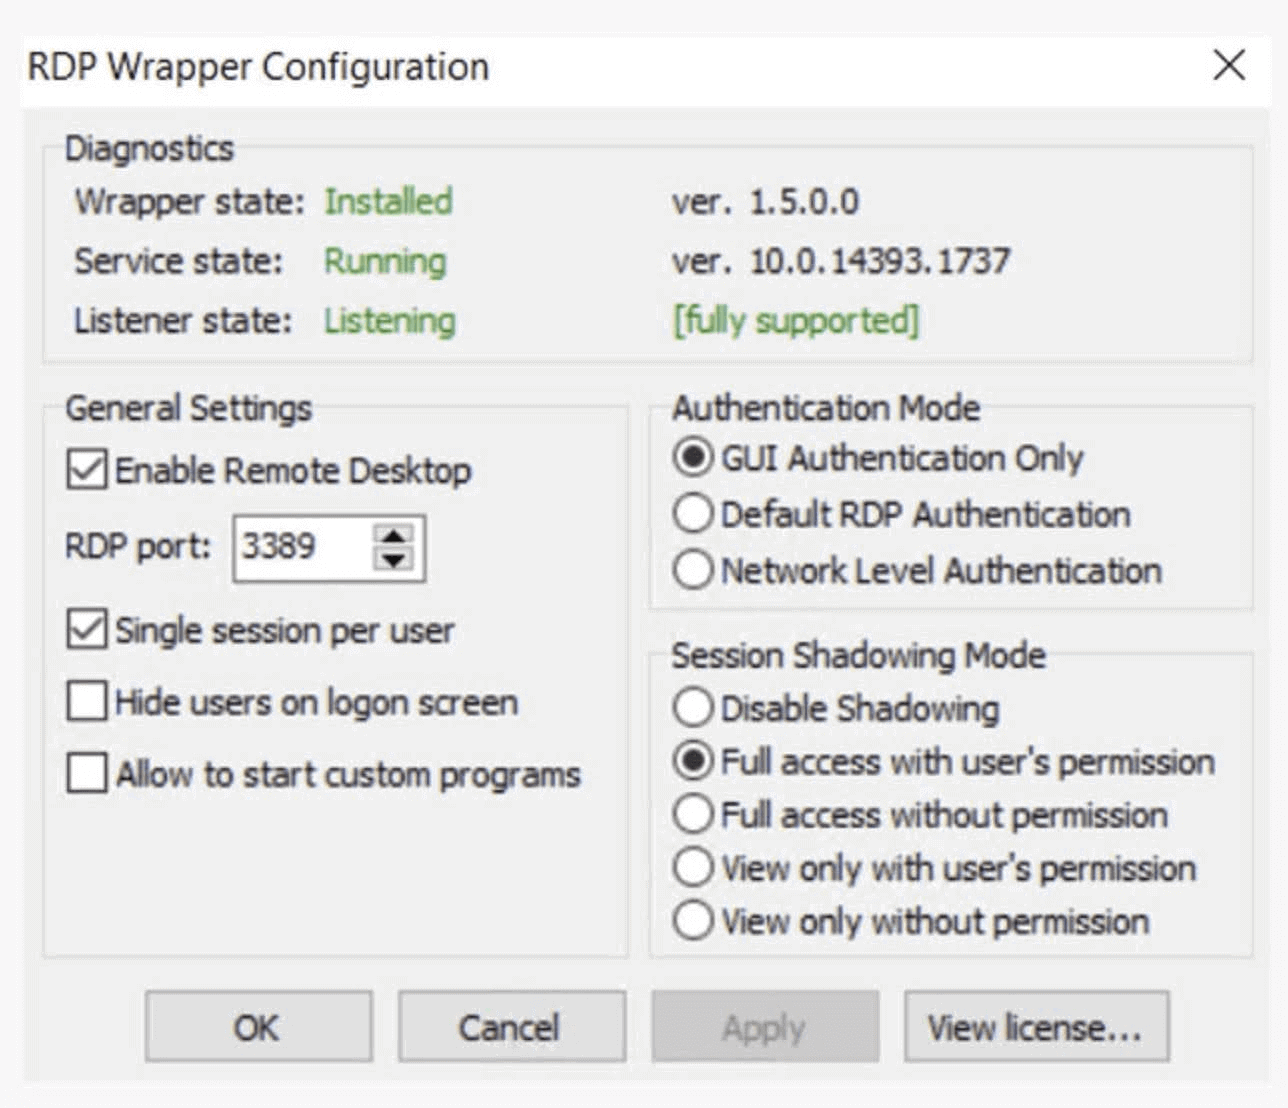
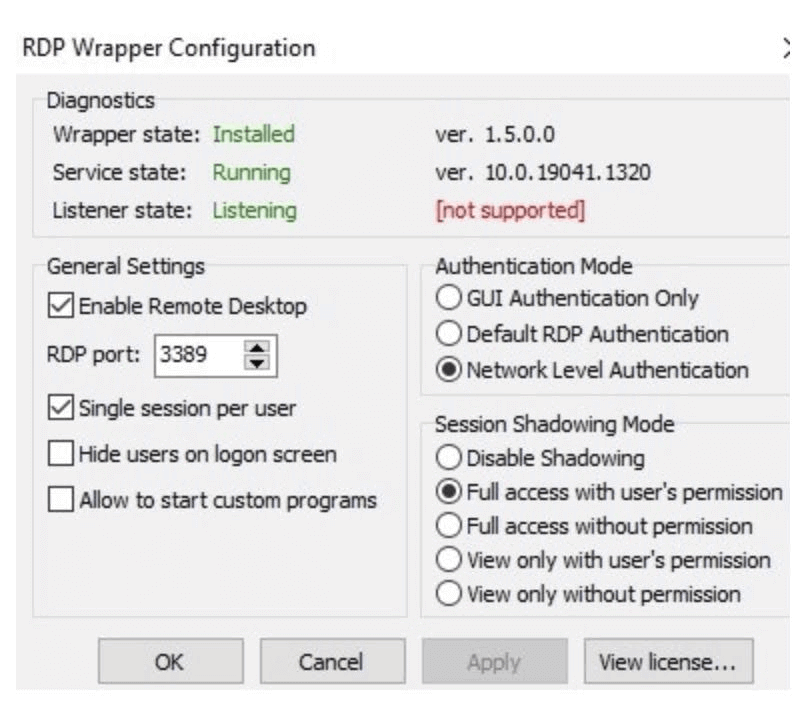
Step 6. Most likely, immediately after installation, RDPConfig will show that the RDP wrapper is running (Installed, Running, Listening), but not supported.
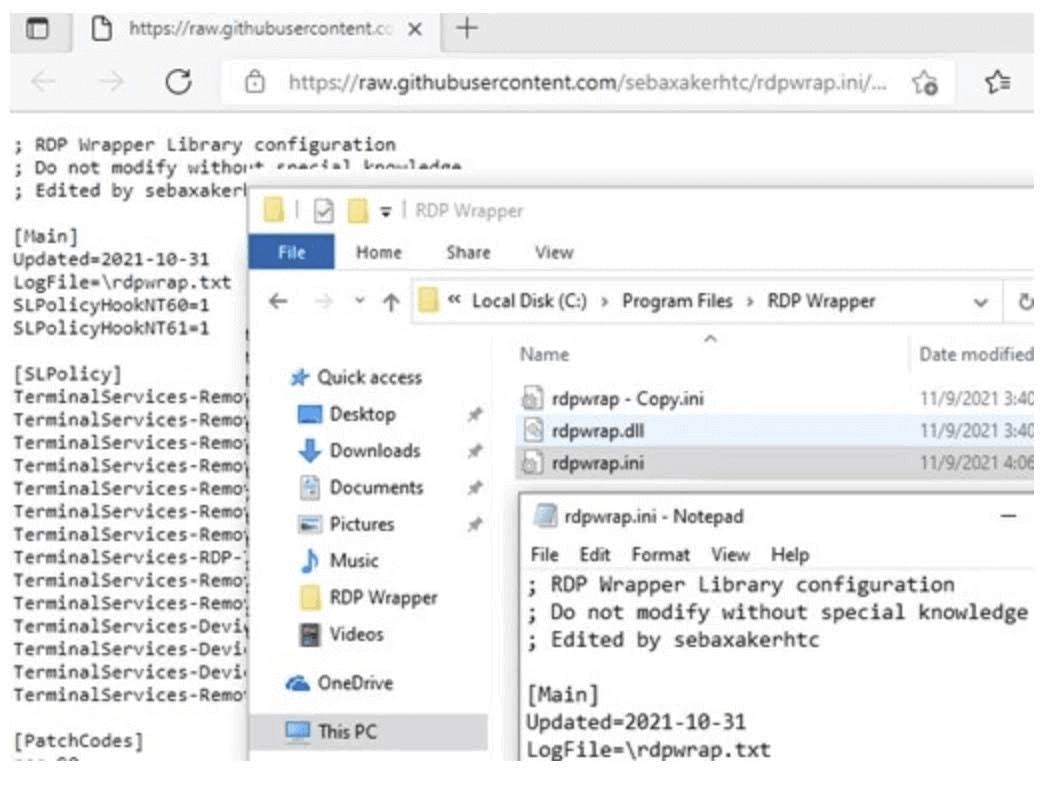
Step 7. Copy and paste the contents of the following page to the C:\Program Files\RDP Wrapper\rdpwrap.ini file:
https://raw.githubusercontent.com/sebaxakerhtc/rdpwrap.ini/master/rdpwrap.ini
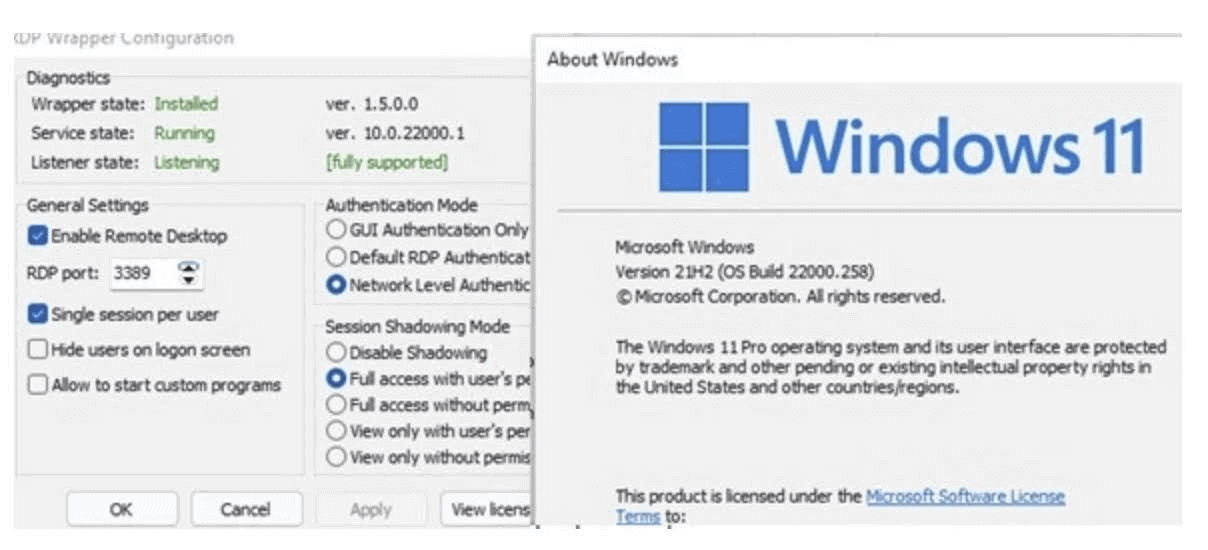
Step 8. Restart your computer. Double-click RDPConfig.exe to open RDP Wrapper Configuration and ensure that all items in the Diagnostics section are green and the caption “fully supported” appears.
Step 9. Run RDPCheck.exe to try to start a secondary RDP session or connect multiple RDP sessions from remote computers. You should be able to start multiple RDP sessions at the same time.
Way 2. Enable multiple RDP sessions by editing the termsrv.dll file
The second option is to enable multiple remote desktop connections to one PC on Windows 11/10/8.1/8/7 by editing the termsrv.dll file. Here we’ll take Windows 8.1 as an example.
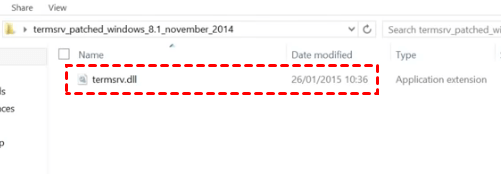
Step 1. Download the zipped patch file that includes the patched version of termsrv.dll file for Windows 8.1. (You can also download the patched termsrv.dll file for Windows 10.)
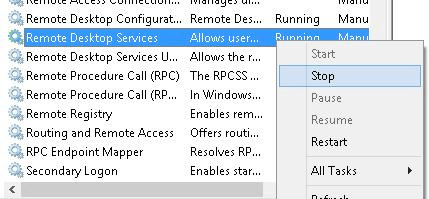
Step 2. Press Win + R, and then type in “services.msc” to open the Services management console. Find Remote Desktop Services in the list and right-click it to stop it.
Step 3. Run Command Prompt as administrator, back up the original termsrv.dll using the following command in case something goes wrong:
copy c:\Windows\System32\termsrv.dll termsrv.dll_old

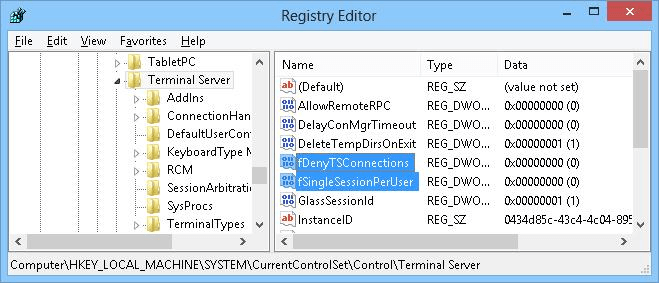
Step 4. Change the values of the following keys in HKLM > System > CurrentControlSet > Control > Terminal Server:
- fDenyTSConnections (DWORD) — 0
- fSingleSessionPerUser (DWORD) — 0
You can also do it quickly by entering the following two command lines in the Command Prompt:
- REG ADD “HKLM\SYSTEM\CurrentControlSet\Control\Terminal Server” /v fDenyTSConnections /t REG_DWORD /d 0 /f
- REG ADD “HKLM\SYSTEM\CurrentControlSet\Control\Terminal Server” /v fSingleSessionPerUser /t REG_DWORD /d 0 /f
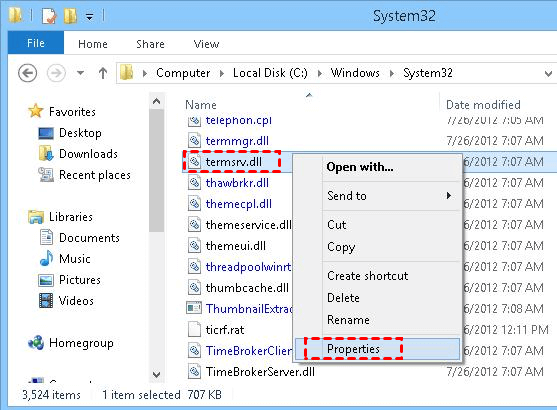
Step 5. Then go to C:\Windows\System32, find the file termsrv.dll, and right-click to open its Properties.
Step 6. By default, the owner of this file is TrustedInstaller and even the administrator doesn’t have any right to replace it. You need to give full control of this file to the administrator. Click Change.
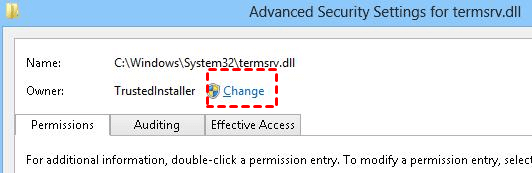
Step 7. Go to the Security tab and click Edit. Find the local administrators group and give it full control over this file and save the changes.

Step 8. Copy termsrv.dll from the archive downloaded in Step 1 for your Windows 8.1 to %SystemRoot%\System32\ (with replacement).
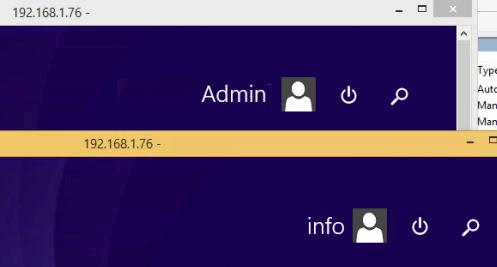
Step 9. Open the Services management console again and start the Remote Desktop Services. Then you’re able to create two RDP sessions with the patched computer from different accounts.
How to enable multiple remote desktop connections to one PC on Windows Server
As we have mentioned before, Windows Server OS supports multiple RDP sessions simultaneously by default. You only need to do a few configurations to allow multiple remote desktop connections on Server 2022/2019/2016/2012 R2.
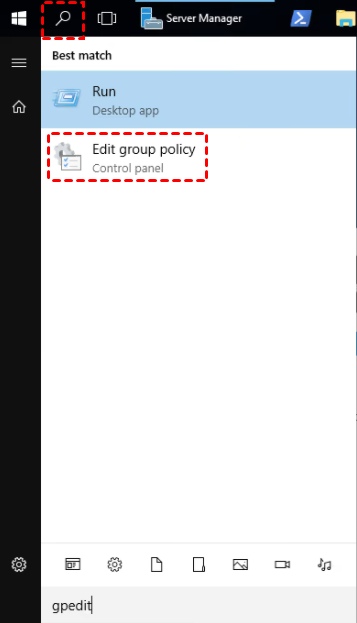
Step 1. Click the Search button next to the start menu then enter in “gpedit.msc”.
Step 2. Navigate here: Computer Configuration > Administrative Templates > Windows Components > Remote Desktop Services > Remote Desktop Session host > Connections.
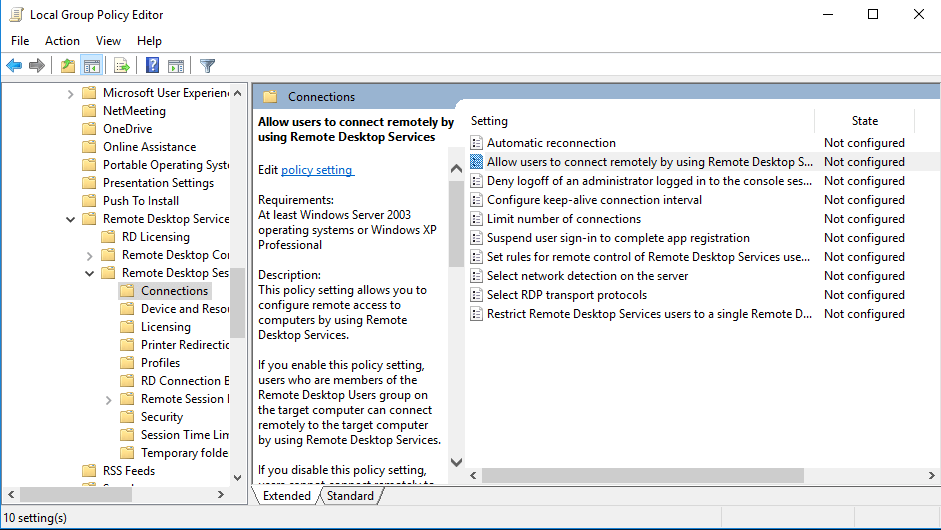
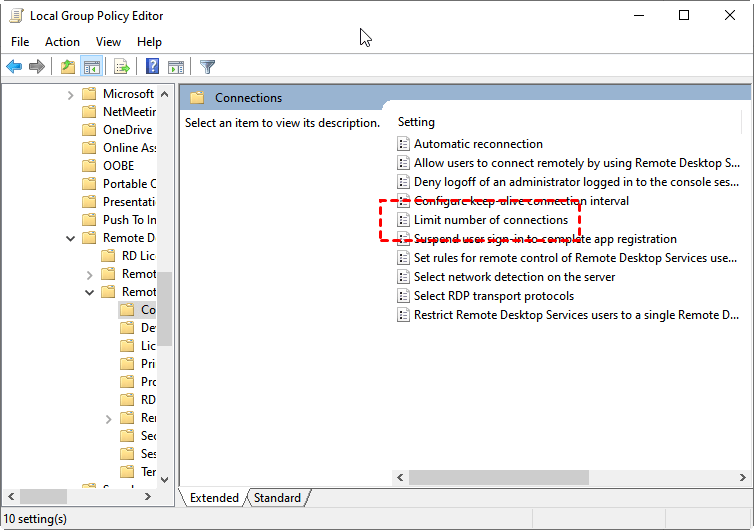
Step 3. On the right pane, find and double-click Limit Number of Connections.
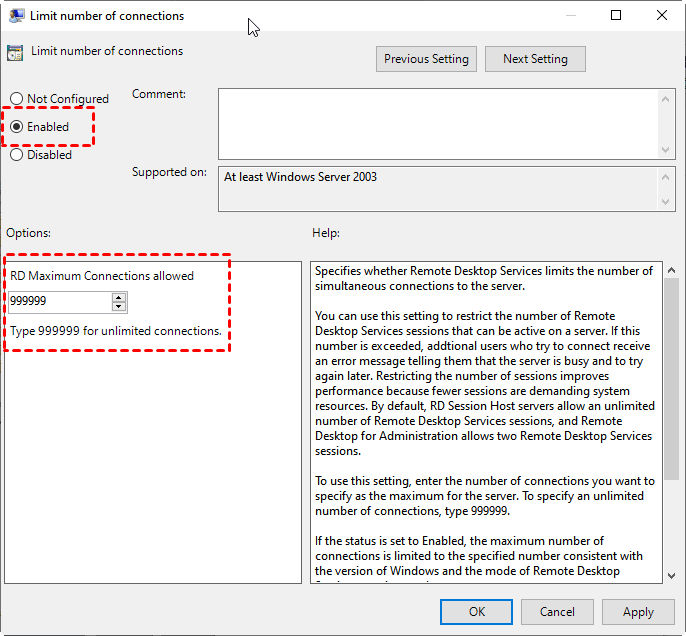
Step 4. You can either set it to Enabled and set the number to the limit you wish to have.
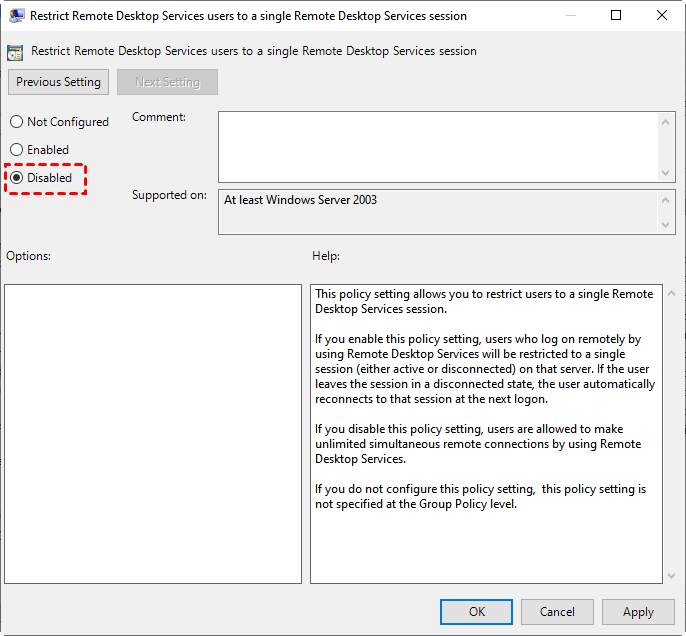
Step 5. Again, on the right pane of Connections, find and double-click Restrict Remote Desktop Services users to a single Remote Desktop Services session.
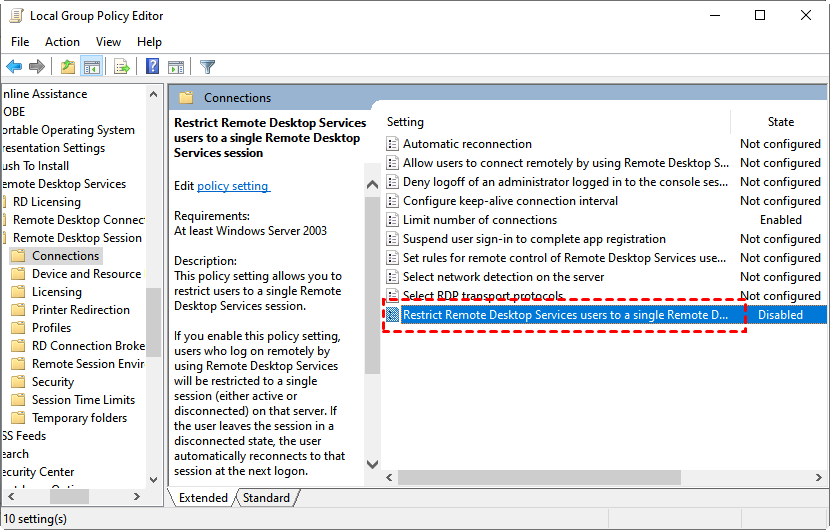
Step 6. Set it to Disabled to turn off the user restrictions.
Step 7. Reboot the computer to make the changes apply. Then you are allowed to start multiple remote desktop connections to one PC on Windows Server.
Bonus tip: An easier way to enable multiple remote desktop connections
AnyViewer is a powerful remote desktop tool that’s completely free, lightning-fast, and incredibly easy to use. It’s built to handle multiple remote desktop connections at once, allowing users to switch between a client’s devices smoothly and without hassle. For professionals who need to manage and support several machines efficiently—without bouncing between different apps or paying extra—AnyViewer is a smart, all-in-one solution.
Before diving into how to use AnyViewer for multiple remote desktop connections, let’s take a moment to highlight why it’s a better option than RDP.
- Broader Compatibility: Remote Desktop Protocol (RDP) only works with Windows Professional and Enterprise editions. AnyViewer, on the other hand, supports a wide range of operating systems, including all Windows editions, Windows Server, and even macOS.
- Multiple Sessions Supported: RDP allows just one active session at a time for free. If a second session is started, the current user gets disconnected. AnyViewer offers support for two remote sessions simultaneously—at no cost.
- Budget-Friendly Solution: Enabling multiple RDP sessions often comes with a hefty price tag. AnyViewer provides unlimited concurrent remote desktop sessions at a much more affordable rate, making it a cost-effective choice for both individuals and businesses.
- No Network Limitations: RDP typically requires complex setup like VPNs or port forwarding when connecting across different networks. AnyViewer eliminates that hassle—it works seamlessly, even when devices are on separate networks.
Step 1. Download, install, and launch AnyViewer on Windows computers. Go to Log in, and then click Sign up. (If you already have signed up on its official website, you can log in directly.)

Step 2. Once you're logged in to AnyViewer, you'll see a confirmation that the login was successful. Your device will automatically be linked to the account you signed in with. If you want to connect additional devices under the same account, it's best to upgrade to a Professional or Enterprise plan, which allows unlimited concurrent sessions.

Step 3. On the computer you intend to use for remote control, you'll see a list of all devices logged into the same AnyViewer account. Simply click One-click control to initiate unattended remote access to any of those devices instantly.

Step 4. The concurrent remote sessions will appear as separate tabs, making it easy to switch between and manage multiple remote connections at the same time.

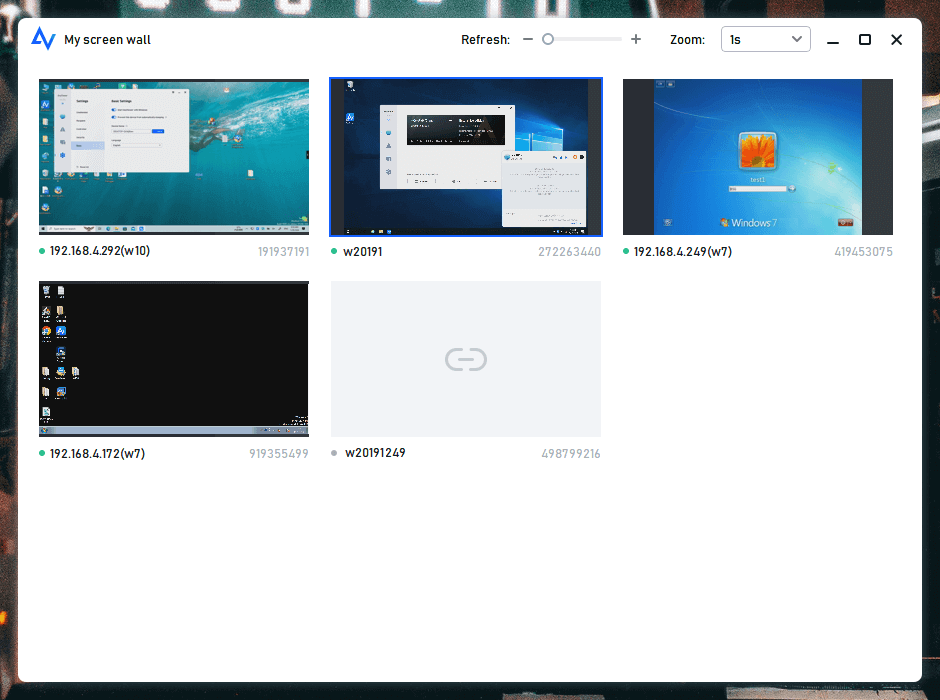
Tips: To monitor multiple devices more efficiently and view them all on a single screen, consider using AnyViewer’s Screen Wall feature. It allows you to keep an eye on several sessions at once and quickly access any device as needed.
Conclusion
Enabling multiple remote desktop sessions to one PC on Windows 10/11 can greatly improve productivity and flexibility. While methods like RDP Wrapper and modifying the termsrv.dll file are effective, they come with certain risks and complications.
For a more straightforward and risk-free solution, AnyViewer is an excellent alternative. With its intuitive interface, fast connection speeds, and free access, AnyViewer makes managing multiple remote desktops easy. It streamlines remote access while avoiding the potential issues and licensing concerns that can arise with other methods.
