
Stepwise Guide: How to Remote into Multiple Computers at Once
Take a moment to read through this post to discover the detailed steps to remote into multiple computers via Remote Desktop Connection, and explore a more efficient method for remotely controlling multiple computers.
By Ellie / Updated on January 20, 2025
Can I remote desktop to multiple computers?
Due to my work, I need to remote into multiple computers at once. For example, in a mainframe room with 10 computers, I have to access each computer remotely to get my work done. Can I remote desktop to multiple computers?"
- Question from Tom
In today's digital age, the ability to access multiple computers remotely has become a necessity for many individuals and organizations. Whether you're a business owner, an IT professional, or a tech-savvy individual, the convenience and efficiency offered by remote desktop software are undeniable. But can you remote desktop to multiple computers simultaneously? Let's explore.
How to use Remote Desktop to remote into multiple computers [stepwise tutorial]
To remote into multiple computers for free, Remote Desktop (RDP) is a viable option. However, additional configurations are necessary. The following section will provide a comprehensive guide on configuring a Remote Desktop for simultaneous access to multiple PCs.
Part 1. Change the RDP port number in the Registry Editor
RDP default port 3389 only works for one computer, which means that if you want to connect to multiple computers at once, you must create a new port on each computer separately and then change the router accordingly to enable remote access to multiple computers.
Step 1. Press Windows + R to and then type "regedit" to open the Registry Editor.

Step 2. Navigation: HKEY_LOCAL_MACHINE\SYSTEM\ControlSet001\ControlTerminal Server\WinStation\RDP-Tcp
Step 3. Double-click on "PortNumber" in the right pane and tick "Decimal". The default port number is 3389, but you can change it to any other value, for example, 3388.
Part 2. Allowing the port to go through the firewall
After the setup of the port number for each PC, now we can allow the port to go through the Firewall so that we can connect successfully.
Step 1. Press Win + R and type "control panel" and hit “OK”.
Step 2. Click on “System and Security” and then find "Windows Defender Firewall". Click on “Advanced settings”.
Step 3. Double-click on "Inbound Rules" and then select "New Rule".
Step 4. Select "Port" in the "Rule Type" screen, and click "Next".
Step 5. In the "Protocol and Ports" screen, select "TCP", enter the port number, such as 3327, and click "Next".
Step 6. Select "Allow the connection" in the "Action" screen, and click "Next". In the "Profile" screen, check the "Domain", "Dedicated" and "Public" options according to your needs and click "Next".
Step 7. In the "Name" screen, enter the name of the new port, and click on "Finish".
Part 3. Assigning ports through the router
Step 1. Open the router configuration interface and find the Single Port Forwarding section.
Step 2. Enter the port number used to identify the computer or registry changes. For example, Desktop for the local computer and Laptop and Joe's PC for other remote computers.
Step 3. We also need to find the IPv4 address of each computer and assign it to the corresponding port number. Press "Win + R" and type "cmd", hit “OK”, and type "ipconfig" to find the computer's local IP address of the computer.
Part 4. Connecting to the new port
Now the setup is completed, you can connect to the object users one by one. But it needs to be mentioned that you should change the port number every time you connect to another user.
Step 1. Search "Remote Desktop Connection" in the search box.
Step 2. In the "General" tab, enter the IP address and user name of the host computer, and then click "Connect".
Step 3. In the Windows Security pop-up window, enter the password under this user name and click "OK".
Step 4. Click "Yes" for the Authentication pop-up window to successfully establish a remote connection. After that, you can remote into multiple computers in turn.
Bonus tip: Easier way to remote into multiple computers
While RDP can fulfill your basic remote control requirements, it's evident that using it to remote into multiple computers at once can be time-consuming and cumbersome. Hence, we highly advocate employing a free and secure remote access software called AnyViewer, which simplifies the process of connecting to multiple computers remotely.
- The highlights:
- Operating AnyViewer is quite straightforward, and the connection speed is rather impressive.
- AnyViewer is safeguarded with Elliptic Curve Cryptography (ECC) encryption, ensuring the confidentiality of your data, a crucial aspect for business applications.
- AnyViewer is compatible with various platforms, including Windows, Android, and iOS.
- With AnyViewer, unattended access is streamlined: a single click allows you to remotely connect to the computer after logging into the corresponding account.
- When connecting to the remote device with multiple screens, you can view the screens in separate windows and move them to your monitors for dual-screen control.
Let's see how to remote desktop into multiple computers easily with AnyViewer:
Step 1. Click the button to download, install, and launch AnyViewer on all computers. Go to Log in, and then click Sign up to create an AnyViewer account.

Step 2. You can see you successfully logged in to AnyViewer. Then, log into the same account on all computers where you want to establish a remote connection.

Step 3. On the computer that you start the remote sessions, go to Device, locate the computer you want to control, click it, and click One-click control. Do the same to remote into another computer.

Step 4. Now you can remote control multiple computers simultaneously and you can manage the sessions on the tab.
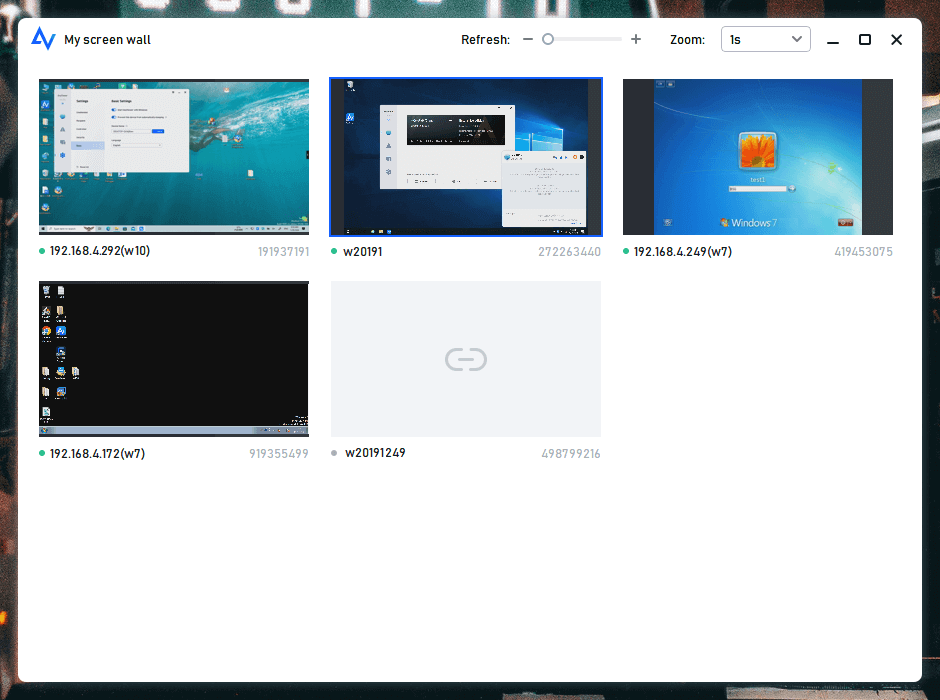
How to manage multiple computers easily
AnyViewer offers a convenient solution for overseeing multiple computers through its Screen Wall feature. This functionality enables users to effortlessly monitor all selected computers within a single window, granting the freedom to choose which ones to control without limitations. Let's delve into the process of creating your screen walls.
Step 1. On your local computer, navigate to the "Device" section, select your local device, and then opt for "Screen wall."
![]()
Step 2. Click on "Create screen wall."

Step 3. Select all the computers you wish to manage simultaneously, and then click "Add."

Step 4. You can now oversee and control all the added computers within a unified window.
Conclusion
While Windows Remote Desktop can help you remote into multiple computers, the procedure can be cumbersome and time-consuming. For a more convenient and straightforward approach to remote desktop into two or multiple computers simultaneously, it's strongly advised to opt for AnyViewer. This software not only simplifies the process but also allows you to effortlessly manage multiple sessions with ease.
