
Microsoft Remote Desktop Mac Use All Monitors Guide
Learn how to set up and use all monitors with Microsoft Remote Desktop on Mac. This guide covers Microsoft Remote Desktop Mac use all monitors, use multiple monitors, and Windows Remote Desktop Mac multiple monitors setup and tips.
By Ellie / Updated on November 7, 2025
How to Enable Microsoft Remote Desktop Mac Use All Monitors?
If you’re someone who manages work between multiple displays, you already know the power of having more screen real estate. Whether you’re an IT administrator, developer, designer, or even a project manager, juggling between applications, data, and remote systems is much easier when you’re not confined to a single screen. Microsoft Remote Desktop Mac Use all monitors mode gives users the ability to connect to their Windows PCs remotely and, even better, utilize every connected display for a seamless, multi-screen experience.

But here’s the catch: not everyone knows how to enable or optimize this feature properly. Many users struggle with partial screen use or blurry displays when trying to work across two or three monitors. Don’t worry, this guide breaks everything down step by step, from setup to troubleshooting, so you can get your perfect Windows Remote Desktop Mac multiple monitors workspace running smoothly on macOS.
Benefits of Using Multiple Monitors with Microsoft Remote Desktop
Working remotely doesn’t have to mean compromising productivity. With Microsoft Remote Desktop Mac use multiple monitors, you can replicate your physical office setup virtually. Imagine having Outlook open on one screen, Excel on another, and a browser or development tool on a third, all without constant window switching.
Here’s how multi-monitor setups boost your workflow:
- Enhanced multitasking: You can monitor different systems or documents simultaneously.
- Better focus: Keep communication tools on one screen while dedicating another to your main tasks.
- Efficiency: Drag and drop between windows easily, just like on your physical desktop.
Professionals like traders, engineers, and designers find this invaluable. A graphic designer, for instance, might keep Photoshop open on one display and their asset folders on another. Developers often test software on one screen while coding on another. Once you enable Microsoft Remote Desktop Mac Use all monitors, it’s like bringing your entire Windows workstation with you anywhere.
System Requirements for Multi-Monitor Setup
Before jumping into setup, make sure your system can handle it. Multi-monitor support requires both hardware and software compatibility.
1. Hardware requirements:
- MacBook or iMac with at least two monitor outputs (or support for DisplayPort/Thunderbolt daisy-chaining)
- External monitors connected via HDMI, DisplayPort, or USB-C
- Sufficient GPU performance for rendering multiple displays
2. Software requirements:
- Microsoft Remote Desktop for Mac (latest version from the Mac App Store)
- Windows 10 Pro, Enterprise, or Windows 11 Pro (Home edition doesn’t support RDP host)
- macOS Monterey, Ventura, or Sonoma for best performance
3. Network recommendations:
- At least 10 Mbps upload and download for smooth visuals
- Preferably a wired Ethernet connection to minimize latency
If all boxes are checked, you’re ready to configure Microsoft Remote Desktop Mac use multiple monitors mode.
How to Set Up Microsoft Remote Desktop Mac Use All Monitors
Before you can enjoy a seamless Windows Remote Desktop Mac multiple monitors experience, you need to install and configure the app correctly. Let’s go step by step.
1. Setting Up Microsoft Remote Desktop on Mac
Installing Microsoft Remote Desktop (RDP) on your Mac is simple, but configuring it correctly for multiple monitors requires a few extra steps. Let’s walk through it.
Step 1. Download the App:
Head over to the Mac App Store and search for "Microsoft Remote Desktop". Click Get or Install to begin downloading the latest version. Microsoft updates the app frequently, so it’s best to install or update directly from the App Store to ensure compatibility with the latest macOS.

Step 2. Launch the Application:
Once installed, open the app from your Applications folder or Launchpad. You’ll see the main window where you can add your remote PC connections.
Step 3. Grant Necessary Permissions:
When prompted, grant the app access to your Mac’s files, microphone, and camera (if needed). This ensures seamless functionality, especially if you need to transfer files or use conferencing tools while connected remotely.
Step 4. Sign in with Microsoft Account (Optional):
You can sign in using your Microsoft or Azure account if you use Remote Desktop Gateway or cloud-based remote services. However, for most users connecting directly to their PC, this step isn’t mandatory.
Step 5. Add Your Remote PC:
Click the "+" icon and select Add PC. Enter your Windows PC name or IP address under "PC Name". Make sure remote access is enabled on the Windows side (we’ll cover this next).

Step 6. Adjust Connection Settings:
Before connecting, click on the Display tab in the connection settings. Here, you’ll find an option called “Use all monitors”, ensure this box is checked. This setting allows your RDP session to stretch across every connected display on your Mac.
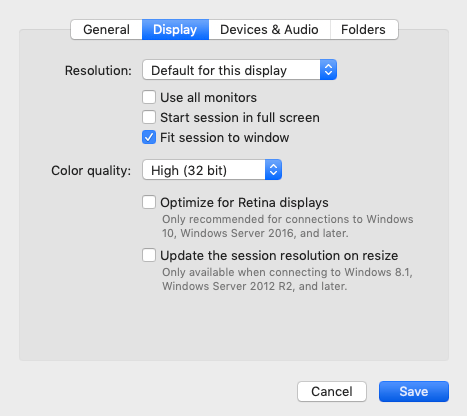
Once done, you’re all set to connect and enjoy a full, multi-monitor experience. But first, your Windows PC must be ready to accept remote connections.
2. Connecting to a Windows PC from Mac
Now that the app is ready, it’s time to set up your Windows PC for remote access if you're planning to control a Windows PC from a Mac. Follow these steps to enable connections and ensure compatibility.
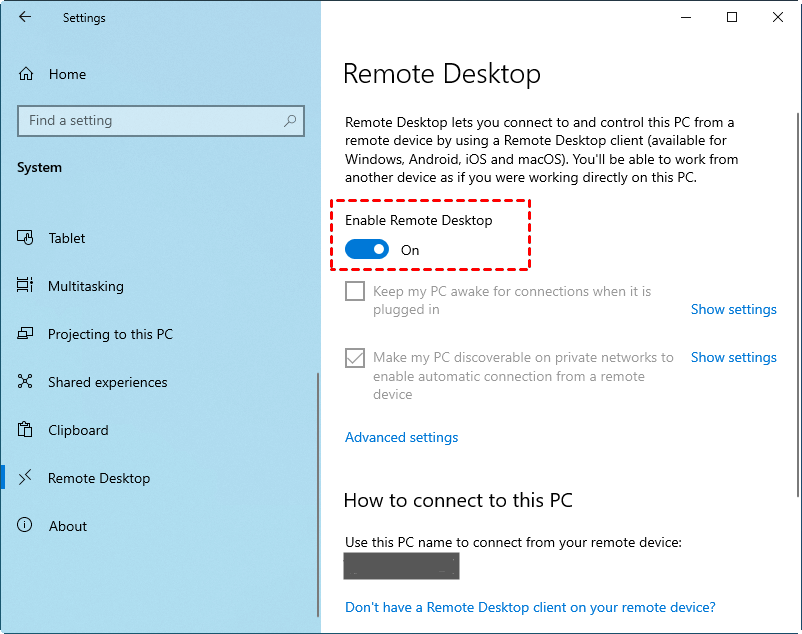
Step 1. Enable Remote Desktop on Windows:
- Open the Start menu on your Windows PC.
- Go to Settings > System > Remote Desktop.
- Toggle Enable Remote Desktop to "On".
- Note down your PC name, as you’ll need it to connect from your Mac.
Step 2. Set Firewall Permissions:
Windows automatically adjusts firewall settings when you enable Remote Desktop, but double-check under Windows Defender Firewall > Allow an app through firewall to ensure “Remote Desktop” is allowed for both private and public networks.

Step 3. Assign User Access:
Click on Select users that can remotely access this PC to add your Windows account or any specific users you wish to grant access to.
Step 4. Verify Network Configuration:
Make sure your PC and Mac are on the same local network for LAN access. For remote (internet) access, you may need to configure port forwarding or use a VPN.
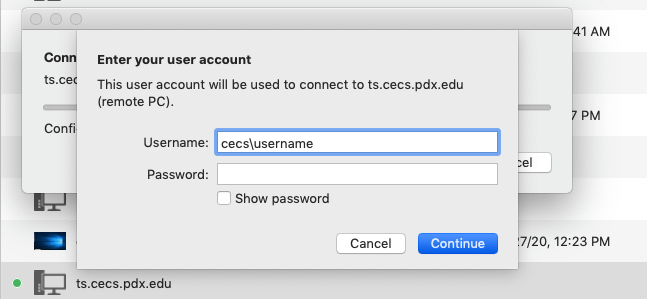
Step 5. Connect:
Once all this is done, go back to your Mac’s Remote Desktop app, enter your Windows PC details, and hit Connect. You’ll be prompted for your Windows username and password, join them, and within seconds, your Windows desktop should now appear stretched across both (or more) screens.
3. Adjusting Display Settings for Multiple Monitors
After enabling multi-monitor mode, you might notice issues with scaling, text size, or window alignment. macOS and Windows handle resolution and DPI scaling differently, so fine-tuning these settings ensures a consistent visual experience.
1. Adjust Resolution in RDP App:
In the Display tab of your connection settings, you can choose between Default for this display or Custom resolution. If one of your monitors is Retina and the other isn’t, custom resolutions prevent blurry text or icons.
2. Arrange Displays in macOS:
Go to System Settings > Displays > Arrangement. Ensure the arrangement matches your physical monitor setup (left-right or top-bottom alignment). Misalignment here can cause strange cursor jumps between screens.
3. Tweak Scaling in Windows:
Inside the remote session, right-click your desktop and select Display Settings. You can individually adjust the scaling percentage (like 100%, 125%, 150%) for each monitor.
4. Color and Brightness:
Color profiles differ between Mac and Windows, especially if one monitor uses sRGB and the other uses P3 color space. You can manually calibrate them to match under Display > Color Profile.
These adjustments might sound tedious, but once done, you’ll have a perfectly aligned, crisp, and responsive multi-display remote setup that feels almost native.
Tips for a Smooth Multi-Monitor Experience
When working remotely, performance and usability are everything. Here are some handy tips to keep your workflow fast and frustration-free:
1. Use Keyboard Shortcuts:
- `Cmd + Tab` switches apps on macOS, while `Alt + Tab` switches within the remote Windows environment.
- `Ctrl + Alt + Break` toggles between full-screen and windowed mode in RDP.
2. Optimize Display Performance:
In RDP preferences, under "Session", disable features like animations, font smoothing, and background images if you’re facing lag.
3. Pin the Connection Bar:
The connection toolbar at the top of the RDP window can be pinned or hidden. Pin it if you frequently switch between displays; hide it for a more immersive experience.
4. Use Mission Control Wisely:
macOS Mission Control can help you organize RDP windows by desktop space. Assign your RDP session to a dedicated desktop for better focus.
5. External Keyboard and Mouse:
Using external peripherals helps mimic a desktop-like workflow, which is especially useful when switching between multiple monitors.
With these small tweaks, your remote desktop setup on Mac will feel just as responsive and organized as working locally.
Common Problems and How to Fix Them
Even with the right setup, you might occasionally run into issues when using Microsoft Remote Desktop with multiple monitors on Mac. Fortunately, most of these problems are easily fixable with a few tweaks.
1. Only One Monitor is Working:
This is a classic issue, especially if you recently updated macOS or the RDP client. Start by verifying that “Use all monitors” is checked in your Remote Desktop app under Display Settings. If it’s already checked, try deselecting it, reconnecting, then re-enabling it again. Also, ensure your macOS recognizes both monitors by going to System Settings > Displays.
2. Misaligned Display or Wrong Order:
Sometimes, monitors appear swapped or misaligned in the remote session. The fix is to rearrange displays both in macOS (under “Displays > Arrangement”) and in Windows (right-click desktop > Display Settings). Match the layout to your physical setup.
3. Cursor Lag or Delayed Response:
Cursor lag usually points to network latency or display overload. To fix it, go to RDP settings and lower display quality, disable "Desktop Background", "Font Smoothing", and "Animations". Using a wired Ethernet connection can also dramatically reduce lag.
4. Black Screen or Flickering:
Black screens often appear when RDP fails to properly render across monitors. Disconnect, go back to Display settings in RDP, and uncheck “Optimize for Retina Displays.” Then reconnect. Updating both macOS and your RDP client can also resolve display flickering issues.
5. Monitor Not Detected After Sleep or Reboot:
When your Mac wakes from sleep, it sometimes loses track of the external display configuration. Simply quit and relaunch Microsoft Remote Desktop, then reconnect. If it persists, restart your Mac, it refreshes all display connections.
6. Performance Drops on Multi-Monitor Use:
Two or three monitors require more graphics bandwidth. In RDP settings, go to "Sessionand select “Reconnect if the connection drops.” Also, reduce resolution slightly (for instance, from 4K to 1080p). The visual quality difference is minimal, but the performance gain is noticeable.
By systematically checking these areas, you can eliminate 95% of multi-monitor issues without ever needing to call IT support.
AnyViewer: Best Alternative for Effortless Mac Multi-Monitor Remote Access
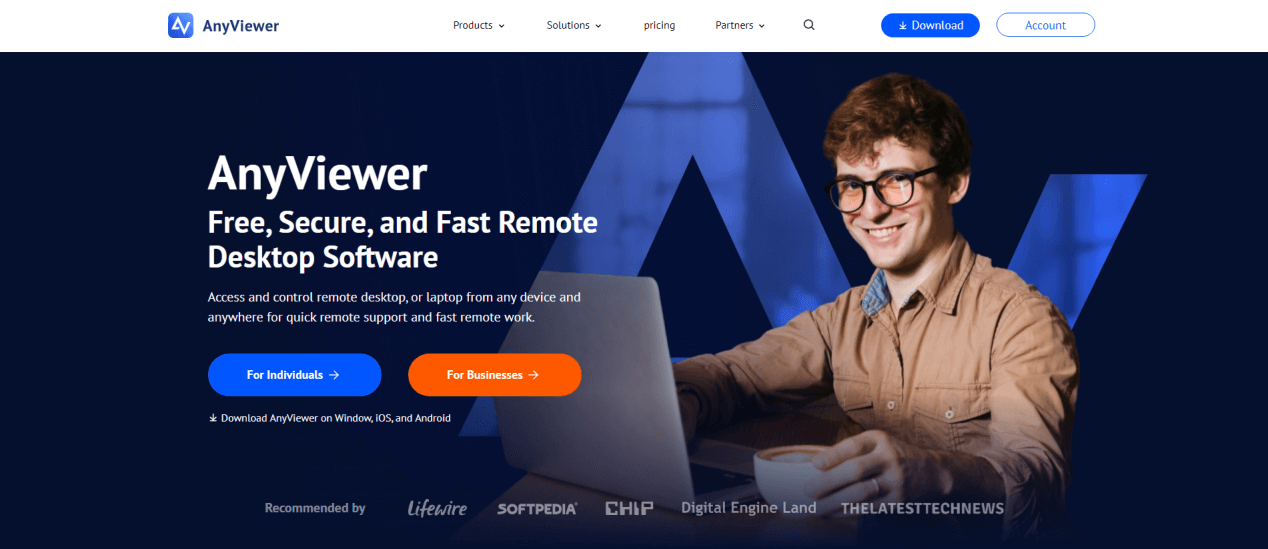
If you’re looking for a smoother, more flexible alternative to Microsoft Remote Desktop on Mac, especially one that’s easier to configure and supports multi-monitor setups effortlessly, AnyViewer is worth considering.
AnyViewer is a powerful, secure remote desktop solution designed for both professionals and businesses. Unlike traditional RDP setups that often require manual network configurations or VPNs, AnyViewer allows you to connect instantly over the internet, even between different networks. Its multi-monitor support lets you view and control multiple displays at once, switch between monitors seamlessly, or mirror them as needed, perfect for multitasking or managing complex workflows remotely.
Beyond display management, AnyViewer also stands out for its robust performance and security. It uses advanced encryption protocols and multi-layered authentication to ensure your connections remain private and protected. Plus, features like file transfer, chat support, and remote reboot make it more versatile than standard RDP tools.
Whether you’re an IT administrator managing remote servers, a designer needing access to high-resolution assets, or a business professional working across multiple systems, AnyViewer provides a lag-free, intuitive, and secure remote access experience. Best of all, it’s a cross-platform remote desktop, supporting Windows, iOS, Android, and Mac devices, so you can work anytime, anywhere, with complete control over every screen.
Pro Tip: If you frequently switch between remote environments or need to access devices outside your local network, AnyViewer’s one-click connection and multi-monitor support can save you hours of setup time while maintaining professional-grade performance.
Conclusion
Using all monitors with Microsoft Remote Desktop Mac Use all monitors can completely transform their remote work experience. No more juggling between windows or losing focus, just organized productivity across every screen. With the right setup, you can replicate your full Windows workspace on macOS effortlessly.
However, if you’re looking for even greater flexibility and ease of use, AnyViewer offers an excellent alternative. It provides seamless multi-monitor support, lightning-fast connections, and strong security, all without the complex configurations required by traditional RDP tools. Whether you’re an IT professional, designer, or business user, AnyViewer ensures a stable, secure, and intuitive remote experience across platforms.
In today’s hybrid work era, multi-monitor remote access is more than just a convenience; it’s a productivity game-changer. So, set up your displays, explore tools like Microsoft Remote Desktop or AnyViewer, and elevate the way you work remotely from your Mac.
