
How to Manage Multiple Displays on Mac
This guide shows how to arrange and adjust multiple screens on a Mac for better workflow. It also introduces AnyViewer for remote multi-monitor control.
By Ellie / Updated on November 7, 2025
How to Manage Multiple Monitors on Mac?
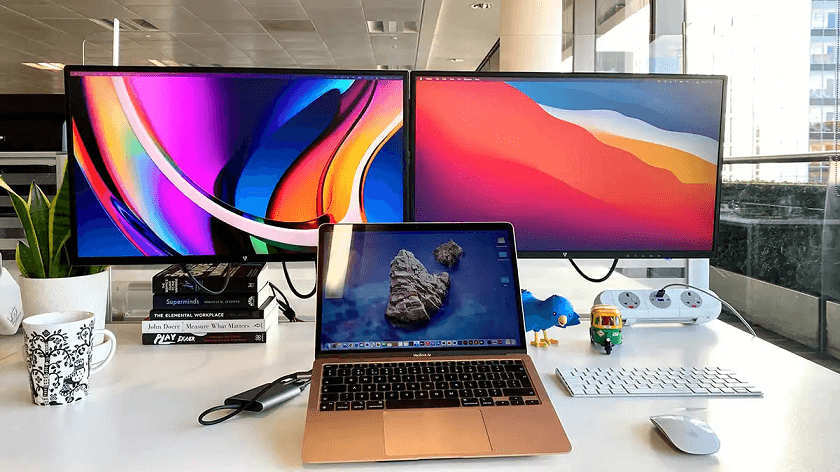
Learning how to manage multiple displays on Mac can completely transform how you work, create, and multitask. Whether you’re a designer juggling multiple projects, a video editor managing timelines, or a professional who simply enjoys an extended digital workspace, setting up multiple screens is a game-changer. Macs are well-known for their sleek hardware and robust macOS ecosystem, which supports advanced display management tools right out of the box. However, to get the most out of your setup, understanding how to connect, configure, and optimize each display is essential.
In this comprehensive guide, we’ll walk you through every step of how to manage multiple displays on Mac, from connection types and settings adjustments to troubleshooting and optimization. Let’s dive into how to make your Mac’s multiple display setup work seamlessly for you.
Why Use Multiple Displays on Mac
Adding extra screens to your Mac setup isn’t just about looking cool; it’s about maximizing productivity and efficiency. Imagine having one screen dedicated to your email or Slack messages while your primary display focuses on design work or coding. That kind of multitasking can significantly cut down the time you spend switching between windows.
- Boosting Productivity
With multiple monitors, you can have your workflow spread across different displays. This setup allows you to reference documents on one screen while editing or writing on another. Many professionals claim that adding a second monitor boosts their productivity by nearly 30%.
- Enhancing Workflow for Creatives
If you’re a creative professional, like a photographer, video editor, or music producer, multiple displays are indispensable. You can keep your tools and timelines on one monitor and the preview or editing workspace on another. macOS handles high-resolution displays beautifully, allowing for sharp, vibrant visuals across your entire workspace.
How to Connect Multiple Displays to a Mac
Before you can start customizing your layout, you need to know how to connect two monitors to a MacBook Air M3 or other Mac models. Once you know your Mac’s compatibility, it’s time to connect the displays.
- Using Thunderbolt, HDMI, and USB-C Ports
If your MacBook has both HDMI and Thunderbolt ports, you can directly plug in two monitors, one via HDMI and another via Thunderbolt/USB-C. macOS automatically detects connected displays. This method works perfectly if you’re figuring out how to extend display on Mac to two monitors without needing extra adapters.
- Daisy-Chaining via Thunderbolt
For high-end setups, you can daisy-chain multiple monitors using Thunderbolt. This means connecting one display to the Mac and then linking the second display to the first one using a Thunderbolt cable. However, not all monitors support daisy-chaining, so check your display’s manual first.
How to Set Up Displays in macOS Settings
Setting up displays in macOS is one of the most important steps when learning how to manage multiple displays on Mac. Fortunately, Apple has designed this process to be incredibly smooth and user-friendly. Whether you’re connecting one external display or several, macOS automatically detects them and gives you a variety of customization options. The goal here is to align your physical desk setup with your digital workspace, making the experience intuitive and seamless.
Let’s break down how to properly set up your displays in macOS and make sure everything is perfectly aligned for maximum productivity.
Accessing Display Settings
To begin configuring your monitors, follow these simple steps:
Step 1. Click the Apple menu in the top-left corner of your screen.
Step 2. Select System Settings (on older versions of macOS, this will be System Preferences).
Step 3. In the sidebar, click Displays.
Here, you’ll see each monitor connected to your Mac represented as a rectangular thumbnail. Each rectangle corresponds to one screen, including your built-in display if you’re using a MacBook.
From this screen, you can rearrange monitors, change resolution, adjust scaling, manage mirroring, and much more, all from a single, convenient panel.
Rearranging Display Layout
This part is crucial if you’re using more than one monitor. The display arrangement determines how your cursor moves between screens and how windows transition across them.
In the Displays settings, you’ll see a small layout diagram showing your screens. To adjust their arrangement, simply click and drag the rectangular icons to match the physical placement of your monitors on your desk.
For example:
- If your second monitor is physically on the right side of your MacBook, drag its icon to the right.
- If you’ve mounted a display above your main one, position its icon above in the layout.
Once aligned, your cursor will move naturally between displays, following your real-world setup. This ensures a fluid experience, no awkward cursor jumps or misaligned windows.
Choosing the Primary Display
The primary display is the one that houses your menu bar, dock, and new app windows by default. To set your primary monitor:
Step 1. In the Arrangement section of the Displays settings, you’ll see a white bar at the top of one of the rectangles.
Step 2. Click and drag that white bar to whichever screen you want as your main display.

This simple step makes a huge difference. For instance, if you use a large external monitor, setting it as your primary display allows all new apps and notifications to appear there by default, keeping your MacBook screen free for secondary tasks or notes.
Adjusting Screen Orientation and Resolution
Every display can have its own resolution and rotation settings. To tweak these:
Step 1. Select the monitor you want to adjust in the sidebar.
Step 2. Under “Resolution,” choose either Default for Display or Scaled.
- Default ensures macOS automatically picks the optimal resolution for your monitor.
- Scaled gives you manual control, useful for getting sharper text or fitting more on-screen.
Step 3. To rotate a screen (useful for vertical setups), click Rotation and choose your desired angle (90°, 180°, or 270°).
Designers, coders, and editors often use vertical orientation for reference material or long documents. macOS handles this rotation seamlessly, so you can experiment with different setups.
Managing Mirroring and Extended Mode
macOS offers two main display modes: Mirroring and Extended.
- Mirroring Mode: Displays the same image on all connected screens. Perfect for presentations, meetings, or demonstrations.
- Extended Mode: Expands your workspace across multiple monitors, letting you use each display independently. This is the go-to mode for productivity and the essential step in how to extend display on Mac to two monitors efficiently.
To switch between these modes:
Step 1. Go to System Settings > Displays.
Step 2. Click the dropdown beside your display name.
Step 3. Choose Mirror for Bulit-in Display or Extend Display.
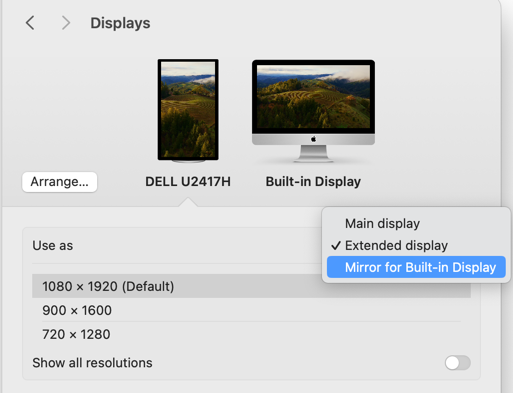
macOS will instantly reconfigure your screens accordingly. You can also hold the Option key while dragging displays in the Arrangement tab to quickly toggle between mirroring and extending.
Customizing Display Names
If you use multiple monitors regularly, renaming them can save you a lot of confusion, especially when managing resolution or arrangement.
To rename a display:
Go to Displays > Advanced Settings, and look for the Rename Display option (available on newer macOS versions).
You can name them “Main Display,” “Vertical Monitor,” or even “Reference Screen” to make identification easier.
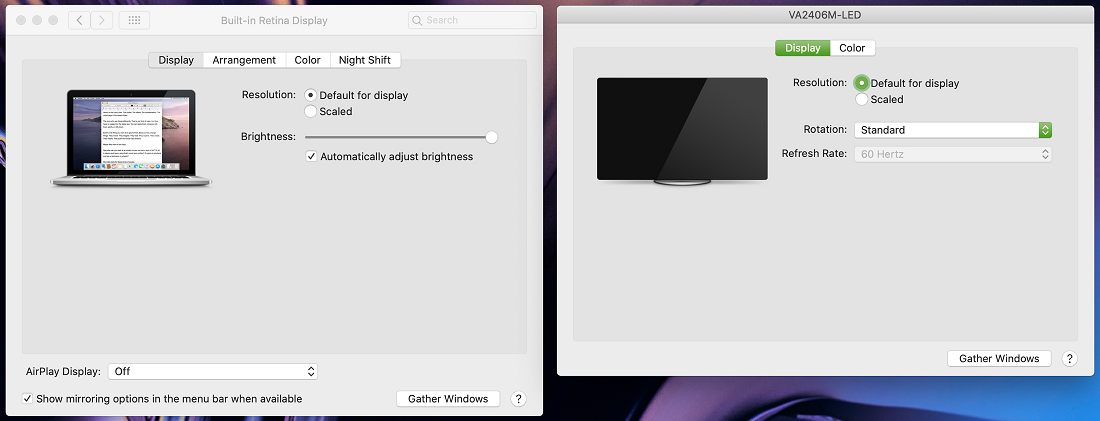
Adjusting Brightness and Color Settings
Each monitor can have individual brightness and color profiles. To adjust brightness, select a display in the sidebar and move the Brightness slider.
If your monitor supports True Tone, enable it to automatically adjust white balance based on ambient light. Similarly, Night Shift can reduce blue light in the evenings for eye comfort. You can schedule Night Shift under Displays > Night Shift Schedule.
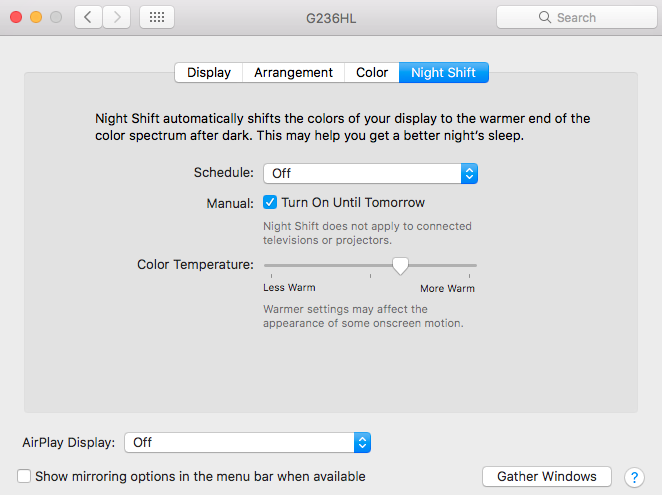
For color-critical work, head to Displays > Color Profile and choose the appropriate setting. Professional monitors often come with built-in color profiles such as sRGB, Adobe RGB, or P3 Wide Color. Choosing the right one ensures accurate color reproduction.
Troubleshooting Display Detection
Sometimes, your Mac might not detect a connected monitor immediately. To fix this:
Step 1. Go to System Settings > Displays.
Step 2. Hold the Option key. You’ll see a button labeled Detect Displays appear; click it.
Step 3. Check your cable connections, and if necessary, unplug and reconnect them.
If you’re using adapters, make sure they’re high-quality and compatible with your Mac model. Faulty or cheap adapters are one of the most common reasons a display fails to appear.
Saving and Managing Display Profiles
Once you’ve configured your layout, scaling, brightness, and color settings, macOS automatically remembers these preferences. So, the next time you reconnect your monitors, they’ll snap back to your exact configuration.
However, if you use different setups (like home and office), you can use third-party apps such as DisplayBuddy, SwitchResX, or BetterDisplay to save profiles and switch between them instantly.
This way, every environment, whether you’re at your desk, in a studio, or giving a presentation, feels perfectly familiar and ready for action.
In short, setting up displays in macOS is all about creating harmony between your digital and physical workspace. Once you’ve fine-tuned arrangement, scaling, and color profiles, your Mac transforms into a powerful, multi-monitor workstation that’s both beautiful and incredibly functional.
Bonus Tip: How AnyViewer Simplifies Remote Multi-Monitor Control on Mac

If you need to manage multiple monitors on a Mac remotely, AnyViewer is one of the best tools to consider. It’s professional remote desktop software that supports multi-monitor control, letting you view and switch between multiple screens on a remote Mac or Windows PC with ease. This is particularly useful for IT administrators, designers, and remote workers who manage complex setups from different locations.
Key Features of AnyViewer for Multi-Monitor Mac Management:
- Multi-Monitor Support: AnyViewer automatically detects all active displays connected to the remote Mac. You can seamlessly switch between monitors or view them all at once, ensuring smooth multitasking even when working remotely.
- Cross-Platform Compatibility: AnyViewer isn’t limited to macOS. You can control Windows PCs from your Mac and vice versa, making it ideal for hybrid environments.
- Ultra-Smooth Performance: With adaptive image quality and optimized data transmission, AnyViewer minimizes lag and provides a responsive remote experience, even when streaming multiple displays.
- Advanced Security Measures: AnyViewer employs end-to-end encryption, two-factor authentication, and session permissions to keep your remote connections secure and private.
- One-Click Access & File Transfer: Whether you’re monitoring multiple systems or transferring files between devices, AnyViewer lets you connect instantly and transfer data effortlessly.
- Multi-Session Management: You can connect to several devices simultaneously, easily switching between sessions without dropping connections or losing visual context.
How to Use AnyViewer for Multiple Monitors on Mac:
Step 1. Download and install AnyViewer on both your Mac and the target computer.
Step 2. Sign in with the same AnyViewer account on both devices to enable one-click remote access.

Step 3. Initiate the remote session from your Mac by clicking One-click control.

Step 4. Once connected, click the Screen icon in the toolbar to view or switch between multiple screens. Adjust display mode (single or all monitors view) based on your workflow. You can zoom, pan, or resize display windows for precision control.
Whether you’re managing several computers in an office or assisting clients remotely, AnyViewer’s multi-monitor support makes it effortless to keep everything visible, organized, and under control. In short, AnyViewer takes Mac multi-monitor management to the next level, offering flexibility, speed, and rock-solid reliability that perfectly complements macOS’s native display capabilities.
Conclusion
Understanding how to manage multiple displays on Mac opens up a world of productivity and creative freedom. With macOS’s intuitive display settings, flexible arrangement options, and precise color calibration tools, you can craft a workspace that perfectly complements your needs, whether that’s creative design, coding, editing, or multitasking across apps. Once you’ve fine-tuned your setup, every project feels smoother, faster, and more organized.
For those who need to manage or access multi-monitor setups remotely, AnyViewer extends these capabilities even further. Its seamless multi-monitor support, cross-platform flexibility, and secure remote control features make it an ideal companion for professionals who work from anywhere.
Ultimately, a well-configured multi-monitor setup doesn’t just expand your screen, it transforms your productivity, creativity, and workflow into something truly exceptional.
