
How to Turn Off Administrator Permission on Any Device
This simple guide shows you how to turn off administrator permission on different devices like Windows, Mac, Linux, Android, and iOS. It helps you protect your system by limiting admin access. You'll also find out how AnyViewer can help you manage devices remotely without needing full admin rights.
By Ellie / Updated on July 11, 2025
How do I disable administrator access?
Controlling administrator rights on your device is important for keeping it secure and running smoothly. Administrators can install software, change settings, and access sensitive parts of the system. If these rights are misused or fall into the wrong hands, it can cause serious problems like deleting files, installing malware, or data breaches.
Whether you're figuring out how to turn off administrator permission on Windows 10, Windows 11, or other systems like macOS, Linux, Android, or iOS, the steps may differ slightly, but the goal is the same: to limit these powerful rights to trusted users only.
This guide explains how to turn off administrator permission on all major platforms. Whether you’re an IT admin, a parent, or just want to protect your device, this article will help you do it safely and effectively.
Why Would You Want to Turn Off Admin Rights?
There are plenty of good reasons to turn off administrator permissions, both at home and in professional environments.
- Security: Admin rights open up critical system components. Turning them off for daily use drastically reduces the risk of malware or accidental system damage.
- Control: If you're a parent or teacher, you probably don't want kids installing random apps or changing security settings.
- Compliance: Many companies must meet security standards that require tight control over who can make system changes.
- Accident Prevention: Limiting admin access minimizes the chances of a user unintentionally deleting or modifying crucial files.
Turning off admin rights is not about restricting users, it's about empowering them to use systems safely. You don't give the valet your master keys, right? The same logic applies here.
Prerequisites before removing administrator permissions
Before you learn how to turn off administrator permissions, it’s important to take a few safety steps to avoid potential lockouts or data loss.
Backup important data
Before making any changes to user roles or permissions, always back up important data. Why? Because altering account privileges, especially on systems like Windows or Linux, can sometimes cause unintended access issues. You don't want to lock yourself, or someone else, out of their files or lose anything valuable in the process.
Use built-in tools like:
- Windows Backup or File History
- Time Machine on macOS
- "rsync"or "tar" commands on Linux
Additionally, store the backup on an external drive or cloud storage platform (Google Drive, OneDrive, Dropbox, etc.) for maximum safety.
Ensure there's another admin user available
This step is critical. Before turning off admin rights for any account, make sure there's at least one other admin account active on the system. If you revoke admin access and there's no one left with elevated privileges, you could end up in a locked-out state, where no one can make necessary changes or troubleshoot issues.
Here's how to verify:
- On Windows: Go to Control Panel > User Accounts > Manage Accounts
- On macOS: System Settings > Users & Groups
- On Linux: Use "getent group sudo" or check "/etc/group"
If there's only one admin, create a new admin user before proceeding. Better safe than locked out!
How to turn off administrator permissions in Windows
If you're looking for how to turn off administrator permission in Windows 10 or Windows 11, you’re in the right place. Below are three effective methods you can use:
Method 1. Using Control Panel
If you're using a Windows computer, one of the most straightforward ways to turn off administrator permissions is through the Control Panel. This method doesn't require any command-line knowledge and is ideal for most users.
Here's a step-by-step guide:
Step 1. Press "Windows + S", type Control Panel, and press "Enter".
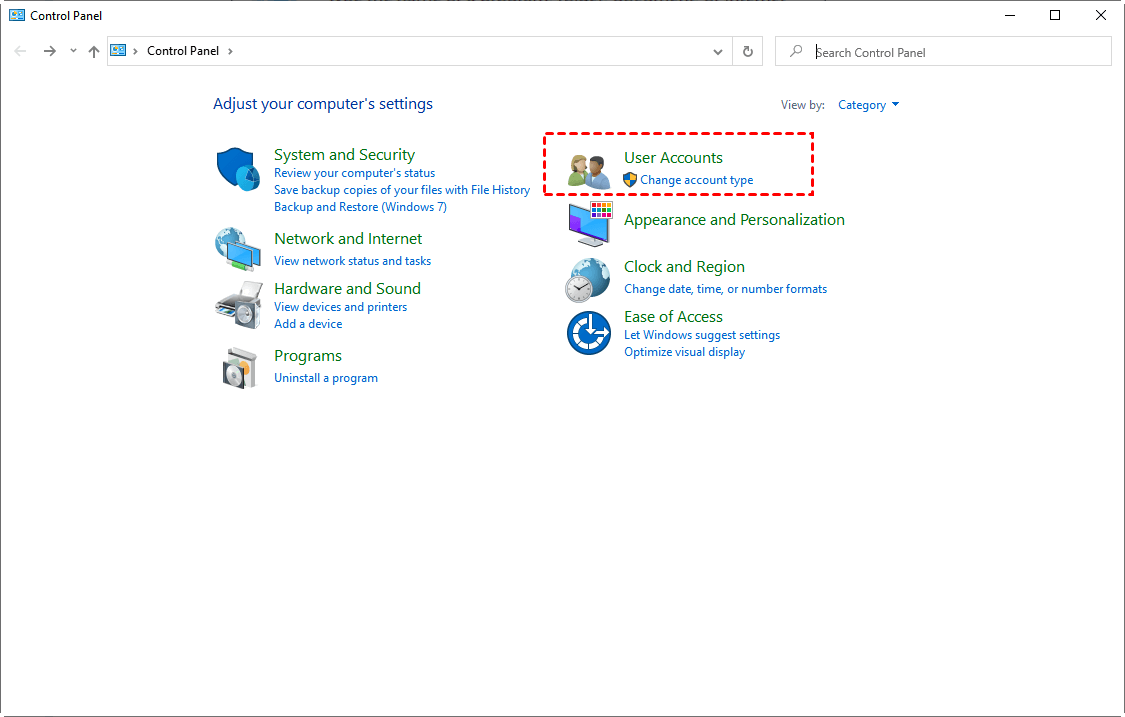
Step 2. In the Control Panel window, click on User Accounts, then again click User Accounts in the next window.
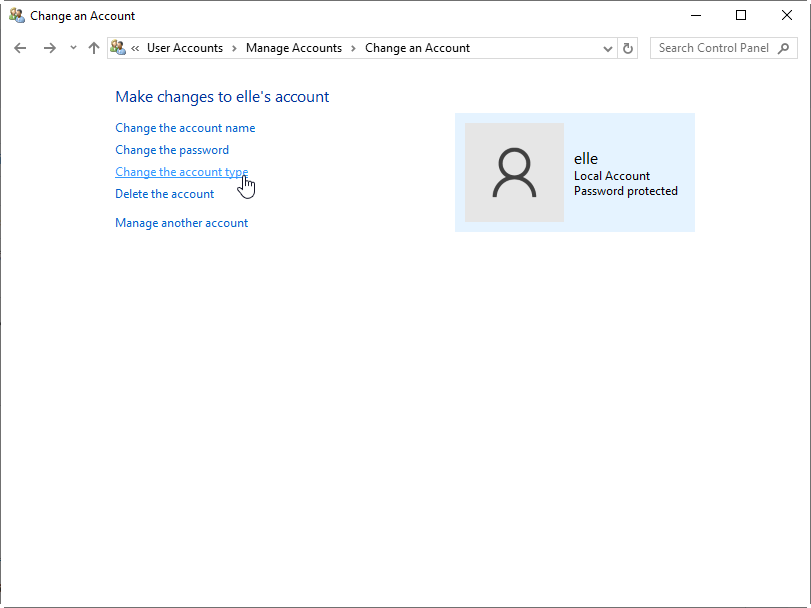
Step 3. Choose Manage another account. This will display all user accounts on your device.
Step 4. Click on the account you want to modify. If it's currently listed as an “Administrator,” you're in the right place.
Step 5. Click on Change the account type.
Step 6. Then, select Standard User and click Change Account Type.
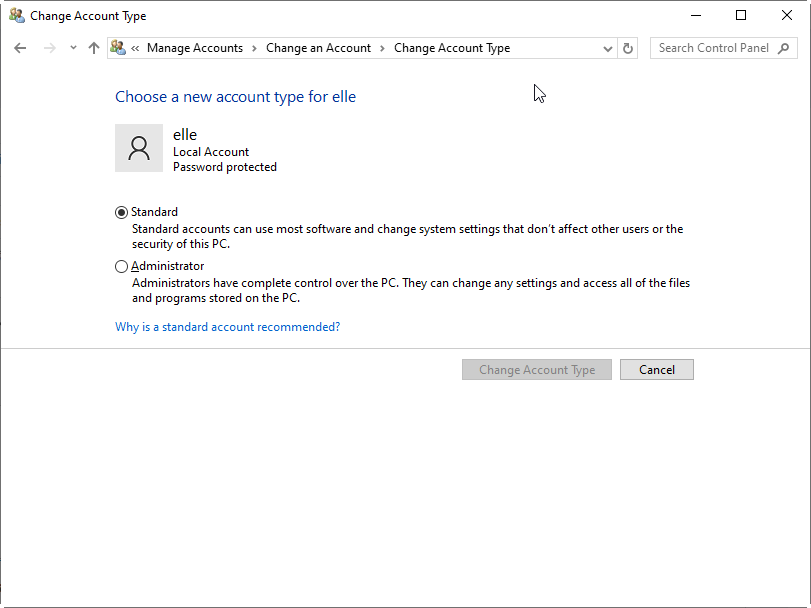
Once you've done this, the user will no longer have administrative privileges. This change takes effect immediately, meaning the user won't be able to install software, change system settings, or perform other actions that require elevated rights.
Important Note: You must be logged in with an existing admin account to do this. If you're using the only admin account on the system, Windows won't allow you to remove admin rights from yourself using this method.
Why use Control Panel? Because it provides a visual, intuitive interface that minimizes the risk of errors, ideal for non-technical users and quick permission changes.
Method 2. Via Local Users and Groups
If you're a power user or working in a business environment, the Local Users and Groups management tool in Windows provides a more detailed way to control permissions.
Here's how to do it:
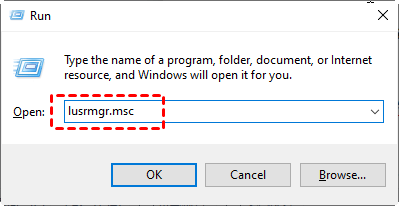
Step 1. Press "Windows + R", type "lusrmgr.msc", and press "Enter".
Step 2. In the left pane, click Users. You'll see a list of all user accounts.
Step 3. Right-click on the user whose admin rights you want to revoke, and select Properties.
Step 4. In the properties window, switch to the Member Of tab. If the account is listed as part of the Administrators group, it currently has admin rights.
Step 5. Click Administrators, then click Remove. To finalize, click Add, type Users, and hit OK to add the account to the standard users group.
Step 6. Click Apply and OK.
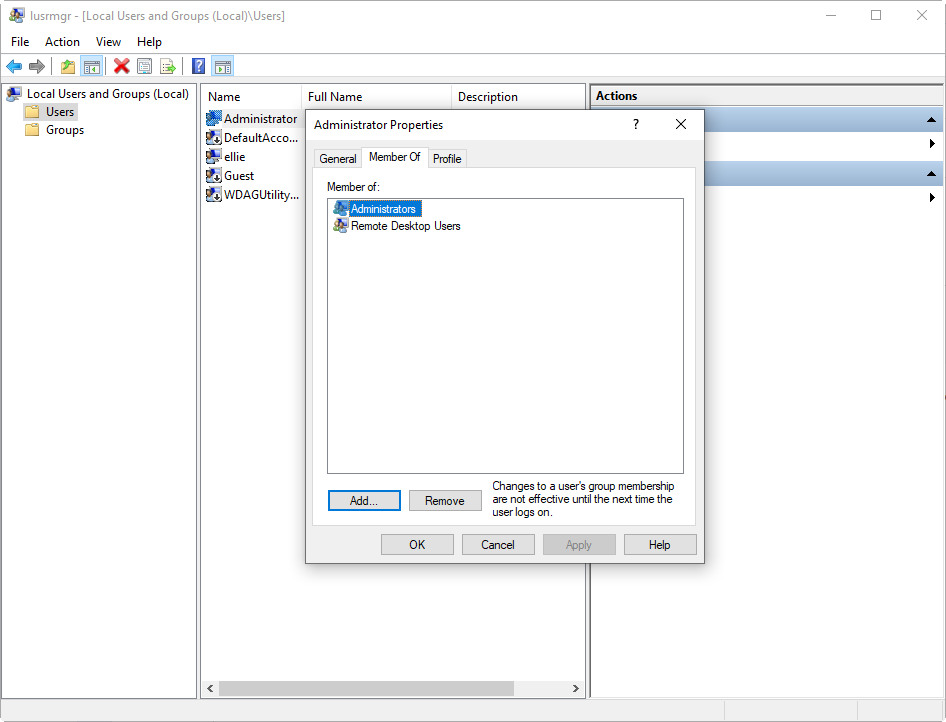
This method gives you more control over group-level permissions and is particularly useful in professional setups where Group Policies and Active Directory are used.
It also allows you to manage multiple accounts efficiently, making it ideal for administrators who need to secure dozens, or even hundreds, of machines.
Method 3. Through Command Prompt
If you're comfortable using command-line tools, Command Prompt provides a fast and powerful way to change user permissions.
Here's how:
Step 1. Press "Windows + X" and choose Command Prompt (Admin) or Windows Terminal (Admin).
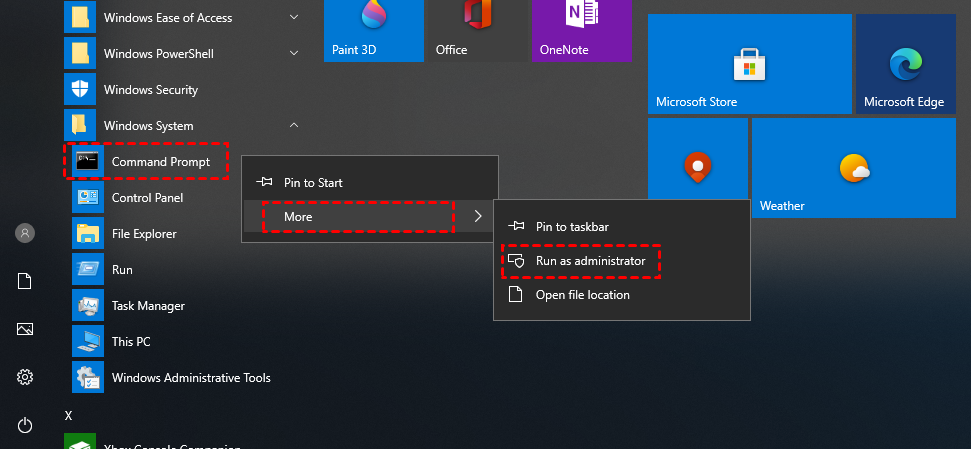
Step 2. Run this command to see the current groups a user belongs to:
- net user [username]
Step 3. To remove a user from the admin group, use this command:
- net localgroup administrators [username] /delete
Replace "[username]" with the actual username.
Step 4. Run the same "net user [username]"command again to ensure the user is no longer part of the Administrators group.
Why use Command Prompt? It's fast, scriptable, and doesn't require navigating through multiple windows. It's perfect for IT professionals managing several systems remotely or automating user-role changes.
Just remember, there's no confirmation prompt here. Make sure you double-check the username before hitting Enter!
How to revoke admin rights on macOS
On macOS, revoking administrator rights is a straightforward process, provided you have access to another admin account. Here's how to do it on macOS Ventura and newer versions:
Step 1. Click the Apple icon in the top-left corner and choose System Settings.
Step 2. Scroll down and click Users & Groups on the left sidebar.
Step 3. Click the lock icon at the bottom left and enter your admin password to enable changes.
Step 4. Find the account you want to modify. Click on their profile.
Step 5. Toggle off "Allow user to administer this computer". This will instantly downgrade the account to a Standard User.
Step 6. You might be asked to confirm your action. Click OK.
Step 7. Have the user log out and back in for the changes to fully take effect.
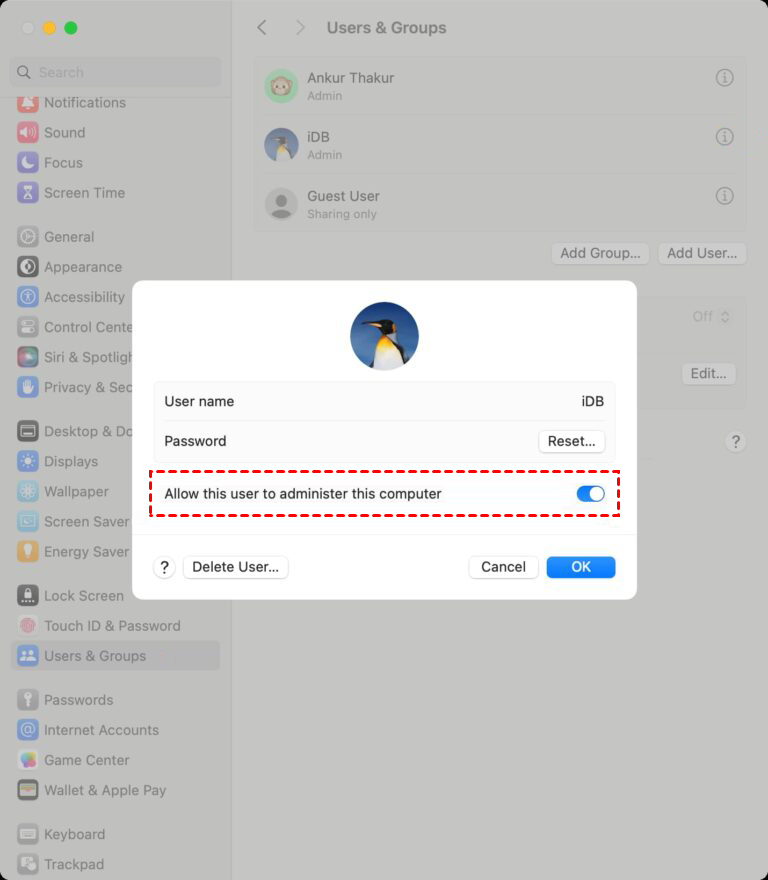
This is the cleanest and safest way to remove admin rights on a Mac. It doesn't affect any files, apps, or user data; it only changes the account's ability to manage system-wide settings.
What Happens When Admin Rights Are Removed
When a user loses administrator permissions on macOS, several things happen under the hood:
- They can no longer install or remove system-wide applications.
- Access to certain system preferences (like Security, Startup Disk, and Network settings) is restricted.
- Terminal commands that require "sudo" will prompt for an admin username and password.
- File access to protected directories is blocked.
From a user experience perspective, things might feel a bit more locked down, but this is by design. Removing admin rights ensures that only authorized users can make significant changes, improving both system integrity and security.
Keep in mind, you'll still need at least one admin account on the system for maintenance and software updates. Never remove admin rights from all accounts unless you're using an MDM (Mobile Device Management) system for centralized control.
Disabling admin privileges in Linux
Linux is widely known for its flexibility and powerful user controls, especially when it comes to managing administrator privileges. In most Linux distributions, administrative access is granted through the use of the "sudo" command, which allows users to execute tasks with root privileges. To turn off administrator permissions, you'll need to remove the user from the sudo group or modify the user's role accordingly.
Let's break it down step-by-step.
Step 1. Press "Ctrl + Alt + T" to open the terminal window.
Step 2. Run the following command:
- groups username
Replace "username" with the account you're investigating. If “sudo” is listed, the user has admin rights.
Step 3. Run the following command to revoke administrator rights:
- sudo deluser username sudo
This command removes the user from the sudo group, which effectively strips away their ability to run commands as a superuser.
Step 4. Run the "groups username"command again to ensure “sudo” is no longer listed.
Step 5. On some distros, users might be members of other privileged groups like "wheel" or "admin". Run:
- sudo gpasswd -d username wheel
Or:
- sudo deluser username admin
This method is reliable and direct. However, be cautious, especially if the account you're modifying is your own. Removing your admin rights while logged in could cause lockout issues unless another admin is available.
Editing the Sudoers File Safely
For more granular control, especially in systems with custom permission sets, editing the sudoers file directly is an option. However, this comes with a high risk if done improperly, as a mistake in this file can block all admin access.
Follow these steps carefully:
Step 1. Always use "visudo" to open the sudoers file because it checks for syntax errors before saving:
- sudo visudo
Step 2. Look for a line like:
- username ALL=(ALL:ALL) ALL
Step 3. You can comment it out using a "#":
- #username ALL=(ALL:ALL) ALL
Step 4. Press "Ctrl + X", then "Y", and "Enter" to save changes and exit safely.
Once done, the user will no longer be able to use "sudo" for privileged operations. Any attempts to do so will result in a "permission denied" or "user is not in the sudoers file" error.
Note: Do not edit the sudoers file directly with a standard text editor like "nano" or "vi". Use "visudo" to avoid fatal errors.
Turning off admin permissions on Android devices
Android devices allow apps and users to gain administrative control through a system called Device Administrator. These privileges can lock the device, reset passwords, or even wipe data. If you want to remove admin rights from a user or app, you can do so from the device settings.
Here's how to remove admin access on Android:
Step 1. Open Settings and go to Privacy Protection.
Step 2. Scroll down and tap on Protection, then select Special Permissions.
Step 3. Tap on Device Admin Apps to view the list of apps with admin rights.
Step 4. Choose the specific app you want to remove admin access from, then tap Deactivate this device admin app.
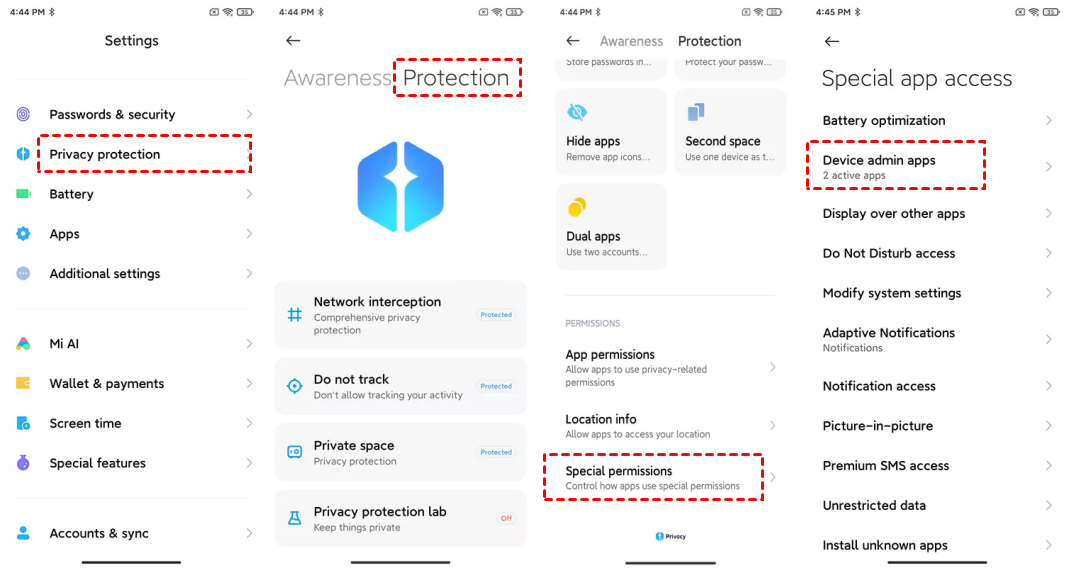
Admin rights for apps can also cause problems if left enabled unnecessarily, such as preventing uninstallations or enabling background tracking. Removing these permissions is a solid step toward better security and privacy.
For corporate-managed Android devices, disabling admin rights may require action from the IT admin through a Mobile Device Management (MDM) portal like Microsoft Intune or Google Workspace Admin Console.
Removing admin access on iOS devices
Unlike Android or desktop OSes, iPhones and iPads don't use a traditional admin system. Instead, administrative control is provided through MDM profiles, which are used by organizations to control settings, app installations, and security policies remotely.
If your iPhone or iPad is enrolled in MDM, you'll typically see restrictions like:
- Unable to delete certain apps
- Forced screen time or passcode policies
- VPNs or email accounts that can't be removed
These controls are enabled through configuration profiles installed on the device.
To check if MDM is active:
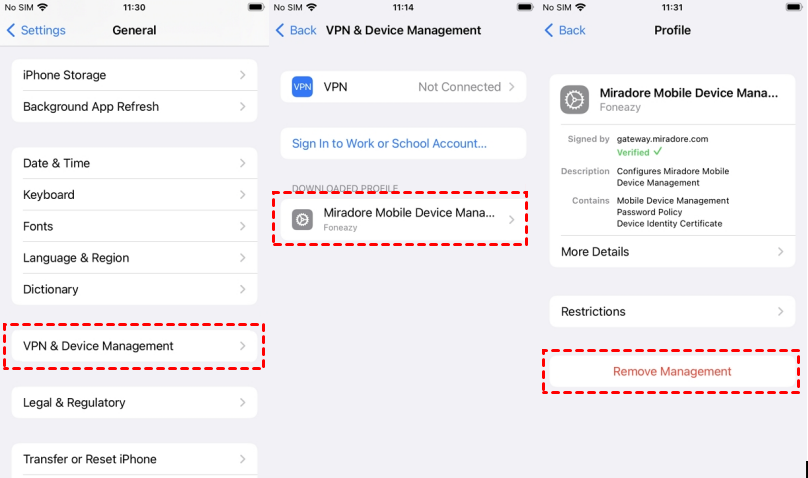
Step 1. Go to Settings > General > VPN & Device Management.
Step 2. If you see a profile listed, tap on it to view details
You'll need to remove this profile to regain full control over your device.
Steps to Revoke MDM Control
To remove the MDM profile and associated admin-like privileges:
Step 1. Open Settings > General > VPN & Device Management.
Step 2. Tap on the profile listed under Mobile Device Management.
Step 3. Tap Remove Management.
Step 4. Enter your device passcode if prompted.
Important: You can only remove the MDM profile if the organization that enrolled the device hasn't set a restriction on removal. In some cases, especially for company-owned devices, the MDM removal option may be grayed out or require credentials from the IT administrator.
If you're using a second-hand iPhone that still has MDM enabled, and you can't remove it, you'll need to contact the previous owner or the company that managed the device. Bypassing MDM without authorization could violate the terms of service and may even be illegal in some jurisdictions.
Bonus tip: Secure remote management without granting admin rights
Turning off administrator permissions is a powerful step toward securing your devices, but what if you still need to provide remote support, access files, or manage systems without being physically present? That's where AnyViewer comes in.

AnyViewer is a professional-grade remote desktop solution that gives you full control over remote devices without requiring local admin rights on every machine. Whether you're an IT admin managing dozens of devices across your organization, a tech-savvy parent helping a family member, or simply working remotely from home, AnyViewer allows you to strike the perfect balance between access and control.
Why AnyViewer is a Game-Changer for Secure Remote Access:
- Security First: Built with end-to-end encryption and robust permission controls, AnyViewer ensures that your remote connections are always secure, even when admin access is restricted.
- No Local Admin Needed: Unlike many remote tools, AnyViewer can be installed and used with limited privileges, making it ideal in environments where admin access is tightly controlled.
- Cross-Platform Compatibility: Connect to and manage devices across Windows, macOS, Android, and iOS, giving you full flexibility whether you're on the go or at the office.
- Fast & Responsive: Experience smooth screen sharing and quick file transfers with ultra-low latency, even on high-resolution displays.
- Business-Ready Features: Multi-session support, device grouping, and unattended access options make AnyViewer perfect for small businesses, help desks, and enterprise IT teams.
Instead of compromising security by enabling full admin access for remote users, you can use AnyViewer to maintain control over who accesses what, and how. This approach not only boosts operational efficiency but also keeps your systems safe from unauthorized changes and potential threats.
Conclusion
Understanding how to turn off administrator permission is crucial for protecting your devices from unauthorized access and accidental system changes, whether you're managing personal devices or an entire network. From Windows to macOS, Linux, Android, and iOS, the methods may differ, but the goal remains the same: limit high-level access to only those who truly need it.
And for those who still need to support, monitor, or access devices remotely without granting full admin rights, AnyViewer offers the perfect balance of security and convenience. It's time to take back control, without compromise.
