
Group Policy for Remote Desktop [Complete Guide]
This article explains how to configure Remote Desktop using group policy for centralized control, security, and efficiency. It also introduces AnyViewer, a user-friendly remote access tool that simplifies the process for individuals and small teams.
By Ellie / Updated on July 16, 2025
Why use Group Policy for Remote Desktop configuration?
Group Policy is a built-in Windows tool that lets IT admins centrally manage user and computer settings in Active Directory environments. It acts as a control hub, allowing you to enforce consistent policies, like security rules or remote access settings, across your entire network without manual configuration on each device.
When it comes to Group Policy for Remote Desktop, it offers the following advantages:
- Centralized Management: Apply settings to all machines at once.
- Improved Security: Enforce encryption, NLA, and restrict device redirection.
- Monitoring & Control: Track remote connections, set session limits, and manage idle time.
- Scalability: Easily supports organizations of any size.
In short, Group Policy for Remote Desktop Services simplifies configuration by offering consistency, security, and full control, all from a single interface.
Complete guide to configure Group Policy for Remote Desktop
Want to centrally manage and secure Remote Desktop access across your network? This comprehensive guide explains how to configure Group Policy for Remote Desktop Services, covering every step from setup to access control.
Enabling Remote Desktop through Group Policy
Enabling Remote Desktop through Group Policy ensures all target computers in your network can accept RDP connections, without requiring manual settings changes on each one.
Here’s a step-by-step approach:
Step 1. Open Group Policy Management Console (GPMC):
- Hit Win + R, type gpmc.msc, and press Enter.

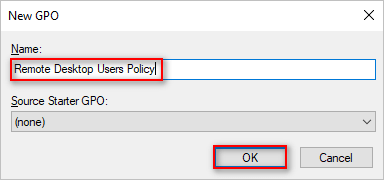
Step 2. Create or Edit a GPO:
- Right-click your domain or OU where the policy will apply.
- Select “Create a GPO in this domain, and Link it here.”
- Name it something like “Enable RDP Access”.
Step 3. Edit the GPO:
- Right-click the GPO and click “Edit”.
- Navigate to: Computer Configuration > Administrative Templates > Windows Components > Remote Desktop Services > Remote Desktop Session Host > Connections
Step 4. Enable “Allow users to connect remotely using Remote Desktop Services”:
- Double-click this setting, choose “Enabled,” then click OK.
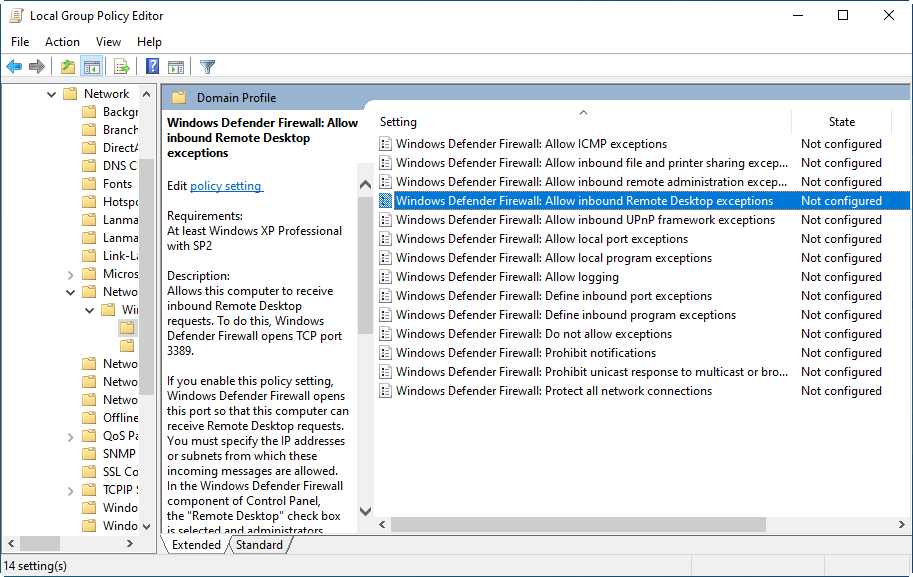
Step 5. Configure Windows Firewall Rule (Optional but recommended):
- Go to: Computer Configuration > Administrative Templates > Network > Network Connections > Windows Defender Firewall > Domain Profile
- Enable the rule “Allow inbound Remote Desktop exceptions.”
Step 6. Update Group Policy:
- On client machines, run gpupdate /force in the Command Prompt.
And just like that, Remote Desktop is now enabled across your network, securely and efficiently.
Configuring user permissions for Remote Desktop access
Enabling Remote Desktop alone isn't enough. You must also define who has the right to connect. This is done by adding users or groups to the Remote Desktop Users group on each machine, or, better yet, centrally via GPO.
To use Group Policy for Remote Desktop users, follow these steps:
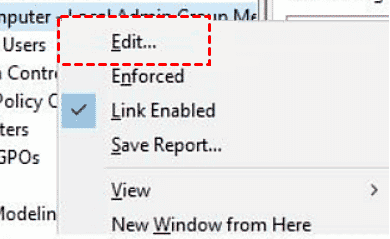
Step 1. Open the GPO Editor:
- Right-click your RDP policy > Edit
Step 2. Navigate to Preferences > Control Panel Settings > Local Users and Groups
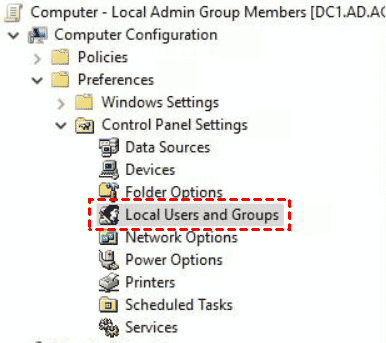
Step 3. Create a New Local Group:
- Right-click > New > Local Group
- Action: Update
- Group Name: Remote Desktop Users
- Add the desired domain users or groups (e.g., DOMAIN\RemoteUsers)
Step 4. Apply and Close
When this policy is applied, selected users will automatically be added to the “Remote Desktop Users” group on the target computers. No more manual additions!
Network Level Authentication and encryption settings
Network Level Authentication (NLA) adds a layer of security by requiring users to authenticate before a remote session is established. To enable NLA:
Step 1. Navigate to: Computer Configuration > Administrative Templates > Windows Components > Remote Desktop Services > Remote Desktop Session Host > Security
Step 2. Enable “Require user authentication for remote connections by using Network Level Authentication”.
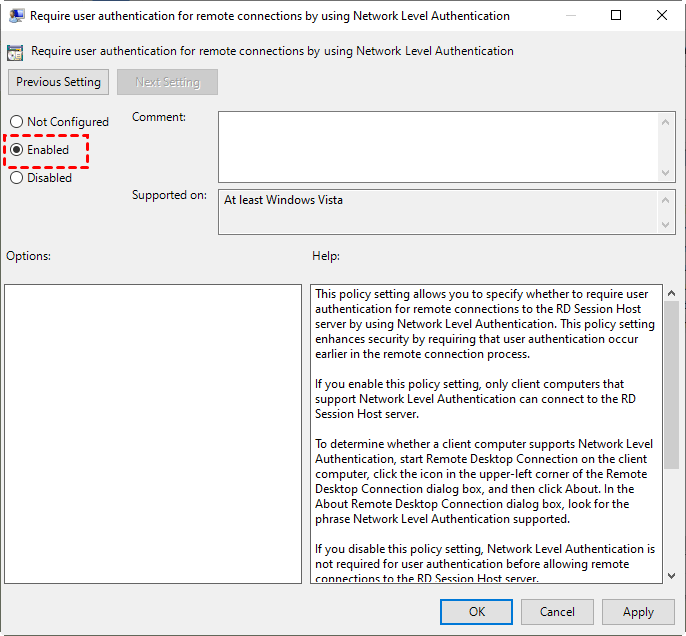
Network Level Authentication (NLA) offers several key benefits: it reduces server resource usage by authenticating users before a remote desktop session is established, prevents unauthenticated users from connecting, and enhances overall session security by ensuring that only verified users gain access. Disabling Network Level Authentication is not recommended for security considerations.
Controlling Remote Desktop session limits and idle timeouts
One of the most overlooked but critical aspects of Remote Desktop management is controlling session behavior. Without boundaries, users may leave sessions running indefinitely, hogging server resources, reducing performance, or creating security risks. Fortunately, Group Policy gives you full control over Remote Desktop session timeouts and limits.
Here’s how to configure it:
Step 1. Open Group Policy Editor and navigate to:
Computer Configuration > Administrative Templates > Windows Components > Remote Desktop Services > Remote Desktop Session Host > Session Time Limits
Step 2. Configure the following settings:
- Set time limit for active but idle Remote Desktop Services sessions
- Set time limit for disconnected sessions
- End session when time limits are reached
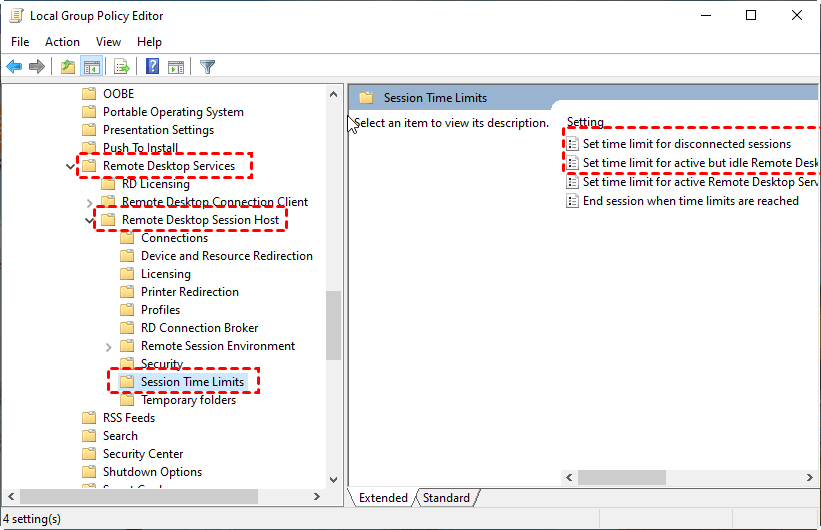
Step 3. Set values based on organizational needs:
- Idle sessions: 15–30 minutes
- Disconnected sessions: 30–60 minutes
- Max session length: 8–12 hours (or based on working hours)
By implementing these policies, you make sure resources aren’t wasted, and users don’t leave potentially vulnerable sessions open indefinitely.
Restricting Remote Desktop access by IP or device
Sometimes, it's not enough to just control who can connect, you also want to control from where. Whether you're looking to restrict access to office IP ranges or trusted VPN clients, Group Policy + Windows Firewall gives you the power.
Here’s how to do it:
Step 1. Open Group Policy Editor:
- Navigate to: Computer Configuration > Windows Settings > Security Settings > Windows Defender Firewall with Advanced Security
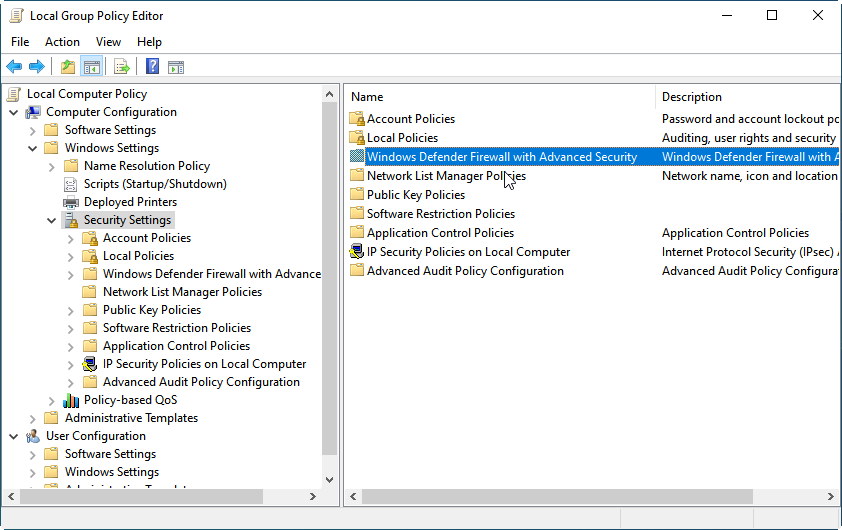
Step 2. Create an Inbound Rule:
- Right-click on “Inbound Rules” > New Rule
- Choose “Predefined” > Remote Desktop
- Allow the connection only from specific IP ranges
Step 3. Use Scope Settings:
- Under the rule’s Properties > Scope tab
- Specify “Remote IP address” as allowed sources (e.g., 192.168.1.0/24)
This prevents unauthorized devices or IPs from even reaching the RDP port, acting as your first line of defense.
Looking for an easier alternative? Try AnyViewer
While Group Policy for Remote Desktop offers robust control for enterprise-level Remote Desktop configuration, it can be complex for small teams or non-technical users. That’s where AnyViewer comes in, a powerful, user-friendly remote access solution designed for all types of users.
AnyViewer vs. Group Policy-based RDP: A quick comparison
| Feature | Group Policy RDP | AnyViewer |
| Setup Complexity | Requires AD, GPO, firewall config | Plug-and-play, no complex setup |
| Platform Support | Windows only | Windows, iOS, Android cross-platform |
| User Access Control | Manual via Group Policy or AD | Built-in user & device authorization |
| Connection Speed & Quality | Depends on network setup | Optimized low-latency remote sessions |
| File Transfer | Limited | Built-in secure file transfer support |
| Multi-device Management | Requires multiple GPOs or tools | Centralized device list & permissions |
| Ideal For | Enterprises with IT teams | Small businesses, freelancers, IT pros |
Why choose AnyViewer over manual RDP configuration?
- No complicated setup: Unlike Group Policy, AnyViewer doesn’t require Active Directory or deep technical knowledge. You can connect to remote devices with just a few clicks.
- Enhanced security: It supports end-to-end encryption, two-factor authentication, and device authorization for secure access.
- Faster performance: Enjoy smooth and responsive remote sessions, even across different networks.
- Cross-platform support: Whether you're using Windows, macOS, Android, or iOS, AnyViewer makes it easy to connect across devices.
- Ideal for businesses & individuals: Perfect for IT professionals, remote workers, and even personal use cases like helping family members.
Whether you’re managing a corporate network via Group Policy or just need quick, secure access to your remote devices, AnyViewer offers a modern, scalable solution that simplifies everything.
Try AnyViewer today and experience hassle-free remote access!
Conclusion
Group Policy provides IT admins with a centralized, secure way to configure and manage Remote Desktop across networks. It ensures consistent settings, user permissions, session control, and access restrictions, all crucial for maintaining security and efficiency.
However, Group Policy setup can be complex, especially for smaller teams or non-technical users. In these cases, AnyViewer offers a simple, secure, and fast alternative that works across multiple platforms without complicated configuration.
Whether you prefer the granular control of Group Policy or the ease of use of AnyViewer, both solutions can effectively support your remote desktop needs.
