
6 Tested Solutions to Fix Connection Blocked After Timeout on TeamViewer
This post primarily introduces why you would encounter “Connection blocked after timeout” TeamViewer error and how to fix it. Keep reading if you’re interested.
By Ellie / Updated on March 5, 2025
How do I fix connection blocked after timeout on TeamViewer?
I received TeamViewer 'Connection blocked after timeout' after 1 minute when I was connecting to my mom’s PC for the first time in months. Is this a temporary issue? Can I fix it?”
-- Question from Reddit

Imagine you’re using TeamViewer, and out of nowhere, the connection drops with a message saying, "Connection blocked after timeout." It’s annoying and can throw off your workflow. In this guide, we’ll dive into why TeamViewer might block your connection after a timeout and provide simple solutions to prevent it from happening again.
Why is connection blocked after timeout?
Here are some possible causes of connection blocked after timeout on TeamViewer:
- Incorrect Detection of Commercial Use: TeamViewer may mistakenly identify your usage as commercial, leading to unexpected timeouts and connection blocks.
- Session Time Limits: The free version of TeamViewer enforces strict session time limits, which can cause connections to drop if the limit is exceeded.
- Version Mismatch: If you and the other party are using different versions of TeamViewer, or if either party is using an outdated version, the connection might be blocked.
- License Issues: An expired or invalid TeamViewer license can result in connection blocks, preventing access to remote systems.
6 solutions to fix TeamViewer "Connection blocked after timeout"
There are typically six solutions to resolve the TeamViewer “Connection blocked after timeout” error for free license users. If you're looking for a quick and effective fix, consider trying the final solution: switching to a TeamViewer alternative. This can help bypass the TeamViewer connection blocked issue and keep your remote access running smoothly.
Solution 1. Restart the app and try again
Step 1. Press Win + R, type in “services.msc”, then click OK.
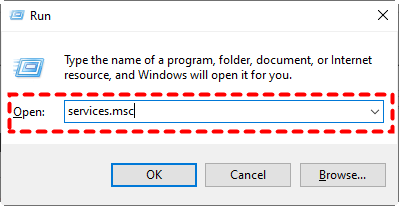
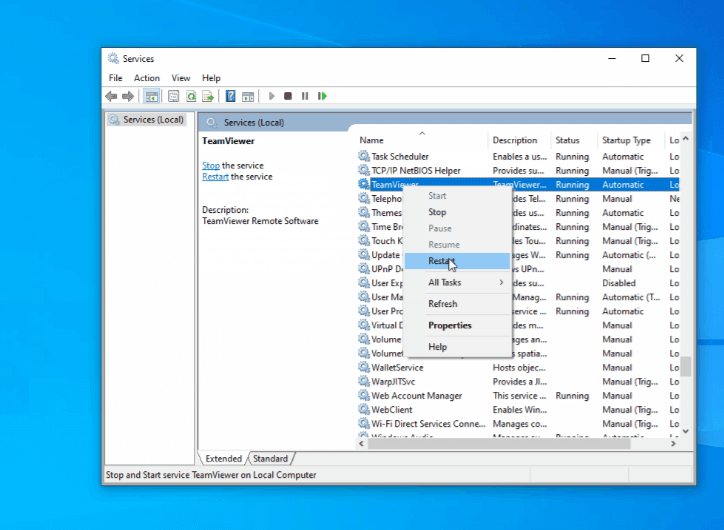
Step 2. Find TeamViewer. Right-click it and then choose Restart.
Step 3. Wait for the process to finish. Then try to connect via TeamViewer again.
Solution 2. Reset the TeamViewer ID
Step 1. Follow the steps above to stop TeamViewer from the Services first.
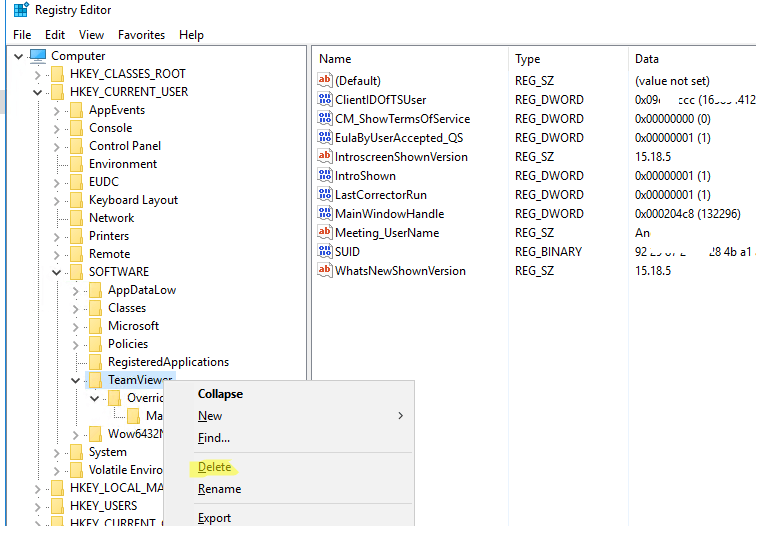
Step 2. Open Registry Editor by entering “regedit.exe” in the Run box. Navigate to: HKEY_CURRENT_USER > Software > TeamViewer. Delete the TeamViewer registry key.
Step 3. Open the PowerShell console with administrator privileges and run the following command to determine the creation date of the "C:Program Files" folder:
Get-Item "C:\Program Files" | select Name,CreationTime

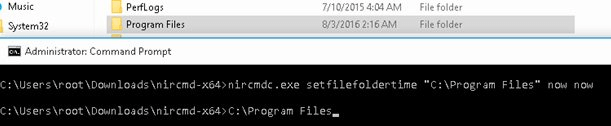
Step 4.Use the NirCMD tool to change the creation date of the Program Files folder. Download it and run it from the elevated Command Prompt console as follows:
nircmdc.exe setfilefoldertime "C:\Program Files" now now
Step 5. Check if the CreationTime value of the directory has changed.

Step 6. Then, using one of the special tools available, change the MAC address of your network card. Alternatively, you can edit your MAC address through the registry by following the steps outlined below.
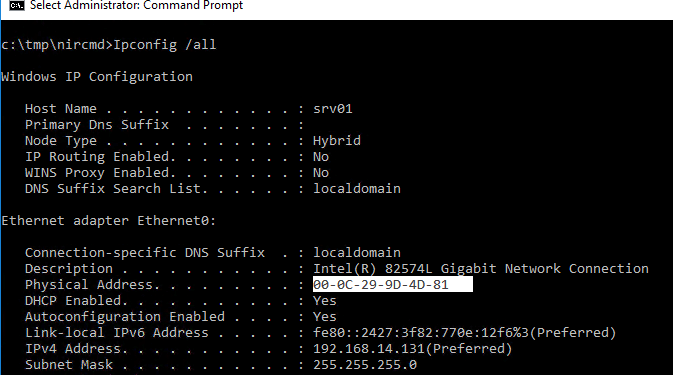
Step 7. To get the current MAC address of your network card, open command prompt, and run the following command:
Ipconfig /all
Pay attention to two parameters: Description (LAN card description) and Physical Address (MAC address).
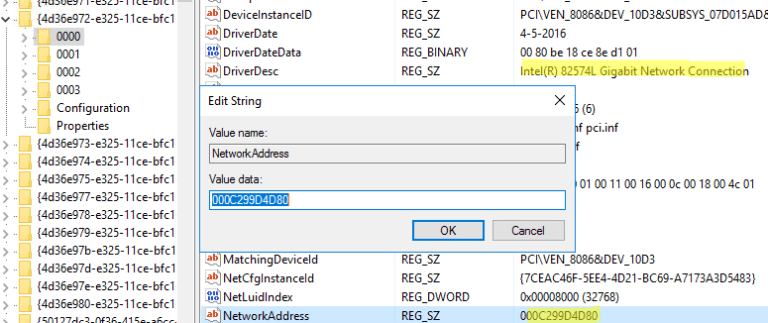
Step 8. Then, open the Registry Editor again and go to the key: HKLM > SYSTEM > CurrentControlSet > Control > Class > {4d36e972-e325-11ce-bfc1-08002be10318}.
Step 9. Find DriverDesc option, where the description (name) of your NIC must be specified (for example, Intel(R) 82574L Gigabit Network Connection). When you've found the correct network card, double-click the NetworkAddress parameter. It specifies the network card's MAC (hardware) address. It is sufficient to change a single digit in the current MAC address, such as 000C299D4D80.
Step 10. As a result, the network card's MAC address is changed. You must now modify the VolumeID of the system partition. VolumeID (or Volume Serial Number) is a hard drive volume's unique identifier that is set during formatting. Use the console utility VolumeID v2.1 to change the VolumeID v2.1. VolumeId.zip should be downloaded and extracted.
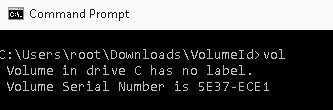
Step 11. Open Command Prompt with Administrator privileges and run the following command to determine the current VolumeID:
vol
Volume Serial Number is 5E37-ECE1.
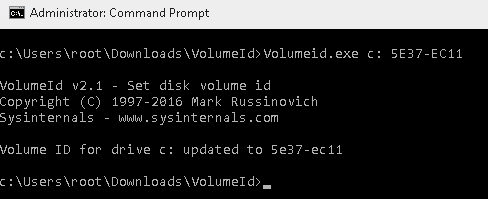
Step 12. Replace the current value with the new value 5E37-EC11:
c:\users\root\Downloads\VolumeID
Volumeid.exe c: 5E37-EC11
Step 13. Close the command prompt and restart your computer. Then restart TeamViewer, and you'll be given a new TeamViewer ID.
Solution 3. Timeout setting for inactive sessions
To avoid your TeamViewer connections from being blocked due to inactive sessions, you can set a time-out period for them. Here’s how to close inactive TeamViewer sessions:
Step 1. Open the Gear icon in the upper-right corner of the TeamViewer (Classic) app. Then, navigate to Advanced > Advanced settings for connections to other computers > Timing out inactive sessions.
Step 2. Choose a time period after which an outgoing remote control session will be automatically terminated if there’s no interaction within the set duration.

Solution 4. Upgrade and activate a paid license
As we mentioned before, TeamViewer non-commercial use timeout happens because you have surpassed the TeamViewer time limit for free-user connections or you have been detected as using it for commercial purposes. So the third solution is to purchase and activate a paid license for it to work better.
Solution 5. Contact TeamViewer support
If you've activated your TeamViewer license and the "Connection blocked after timeout" issue persists, it’s time to reach out to TeamViewer Support. Their team of experts can assist you in resolving the problem and getting your remote connections back on track.
Solution 6. Free TeamViewer alternative
Looking for the best TeamViewer alternative? We’ve got you covered! While TeamViewer is a popular remote access software, its timeout limitations often prompt users to explore alternatives. One professional remote desktop software option to consider is AnyViewer.
AnyViewer offers a professional, feature-rich alternative for remote access, making it a solid choice for those seeking more flexibility and functionality. Here are some of its standout features:
- Unattended & Attended Access: Whether you need someone on the other end or you’re accessing devices remotely without supervision, AnyViewer offers both solutions for maximum flexibility.
- Multi-Platform Support: Connect seamlessly across Windows, macOS, Android, and iOS—perfect for users across different devices and operating systems.
- Strong Encryption: Elliptic Curve Cryptography (ECC) provides robust end-to-end encryption, ensuring secure and private sessions. Your data remains protected, even when devices are on different networks.
- Multiple-Monitor Support: If you’re using a multi-monitor setup, AnyViewer lets you view all screens or select a specific one during remote access for a smoother experience.
- File Transfer: Seamlessly transfer files between devices during remote sessions, ensuring efficient collaboration and support.
- Unlimited Concurrent Sessions: Enjoy the flexibility of running multiple remote sessions simultaneously, enhancing productivity and efficiency for both IT support teams and businesses.
Step 1. Install and run AnyViewer on both your work and home computers. Navigate to Log in and then Sign up for creating an AnyViewer account on the Controller computer (if you have already registered on the official website, you can log in directly).

Step 2. You should now see that you have successfully logged into AnyViewer. Your device will be assigned to the account automatically and listed on My devices list once logged in.

Step 3. Log in to the same AnyViewer account on both devices, then on your local device, go to Device, click the remote computer, and click One-click control to establish a direct connection.

Step 4. After successfully connecting, you will see the remote desktop. Then you can control it completely and provide remote support as if you were sitting in front of it.
- ✍ Notes:
- Upgrade your account to a Professional or Enterprise plan and enjoy more:
- Assign more devices for one-click unattended access and remote power management.
- Control more computers from one computer at the same time.
- More computers can start remote sessions simultaneously.
- Connect in privacy mode.
- Ultra high-quality image.
- MSI deployment.
- Role permission management.
Closing words
This post has highlighted the causes of the "Connection blocked after timeout" on TeamViewer and provided solutions to resolve it. However, the simplest solution might be to switch to a free TeamViewer alternative, such as AnyViewer. It lets you connect remotely from PC to PC, iOS to PC, or Android to PC at no cost. Give it a try today and experience seamless remote access!
