
Top 7 Best Remote Desktop Software for Video Editing of 2026
Video editors may have the need to edit video remotely. Which is the best remote desktop software for video editing? This post highlights the top 7 choices. Continue reading if you want to find out more.
By Ellie / Updated on December 26, 2025
Remote video editing - what's the best software?
We want to use one Windows PC as a remote server, accessible simultaneously from both a laptop and another PC. All devices are running Windows. One user specifically needs to run Adobe After Effects, so achieving optimal performance in terms of frame rate, latency, and screen resolution is crucial. What advice can you provide for this setup?”
- Question from Reddit
In today's interconnected world, the need for remote desktop software is more significant than ever. Video editors need the flexibility to access their workstations and collaborate with colleagues or clients from any location.
Key factors to consider before choosing
Before diving into our list of the best remote desktop software options for video editing, it's essential to understand the features that matter most for this specific task.
- Performance: Look for a solution that offers low latency and high-quality video streaming.
- Security: Ensure the software provides strong encryption and security features to protect your data.
- Compatibility: Check if the software works on the operating systems you and your team use.
- Ease of Use: User-friendly interfaces can make the remote editing process smoother.
- Cost: Consider your budget, as some solutions offer free plans or trials, while others are paid.
Top 7 best remote desktop software for video editing
The choice of remote desktop software for video editing depends on various factors, including your specific needs, budget, and preferences. Here are some popular remote video editing solutions. Choose according to your own needs.
Option 1. AnyViewer: All-in-one solution
The first and also the highly-recommended remote desktop software for video editing is AnyViewer. AnyViewer is a free yet professional remote desktop software for Windows, iOS, and Android. It provides low-latency connections and an increased frame rate of up to 60 FPS. Besides, it offers high-quality video streaming, providing 4K resolution viewing.
Step 1. Download, install, and launch AnyViewer on both computers.
Step 2. On the remote computer, sign up and log in to an AnyViewer account in advance.

Step 3. On the local computer, log in to the same account, go to the Device tab, choose the target computer, and click One-click control.

Step 4. After connecting successfully, you can go to the toolbar for better image quality. You can also enable remote sound for a better experience.
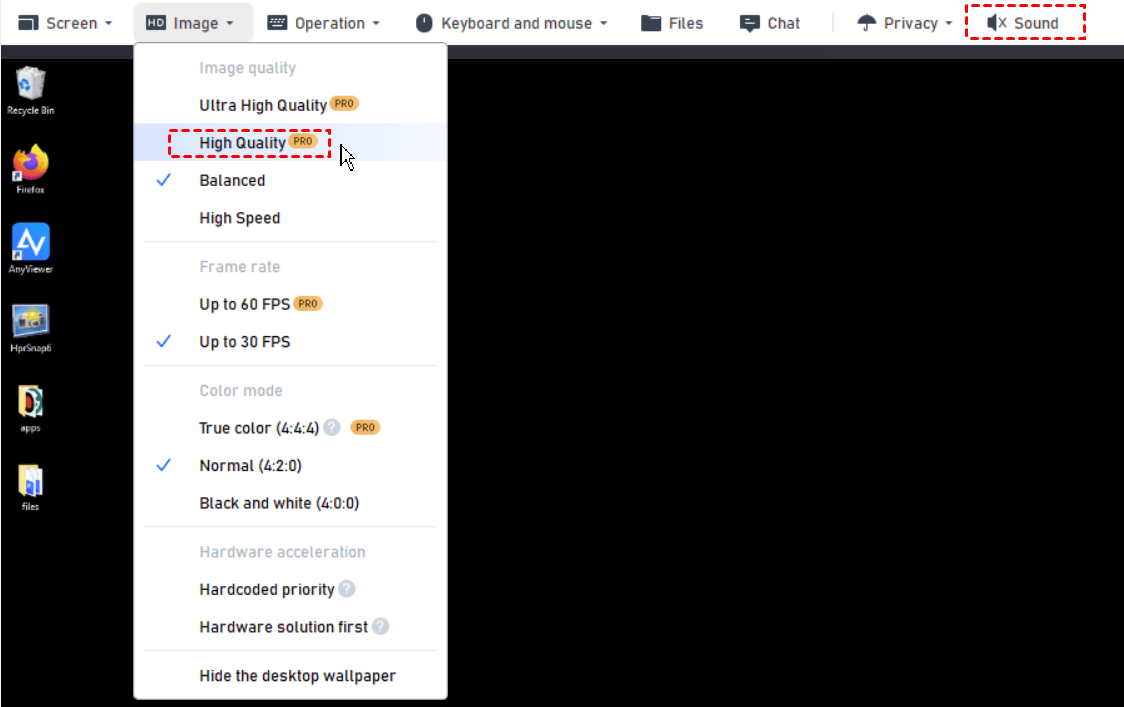
- ★Tips:
- Please note that High/Ultra-High Quality modes are for Professional or Enterprise plans only.
- Except for image quality, you can also improve the visual accuracy of your remote video editing by switching to 4:4:4 true color mode and 60 FPS mode.

Option 2. TeamViewer: Reliability & ease of use
TeamViewer is a widely used remote desktop software that offers good performance for video editing. It supports file transfer, and screen sharing, and has a feature-rich interface. It works on various platforms and is known for its ease of use.
Attention: TeamViewer is only free for personal use. If it has detected you are using it for commercial purposes, including accessing your home computer from work or connecting to a Windows Server operating system - or for any purpose for which you directly or indirectly receive compensation, your connection will be blocked right away and you’ll need a paid license to use it again.
Step 1. Download and install TeamViewer on both computers respectively.
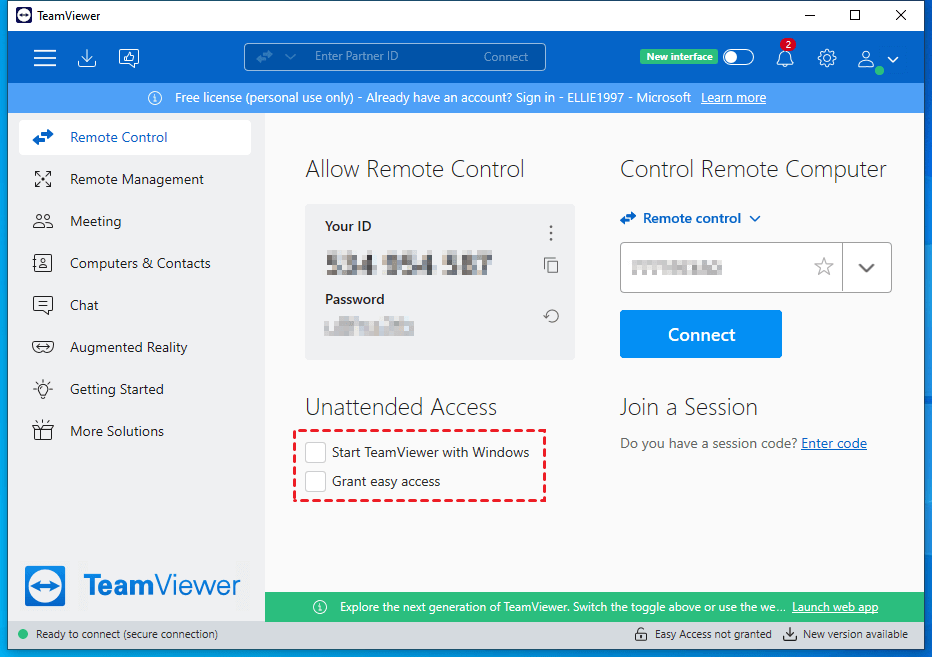
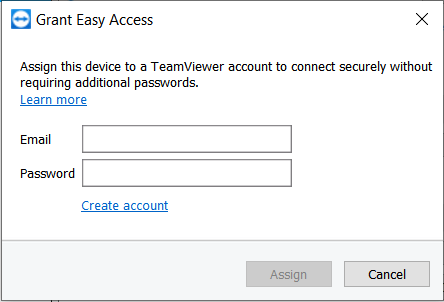
Step 2. On TeamViewer's main interface, tick Start TeamViewer with Windows first, and then tick Grant easy access.
Step 3. Enter your TeamViewer account.
Step 4. Then you will see TeamViewer remote access to unattended computers has been enabled on this device now. Accessing this host without a password is possible through your account.
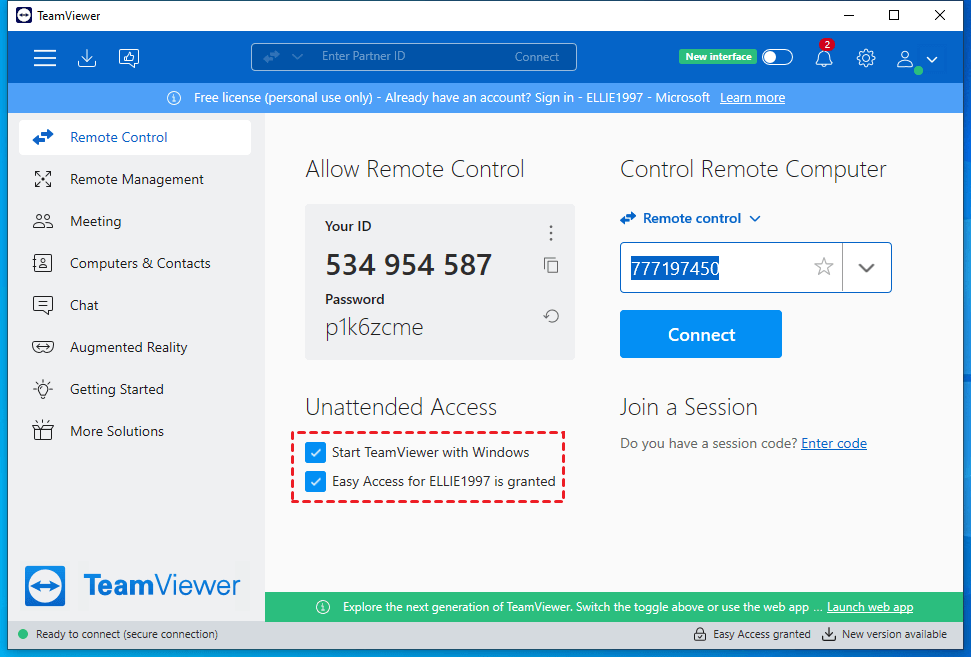
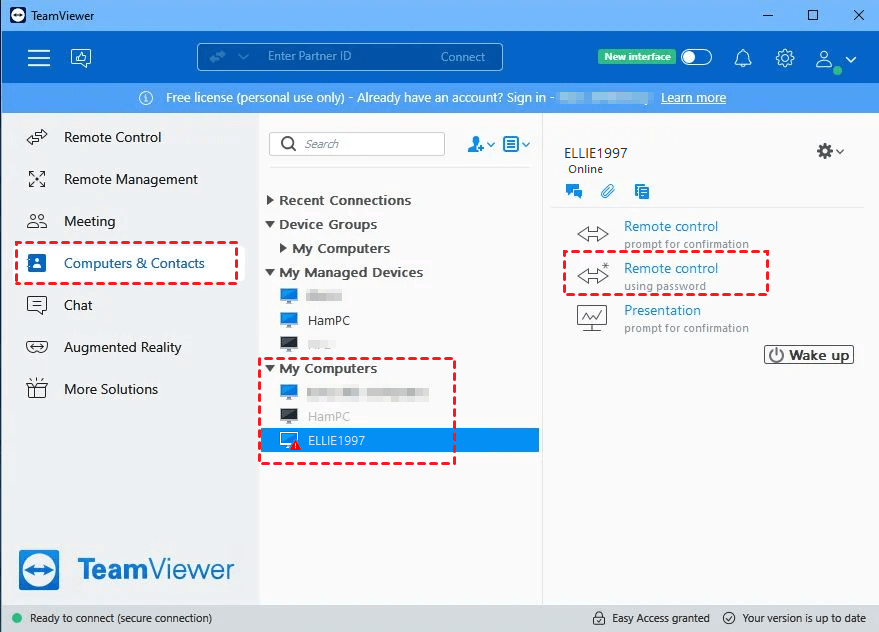
Step 5. On the local computer, follow the same steps to enable easy access. Then go to Computers & Contacts, choose your target computer, and then click Remote control using the password.
Option 3. Chrome Remote Desktop: The free option
Chrome Remote Desktop is a free remote desktop solution that works through a Chrome browser extension. While it may not have all the features of premium options, it's simple to set up and can work well for basic video editing tasks.
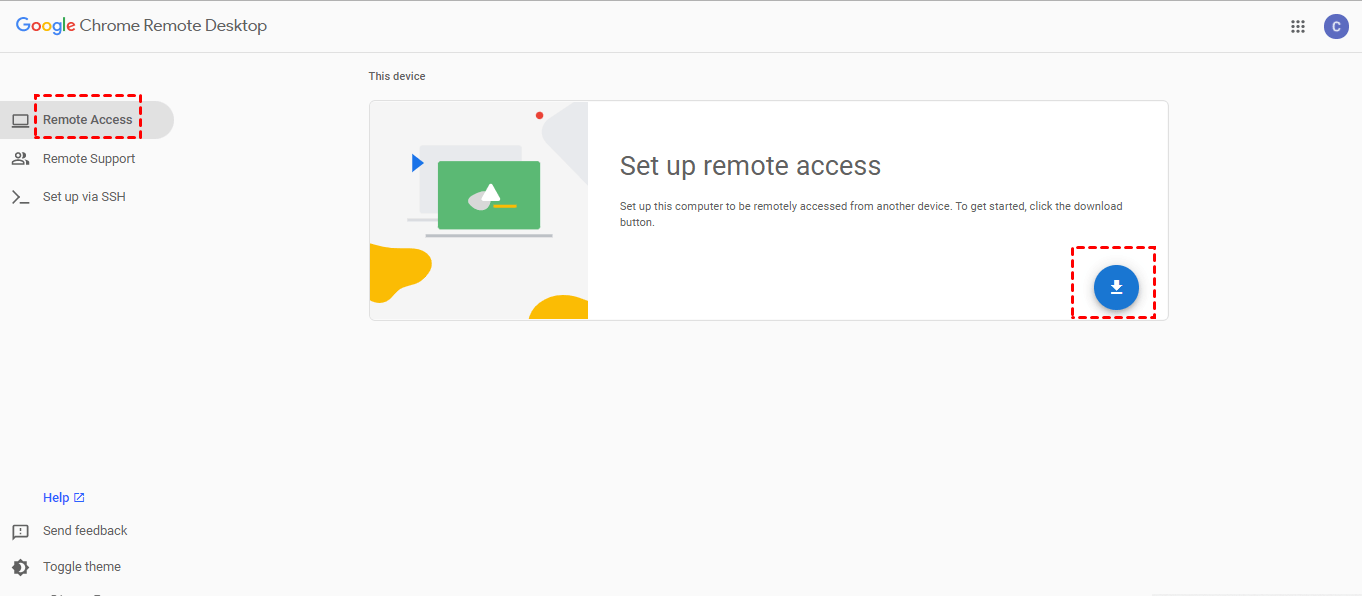
Step 1. On the remote computer, launch your Google Chrome browser, and search for "Chrome Remote Desktop." Open the official web page and select "Remote Access." Click the download icon to initiate the setup for remote access.
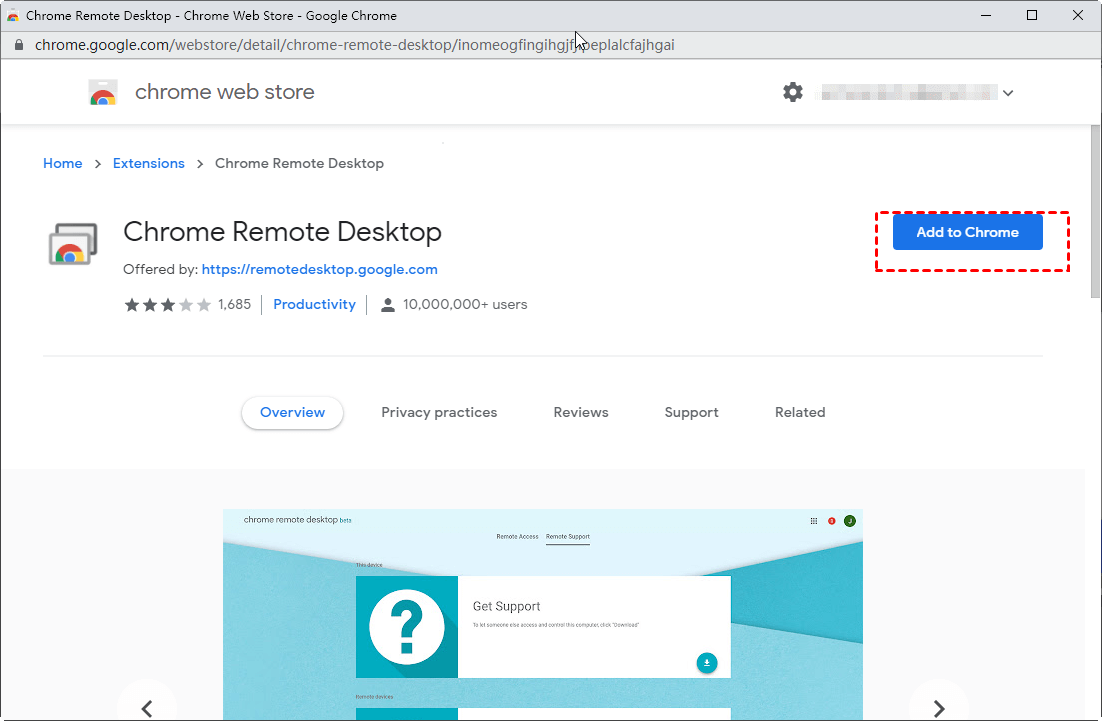
Step 2. Click "Add to Chrome" to incorporate the Chrome Remote Desktop extension into your Chrome browser.
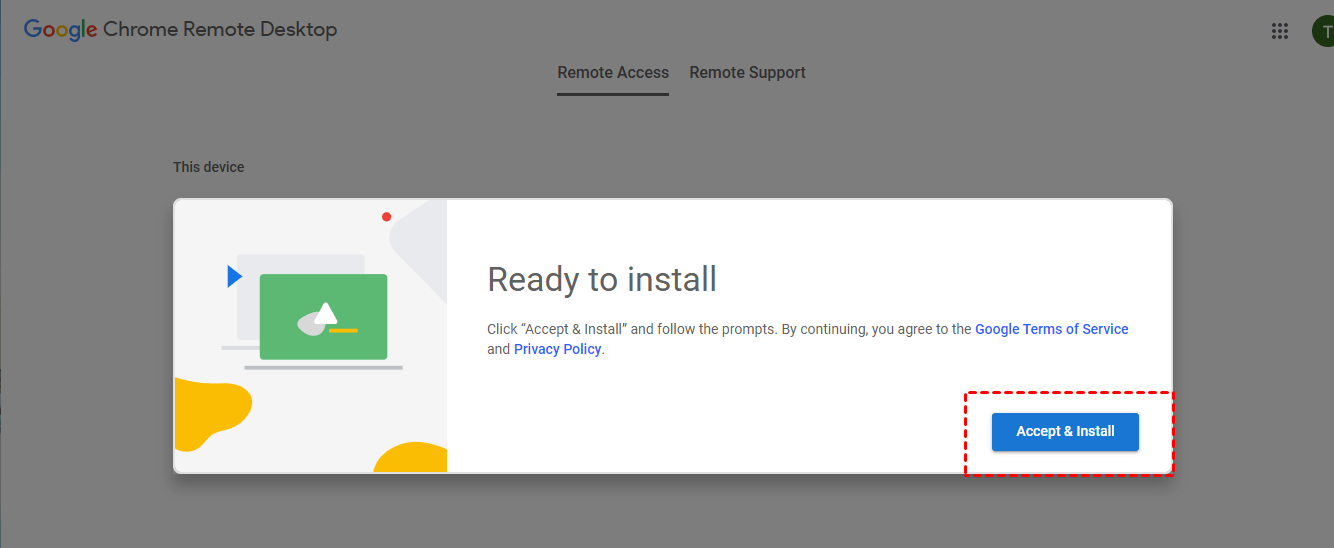
Step 3. Click "Accept & Install" to proceed with the installation.
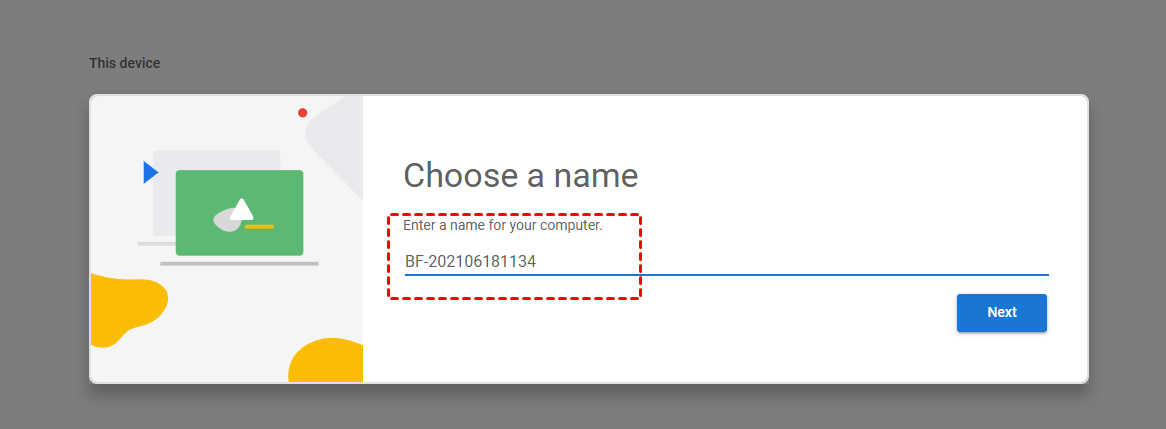
Step 4. Provide a name for your computer, and then click "Next."
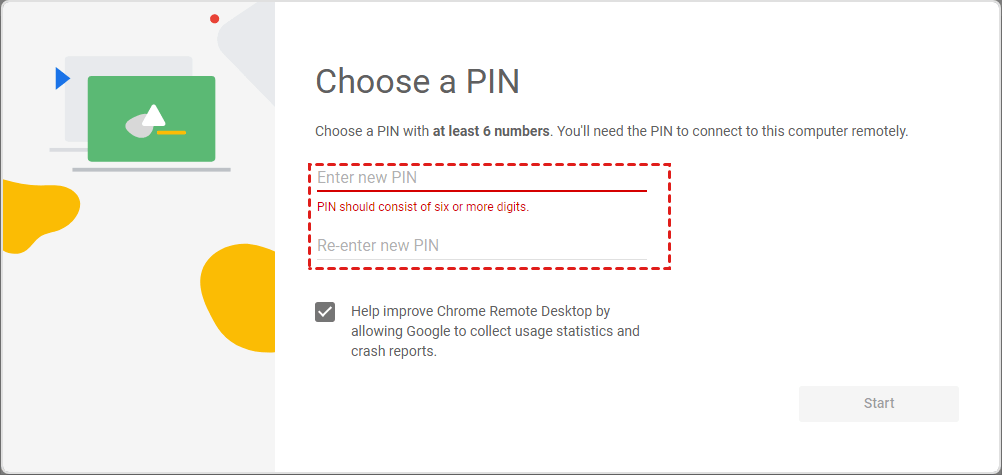
Step 5. Choose a PIN consisting of at least 6 numbers and enter it twice to initiate the program.
Step 6. On the local computer, log in to the same Google account and repeat the above steps. Click the computer you want to connect to. Enter its PIN, then you can start to control it.
Option 4. Splashtop: A business-grade solution
Splashtop is a remote desktop software solution that provides fast and secure remote access to computers and workstations from various devices. It has gained popularity for its high-performance capabilities and is often used by professionals across different industries, including video editing, IT support, and business management.
Attention: Splashtop does have a free version for personal and non-commercial use on users' local home network called Splashtop Personal. However, it is limited to your local home network. Using Splashtop across the Internet requires a subscription.
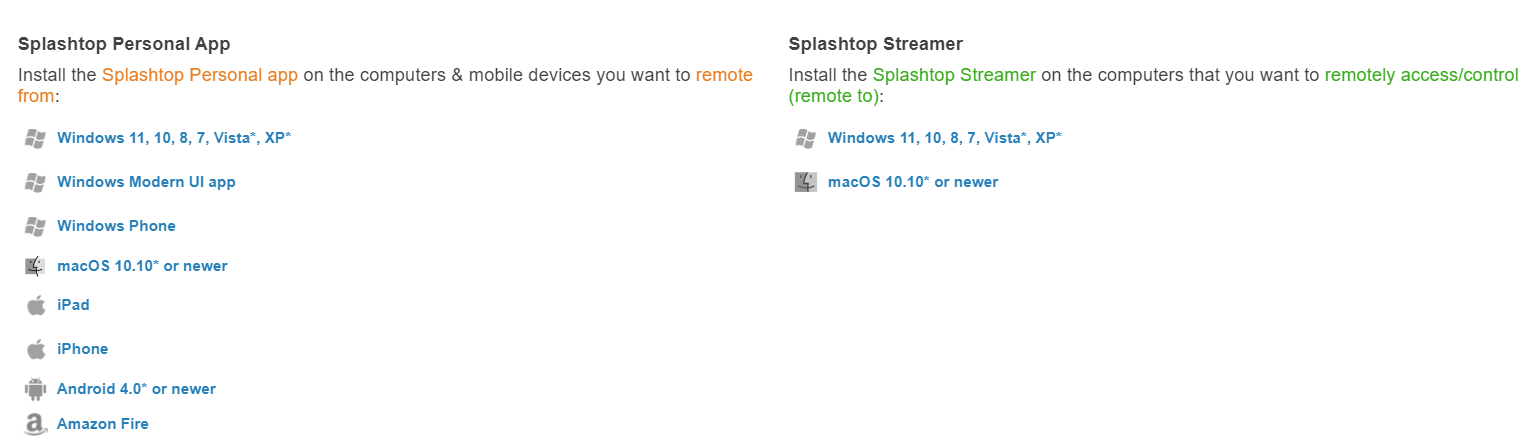
Step 1. Start by downloading the Splashtop Personal App on your local computer and the Splashtop Streamer on the remote computer. Make sure to choose the correct version based on your computer's operating system.
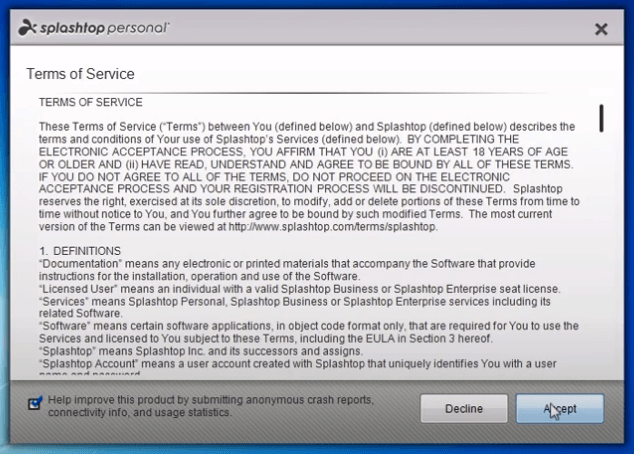
Step 2. Follow the provided instructions to install Splashtop Personal on both computers.
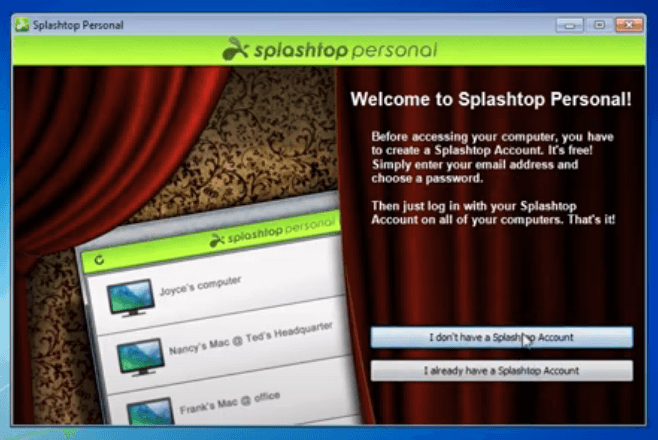
Step 3. When prompted, log in to your Splashtop account. If you already have an account, select "I already have a Splashtop account." If not, choose "I don't have a Splashtop account."
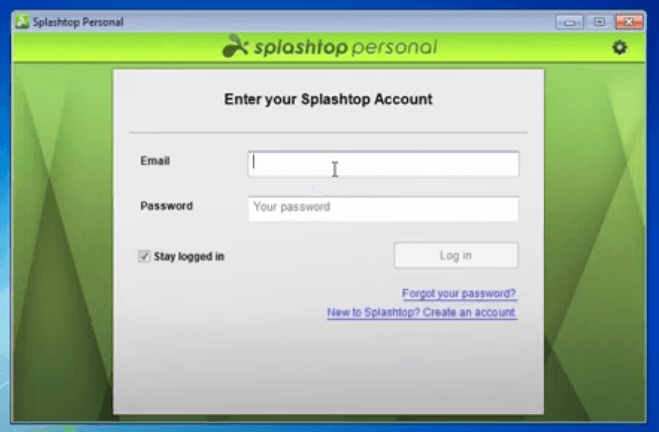
Step 4. Log in to your Splashtop account.
Note: If you encounter login issues, it could be because your device needs authentication. Check your email for an authentication email and follow the provided link to authenticate your device.
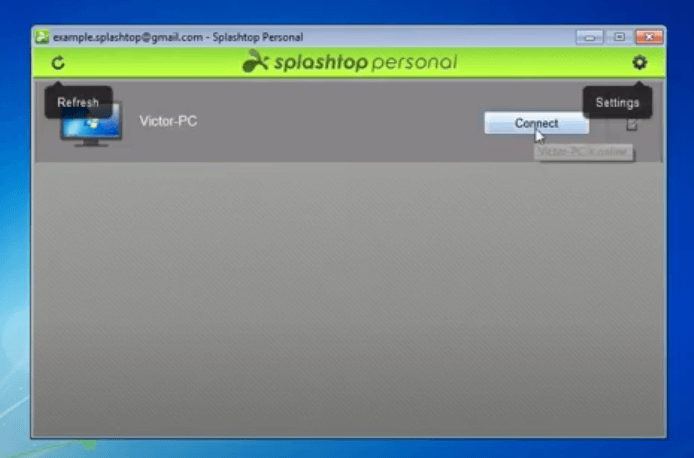
Step 5. Once successfully logged in, you'll see the device with Splashtop Streamer installed. Click "Connect" to establish a successful connection to the remote device within your home network.
Option 5. Remote Desktop Protocol (RDP): Windows-based editing
If you're using Windows, you can also use the built-in Remote Desktop Protocol (RDP) for remote desktop access. RDP can be a good choice if you are connecting to a Windows-based workstation for video editing. RDP typically provides good performance and responsiveness, allowing you to edit videos with real-time previews and smooth playback.
Attention: RDP sessions are highly dependent on internet speed and stability. For smooth video editing, both the upload speed of the remote computer's internet connection and the download speed of your local connection must be sufficient to handle the video data.
Part 1. Configure Remote Desktop connection on the host computer
1. Allow remote connections to this computer in the Control Panel
Step 1. Select Control Panel > System and Security > System, under the “System” section, click Remote Settings.
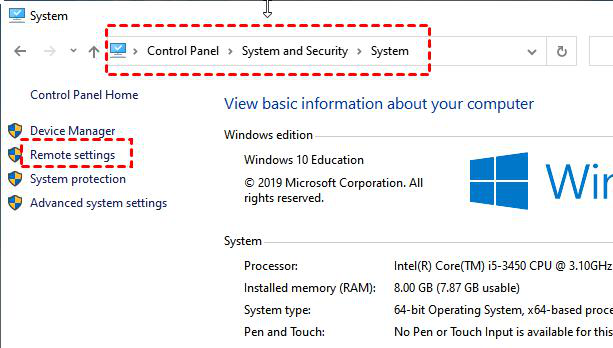
Step 2. Mark the checkbox adjacent to "Enable remote connections to this computer" and then proceed by clicking the "OK" button.

2. Change Windows Firewall settings
Step 1. On the host computer, select Control Panel > System and Security > Windows Defender Firewall.
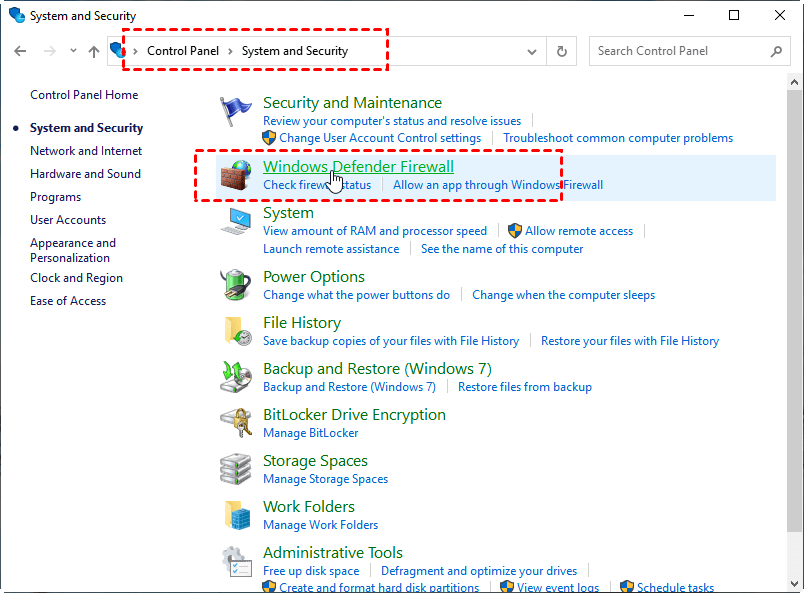
Step 2. Click “Allow an App or Feature Through Windows Defender Firewall” on the left navigation.
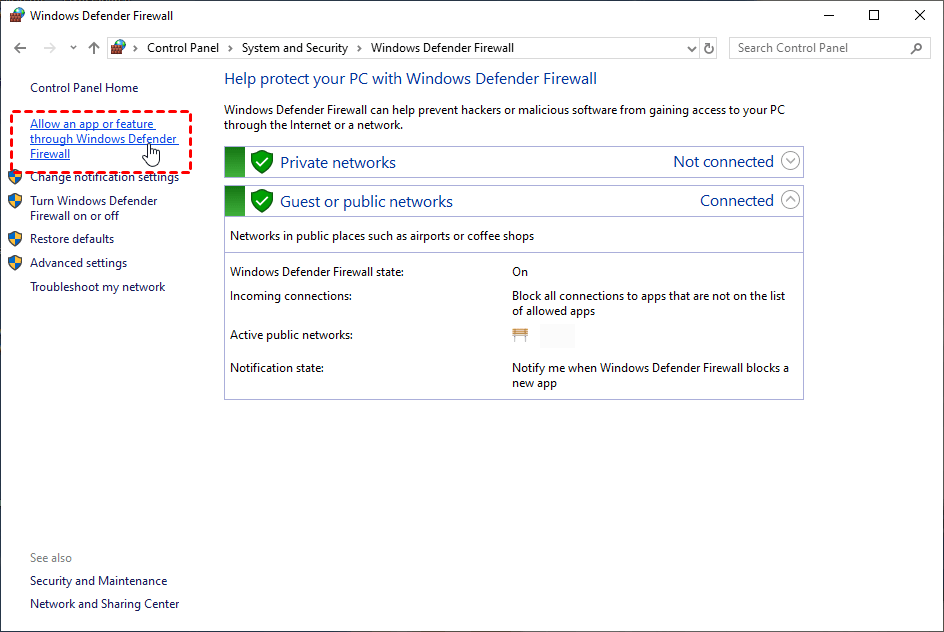
Step 3. Check “Remote Desktop” and hit OK.

3. Get the IP address and computer name
Step 1. Press Win + R on the host computer to open the Run dialog box. Enter "cmd" and then hit OK.

Step 2. Retrieve the IP address for the Remote Desktop by entering the command "ipconfig" and making note of the IPv4 Address.

Step 3. Find your PC name for Remote Desktop by typing in "query user." This will display your PC's name.

4. Get valid login credentials
Before you attempt remote access, make sure you have the necessary login credentials, including the username and password for the Windows computer you intend to access remotely. Having these essential details readily available is crucial for a successful remote connection.
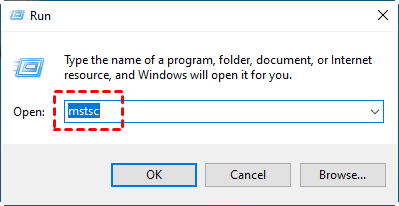
Part 2. Connect to the host computer from the client computer via RDP
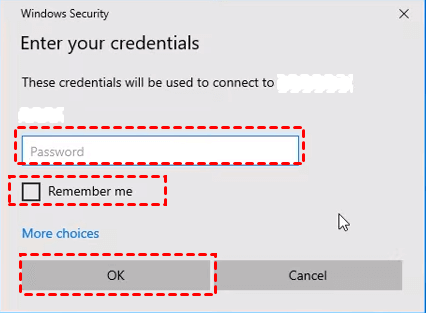
Step 1. On the client computer, press Win + R, and type “mstsc” in the Run Dialog box to open the Remote Desktop connection.
Step 2. Click on "Show Options," and then enter the IP address and hostname of the host computer. Afterward, click the "Connect" button.
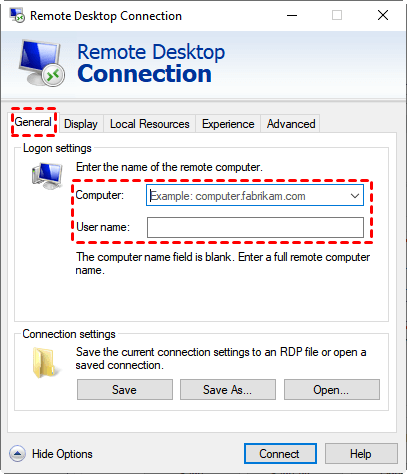
Step 3. In the pop-up window, enter the password for the client computer, and then click "OK”.
Option 6. Parsec: Beyond gaming
Parsec is a remote desktop and game streaming platform that is often associated with gaming, but it can also be used for remote video editing and other graphics-intensive tasks. Parsec's primary focus is on delivering low-latency, high-quality streaming, making it suitable for situations where real-time interaction with a remote computer is critical, such as video editing.
Attention: Using Parsec for video editing requires a fast and stable internet connection. Both the upload speed of the host computer and the download speed of the client device are crucial. If either connection is slow or unreliable, it can result in latency, lag, and degraded video quality during remote editing sessions.
Step 1. On the remote computer, install the Parsec software on the host computer by visiting the Parsec website (https://parsec.app/) and downloading the appropriate version for your operating system.
Step 2. Follow the installation instructions to complete the setup on the host computer. Sign in to your Parsec account or create one if you don't already have an account.
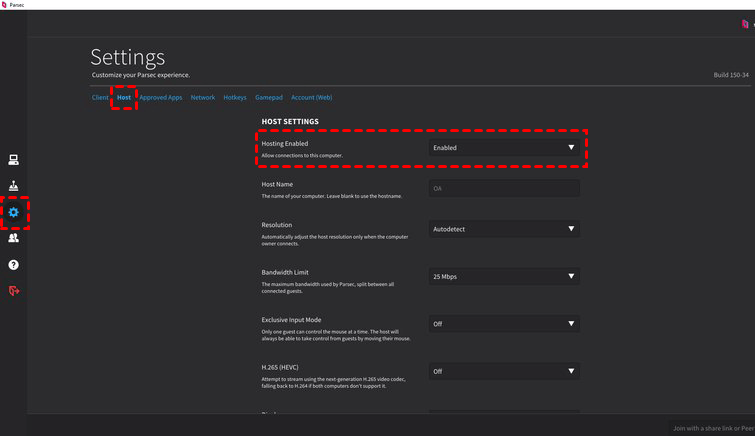
Step 3. Launch the Parsec application on the host computer. Click on the "Settings" menu. Under the "Host" section, enable the "Hosting" option to allow others to connect to your computer.
Step 4. On the local computer, install the Parsec software and sign in to the same Parsec account. In the Parsec application, click the "Computer" tab select the host computer you want to connect to for video editing, and click "Connect".

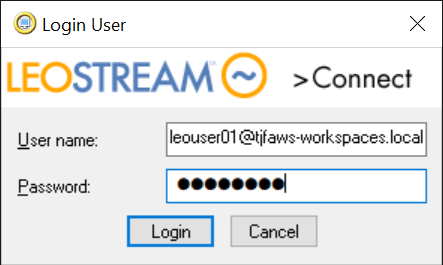
Option 7. Leostream: Remote desktop streamer
IT professionals often prefer Leostream for managing remote desktop accounts in large organizations. It also enables connections to virtual machines and recently introduced a feature allowing users to connect to Amazon Web Services EC2 cloud-compute platform using the NICE DCV protocol. This is especially beneficial for graphic-intensive tasks like video editing and visual effects.
Attention: Leostream is not a dedicated solution for video editing. Using it for remote video editing would involve deploying a virtual desktop infrastructure (VDI) or remote desktop services (RDS) environment and then managing access to virtualized desktops or applications
Step 1. Download and install the Leostream Connection Broker on a server in your virtualized environment.
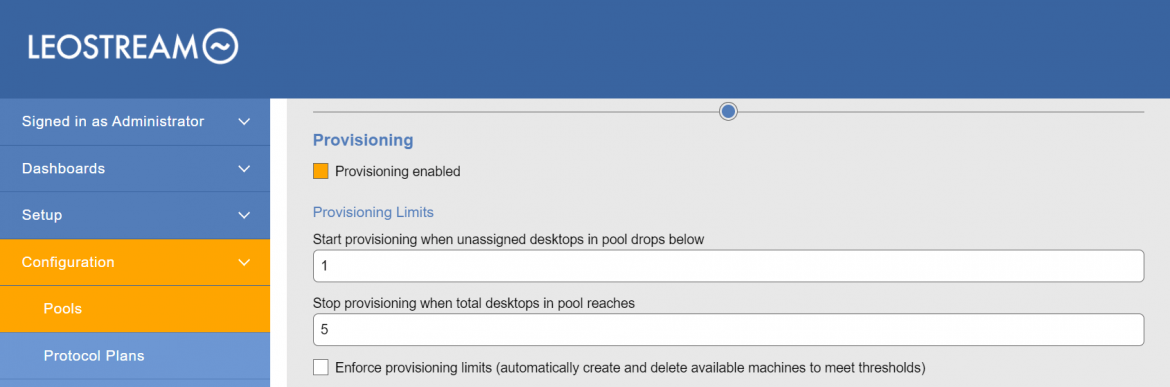
Step 2. Configure the Leostream Connection Broker with details about your virtualization environment, such as the hypervisor, virtual machine templates, and resource pools.
Step 3. Create user accounts and profiles for individuals who need remote access to the virtualized desktops. Assign appropriate permissions and access policies.
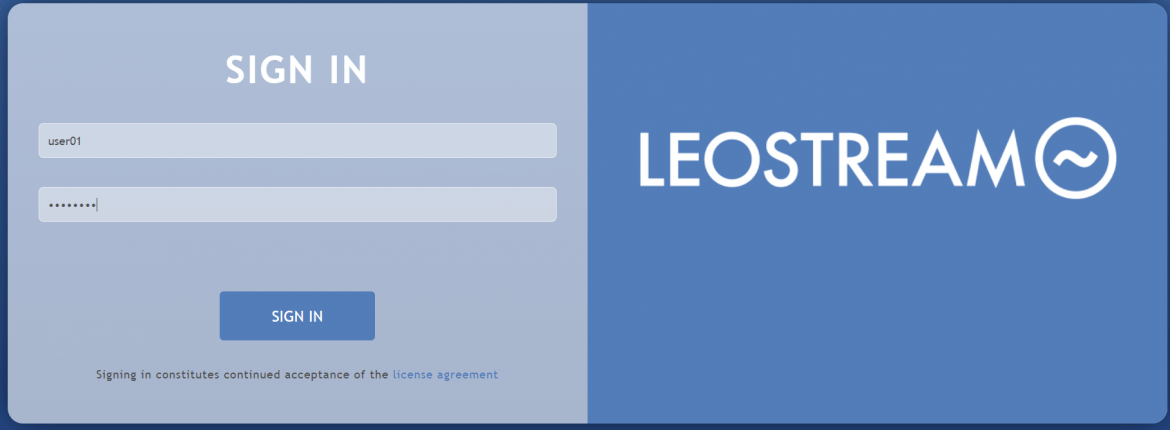
Step 4. Download the Leostream Connect client on the local device. After specifying the IP address of the gateway, you’ll be presented with a user login dialog.
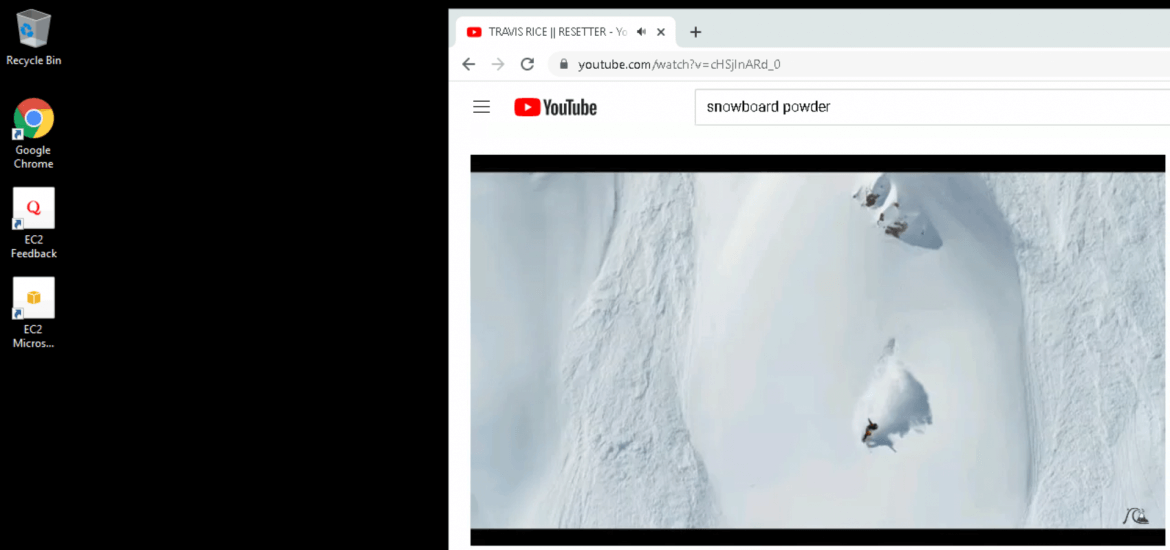
Step 5. Once connected, users can launch their video editing software and perform video editing tasks remotely.
The bottom line
In conclusion, selecting the best remote desktop software for video editing is essential. Consider factors like performance, security, compatibility, ease of use, and cost. Options include AnyViewer for professional features, TeamViewer for reliability, Chrome Remote Desktop for basic tasks, Splashtop for business-grade use, RDP for Windows-based editing, Parsec for low-latency streaming, and Leostream for organization-wide remote access. Choose based on your needs and internet stability. Efficient remote video editing awaits with the right software.
