
Top 6 Free Network File Transfer Software 2026
Are you looking for the best way to transfer files between computers? This post primarily introduces the top 6 network file transfer software. Keep reading if you’re interested.
By Ellie / Updated on March 20, 2026
How do I transfer files between computers on my network?
In the current era of information, the significance of sharing data is continually on the rise. Thankfully, modern advancements have blessed us with file-sharing applications, enabling swift data transfers between systems. Network file transfer software has become an indispensable tool in our professional routines, whether we're collaborating remotely, working within a team, or simply sharing files with a nearby colleague on the fly.
With an array of options available, determining the optimal network file transfer software can be a challenge. So, what criteria should guide your selection? Consider the following key attributes:
- Cost-effectiveness: Opt for a solution that is free of charge.
- User-friendly interface: Select software that is intuitive and easy to navigate.
- Speedy transfers: Prioritize applications with rapid transfer speeds to enhance efficiency.
- Generous file size limits: Look for software that accommodates larger file sizes, facilitating comprehensive data exchange.
- Enhanced security measures: Ensure the software provides robust security features to safeguard your data during transit.
Best 6 network file transfer software
Here we’ll introduce six of the best free network file transfer software tools. These options are great for various scenarios—from local transfers within a LAN to long-distance connections over the internet.
Option 1. Remotely transfer files between computers via AnyViewer
AnyViewer stands out as one of the simplest and fastest tools for network file sharing. It’s particularly useful for transferring files between computers that are located remotely or not connected to the same local network. Thanks to its intuitive interface and minimal setup requirements, users can quickly initiate transfers without technical complications, making it a top choice for personal and professional use alike.
What truly sets AnyViewer apart is its powerful set of features. It boasts wide compatibility with multiple Windows and Mac versions, supports unattended remote transfers with just one click, and delivers impressive file transfer speeds, even for large files over the internet. Transfers within the same LAN or WiFi network are even faster.
In addition to being a top-tier fast network file transfer software, AnyViewer also serves as a powerful remote desktop and screen sharing tool. It lets users easily manage, control, and view another computer in real time. With fast response speeds and high image quality, it’s even a great option for remote gaming.
- To transfer files freely, it is highly recommended to upgrade your account to a professional or enterprise plan. Here are what a professional or enterprise plan can bring to you:
- File transfer speeds of up to 10 MB/s
- 5 transfer threads running simultaneously
- No limit on the number of files transferred at once
- Support for individual file sizes up to 1 TB
- More assigned devices for unattended file transfers
Let's see how to remotely transfer files between computers via AnyViewer:
Step 1. Download, install, and launch AnyViewer on both Windows computers.
Step 2. On the remote computer, go to Log in, and then click Sign up (if you have already signed up on its official website, you can log in directly).

Step 3. Fill in the signup information and you can see you successfully logged in to AnyViewer. Your device will automatically be assigned to the account you’ve logged in to.

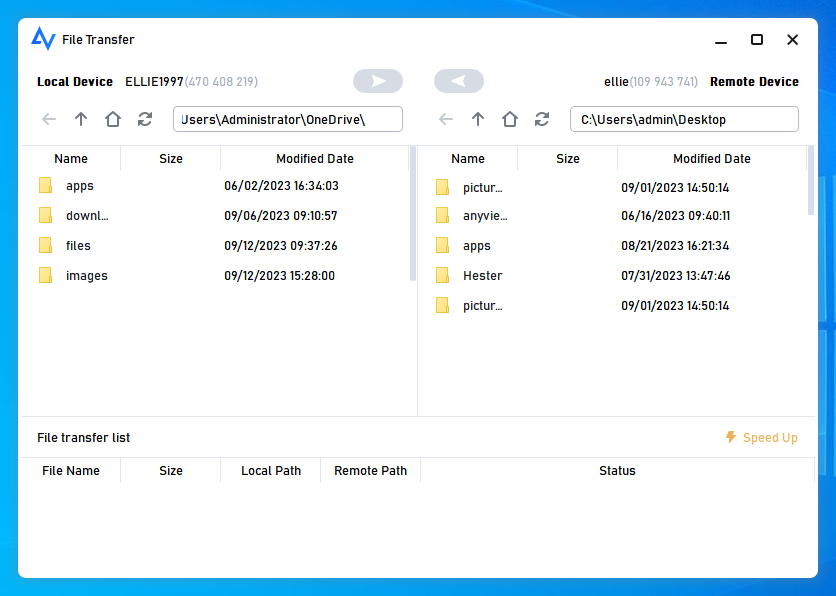
Step 4. Log in to the same account on the local computer. Choose your target remote computer from the device list, and then click File Transfer.


Step 5. Then a File Transfer dialog box will appear. You’re able to transfer files between devices freely by clicking the arrows after choosing the target files. You can also double-click the target file to achieve transfer.
Option 2. Share files between computers via Nearby Sharing
Another way is to use Nearby Sharing, the free LAN file sharing software. You should be informed before you begin that this method only works with Windows 10 and Windows 11 and that both devices need to be linked to the same network.
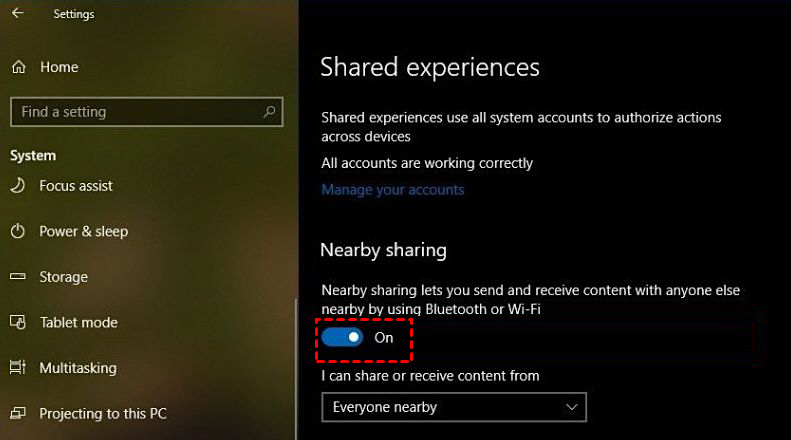
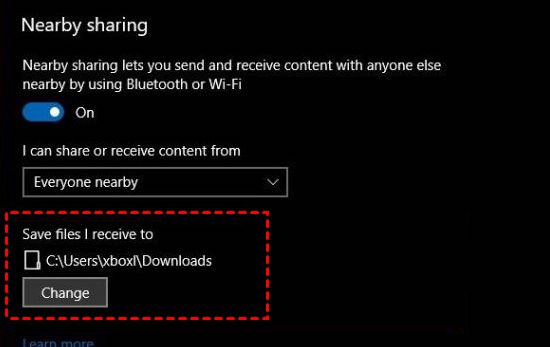
Step 1. Navigate to: Settings > System > Shared Experiences, and then turn on the Nearby sharing button.
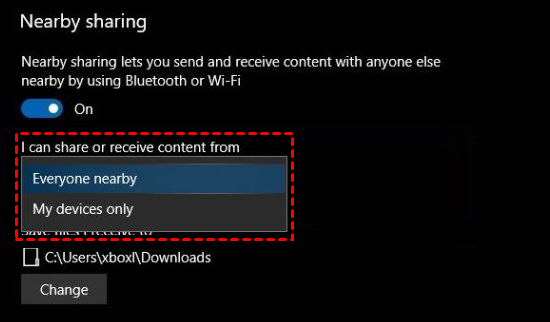
Step 2. Select the sharing pattern based on your own need from the drop-down menu.
Tips:
- Everyone nearby means your PC will share or receive content from all nearby devices.
- My devices only means your PC will share or receive content only with devices using the same Microsoft account.
Step 3. You can click Change to choose the folder location where you prefer to store the files being transferred to your PC.
Step 4. Go to the file explorer, right-click the desired file you want to transfer, and then select Share in the context menu.

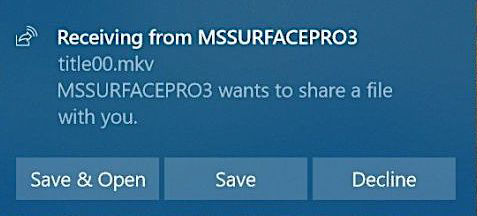
Step 5. Select the target device you want to transfer files to from the pop-up window.

Step 6. Then the target device will receive a notification. Click Save & Open to start the file transfer.
Option 3. Sync files from computer to computer via AOMEI Backupper
The best free file sync software for Windows 11/10/8.1/8/7/Vista/XP, AOMEI Backupper Standard, can assist you with fast file transfer between computers over a network. It includes file sync, which allows users to transfer files to external/internal hard drives, cloud drives, NAS devices, and networks, among other things. And, best of all, it's completely free!
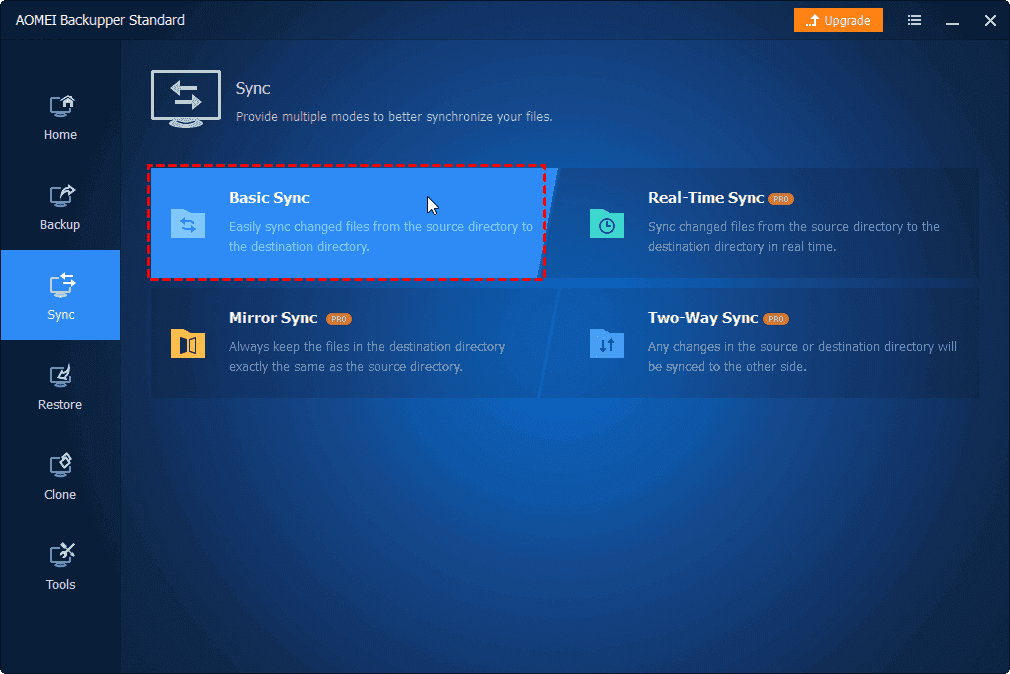
Step 1. Install and launch AOMEI Backupper Standard on the source computer. Click Sync, and then click Basic Sync.
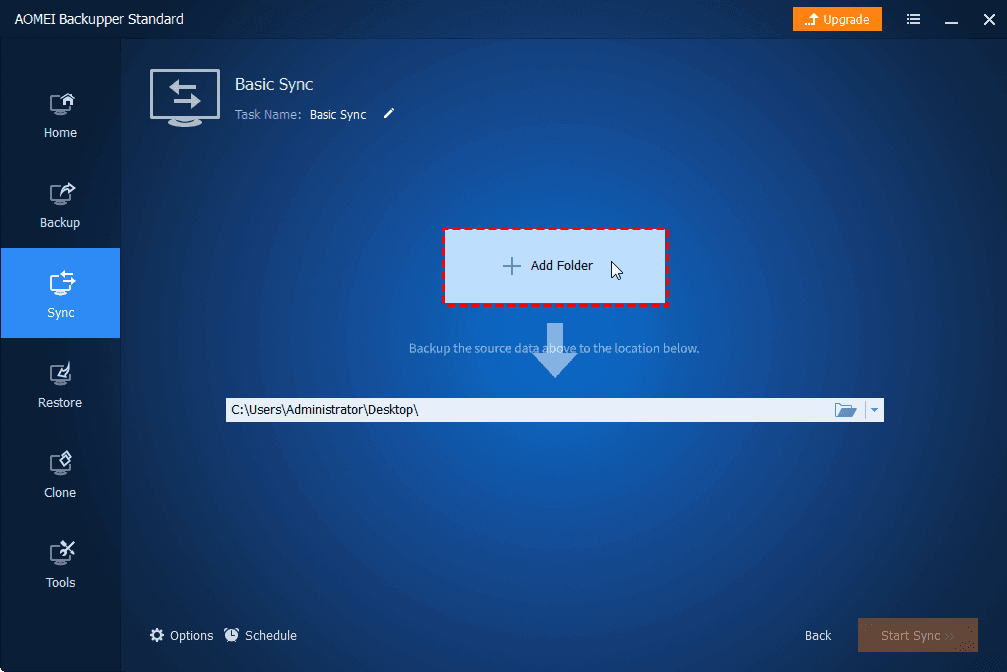
Step 2. Add folders you want to transfer by clicking Add Folder.
Step 3. Choose the destination location. Here you can select Add Share or NAS Devices.
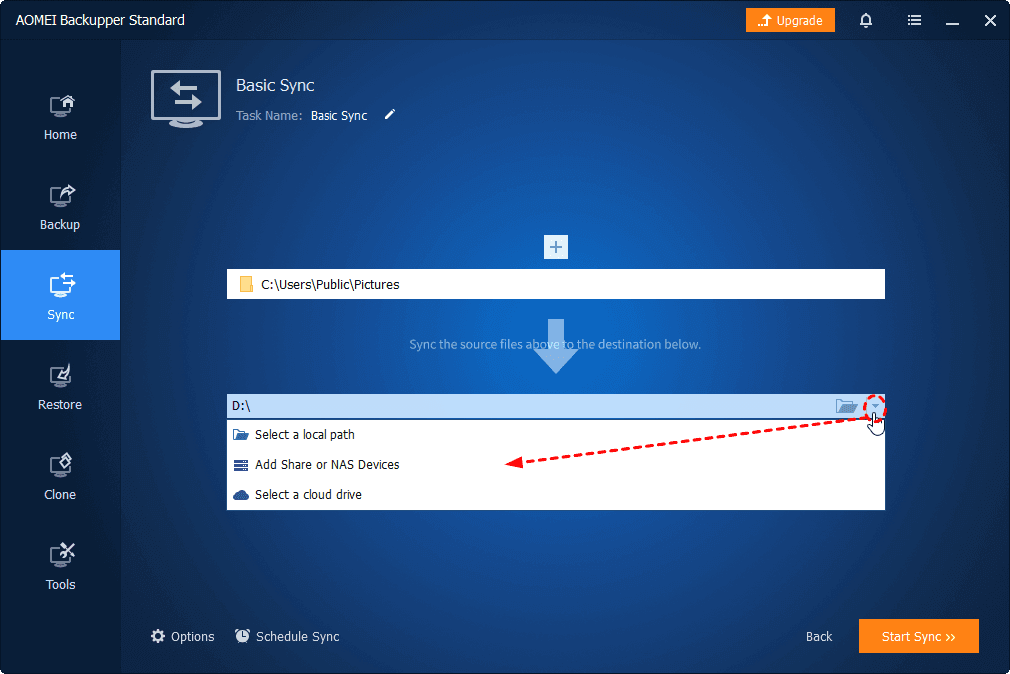
Step 4. In the Add Share or NAS Devices window, type the IP address of the source computer and click the blue button at the right. Type username and password if it prompts.
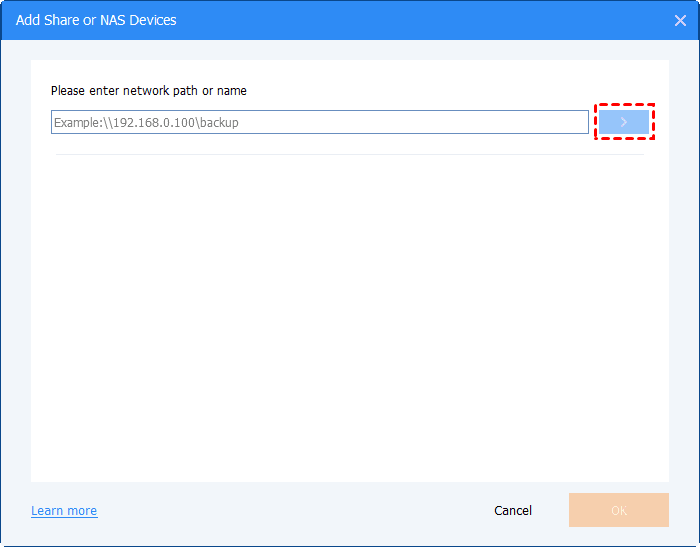
Step 5. After the IP address has been added, all network-shared folders on the computer will be listed. Choose one folder to store the folder(s) you plan to transfer and click OK.
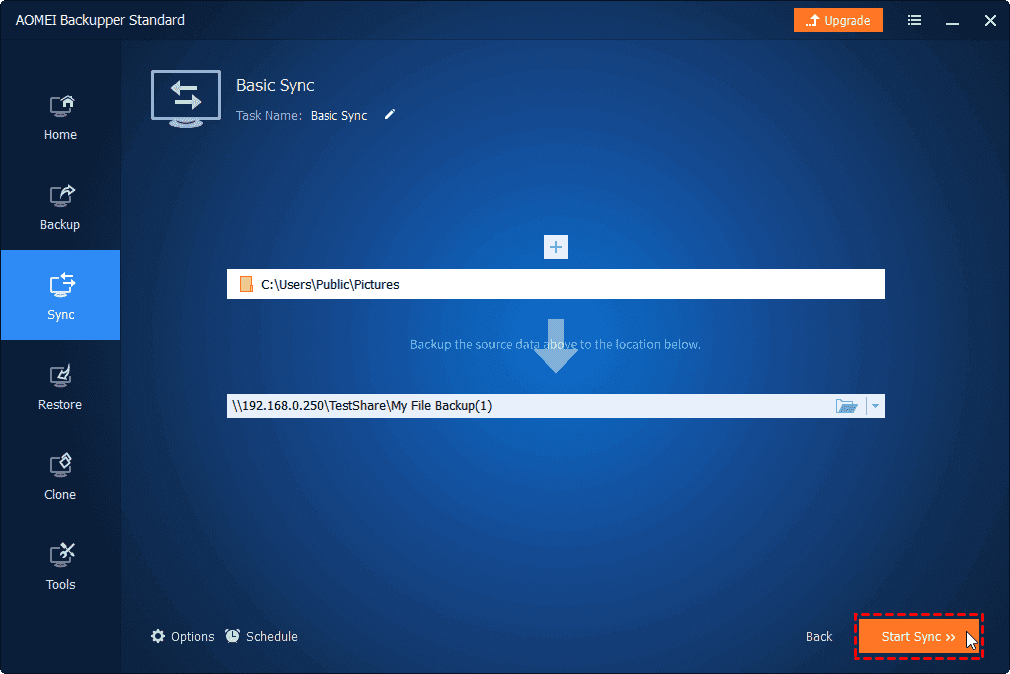
Step 6. Then click Start Sync.
Step 7. Go to This PC > Network on the destination computer to access the synced files wirelessly.
Option 4. Computer-to-computer file transfer via cloud storage services
You are also able to share files from computer to computer using cloud storage services, for example, Google Drive and OneDrive. Here we'll take Google Drive as an example.Google Drive can provide you with 15GB of free online storage space as long as you have a Google account, and you can easily share any content you want, whether it's a single file or an entire folder.
Step 1. Open the main interface of Google Drive, find and click My Drive in the left sidebar, click My Drive again, and select Upload files or Upload folder in the expanded menu.
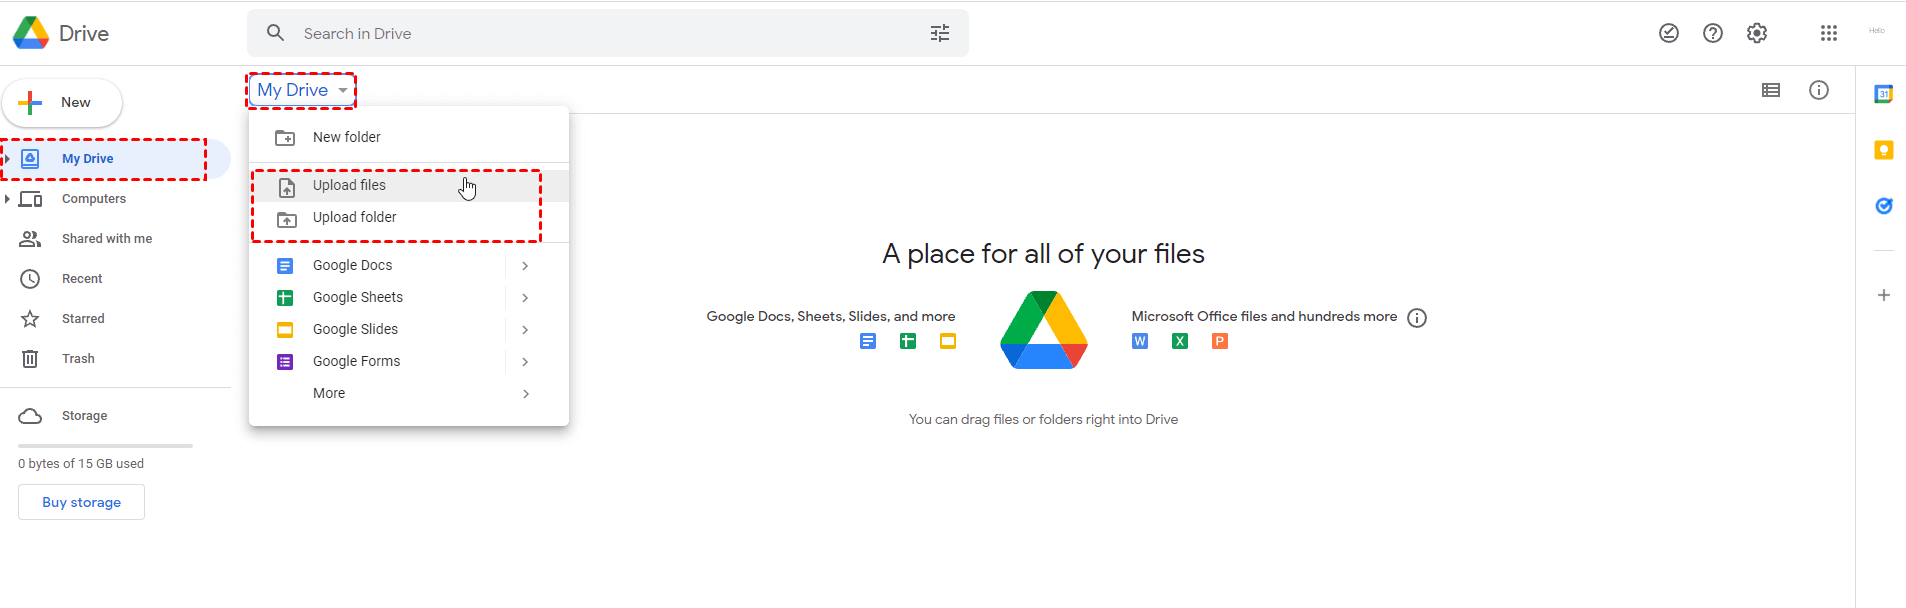
Step 2. For example, click Upload files, and a window will pop up automatically. Select the files you want to upload and click Open in the lower-right corner.

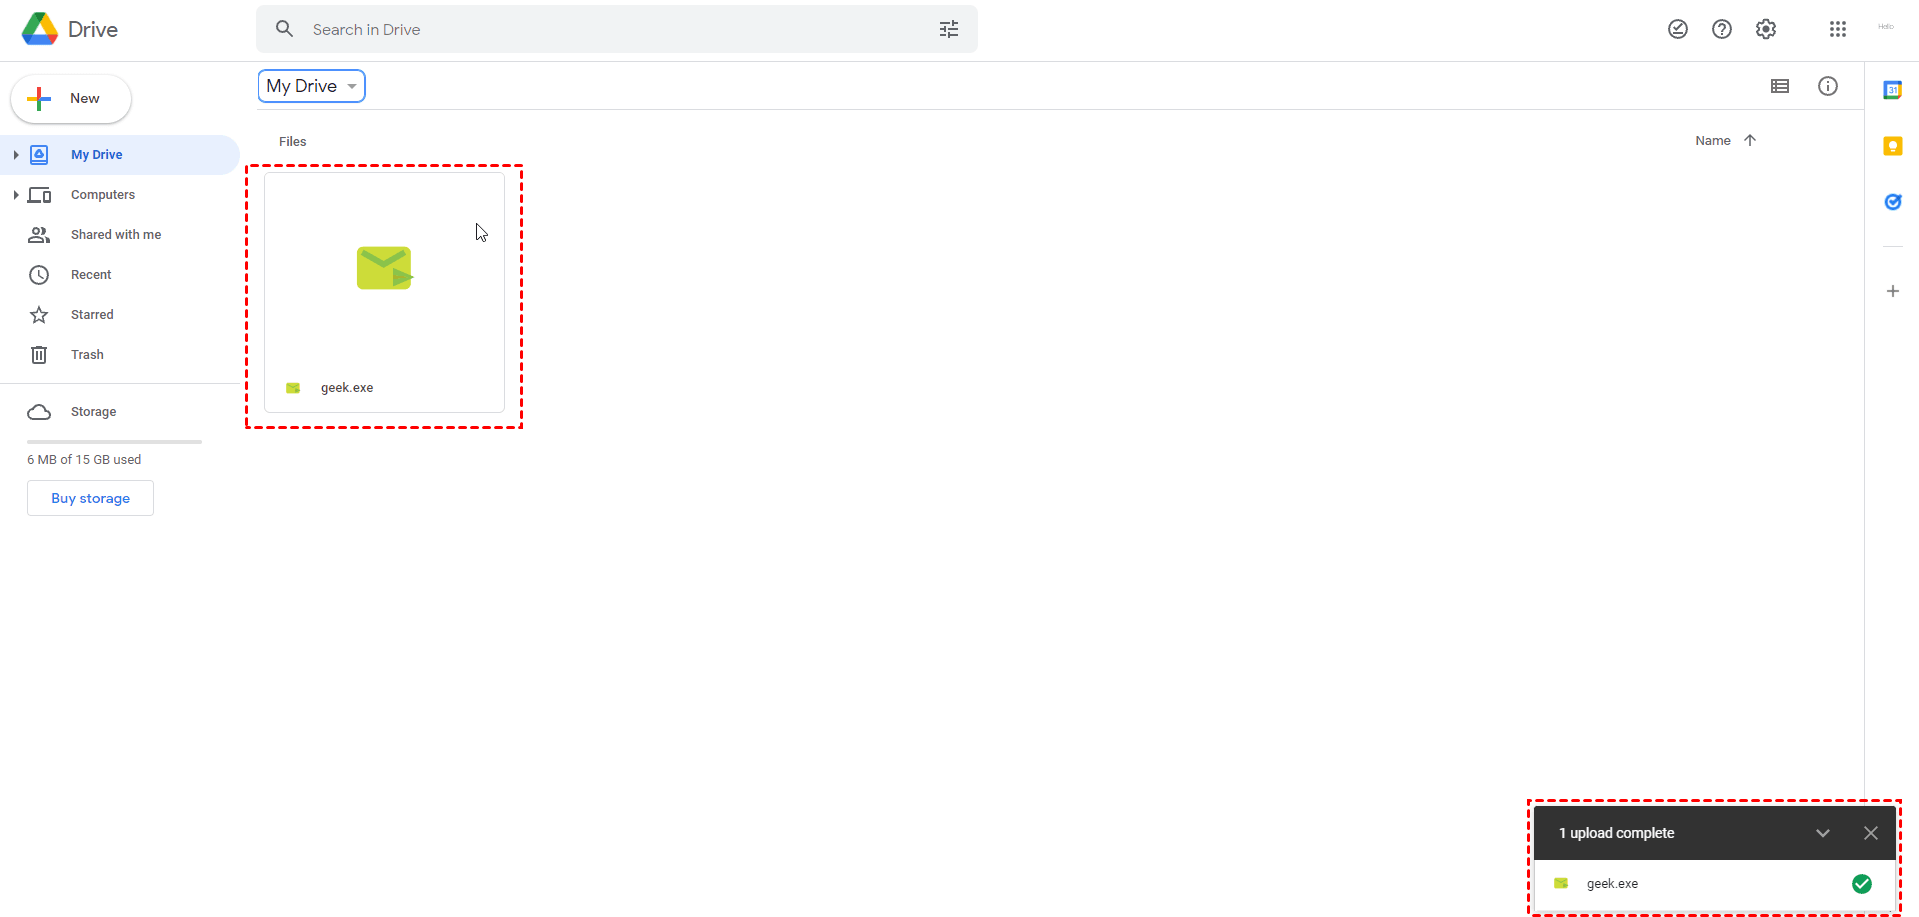
Step 3. You can see the file upload progress in the lower right corner. After the upload is completed, you can find the file in the main interface.
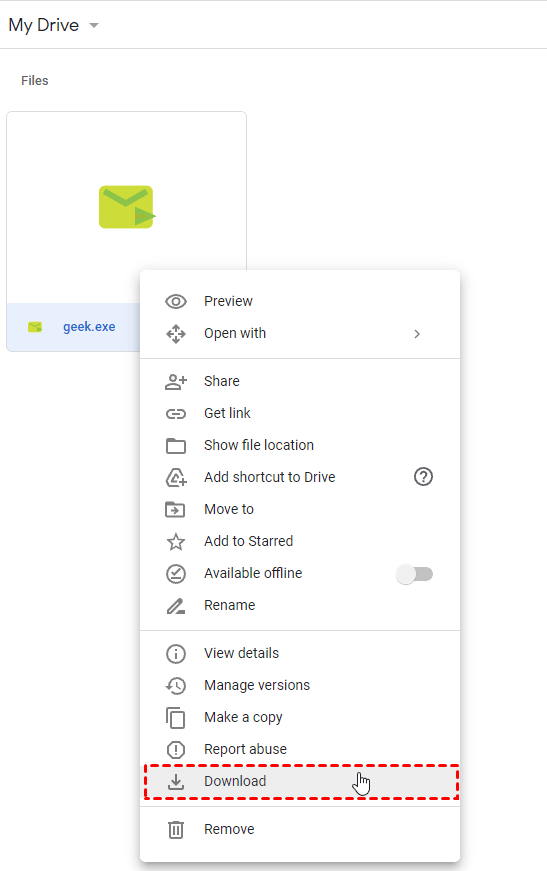
Step 4. Open Google Drive on the other computer and log in to the same Google account. Find the file you’ve transferred, right-click the file, and select Download in the expanded menu to realize remote file transfer between different computers.
Option 5. Professional file transfer protocol via FileZilla
File Transfer Protocol (FTP), a longstanding method for file exchange, operates on the TCP/IP protocol, specializing in handling large files between servers and clients. Accessible through an FTP client, this protocol simplifies data transfer tasks.
A range of free FTP clients, like FileZilla, are readily accessible online. However, it's crucial to acknowledge FTP's security limitations. Notably, user credentials are transmitted without encryption, potentially exposing them to interception. Thus, FTP is best suited for non-sensitive data transfers to minimize security vulnerabilities.
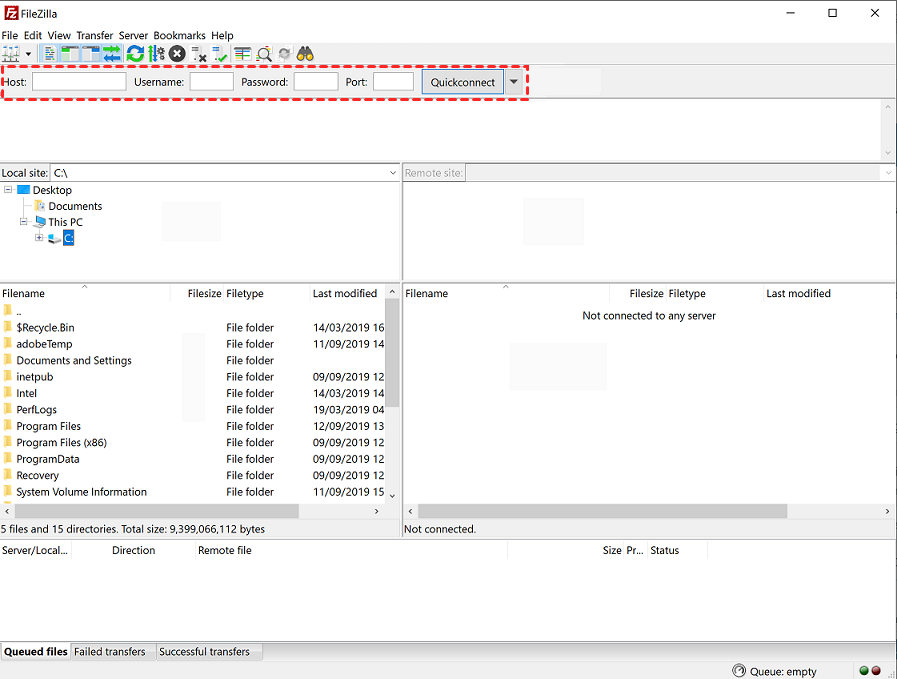
Step 1. Download and install FileZilla, an FTP client supporting FTPS with TLS encryption, from filezilla-project.org.
Step 2. Launch FileZilla; it'll look like the screenshot provided.
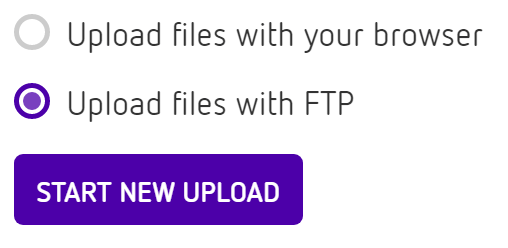
Step 3. Make sure FTP is set up in Asset Bank. Click "Upload" to see the options.
Step 4. Click "Show help for using an FTP client" to find the details needed to connect.
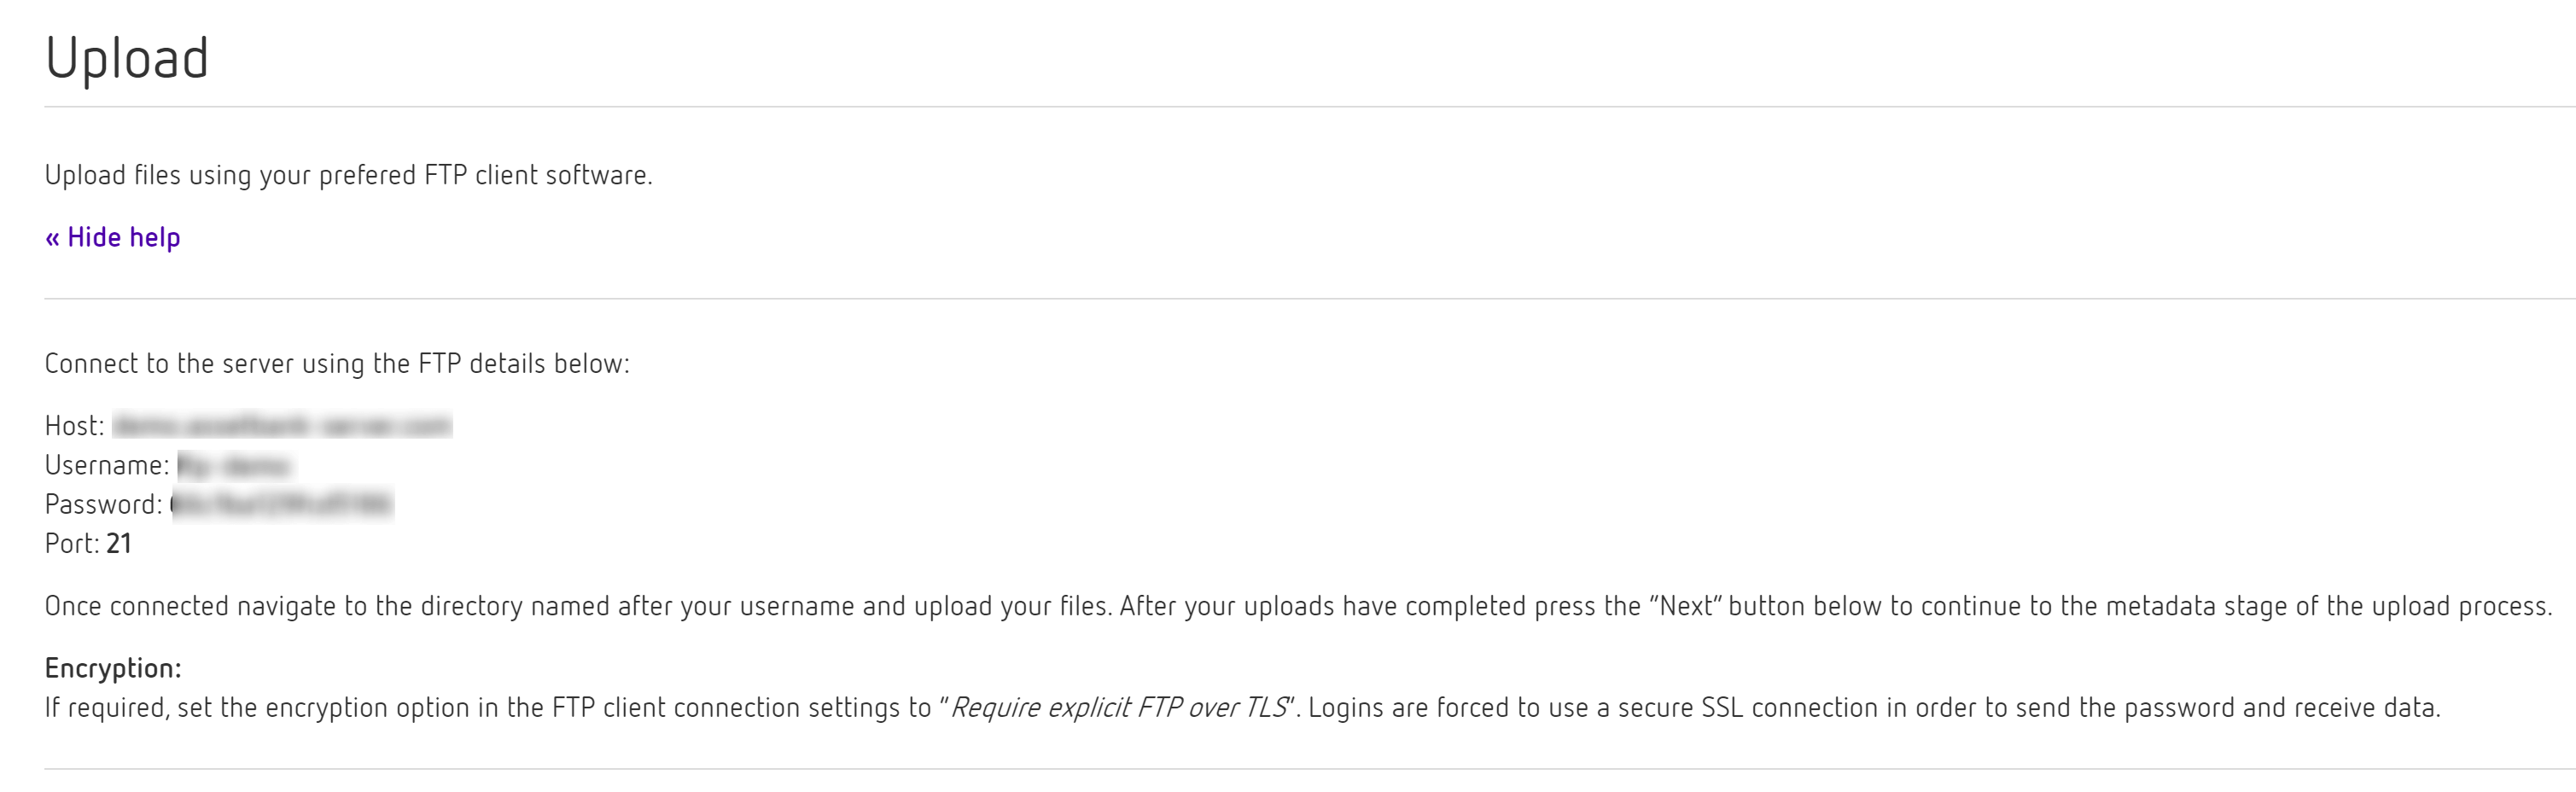
Step 5. Enter the details in FileZilla and hit "Quickconnect."
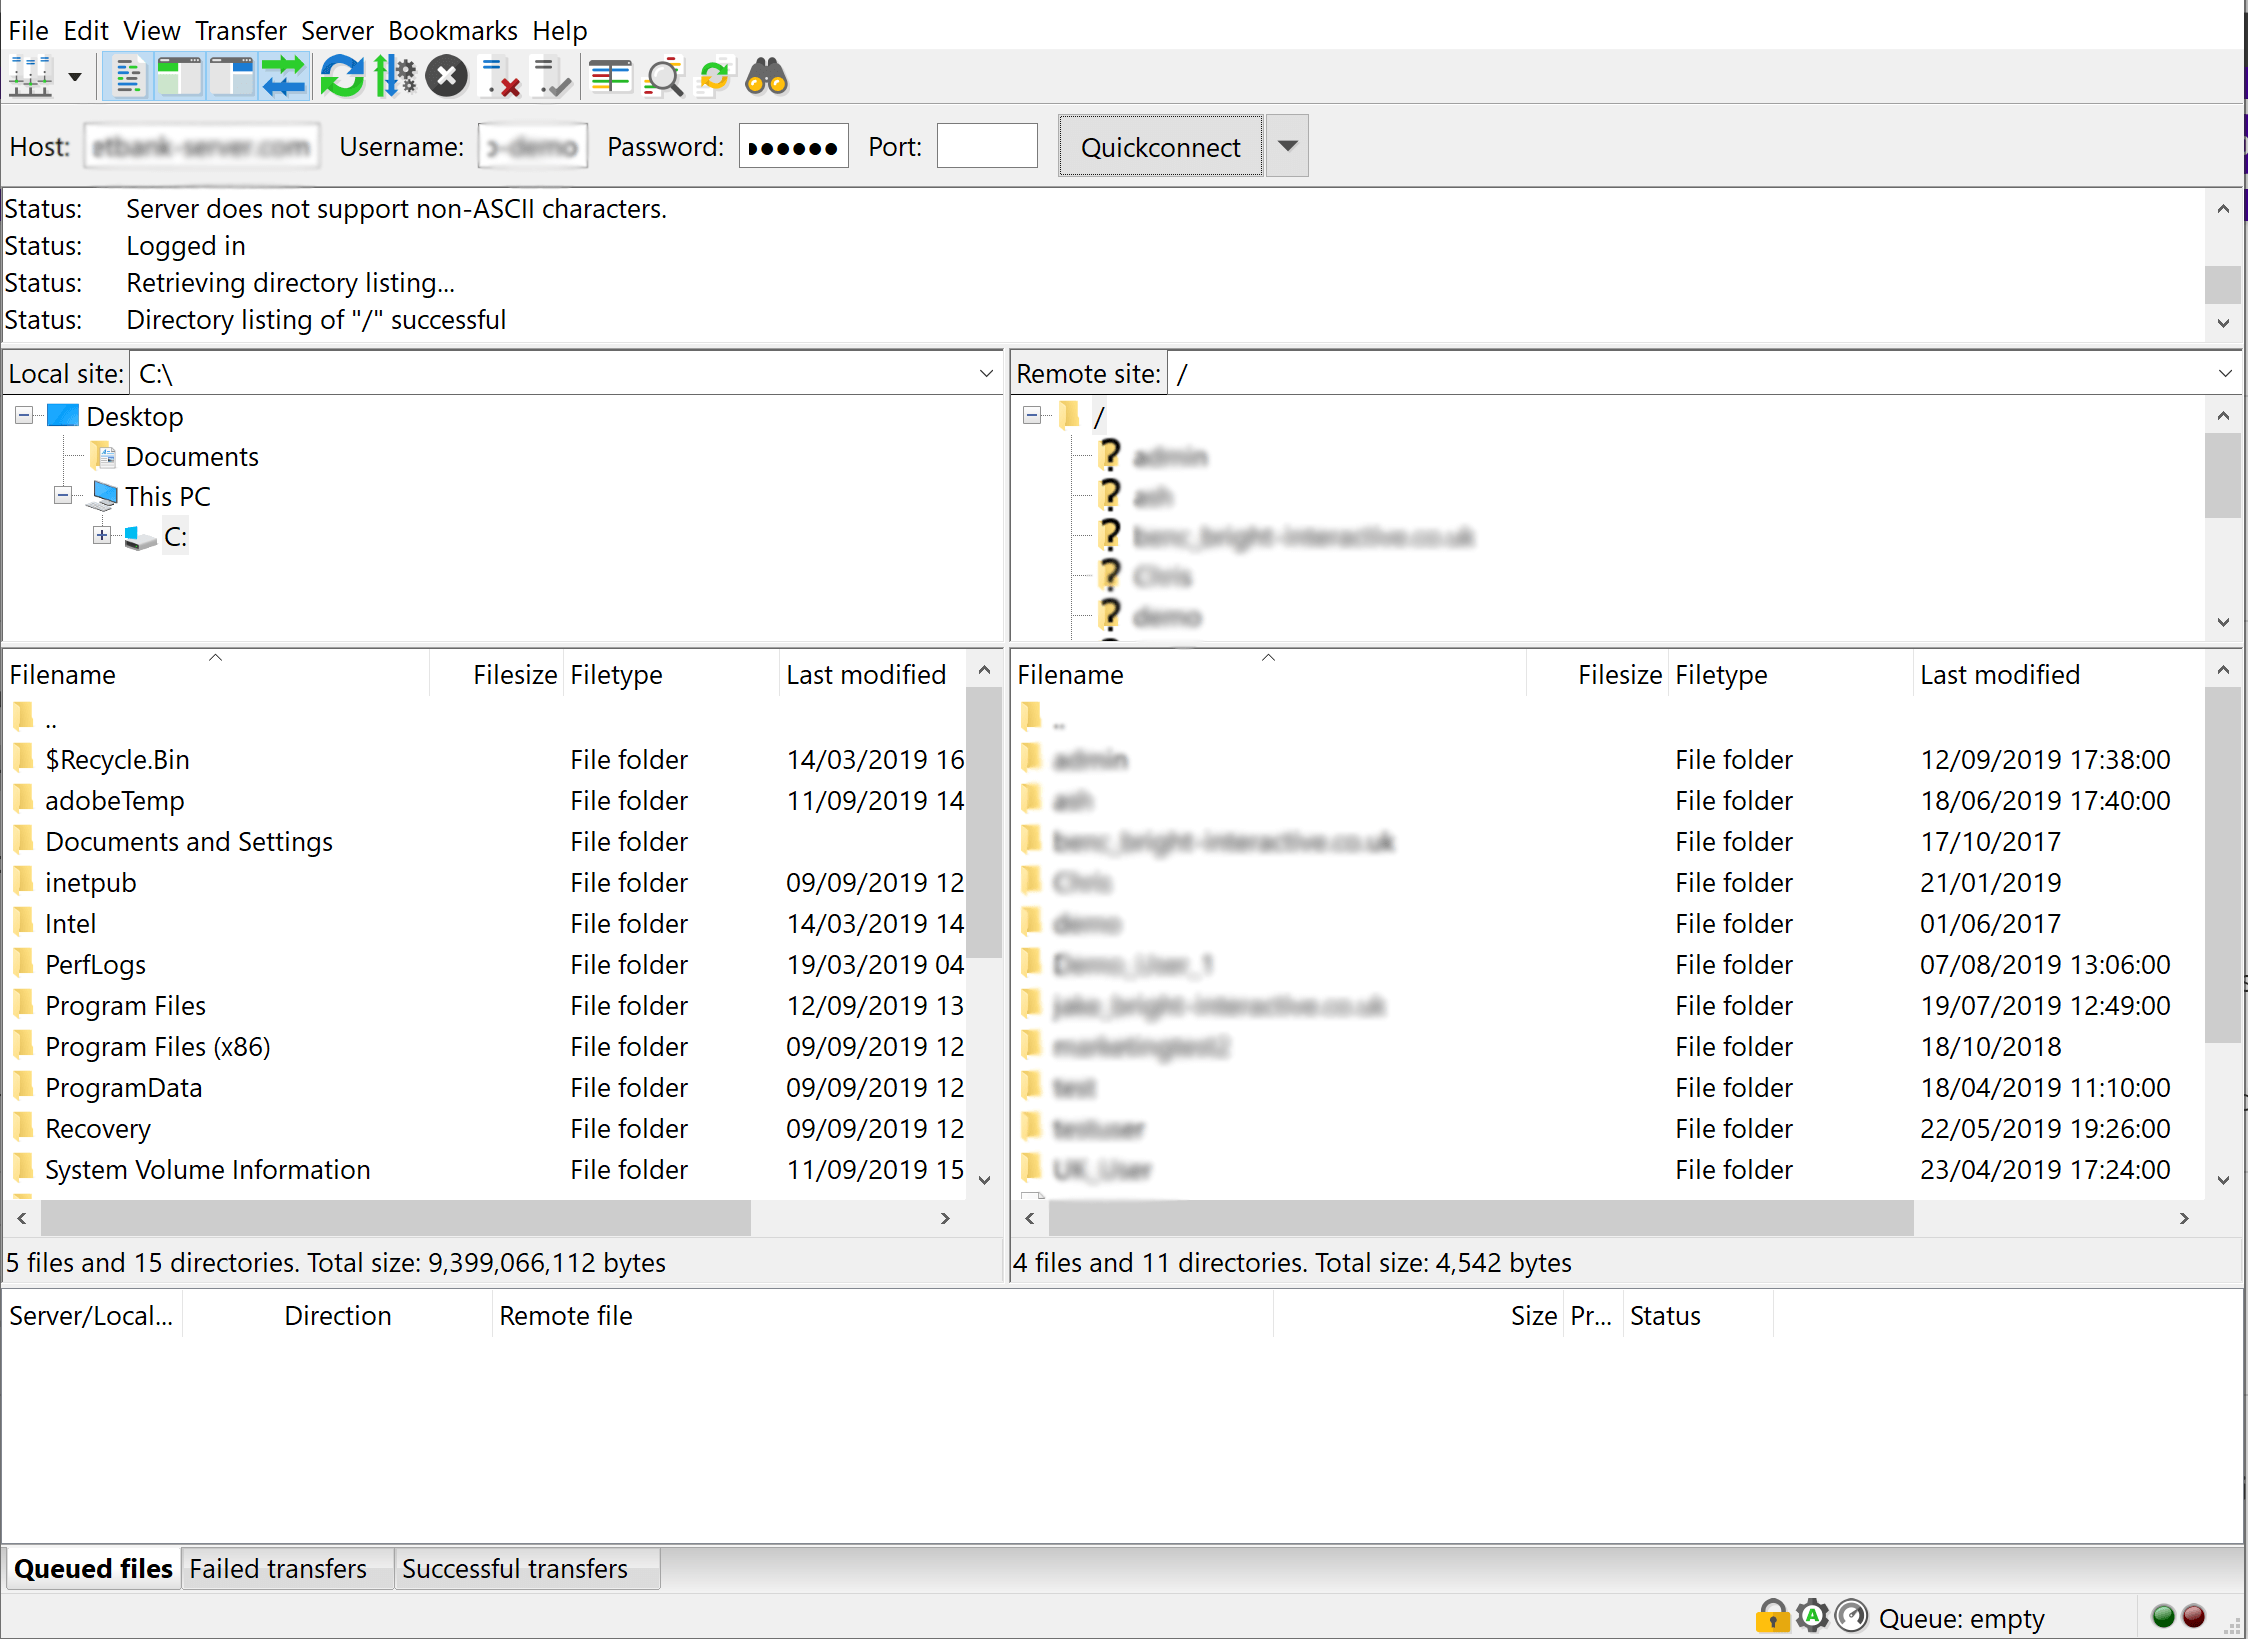
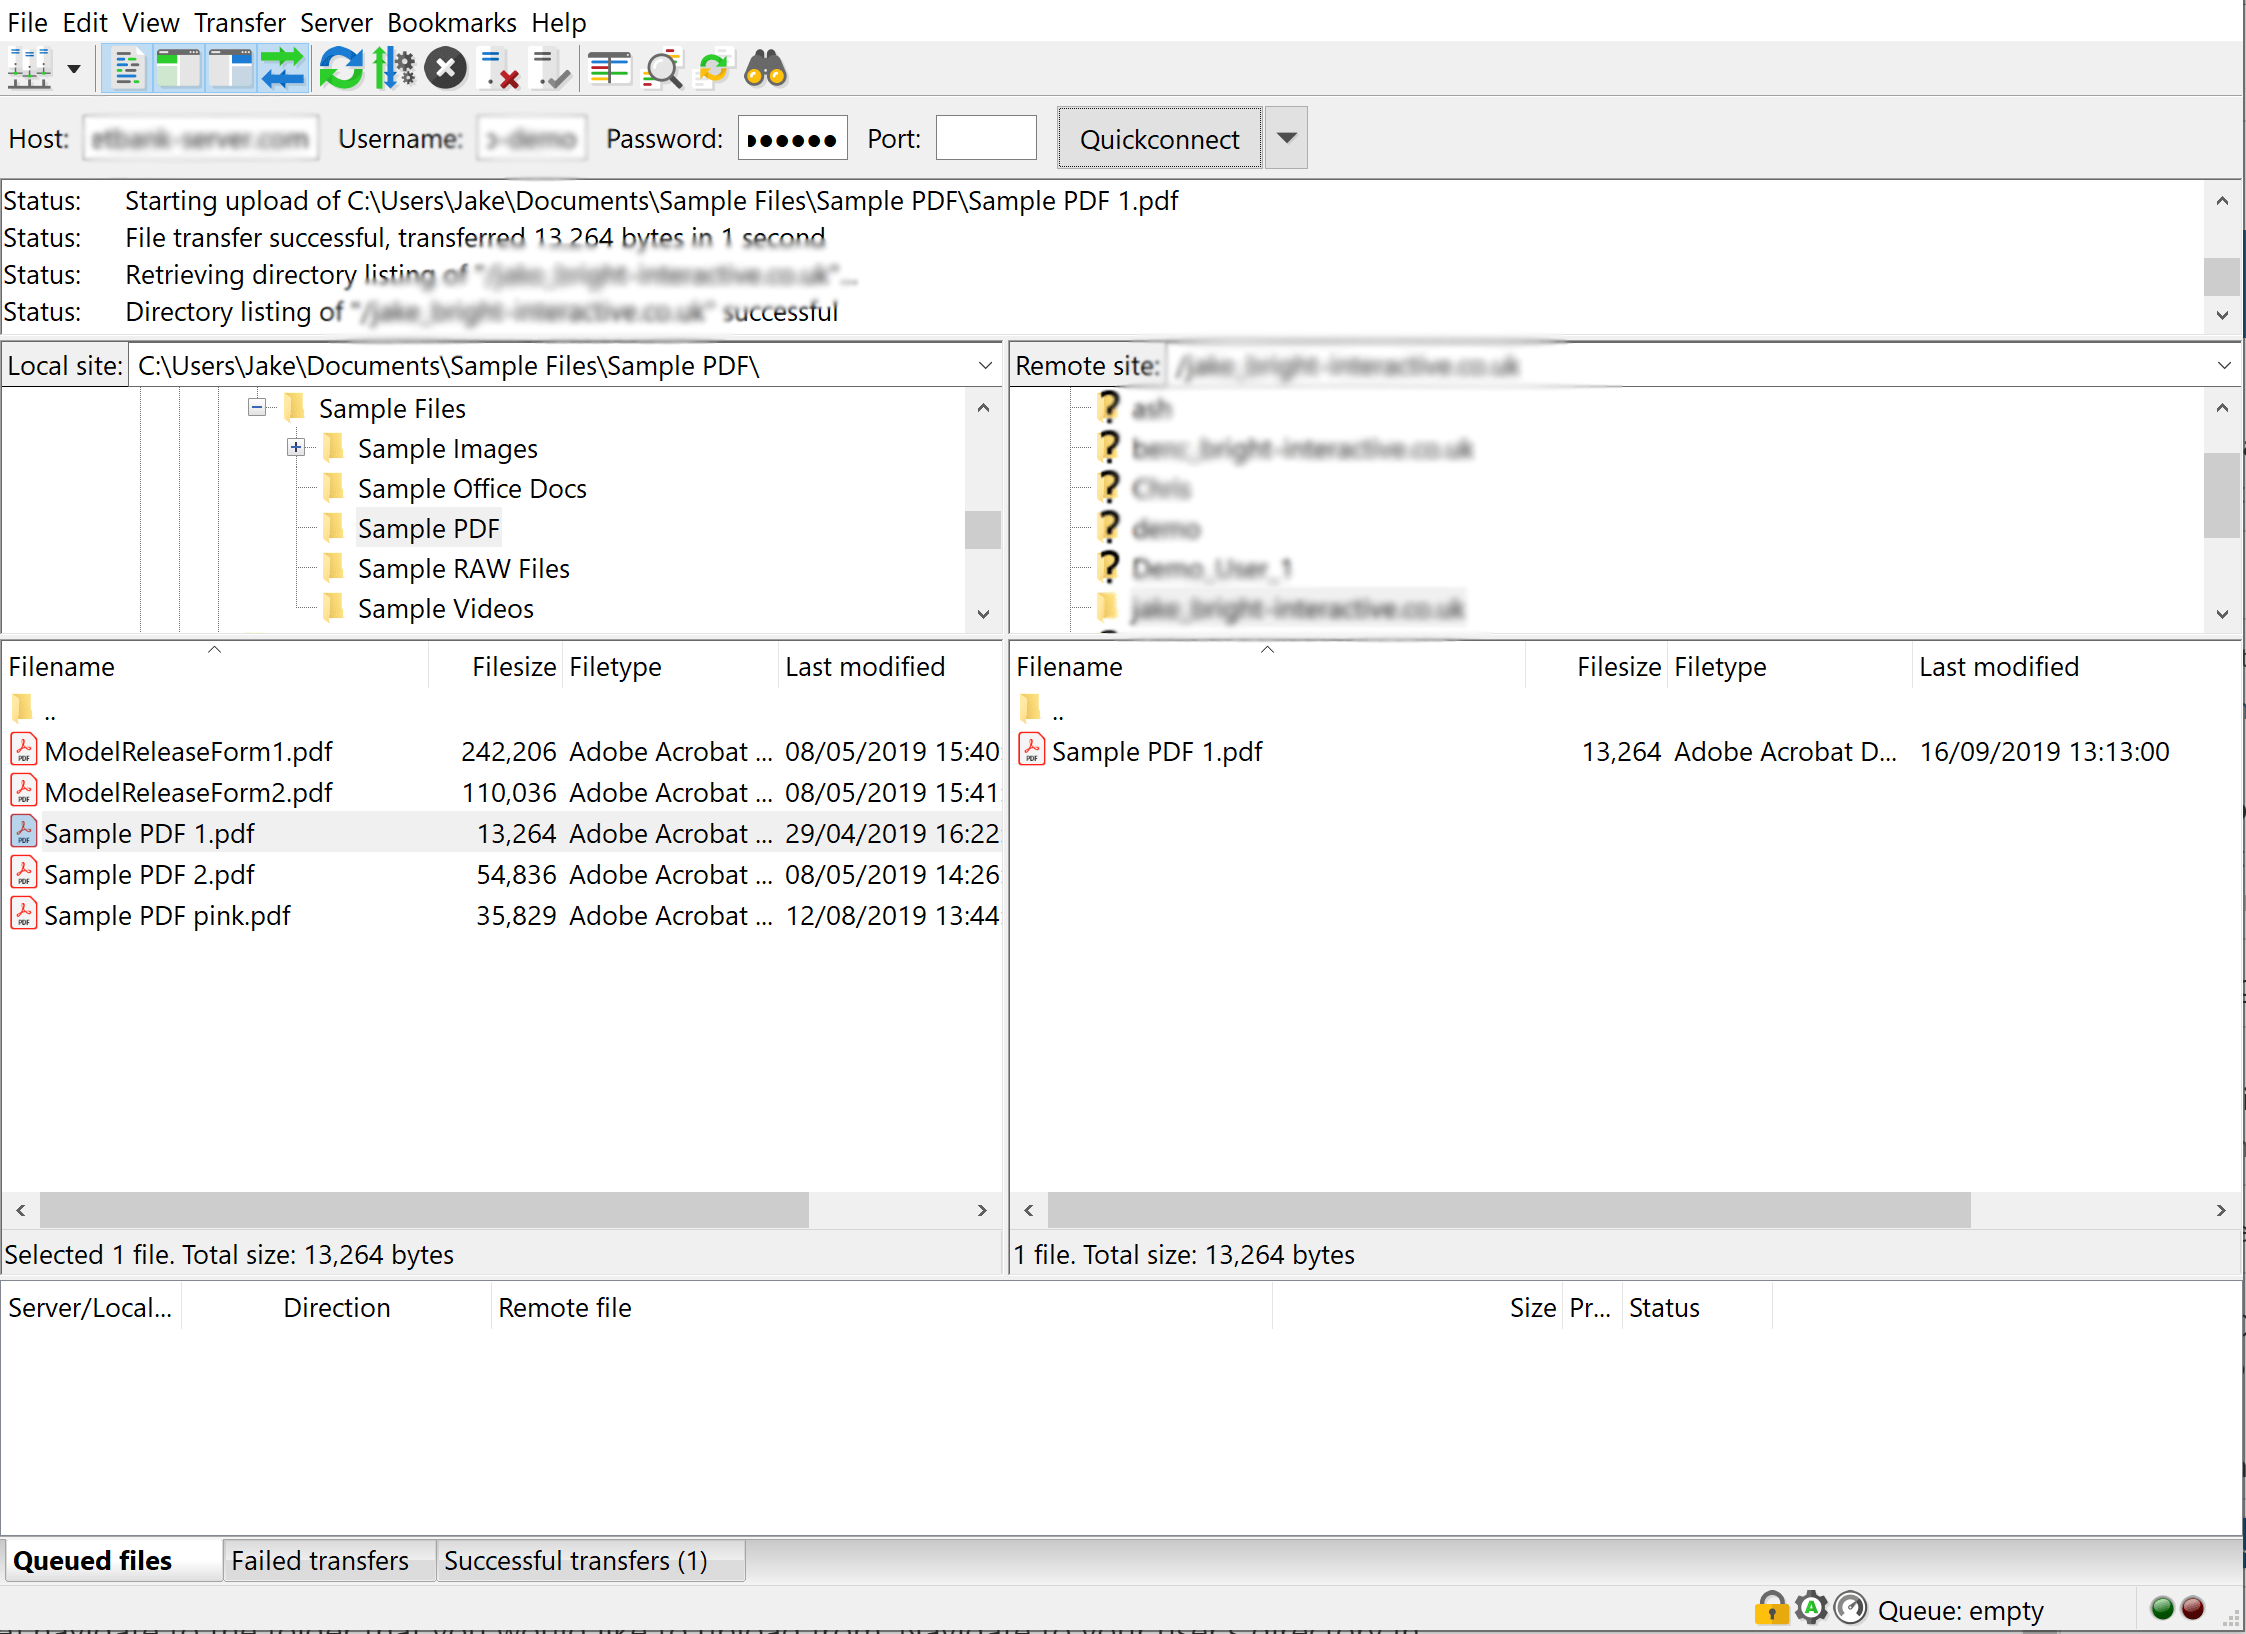
Step 6. Once connected, navigate to your folder in "Local Site" (left) and your user's directory in "Remote Site" (right). Upload your file by double-clicking or right-clicking.
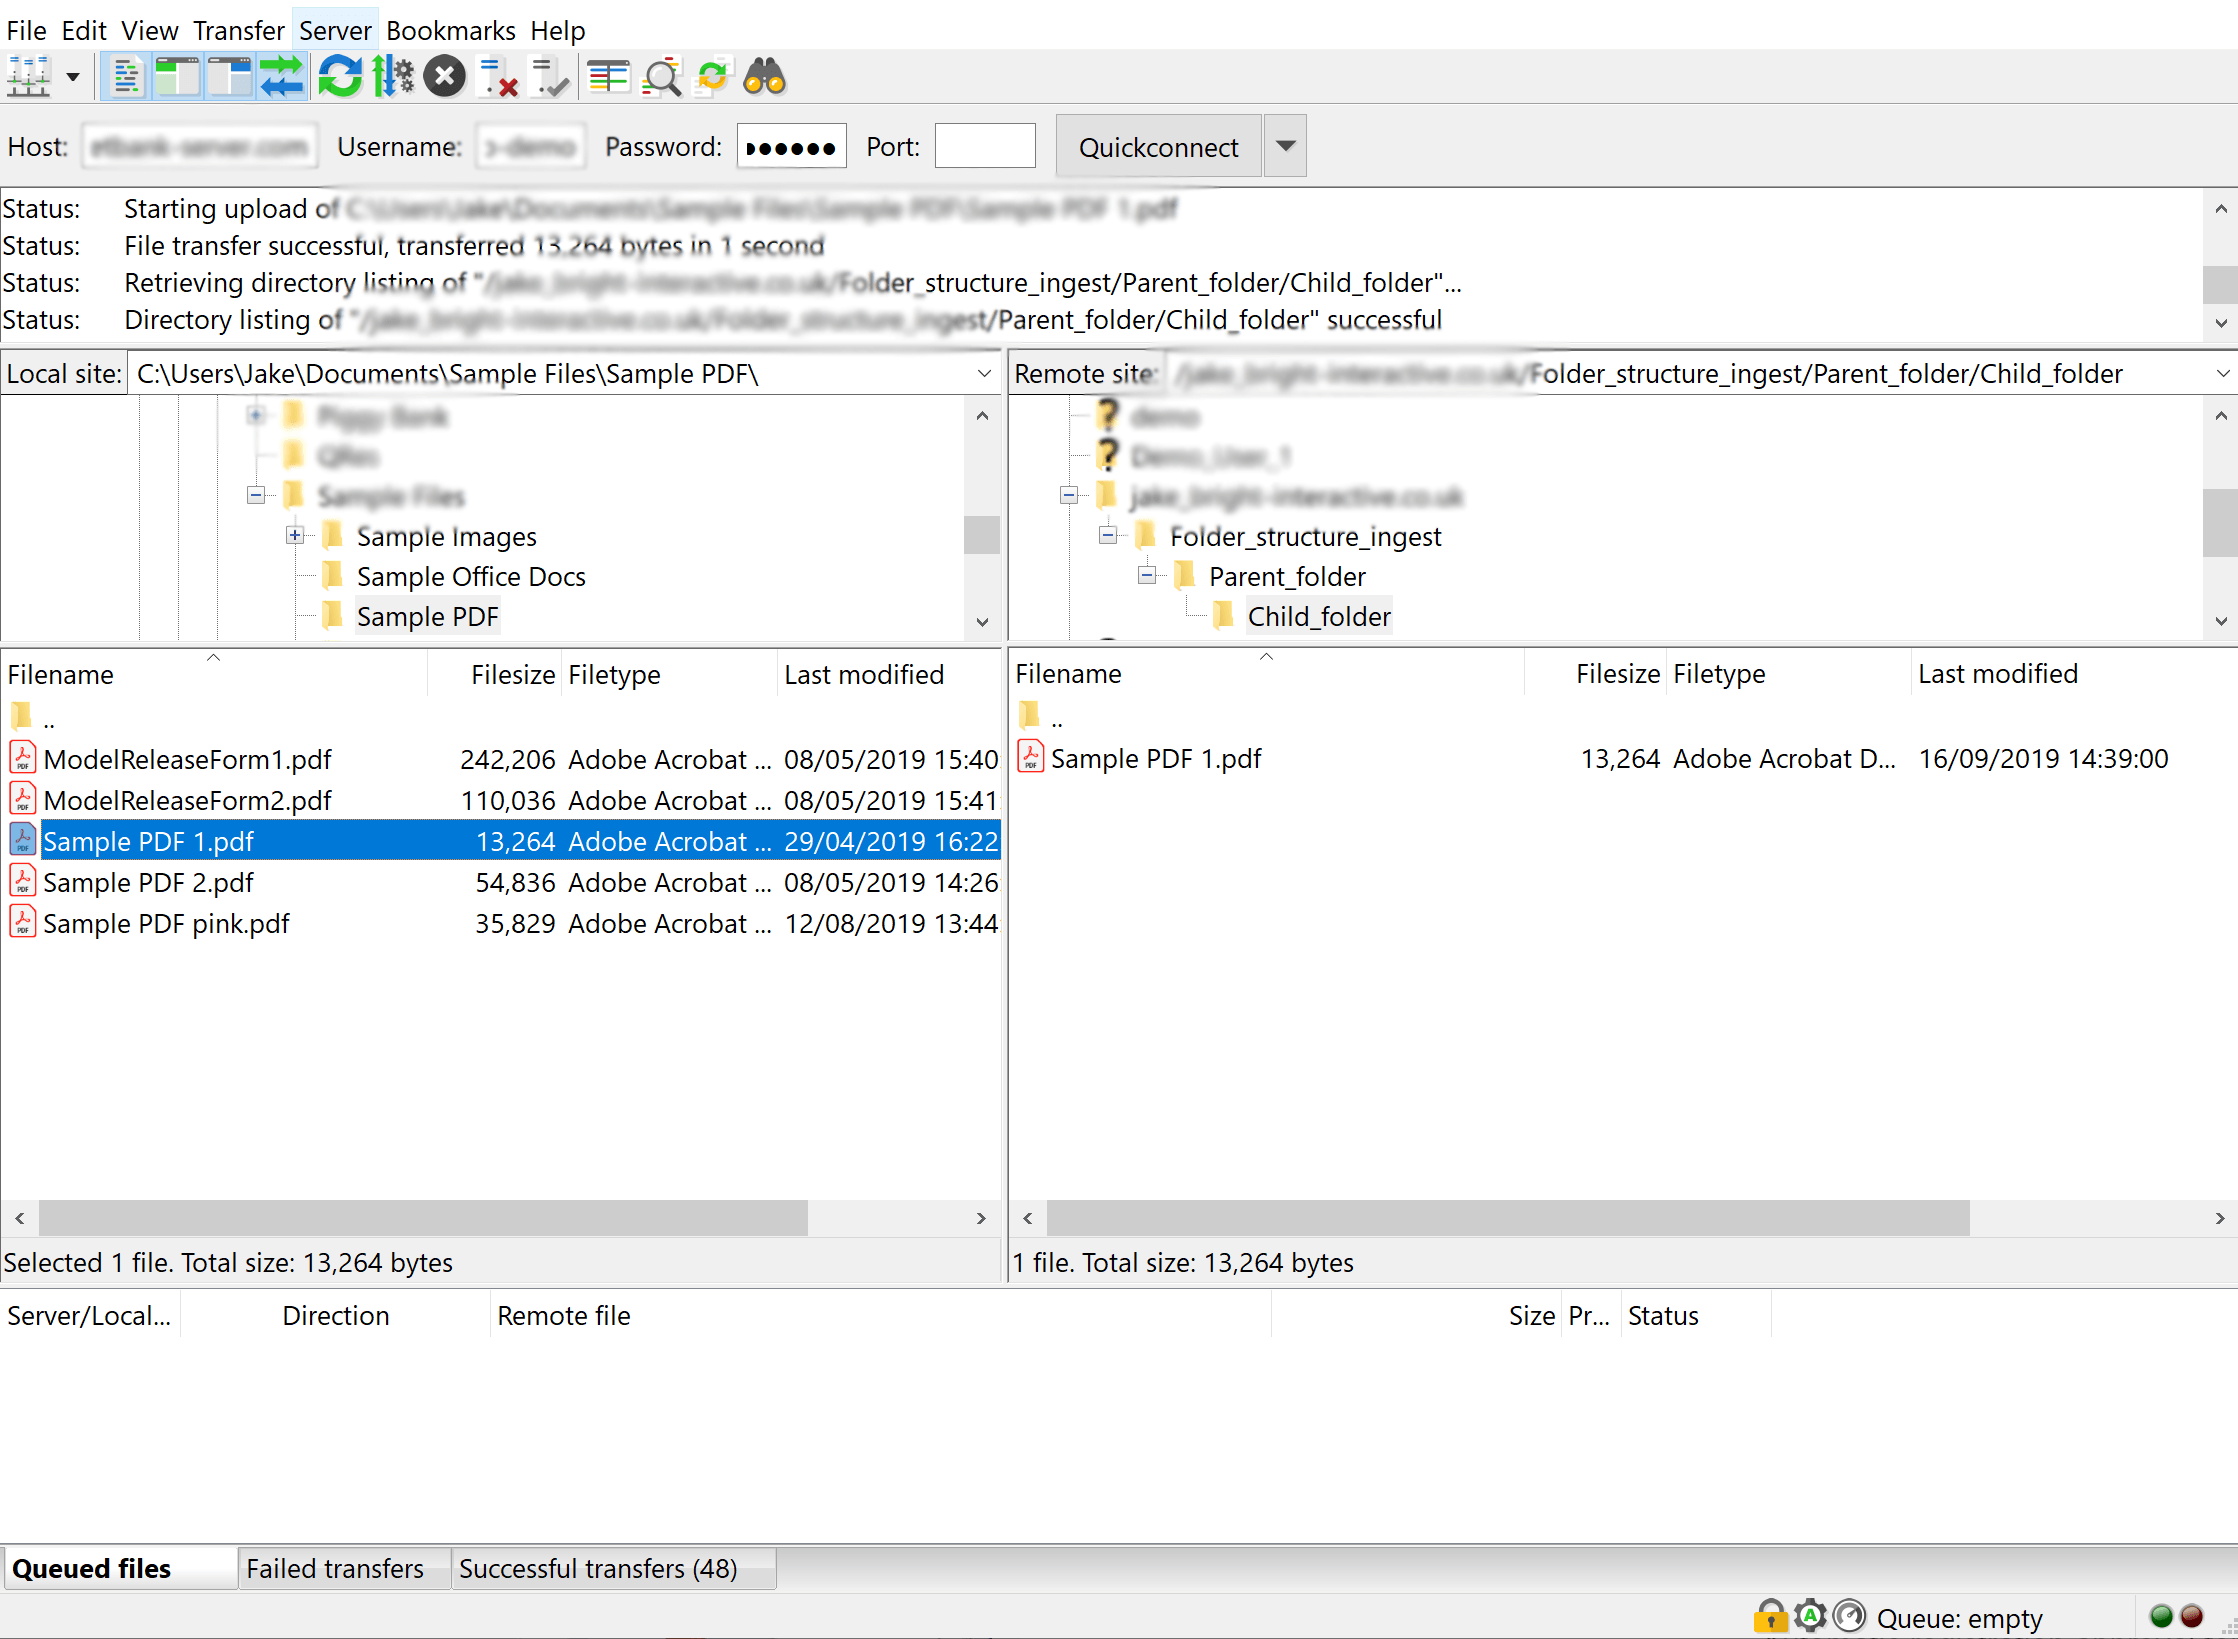
Step 7. Go back to Asset Bank, click "Next," and add metadata. If you have folders, mirror them in the FTP server's upload directory.
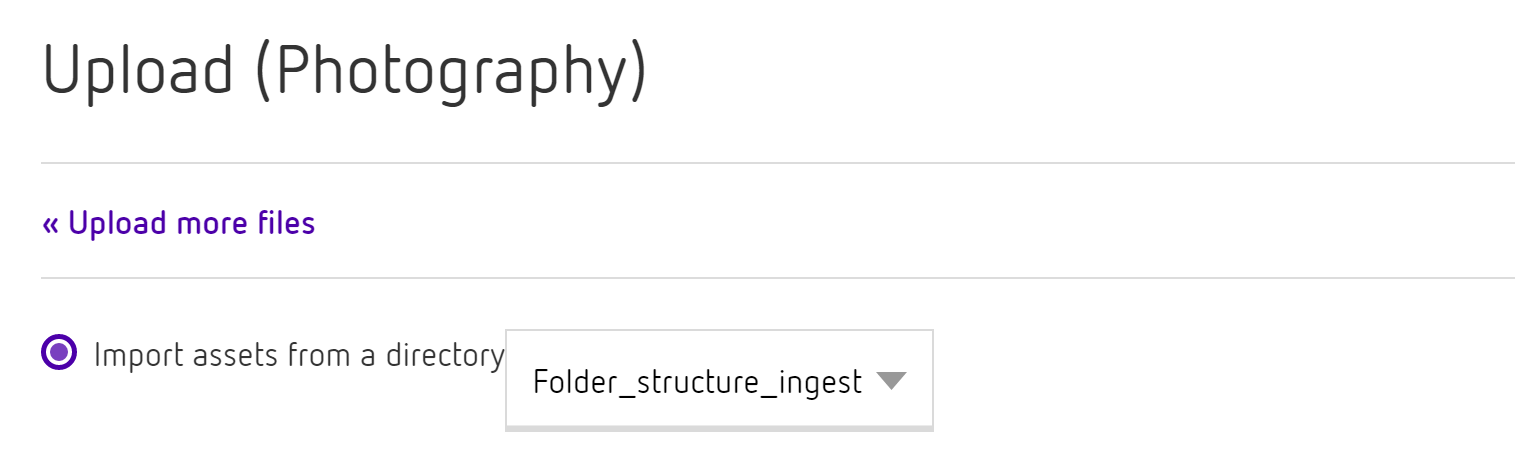
Step 8. After the Asset Bank upload, choose a directory for importing assets, following the provided screenshot prompts.
Option 6. Send files between computers using email
Sending files via email is a common and convenient way to share information between computers, for example, Gmail. Provided by Google, Gmail is one of the most widely used email services worldwide.
Remember, while email is convenient for sending small to moderately-sized files, it may not be suitable for very large files due to attachment size limitations and potential issues with recipient email servers. For larger files, consider using a file-sharing service or cloud storage platform.
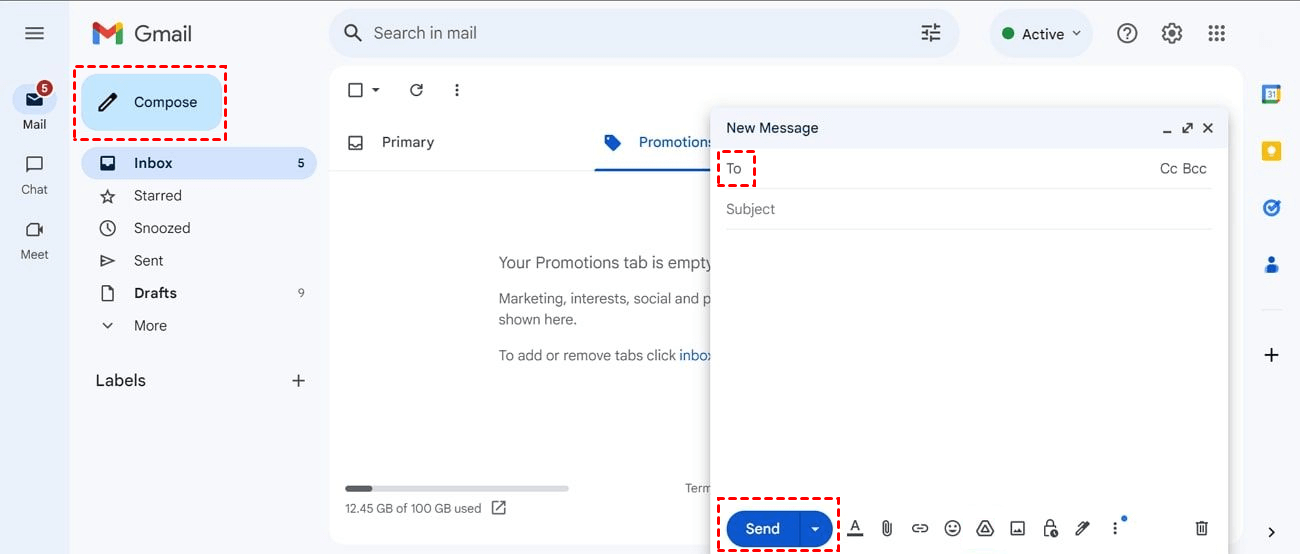
Step 1. Open the Gmail official site on one computer, and create and sign in to your email account. On the main page, click Compose.
Step 2. Then type in the email addresses that have been logged in to another computer behind To. Click the attachment icon below to choose the picture files you want to transfer. Click Send to start sending picture files to the other computer.
Step 3. On the other computer, open and sign in to your email application to check and download the picture files.
Closing words
In an age where data sharing is paramount, finding the best network file transfer software can be transformative. From team collaboration to cross-platform access, the right tool ensures your work moves as fast as you do.
Among the many choices, AnyViewer continues to prove itself as a leading contender for the best free network file transfer software. Its powerful capabilities, lightning-fast speed, and ease of use make it a standout solution for individuals and businesses alike. Whether transferring files across the room or halfway across the world, AnyViewer helps you stay productive, connected, and secure.
